
Last updated: February 2021
Understand everything about SELinux, configure, manage, and troubleshoot SELinux issues with examples. Learn how to relabel objects (files, directories, processes, etc) with restorecon and semanage tool.
UNDERSTANDING SELinux
SELinux means security-enhanced Linux, it is an advanced security feature/utility in Linux.
SELinux cannot be replaced with antivirus, firewall, permissions, and ACLs on Linux. As the name implies, it is a security-enhanced feature and not a replacement of other security features.
Depending on an environment or the function of a server, you may or may not enable SELinux. SELinux security abilities and importance cannot be overemphasized, however, I have worked with top organizations including multinationals on a project and I have seen these organizations disable SELinux, not by my advice though.
SELinux is enabled and in (Enforcing mode) on a Red Hat Enterprise Linux 7 & 8 and some other Linux distributions running SELinux by default.
Disabling SELinux may not be a security threat to the server that is not exposed to the internet, but if otherwise, it is advisable to leave SELinux enabled, or enable it if it is disabled.
For example, if you have a web server, Apache, Nginx or other web servers running on Linux, it is most certain that users from outside your network environment will always need to access the services/applications running on these web servers, if there are loopholes in these services as a result of flaws in the code, and a hacker can discover these holes and breaks into the system, the extent to what the hacker can do depends if SELinux is enabled or not.
SELinux labels files/directories and determines what kind of services can access what kind of file/directories.
So, if SELinux is disabled and a write/executable access is given to the web services accessing some particular files or directories, the hacker will be able to do whatsoever he wants to do on that file/directory, the hacker can go as far as running some scripts to break into some other important files or servers in the environment.
On the contrary, if SELinux is enabled, the hacker will not be able to do anything because access will be revoked on the file and other files and directories on the system. Don’t forget, as we said, SELinux labels files and directories.
Even if the hacker gets in, SELinux will limit his actions from spreading through the whole system because of the differences in the filesystem labels. Hence why it is important to have SELinux enabled and in enforcing mode.
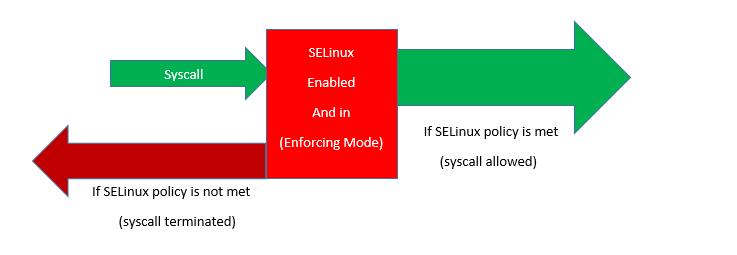
When a syscall is initiated, depending on the mode of SELinux at the time, if SELinux mode is set to enforcing, SELinux verifies it’s policies associated with the syscall, if the syscall meets the SELinux policy, the syscall goes through auditd so that SELinux events can be logged to “/var/log/audit/audit.log, and syscall is allowed.
If syscall doesn’t meet the SELinux policy, syscall is denied as (AVC denials) and terminated.
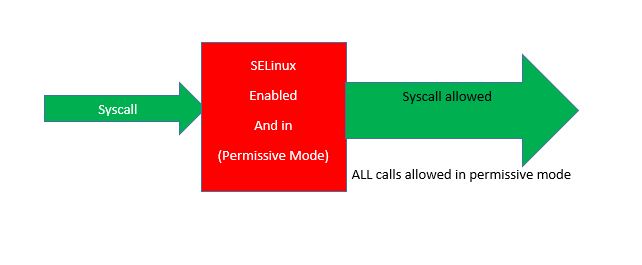
If SELinux mode is set to permissive, SELinux goes through auditd so that SELinux events can be logged to “/var/log/audit/audit.log, and every syscall are allowed.
All syscalls are permitted in this mode whether or whether not the syscall meets the conditions of SELinux policy associated with it.
If SELinux is disabled, then the feature is disabled, nothing happens.
There are three modes of SELinux. They are permissive, enforcing, and disabled mode.
SELinux can be enabled or disabled. If SELinux is enabled, it can either be in permissive or enforcing mode, if SELinux is disabled, then it is disabled.
How Do I Know If SELinux Is Enabled
One of the ways to verify SELinux status is to concatenate the SELinux configuration file as shown below.
[root@HQDEV1 ~]# cat /etc/sysconfig/selinux

# This file controls the state of SELinux on the system.
# SELINUX= can take one of these three values:
#     enforcing - SELinux security policy is enforced.
#     permissive - SELinux prints warnings instead of enforcing.
#     disabled - No SELinux policy is loaded.
SELINUX=enforcing
# SELINUXTYPE= can take one of these three values:
#     targeted - Targeted processes are protected,
#     minimum - Modification of targeted policy. Only selected processes are protected.
#     mls - Multi Level Security protection.
SELINUXTYPE=targeted
The current status of SELinux is highlighted in yellow which is enforcing mode.
Moving forward, another way to verify the SELinux status is by running the command,
[root@HQDEV1 ~]# sestatus

SELinux status:                 enabled
SELinuxfs mount:                /sys/fs/selinux
SELinux root directory:         /etc/selinux
Loaded policy name:             targeted
Current mode:                   enforcing
Mode from config file:          enforcing
Policy MLS status:              enabled
Policy deny_unknown status:     allowed
Memory protection checking:     actual (secure)
Max kernel policy version:      31
you can see from the output of the command that the current mode is enforcing.
You can also run the command,
[root@HQDEV1 ~]# getenforce

Enforcing
from the output of the command, SELinux is in enforcing mode
SELinux Disabled Mode
If SELinux is in disabled mode, it means all the syscall (system calls) will be allowed when initiated, the SELinux feature is disabled, SELinux binaries and policies are all disabled, so nothing filters the system calls.
If SELinux is configured to be disabled from an enabled mode, the system must be restarted so that all SELinux libraries that usually loads with the kernel when it is booted up won’t load.
Also, if SELinux is configured to be enabled from a disabled mode, the system must be restarted so that the kernel can load all the SELinux libraries from boot.
SELinux Permissive Mode
If SELinux is set to permissive mode, whether the syscall (system calls) meets or doesn’t meet the SELinux policy, the syscalls will be allowed to pass through when it is initiated. More so, SELinux when enabled, permissive or enforcing, logs its events in /var/log/audit/audit.log file
SELinux Enforcing Mode
If SELinux is in enforcing mode, it means only the system calls that meet the SELinux policy will be allowed, the syscall that doesn’t meet the policies will be denied.
SELinux can be switched from enforcing to the permissive mode and vice versa without the need to restart the system. This switching can be very useful when troubleshooting SELinux.
For example, if you suspect any issue related to SELinux, you can easily switch from enforcing to permissive mode to allow all syscalls, if the problematic syscall succeeds, you can then conclude it’s SELinux issue before switching back to enforcing mode and start the troubleshooting.
We will look at how to effectively do this with some examples as we go on.
To switch from enforcing to permissive mode, use the command,
[root@HQDEV1]# setenforce permissiveTo switch from permissive to enforcing mode, use the command,
[root@HQDEV1]# setenforce enforcingHow To Enable SELinux
Enabling SELinux means you can either set SELinux to be in permissive or enforcing mode
How To Set SELinux To Permissive Mode
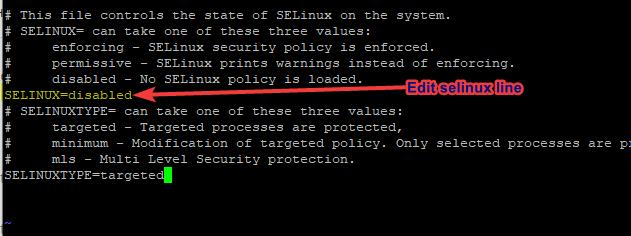
one of the ways to set SELinux to permissive mode is to edit the SELinux configuration file (/etc/sysconfig/selinux). The following steps can be taken.
1. Open SELinux configuration file with any Linux text editor
[root@HQDEV1 ~]# vi /etc/sysconfig/selinux2. Edit the SELinux line to permissive
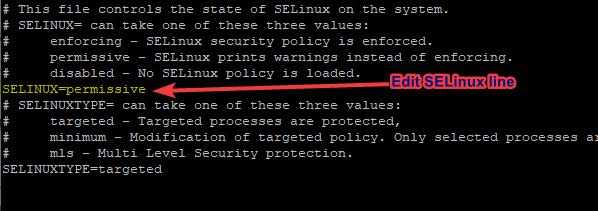
3. Save and exit the file.
How To Set SELinux To Enforcing Mode
one of the ways to set SELinux to enforcing mode is to edit the SELinux configuration file (/etc/sysconfig/selinux). The following steps can be taken
1. Open SELinux configuration file with any Linux text editor
[root@HQDEV1 ~]# vi /etc/sysconfig/selinux2. Edit the SELinux line to enforcing
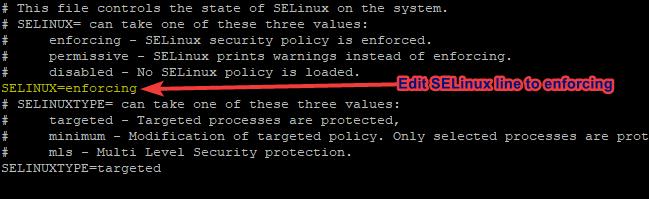
3 save and quit the file
How To Disable SELinux
To disable SELinux, edit the selinux configuration file (/etc/sysconfig/selinux). The following steps can be taken
1. Open SELinux configuration file with any Linux text editor
[root@HQDEV1 ~]# vi /etc/sysconfig/selinux2. Edit the SELinux line to disabled
3. save and exit
4. reboot the system
[root@HQDEV1 ~]# rebootFor easy comprehension, I have divided this topic into three sections. We have come to the end of the first section. Let’s summarize everything we have learnt.
Summary Of SELinux First Section
SELinux is a security-enhanced feature in Linux, an administrator can decide to enable or disable this feature.
It is advisable to enable this feature if your system will be internet-facing and enabling SElinux means setting SELinux to either be in permissive or enforcing mode.
Enforcing mode is where the syscalls will be checked with regard to its SELinux policies, if the policy check passes, syscall is allowed, otherwise, syscall will be blocked.
So, what is this SELinux policy? and how can SELinux be configured to allow syscalls when it’s denied? This question takes us to the second section of this topic.
To protect a Linux system from hackers, SELinux uses SElinux policies. SElinux policy is a set of rules that defines what kind of services/programs can access what kind of objects (file, directories, services, or ports).
These rules are written by the application/program developers and the developer will specify these rules in his program code, the developer knows the objects (the necessary files, directories, services or ports) his application will access to function properly and sets a policy that restricts the application only to the required objects.
Changing the policies, configuring, and troubleshooting SELinux requires understanding SELinux context and booleans.
What Is SELinux Context
SELinux context is simply the labels that are associated with objects(files, directories, ports, processes, etc).
Everything on a Linux system, including objects such as (files, directories, ports, processes/services, devices, etc) have context, i.e, they are all labeled or associated with context.
Context is used to make access control decisions, i.e, allow this subject(syscall) to go through if the object’s context/label is correct.
Context is divided into four parts. They are the user part, role part, type part, and the sensitivity part
To see the context of an object (files, directories, ports, processes/services, devices, etc), we use the “-Z” option with their simple listing commands
For example, to see the context of the files in “/tmp” directory, you will run the command,
[root@HQDEV1 ~]# ls -lZ /tmp

total 0
drwx------. 3 root root system_u:object_r:tmp_t:s0          17 May 15 10:05 systemd-private
drwx------. 3 root root system_u:object_r:tmp_t:s0          17 May 15 10:04 systemd-private
drwx------. 3 root root system_u:object_r:tmp_t:s0          17 May 15 10:04 systemd-private
drwx------. 3 root root system_u:object_r:tmp_t:s0          17 May 15 10:05 systemd-private
drwx------. 3 root root system_u:object_r:tmp_t:s0          17 May 15 10:04 systemd-private
drwx------. 3 root root system_u:object_r:tmp_t:s0          17 May 15 10:04 systemd-private
drwx------. 2 root root unconfined_u:object_r:user_tmp_t:s0  6 May  7 12:01 tracker-extract
drwx------. 2 root root system_u:object_r:vmtools_tmp_t:s0   6 May 11 12:26 vmware
drwx------. 2 root root system_u:object_r:vmtools_tmp_t:s0   6 May 15 10:04 vmware
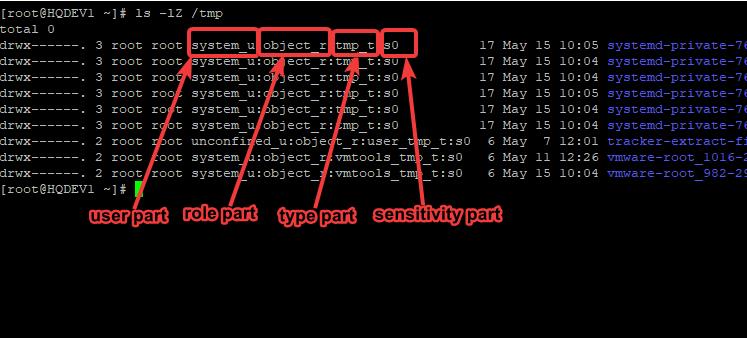
you can see the four parts of a file context. The one that ends with “_u” is the user part, the one that ends with “_r” is the role part, the one that ends with “_t” is the type part, while the last section that ends with “s0” is the sensitivity part.
Like I mentioned, all these context parts are used to make access control decisions.
To see the context of a service or process, you run the command,
[root@HQDEV1 ~]# ps auxZ

LABEL                           USER        PID %CPU %MEM    VSZ   RSS TTY      STAT START   TIME COMMAND
system_u:system_r:init_t:s0     root          1  0.0  0.6 247148 12936 ?        Ss   May18   0:16 /usr/lib
system_u:system_r:kernel_t:s0   root          2  0.0  0.0      0     0 ?        S    May18   0:00 [kthread
system_u:system_r:kernel_t:s0   root          3  0.0  0.0      0     0 ?        I<   May18   0:00 [rcu_gp]
system_u:system_r:kernel_t:s0   root          4  0.0  0.0      0     0 ?        I<   May18   0:00 [rcu_par
system_u:system_r:kernel_t:s0   root          6  0.0  0.0      0     0 ?        I<   May18   0:00 [kworker
system_u:system_r:kernel_t:s0   root          8  0.0  0.0      0     0 ?        I<   May18   0:00 [mm_perc
system_u:system_r:kernel_t:s0   root          9  0.0  0.0      0     0 ?        S    May18   0:06 [ksoftir
system_u:system_r:kernel_t:s0   root         10  0.0  0.0      0     0 ?        R    May18   0:07 [rcu_sch

If you want to see the context of a particular service, you can use the pipe option
For example, to see the contexts of nginx service, run the command,
[root@HQDEV1 ~]# ps auxZ |grep nginx

system_u:system_r:httpd_t:s0    root      50501  0.0  0.1 117724  2156 ?        Ss   02:12   0:00 nginx: master process /usr/sbin/nginx

system_u:system_r:httpd_t:s0    nginx     50502  0.1  0.4 148740  7724 ?        S    02:12   0:00 nginx: worker process

unconfined_u:unconfined_r:unconfined_t:s0-s0:c0.c1023 root 50506 0.0  0.0 12108 1112 pts/2 S+ 02:12   0:00 grep --color=auto nginx
To see the context of a port, use the command,
[root@HQDEV1 ~]# netstat -Ztulpen

Active Internet connections (only servers)
Proto Recv-Q Send-Q Local Address           Foreign Address         State       User       Inode      PID/Program name     Security Context
tcp        0      0 0.0.0.0:111             0.0.0.0:*               LISTEN      0          22448      1/systemd            system_u:system_r:init_t:s0
tcp        0      0 192.168.122.1:53        0.0.0.0:*               LISTEN      0          41906      2066/dnsmasq         system_u:system_r:dnsmasq_t:s0-s0:c0.c1023
tcp        0      0 0.0.0.0:22              0.0.0.0:*               LISTEN      0          31841      1186/sshd            system_u:system_r:sshd_t:s0-s0:c0.c1023
tcp        0      0 127.0.0.1:631           0.0.0.0:*               LISTEN      0          31928      1172/cupsd           system_u:system_r:cupsd_t:s0-s0:c0.c1023
tcp6 0 0 :::111 :::* LISTEN 0 22450 1/systemd 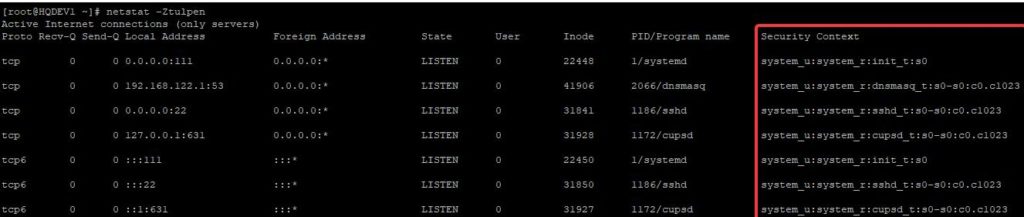
Having understood how to view the contexts of an object, in this tutorial, we will only look at the type part on files/directories with examples, other part of context will be treated in other articles.
Type Context
type context ( _t) just as other context in SELinux is used to control access on a Linux system. type context is the context that is mostly modified when it comes to SELinux troubleshooting.
Before we dig deep into type context, you need to understand these keynotes below.
Keynotes
1. There is an SELinux security context and attributes for every location/path on the system.
This fact has already been established. Again, for example, to view the type context of the /tmp directory, you run the command,
[root@HQDEV1 ~]# ls -ldZ /tmp

drwxrwxrwt. 14 root root system_u:object_r:tmp_t:s0 4096 May 23 15:03 /tmp

you can see the type context is “tmp_t”
2. When you create a file or directory, the appropriate SELinux security context and attributes for the location the file or directory was created will be associated with it
For example, create two files in “/tmp” and view the SELinux security type context of the files created
[root@HQDEV1 ~]# touch /tmp/tekneed[root@HQDEV1 ~]# touch /tmp/tekneed2[root@HQDEV1 ~]# ls -lZ /tmp/tekneed /tmp/tekneed2
-rw-r--r--. 1 root root unconfined_u:object_r:user_tmp_t:s0 0 May 23 15:37 /tmp/tekneed
-rw-r--r--. 1 root root unconfined_u:object_r:user_tmp_t:s0 0 May 23 15:39 /tmp/tekneed2you can see that the files created have “user_tmp_t” type context
create another tekneed and tekneed2 file in /boot and view their type contexts
[root@HQDEV1 ~]# touch /boot/tekneed[root@HQDEV1 ~]# touch /boot/tekneed2[root@HQDEV1 ~]# ls -lZ /boot/tekneed /boot/tekneed2
-rw-r--r--. 1 root root unconfined_u:object_r:boot_t:s0 0 May 23 15:59 /boot/tekneed
-rw-r--r--. 1 root root unconfined_u:object_r:boot_t:s0 0 May 23 15:59 /boot/tekneed2
you can see that the type context and attributes of /boot location has been automatically associated/labelled on tekneed and tekneed2 files which is “boot_t”
NB: All the context in a location are not necessarily the same.
3. SELinux just knows how to label the files or directories, you don’t have to bother yourself about it except in the advent where you need to do some special configuration, troubleshoot SELinux or change the labels/context which we are going to do as we go on in this tutorial
4. when you copy a file/directory to a location, the file automatically inherits the SELinux security context and attributes of the location it was copied to
5. When you move a file/directory to a location, the file/directory does not inherit the SELinux security context and attributes of the new location, instead, it moves with its old location’s context.
6. An unconfined context is not limited by SELinux
Understanding SELinux type Context With Examples
In this example, I assume that you already know about Apache web server and it’s very simple basic configuration
- create a test website, create a web1.html file in “/var/www/html”
[root@HQDEV1 ~]# vi /var/www/html/web1.htmlAdd this in the file
Web1 test file for SELinuxsave and quit
- open the website
you can use a text-based tool like elinks, firefox or any other browser, I will be using elinks in this lesson, install elinks if you don’t have it installed on your system.
[root@HQDEV1 ~]# yum install elinks -y[root@HQDEV1 html]# elinks http://192.168.170.128/web1.htmlOR
[root@HQDEV1 html]# elinks http://localhost/web1.html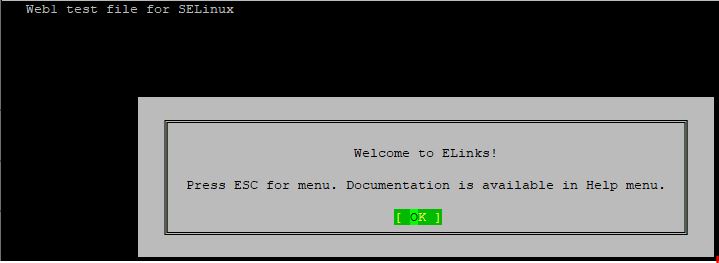
You can see the output of the simple website file, it’s working fine, right? Yes it is.
Now, let’s create another website file called “website1” in your home directory and move it to the default apache document root “/var/www/html” for your website to be visible over the network
- creating website1 file
[root@HQDEV1 ~]# vi website1Add this in the file
This is just a test file for SELinux, nothing moresave and quit
- Move website1 file to apache’s document root
[root@HQDEV1 ~]# mv website1 /var/www/html/- Open the website
[root@HQDEV1 ~]# elinks http://192.168.170.128/website1
You can see that permission is denied this time around.
So, what be the issue? the website’s content can’t be displayed over the network and it needs to be displayed, which leads us to how we can troubleshoot SELinux issues.
How To Troubleshoot SELinux With Examples
Based on the error above, the first way to troubleshoot SELinux is to first ascertain if SELinux is the problem or not.
To be sure SELinux is the issue or not, set SELinux to permissive mode and initiate the syscall again.
So, let’s make SELinux permissive
[root@HQDEV1 ~]# setenforce permissive[root@HQDEV1 ~]# getenforce
PermissiveInitiate the syscall again (open the website)
[root@HQDEV1 html]# elinks http://192.168.170.128/website1
The website is now accessible, we now know that the issue is from SELinux
set SELinux to enforcing mode and start troubleshooting
[root@HQDEV1 html]# setenforce enforcing[root@HQDEV1 html]# getenforce
EnforcingMost times, problems with SELinux is as a result of filesystems being mislabeled with the wrong context, and booleans not being enabled.
let’s start the troubleshooting by checking the “type context” of the html location and the files in the location.
[root@HQDEV1 html]# ls -ldZ /var/www/html

drwxr-xr-x. 2 root root system_u:object_r:httpd_sys_content_t:s0 39 May 23 14:06 /var/www/html
[root@HQDEV1 html]# ls -lZ /var/www/html

total 8
-rw-r--r--. 1 root root unconfined_u:object_r:httpd_sys_content_t:s0 27 May 23 12:27 web1.html
-rw-r--r--. 1 root root unconfined_u:object_r:admin_home_t:s0        52 May 23 14:05 website1
you will notice that the type context for web1.html is “httpd_sys_content_t” and we could successfully open the website. You will also notice that website1 type context is just awkward, it’s labeled “admin_home_t”
when you initialize your thought of troubleshooting, you will naturally know website1 file was likely moved from the home directory because of its type context. This ascertains the number 5 point of the keynotes above, which is, a moved file does not inherit the SELinux context of its new location.
Just like every program developers, Apache developers have specifics and directives in the apache SELinux policy, so if a type context of an object is different from the policy (i.e, if source context is different from the target context), syscall will be terminated which is what has happened.
Even if hackers break in via apache service, be it via a port or whatever means, they will be very limited because the contexts of every filesystem are different and syscalls will always get terminated.
To solve this problem, the website1 file type context needs to be changed to ” httpd_sys_content_t”. Sometimes, you may create a temporary file to ascertain the right type context.
There are various tools that can be used to change a context in SELinux, some of the tools are restorecon, semanage, chcon, etc. Continuing with our troubleshooting steps, let’s start with restorecon tool.
Using restorecon SELinux Utility
To solve the problem using restorecon, run the command,
[root@HQDEV1 html]# restorecon -R -v /var/www/html

Relabeled /var/www/html/website1 from unconfined_u:object_r:admin_home_t:s0 to unconfined_u:object_r:httpd_sys_content_t:s0
OR, you can also use the restorecon command against the parent directory of the file with the issue
[root@HQDEV1 html]# restorecon -R -v /var

Relabeled /var/log/Xorg.9.log from system_u:object_r:var_log_t:s0 to system_u:object_r:xserver_log_t:s0
Relabeled /var/log/dnf.log from system_u:object_r:rpm_log_t:s0 to system_u:object_r:var_log_t:s0
Relabeled /var/log/dnf.librepo.log from system_u:object_r:rpm_log_t:s0 to system_u:object_r:var_log_t:s0
Relabeled /var/log/dnf.rpm.log from system_u:object_r:rpm_log_t:s0 to system_u:object_r:var_log_t:s0
Relabeled /var/log/vmware-network.2.log from system_u:object_r:var_log_t:s0 to system_u:object_r:vmware_log_t:s0
Relabeled /var/log/vmware-network.1.log from system_u:object_r:var_log_t:s0 to system_u:object_r:vmware_log_t:s0
Relabeled /var/log/vmware-network.log from system_u:object_r:var_log_t:s0 to system_u:object_r:vmware_log_t:s0
Relabeled /var/www/html/website1 from unconfined_u:object_r:admin_home_t:s0 to unconfined_u:object_r:httpd_sys_content_t:s0
verify the type context of the file
[root@HQDEV1 html]# ls -lZ

total 8
-rw-r--r--. 1 root root unconfined_u:object_r:httpd_sys_content_t:s0 27 May 23 12:27 web1.html
-rw-r--r--. 1 root root unconfined_u:object_r:httpd_sys_content_t:s0 52 May 23 14:05 website1
access the website
[root@HQDEV1 html]# elinks http://192.168.170.128/website1You can see that the website is now accessible.
The restorecon utility checks the filesystems to see if the contexts in their location are appropriate as described in the SELinux policy, if they are not, it will do the correction by overwriting the appropriate context in the filesystem.
Summary Of SELinux second section
In the second section of this subject matter, I have explained SELinux policy, which are a set of rules written by an application developer. If syscalls don’t meet the conditions of these rules, it gets terminated.
We have also looked at SELinux context and its part, which are the user, role, type, and sensitivity part. We started with the type part and we were able to troubleshoot Apache SELinux issue by relabeling the type context of a website file using the “restorecon” command.
Going forward, in the third section of this subject matter, we will look at how to use other commands to relabel SELinux context and other SELinux concepts.
There are hundreds of SELinux contexts, but when troubleshooting, a good way to check for the right context is to check the default location of a directory just as we did earlier to be able to quickly get the right context.
Sometimes, you will need to create a file in a directory to get the right type context for a file.
To list all the context on the system , use the command,
[root@HQDEV1 ~]# semanage fcontext -l

/usr/share/munin/plugins/unbound                   regular file       system_u:object_r:system_munin_plugin_exec_t:s0
/usr/share/munin/plugins/uptime                    regular file       system_u:object_r:system_munin_plugin_exec_t:s0
/usr/share/munin/plugins/users                     regular file       system_u:object_r:system_munin_plugin_exec_t:s0
/usr/share/munin/plugins/varnish_.*                regular file
.........
In our previous troubleshooting steps, we used restorecon tool to relabel the type context for “website1”, let’s see how we can use the “semanage” utility to configure a type context for a file.
Using semanage SELinux Utility
One way to harden an Apache server is to change the document root. Just as I have earlier said, this lesson assumes you are already familiar with Apache, Click on this link to learn the basics of Apache service
To change Apache’s document root, follow the steps below.
- make a directory for the new document root
[root@HQDEV1 ~]# mkdir -p /webserver/new_doc_root- create a website file in the new document root
[root@HQDEV1 ~]# vi /webserver/new_doc_root/website2Add the content below in the file.
This is a test website for the new document rootsave and quit
- Edit the Apache configuration file. It is safe to backup the file before editing
- Back up Apache config file
[root@HQDEV1 ~]# cp /etc/httpd/conf/httpd.conf /etc/httpd/conf/httpd.conf_original- Now Edit the file
[root@HQDEV1 ~]# vi /etc/httpd/conf/httpd.conflook for the line, “DocumentRoot”, and the two “Directory” lines, change it to the new document root as highlighted in yellow below
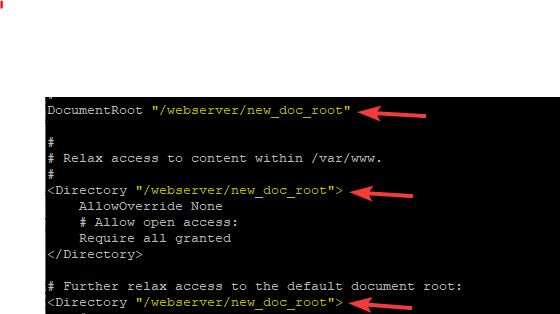
- Restart Apache service or start it if it is not running
[root@HQDEV1 ~]# systemctl restart httpd[root@HQDEV1 ~]# systemctl start httpd- Access the website
[root@HQDEV1 ~]# elinks http://localhost/website2you will be denied access to the website.
Again, let’s put on our troubleshooting thought. Just as we troubleshot the first SELinux issue, remember I said that you should look out for the “type context” first, followed by boolean when troubleshooting SELinux. We will understand what boolean is as we go on.
For this problem, we already know it’s not likely a boolean issue because we changed Apache’s default document root. Hence, let’s look at the log files. You remember the location where SELinux logs its event right? I mentioned it in the first half of this lesson, /var/log/audit/audit.log
- check SELinux log file
[root@HQDEV1 ~]# more /var/log/audit/audit.log |grep AVCSince this is the last syscall terminated by SELinux, The last line of the log file will display below
type=AVC msg=audit(1590419666.908:2498): avc: denied { getattr } for pid=73144 comm="httpd" path="/webserver/new_doc_root/website2" dev="dm-0" ino=17969669 scontext=system_u:system_r:httpd_t:s0 tcontext=unconfined_u:object_r:default_t:s0 tclass=file permissive=0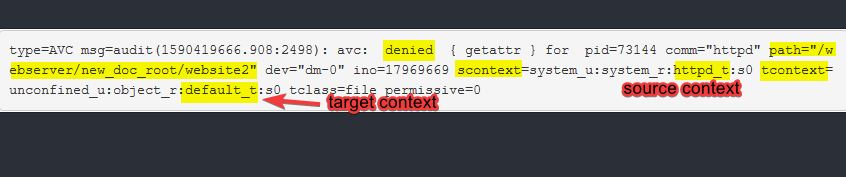
you can see that the source type context(httpd_t) is pointing to a default target type context (default_t), and the defaul target has already been changed in Apache’s configuration file. Hence, we need to rectify this by using the semanage utility.
To use the semanage utility to change a file context, use semanage with fcontext, that is, “semanage-fcontext”. Running the command, “semanage –help”, “man semanage” or ” man semanage-fcontext” also gives a better insight of how to use the semanage utility.
For example, run the command below and find the line, “EXAMPLE”
[root@HQDEV1 ~]# man semanage-fcontext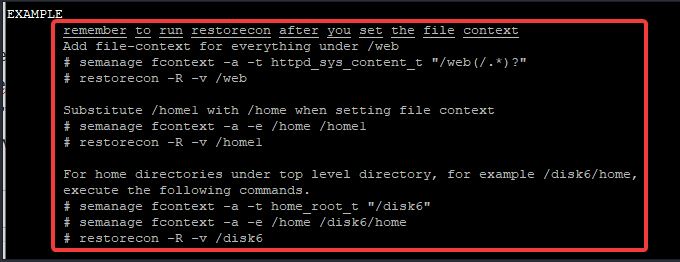
You can see examples of how the semanage tool can be used. The first example is what we need.
- To change the file context for the new document root, use the command,
[root@HQDEV1 ~]# semanage fcontext -a -t httpd_sys_content_t "/webserver/new_doc_root(/.*)?"[root@HQDEV1 ~]# restorecon -R -v /webserver/new_doc_root
Relabeled /webserver/new_doc_root from unconfined_u:object_r:default_t:s0 to unconfined_u:object_r:httpd_sys_content_t:s0
Relabeled /webserver/new_doc_root/website2 from unconfined_u:object_r:default_t:s0 to unconfined_u:object_r:httpd_sys_content_t:s0
- Access the website
[root@HQDEV1 ~]# elinks http://localhost/website2
You can see that the website is now accessible.
NOTE
semanage fcontext writes to the policy and not directly to the filesystem, hence why you need to use the restorecon utility after using the “semanage fcontext” utility so that the changes can be written to the filesystem.
restorecon checks the policy, verifies and writes the appropriate context from the policy to the filesystem. It ensures all contexts are properly labelled.
- Do a cleanup of your environment (Restore your backup)
[root@HQDEV1 ~]# mv /etc/httpd/conf/httpd.conf_original /etc/httpd/conf/httpd.conf- Restart Apache service.
[root@HQDEV1 ~]# systemctl restart httpdUsing Setroubleshoot-server / sealert To Troubleshoot SELinux
No doubt, troubleshooting SELinux issues can sometimes tasking, however, knowing the right tools to use and sometimes the log files to check can reduce the stress.
The setroubleshoot-server makes SELinux somewhat easy to troubleshoot. setroubleshoot-server is installed on RHEL / CentOS 7 & 8 and some other Linux distributions by default.
To verify if setroubleshoot-server is installed, use the command,
[root@HQDEV1 ~]# rpm -q setroubleshoot-server

setroubleshoot-server-3.3.20-2.el8.x86_64
If SELinuxtroubleshoot-server is not installed in your distribution, install it by using your distribution’s package manager.
[root@HQDEV1 ~]# yum install setroubleshoot-serversetroubleshoot logs SELInux issue in the “/var/log/messages/” file with a “sealert” command to run for further troubleshooting analysis. One good thing about the setroubleshoot is that it also suggests the solution with a confidence score.
Let’s understand with examples.
1. Just as we did previously, create a website file in your home directory
[root@HQDEV1 ~]# vi website3sealert test websitesave and quit
2. move the file to Apache document root.
[root@HQDEV1 ~]# mv website3 /var/www/html3. Access the website via any browser or elinks
[root@HQDEV1 ~]# elinks http://localhost/website3you will get a denied message
setroubleshoot logs SELinux issue in /var/log/messages file with an “sealert” command.
4. search for sealert related messages in /var/log/messages file
[root@HQDEV1 ~]# less /var/log/messagessearch for sealert messages related to httpd in the file, you can use (/sealert) and scroll to the last page since we are looking for the last SELinux event.
May 27 16:31:18 HQDEV1 setroubleshoot[21319]: SELinux is preventing /usr/sbin/httpd from getattr access on the file /var/www/html/website3. For complete SELinux messages run: sealert -l 19df2d63-f3d0-47a6-b6f7-0f585885080a
can run restorecon.

......
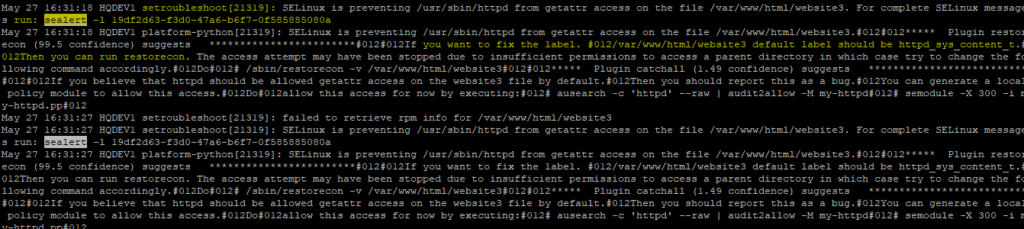
from the log file, you can see setroubleshoot messages, and you can also see the the confidence score, 99.5 %.
setroubleshoot also says we should run the command,
sealert -l 19df2d63-f3d0-47a6-b6f7-0f585885080aLet’s run the command,
[root@HQDEV1 ~]# sealert -l 19df2d63-f3d0-47a6-b6f7-0f585885080a

SELinux is preventing /usr/sbin/httpd from getattr access on the file /var/www/html/website3.

*****  Plugin restorecon (99.5 confidence) suggests   ************************

If you want to fix the label.
/var/www/html/website3 default label should be httpd_sys_content_t.
Then you can run restorecon. The access attempt may have been stopped due to insufficient permissions to access a parent directory in which case try to change the following command accordingly.
Do
# /sbin/restorecon -v /var/www/html/website3

*****  Plugin catchall (1.49 confidence) suggests   **************************

If you believe that httpd should be allowed getattr access on the website3 file by default.
Then you should report this as a bug.
You can generate a local policy module to allow this access.
Do
allow this access for now by executing:
# ausearch -c 'httpd' --raw | audit2allow -M my-httpd
# semodule -X 300 -i my-httpd.pp


Additional Information:
Source Context                system_u:system_r:httpd_t:s0
Target Context                unconfined_u:object_r:admin_home_t:s0
Target Objects                /var/www/html/website3 [ file ]
Source                        httpd
Source Path                   /usr/sbin/httpd
Both the logs and the output of sealert command gave an insight into what the solution is.
sometimes, depending on the SELinux issue, sealert gives different suggestions with their confidence scores, you will need to analyze all, put on your troubleshooting thought, and make a good decision.
SELinux Boolean
SELinux booleans are SELinux functionalities of a policy that can be turned on or turned off.
If the boolean for a particular syscall function is disabled/turned off, the syscall will be terminated. Apart from checking the context when troubleshooting SELinux, one also needs to always verify the status of the boolean associated with a syscall for a particular function.
To see all the booleans on a Linux system, run the command,
[root@HQDEV1 ~]# getsebool -a

abrt_anon_write --> off
abrt_handle_event --> off
abrt_upload_watch_anon_write --> on
antivirus_can_scan_system --> off
antivirus_use_jit --> off
auditadm_exec_content --> on
authlogin_nsswitch_use_ldap --> off
authlogin_radius --> off

..........
you can see that there are a lot of booleans, however, you can use the grep utility to filter the boolean of a specific process.
To get all the booleans of the httpd process for example, run the command,
[root@HQDEV1 ~]# getsebool -a |grep httpd

httpd_anon_write --> off
httpd_builtin_scripting --> on
httpd_can_check_spam --> off
httpd_can_connect_ftp --> off
httpd_can_connect_ldap --> off
httpd_can_connect_mythtv --> off
httpd_can_connect_zabbix --> off
httpd_use_sasl --> off
httpd_verify_dns --> off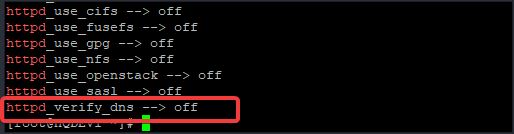
You can see that the httpd service still has a lot of booleans. From one of the booleans, you can see that the “httpd_verify_dns” boolean is turned off.
This means that if you configure Apache to verify DNS, it will not work because the boolean for that specific function is turned off.
The only way for Apache to verify DNS is to turn on the boolean or rather disable SELinux completely which you wouldn’t want to consider, hence why it is essential you check for booleans while troubleshooting SELinux.
How To Turn On SELinux Boolean Value
To turn on a boolean, run the command,
setsebool <boolean> onTo turn on the “httpd_verify_dns” boolean, run the command,
[root@HQDEV1 ~]# setsebool httpd_verify_dns onverify,
[root@HQDEV1 ~]# getsebool -a |grep "httpd_verify_dns"

httpd_verify_dns --> on
NOTE :
Turning on a boolean with setsebool utility does not make the changes persistent, to make the changes persistent, use the command,
setsebool -P <boolean> onHence, to turn on the “httpd_verify_dns” boolean persistently, use the command,
[root@HQDEV1 ~]# setsebool -P httpd_verify_dns onHow To Turn Off SELinux Boolean Value
To turn off a boolean, use the command,
setsebool <boolean> offTo turn off the “httpd_verify_dns” boolean, run the command,
[root@HQDEV1 ~]# setsebool httpd_verify_dns offverify,
[root@HQDEV1 ~]# getsebool -a |grep "httpd_verify_dns"

httpd_verify_dns --> off
To make the changes persistent, use the command,
setsebool -P <boolean> off[root@HQDEV1 ~]# setsebool -P httpd_verify_dns offHow To Generate Other SELinux man pages In CentOS/RHEL 7 & 8
If you have gone through my “Linux basics” tutorials, you will know how to effectively use the man pages, especially with a keyword.
you can use the sepolicy tool to generate other man pages associated with SELinux. Every service has it’s own SELinux man pages which makes it a lot easier for configuring, managing and troubleshooting SELinux.
To generate other man pages, follow the steps below.
- First step is to install the sepolicy tool
The sepolicy tool can’t be installed with the command “yum install sepolicy”. In one of the lessons on this site, I talked about how to use yum to get a package binary. We will use that same method to get the package binary of sepolicy.
- To get the package binary of sepolicy, run the command,
[root@HQDEV1 ~]# yum provides sepolicy

Updating Subscription Management repositories.
policycoreutils-devel-2.8-16.1.el8.i686 : SELinux policy core policy devel utilities
Repo        : rhel-8-for-x86_64-baseos-rpms
Matched from:
Filename    : /usr/bin/sepolicy

....................
Now that we can see the package binary, install the policycoreutils-devel package
[root@HQDEV1 ~]# yum install policycoreutils-devel

Updating Subscription Management repositories.
Extra Packages for Enterprise Linux 8 - x86_64                                       33 kB/s |  59 kB     00:01
Red Hat Enterprise Linux 8 for x86_64 - AppStream (RPMs)                            3.3 kB/s | 4.5 kB     00:01
Dependencies resolved.
====================================================================================================================
 Package                             Architecture  Version               Repository                            Size
===================================================================================================================

............
Run the seploicy man page command
[root@HQDEV1 ~]# sepolicy manpage -a

/tmp/NetworkManager_selinux.8
/tmp/NetworkManager_ssh_selinux.8
/tmp/abrt_selinux.8
/tmp/abrt_dump_oops_selinux.8
/tmp/abrt_handle_event_selinux.8
/tmp/abrt_helper_selinux.8
/tmp/abrt_retrace_coredump_selinux.8
/tmp/abrt_retrace_worker_selinux.8
/tmp/abrt_upload_watch_selinux.8

...............
[root@HQDEV1 ~]# mandb

Purging old database entries in /usr/share/man/overrides...
Processing manual pages under /usr/share/man/overrides...
Purging old database entries in /usr/share/man...
Processing manual pages under /usr/share/man...
Purging old database entries in /usr/share/man/overrides...
Processing manual pages under /usr/share/man/overrides...
..........
By default, sepolicy writes all the man pages to the /tmp directory, move them to the “/usr/share/man/man8” location
[root@HQDEV1 ~]# cd /tmp[root@HQDEV1 ~]# ls
quota_nld_selinux.8
quota_selinux.8
rabbitmq_selinux.8
racoon_selinux.8
radiusd_selinux.8
radvd_selinux.8
raid_selinux.8
rasdaemon_selinux.8
rdisc_selinux.8
readahead_selinux.8
realmd_consolehelper_selinux.8
realmd_selinux.8
.............[root@HQDEV1 ~]# mv /tmp/*_selinux.8 /usr/share/man/man8NOTE: you can directly specify the location where you want sepolicy to write all the SELinux man page instead of the default “/tmp” location by using the command below
[root@HQDEV1 tmp]# sepolicy manpage -a -p /usr/share/man/man8- Now list all the other SELinux man pages
[root@HQDEV1 tmp]# man -k _selinux.8you can also use the grep utility to filter for a specific service
[root@HQDEV1 tmp]# man -k _selinux.8 |grep httpThe auditd Service
SELinux uses the auditd services to log its event. The auditd service must be up and running if SELinux is enabled in your environment.
To verify the status of the auditd service, run the command,
[root@HQDEV1 ~]# systemctl status auditd.service

● auditd.service - Security Auditing Service
   Loaded: loaded (/usr/lib/systemd/system/auditd.service; enabled; vendor preset: enabled)
   Active: active (running) since Mon 2020-05-25 23:39:25 WAT; 1 day 15h ago
     Docs: man:auditd(8)
...........
If this service is not running, no SELinux events will be generated (/var/log/audit/audit.log)
We have come to the end of the third section of this subject matter, we will look at other types of context in the next article.
SELinux FAQ
What is SELinux used for
SELinux is used to enhance the security of a Linux system.
What is the purpose of SELinux
Is SELinux enabled by default
Yes SELinux is enabled by default and in Enforcing mode.
How do you relabel SELinux.
RHCSA 8 Exam Practice Question On Configuring & Managing SELinux
Your feedback is welcomed. If you love others, you will share with others
Um dos melhores site gratis para certificação RHCSA se não for o melhor! Muito obrigado!!!
de nada!!