
Last updated: June 2020
Contents
man means manual. Just as there are manuals for your vehicles and gadgets, the Linux operating system also has manual pages for almost every command that is used in Linux. With the “man” tool in Linux, you can check the manual pages for every command.
To check the manual page of a command however means that you already know the name of the command. For example, if you want to check the manual page for the “ls” command, you use the command,
[root@HQDEV1 ~]# man lsIt is also similar to when you check the table of content or index of your vehicle manual for a particular function you already have in mind, for example, “changing the oil filter”.
So, what if you need to do a particular task on the Linux system, for example, you need to change a user’s or your own password and you don’t even know the exact command to use? remember, you can only open the manual page of the command you already know.
At the beginning of this series, “Learn Linux from scratch”, in one of the modules, I mentioned that there are over 1,000 commands in Linux and it is impossible to know all of these commands offhand, not to mention of their thousands of options/flags as well.
Thanks to the “man” utility. With the “man” tool, you can get to find the exact command you want to use to perform a specific task or function, and of course, directives on how to use the command to achieve your aim. So, no worries if you forget a command or don’t even know what command to use for a specific system task.
The command of a specific task in Linux, and instructions on how to use them can be found with the help of “man” command.
We are going to see some examples, but before then, Let’ understand some important parameters of the man pages.
When you use the command,
# man <command> For example,
[root@HQDEV1 ~]# man rmThe rm manual page will be opened and a lot of parameters like name, synopsis, description, etc will be displayed. Let’s understand some of these important parameters
- Name: represents a command name and what it does basically
- Synopsis: represents the exact way a command will be used
- Description: explains/describes the command and various ways it can be used
- Options: gives the different options/flags that can be used with the command. In one of the previous modules, options was explicitly explained.
- Examples: gives an example of how the command can be used
sometimes, you may get confused and not find the information of synopsis very useful, look at the options in this case, if you are not still very sure of how to use the command, some manual pages contain examples, look at the Examples.
If the manual page contains a lot, you can do a search for examples by using the forward slash (/Examples). It also applies to any information you are searching for in the man page. If you are searching for a parameter that is mentioned in the man page and you further need details, use the forward-slash operator (/).
To find the exact command for a specific task, you do a “keyword” search with the “man” tool
Lastly, before we see some examples, let’s understand the sections of the manual pages.
sections of the manual pages are defined as seen in the screen-shot below.
[root@HQDEV1 ~]# man man-pages
These sections are self-explanatory, the important sections mostly required by a user or an administrator are section 1,5 and 8. In the screen-shot above, section 1 is a user command, mostly used by other users, while section 8 is a system management command, mostly used by root users/administrators.
Let’s say you want to change your password or a user’s password and you do not know the command and how to go about it, follow the steps below
1. use the man command by keyword
# man -k <keyword> If you get “nothing appropriate”, you need to update man’s database.
[root@HQDEV1 ~]# man -k password

chage (1)            - change user password expiry information
chgpasswd (8)        - update group passwords in batch mode
chpasswd (8)         - update passwords in batch mode
cracklib-check (8)   - Check passwords using libcrack2
create-cracklib-dict (8) - Check passwords using libcrack2
endpwent (3)         - get password file entry
endspent (3)         - get shadow password file entry
fgetpwent (3)        - get password file entry
fgetspent (3)        - get shadow password file entry
fgetspent_r (3)      - get shadow password file entry
getpass (3)          - get a password
getpw (3)            - reconstruct password line entry
getpwent (3)         - get password file entry
getpwnam (3)         - get password file entry
getpwnam_r (3)       - get password file entry
getpwuid (3)         - get password file entry
getpwuid_r (3)       - get password file entry
getspent (3)         - get shadow password file entry
getspent_r (3)       - get shadow password file entry
getspnam (3)         - get shadow password file entry
getspnam_r (3)       - get shadow password file entry
grpconv (8)          - convert to and from shadow passwords and groups
grpunconv (8)        - convert to and from shadow passwords and groups
grub2-set-password (8) - Generate the user.cfg file containing the hashed grub bootloader password.
grub2-mkpasswd-pbkdf2 (1) - Generate a PBKDF2 password hash.
grub2-setpassword (8) - Generate the user.cfg file containing the hashed grub bootloader password.
jose-jwe-enc (1)     - Encrypts plaintext using one or more JWK/password
lchage (1)           - Display or change user password policy
lckpwdf (3)          - get shadow password file entry
login.defs (5)       - shadow password suite configuration
lpasswd (1)          - Change group or user password
openssl-passwd (1ssl) - compute password hashes
openssl-srp (1ssl)   - maintain SRP password file
pam_cracklib (8)     - PAM module to check the password against dictionary words
pam_pwhistory (8)    - PAM module to remember last passwords
pam_pwquality (8)    - PAM module to perform password quality checking
pam_unix (8)         - Module for traditional password authentication
passwd (5)           - password file
passwd2des (3)       - RFS password encryption
password-auth (5)    - Common configuration file for PAMified services
putpwent (3)         - write a password file entry
putspent (3)         - get shadow password file entry
pwck (8)             - verify integrity of password files
pwconv (8)           - convert to and from shadow passwords and groups
pwd.h (0p)           - password structure
pwhistory_helper (8) - Helper binary that transfers password hashes from passwd or shadow to opasswd
pwmake (1)           - simple tool for generating random relatively easily pronounceable passwords
pwscore (1)          - simple configurable tool for checking quality of a password
pwunconv (8)         - convert to and from shadow passwords and groups
saslpasswd2 (8)      - set a user's sasl password
secret-tool (1)      - Store and retrieve passwords
setpwent (3)         - get password file entry
setspent (3)         - get shadow password file entry
sgetspent (3)        - get shadow password file entry
sgetspent_r (3)      - get shadow password file entry
shadow (3)           - encrypted password file routines
shadow (5)           - shadowed password file
smbpasswd (5)        - The Samba encrypted password file
srp (1ssl)           - maintain SRP password file
sslpasswd (1ssl)     - compute password hashes
systemd-ask-password (1) - Query the user for a system password
systemd-ask-password-console.path (8) - Query the user for system passwords on the console and via wall
systemd-ask-password-console.service (8) - Query the user for system passwords on the console and via wall
systemd-ask-password-wall.path (8) - Query the user for system passwords on the console and via wall
systemd-ask-password-wall.service (8) - Query the user for system passwords on the console and via wall
systemd-tty-ask-password-agent (1) - List or process pending systemd password requests
ulckpwdf (3)         - get shadow password file entry
unix_chkpwd (8)      - Helper binary that verifies the password of the current user
unix_update (8)      - Helper binary that updates the password of a given user
userpasswd (1)       - A graphical tool to allow users to change their passwords.
vigr (8)             - edit the password, group, shadow-password or shadow-group file
vipw (8)             - edit the password, group, shadow-password or shadow-group file
vncpasswd (1)        - change the VNC password
xcrypt (3)           - RFS password encryption
xdecrypt (3)         - RFS password encryption
xencrypt (3)         - RFS password encryption
You can see that there are a lot of commands. As I mentioned, the man-pages section mostly required by an administrator or a user is 1, 5, and 8.
Hence, If your eyes are not very fast to scan things like that of “Merlin”, you can streamline the search by grepping for 1, if you don’t see what you need, you grep for 5, and 8 consecutively.
2. So, let’s streamline the search.
[root@HQDEV1 ~]# man -k password |grep 1

chage (1)            - change user password expiry information
grub2-mkpasswd-pbkdf2 (1) - Generate a PBKDF2 password hash.
jose-jwe-enc (1)     - Encrypts plaintext using one or more JWK/password
lchage (1)           - Display or change user password policy
lpasswd (1)          - Change group or user password
openssl-passwd (1ssl) - compute password hashes
openssl-srp (1ssl)   - maintain SRP password file
pwmake (1)           - simple tool for generating random relatively easily pronounceable passwords
pwscore (1)          - simple configurable tool for checking quality of a password
secret-tool (1)      - Store and retrieve passwords
srp (1ssl)           - maintain SRP password file
sslpasswd (1ssl)     - compute password hashes
systemd-ask-password (1) - Query the user for a system password
systemd-tty-ask-password-agent (1) - List or process pending systemd password requests
userpasswd (1)       - A graphical tool to allow users to change their passwords.
vncpasswd (1)        - change the VNC password
[root@HQDEV1 ~]#
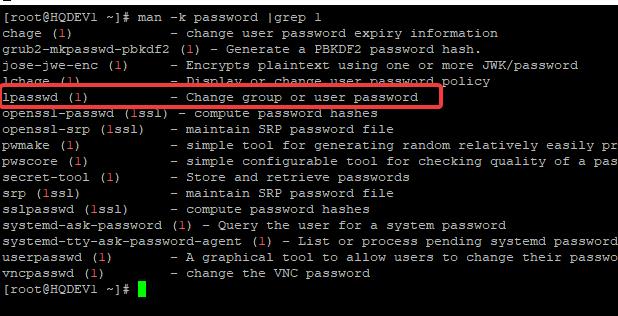
Now that we can see the lpasswd command as the command that can change a user’s password, we don’t need to grep for 5 and 8 anymore.
3. Let’s know how this command is used by consulting the manual page
[root@HQDEV1 ~]# man lpasswd

lpasswd(1)                                      General Commands Manual                                      lpasswd(1)

NAME
       lpasswd - Change group or user password

SYNOPSIS
       lpasswd [OPTION]... [name]

DESCRIPTION
       Changes password of user or group name.

       If  the  name  argument  is not provided, username of the invoking user is used; the name argument is ignored if
       lpasswd is run set-uid to a different user.

       Entering an empty password (by pressing Enter) aborts the password setting operation.

OPTIONS
       -F, --plainpassword-fd=fd
              Read password from file descriptor fd, terminated by end of file, '\r' or '\n'.
The name, synopsis, and description are very clear and useful. From the synopsis, the command can be used as
lpasswd [option] name3. Therefore, to change the password of the user michael, we can use the command,
[root@HQDEV1 ~]# lpasswd michael

New password:
New password (confirm):
Password changed.
[root@HQDEV1 ~]#
NOTE: when you are able to get the right command by using the man tool by keyword, you can also use (- – help ) with the command as used below. help too gives an insight on how to use a command and can be very helpful especially if the information in the manual page of a command is cumbersome.
[root@HQDEV1 ~]# lpasswd --help

Usage: lpasswd [OPTION...] user
  -i, --interactive              prompt for all information
  -g, --group                    set group password instead of user password
  -P, --plainpassword=STRING     new plain password
  -p, --password=STRING          new crypted password
  -F, --plainpassword-fd=NUM     read new plain password from given descriptor
  -f, --password-fd=NUM          read new crypted password from given descriptor

Help options:
  -?, --help                     Show this help message
      --usage                    Display brief usage message
[root@HQDEV1 ~]#
Let’s say you want to copy a file and you don’t know what command to use and how to use it.
1. use the man command by keyword
[root@HQDEV1 ~]# man -k copy

bcopy (3)            - copy byte sequence
buildah-copy (1)     - Copies the contents of a file, URL, or directory into a container's working directory.
copy_file_range (2)  - Copy a range of data from one file to another
copysign (3)         - copy sign of a number
copysign (3p)        - number manipulation function
copysignf (3)        - copy sign of a number
copysignl (3)        - copy sign of a number
cp (1)               - copy files and directories
cp (1p)              - copy files
cpio (1)             - copy files to and from archives
dd (1)               - convert and copy a file
dd (1p)              - convert and copy a file
docker-cp (1)        - Copy files/folders between a container and the local filesystem
exec (1p)            - execute commands and open, close, or copy file
If you have been following the “Learn Linux from scratch” series, you should know it is easier to pipe the command above to the more command.
when you look through the commands, you will notice that cp and cpio are likely to do the job

2. Streamline the search
[root@HQDEV1 ~]# man -k copy |grep 1

buildah-copy (1)     - Copies the contents of a file, URL, or directory into a container's working directory.
cp (1)               - copy files and directories
cp (1p)              - copy files
cpio (1)             - copy files to and from archives
dd (1)               - convert and copy a file
dd (1p)              - convert and copy a file
docker-cp (1)        - Copy files/folders between a container and the local filesystem
exec (1p)            - execute commands and open, close, or copy file descriptors
flatpak-create-usb (1) - Copy apps and/or runtimes onto removable media.
head (1p)            - copy the first part of files
install (1)          - copy files and set attributes
mcopy (1)            - copy MSDOS files to/from Unix
objcopy (1)          - copy and translate object files
ostree-pull-local (1) - Copy data from a source repository
podman-cp (1)        - Copy files/folders between a container and the local filesystem
rsync (1)            - a fast, versatile, remote (and local) file-copying tool
scp (1)              - secure copy (remote file copy program)
ssh-copy-id (1)      - use locally available keys to authorise logins on a remote machine
tail (1p)            - copy the last part of a file
uucp (1p)            - system-to-system copy
[root@HQDEV1 ~]#
3. consult the man page
[root@HQDEV1 ~]# man cp

CP(1)                                                                      User Commands                                                                      CP(1)

NAME
       cp - copy files and directories

SYNOPSIS
       cp [OPTION]... [-T] SOURCE DEST
       cp [OPTION]... SOURCE... DIRECTORY
       cp [OPTION]... -t DIRECTORY SOURCE...

DESCRIPTION
       Copy SOURCE to DEST, or multiple SOURCE(s) to DIRECTORY.

       Mandatory arguments to long options are mandatory for short options too.

       -a, --archive
              same as -dR --preserve=all

       --attributes-only
              don't copy the file data, just the attributes

       --backup[=CONTROL]
              make a backup of each existing destination file

       -b     like --backup but does not accept an argument

       --copy-contents
              copy contents of special files when recursive

       -d     same as --no-dereference --preserve=links

       -f, --force
              if an existing destination file cannot be opened, remove it and try again (this option is ignored when the -n option is also used)

       -i, --interactive
              prompt before overwrite (overrides a previous -n option)

       -H     follow command-line symbolic links in SOURCE

       -l, --link
              hard link files instead of copying

       -L, --dereference
              always follow symbolic links in SOURCE
The name, synopsis and description is very clear and useful. From the synopsis, the command can be used as
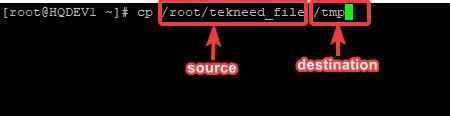
cp [OPTION]... [-T] SOURCE DEST4. To copy a file from source to destination, for example, to copy the file, “tekneed_file” from /root to /tmp, use the command,
[root@HQDEV1 ~]# cp /root/tekneed_file /tmp
Using a command with – – help can also be helpful
[root@HQDEV1 ~]# cp --help

Usage: cp [OPTION]... [-T] SOURCE DEST
  or:  cp [OPTION]... SOURCE... DIRECTORY
  or:  cp [OPTION]... -t DIRECTORY SOURCE...
Copy SOURCE to DEST, or multiple SOURCE(s) to DIRECTORY.

Mandatory arguments to long options are mandatory for short options too.
  -a, --archive                same as -dR --preserve=all
      --attributes-only        don't copy the file data, just the attributes
      --backup[=CONTROL]       make a backup of each existing destination file
  -b                           like --backup but does not accept an argument
      --copy-contents          copy contents of special files when recursive
  -d                           same as --no-dereference --preserve=links
  -f, --force                  if an existing destination file cannot be
                                 opened, remove it and try again (this option
                                 is ignored when the -n option is also used)
  -i, --interactive            prompt before overwrite (overrides a previous -n
                                  option)
  -H                           follow command-line symbolic links in SOURCE
  -l, --link                   hard link files instead of copying
  -L, --dereference            always follow symbolic links in SOURCE
  -n, --no-clobber             do not overwrite an existing file (overrides
                                 a previous -i option)
  -P, --no-dereference         never follow symbolic links in SOURCE
  -p                           same as --preserve=mode,ownership,timestamps
      --preserve[=ATTR_LIST]   preserve the specified attributes (default:
                                 mode,ownership,timestamps), if possible
                                 additional attributes: context, links, xattr,
                                 all
Your feedback is welcomed. If you love others, you will share with others
Leave a Reply