
Last updated: February 2021
Contents
- UNDERSTANDING THE SUBJECT MATTER
- What Is LVM In Linux
- Advantages Of Using LVM
- Disadvantages Of Using LVM
- Should I use LVM
- What’s The Difference Between LVM & Standard Partition
- Physical Volume
- Steps On How To Create Physical Volume(PV)
- Volume Group
- Steps On How To Create Volume Group(VG)
- Physical Extent(PE)
- Logical Volume(LV)
- Steps On How To Create Logical Volume(LV)
- ACTION TIME
- TUTORIAL VIDEO
UNDERSTANDING THE SUBJECT MATTER
LVM (logical volume manager) is a management technology for storage.
Prior to LVM technology, storage management has not been really easy, especially in the area of partition resizing, but now that LVM is around, Storage deployment and management has become very flexible and easier to manage more especially in the area of volume management compared with the traditional way of standard/manual partitioning.
This concept has actually changed the storage world positively.
Using LVM comes with great and easy to do configuration, but before we start configuring, it will be a better idea to understand the concepts and terminologies around LVM, like the physical volume (PV), volume group (VG), physical extent (PE), logical volume(LV) and logical extent. (LE)
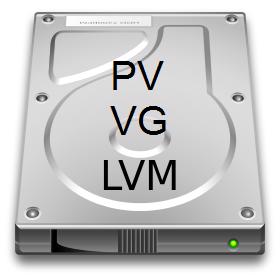
For a better understanding of these terminologies, I have drawn a chart below with a detailed explanation

From the chart above, you can see that LVM technology ends at creating a Logical Volume(LV). A physical volume must be created, followed by a volume group, and lastly, a logical volume.
The Physical Volume and Volume group are just one of the processes that must be followed to create the end result, which is the Logical Volume.
Let’s compare a cake to a LV for instance. To bake a regular cake, you will need flour (PV) and water (VG). All these will constitute in making a regular cake which is the end result (LV)
One, two, three and more physical volumes can be combined to make one volume group, whilst you can create as many logical volumes (virtual partition/LVM partition) as possible from the volume group depending on the volume group size.
Logical volume (LV) can be compared to as a standard/manual partition, but this time around a virtual partition.
Some of the advantages of using LVM over standard partition are:
. Easy Volume Resize Option
This is one of the benefits of using LVM, volumes can be reduced or extended easily. LVM is very flexible to do this with just one command line.
More so, volumes can be easily added with LVM.
. Easy Storage Management
Sometimes, to follow the architecture and convention of an environment, there may be a need to create a partition from a particular disk with no free space. with LVM, PV’s can easily be added to a VG with no free space, hence more LV’s can be created on the VG.
. Other Features
With LVM, one can do an lvm snapshot, lvm mirroring, vgexport, vgimport, etc. All these features allows for an easy backup of data and easy replacement of failing disks.
There is no major draw back of using LVM, the only thing is that an environment should be carefully planned before using LVM.
For example, if you create all your LVs on one hard disk without partition, if something goes wrong with that hard disk, you will practically loose all your data especially in an environment where there is no synchronization or replication.
The use of LVM for storage management in Linux is now becoming inevitable most especially for large environment.
Having explained the advantages and disadvantages of LVM, if you want to easily manage your storage and make life easier for you as an administrator and for other administrators that will continue to manage a storage environment when you leave, you may want to consider using LVM and to enjoy it’s cool features.
The only pain that comes with LVM is having to understand the LVM technique, and when you do, it makes life easier.
Sometimes you may also want to consider configuring LVM with the default parameters like the default physical extent to avoid getting things complicated except if there is a special requirement for the applications not to use the default parameters.
Also, there is a bigger advantage of using LVM on a small system. Using the advanced features like “vgexport” and “vgimport” will be faster and easier as you can easily export and import volume groups on a small system.
1. Partition sizes can be easily changed with LVM compared to standard partition. With LVM, you do not need to unmount a filesystem before resizing, it can be done while online.
2. With LVM, multiple volumes can be easily added. You can add more than 250 volumes but with a standard partition, you can’t add up to 50 partitions.
Physical volume(s) are created from block devices. A block device could be LUNS created from the storage array, the physical hard drive or even a partition on a disk.
One can technically say that a physical volume is a block device.
LVM uses physical volume as part of it’s management technique. Reason why if a PV is created, a certain LVM information like the LVM header will be created on the PV as an identifier, confirming that such block device or devices belongs and will be managed by LVM.
The utility LVM uses in creating the Physical volume is “pvcreate”. Yes, physical volume (s) has to be initialized for use by LVM using the “pvcreate” command after which the volume group can also be created.
“No physical volume, no volume group”.
1. verify the physical disks (raw device) on the system, and which one to create a physical volume on
[root@rhel8 ~]# lsblk

NAME              MAJ:MIN RM SIZE RO TYPE MOUNTPOINT
sda                 8:0    0  32G  0 disk
├─sda1              8:1    0   1G  0 part /boot
└─sda2              8:2    0  31G  0 part
  ├─rootvg-tmplv  253:0    0   2G  0 lvm  /tmp
  ├─rootvg-usrlv  253:1    0  10G  0 lvm  /usr
  ├─rootvg-optlv  253:2    0   2G  0 lvm  /opt
  ├─rootvg-homelv 253:3    0   1G  0 lvm  /home
  ├─rootvg-varlv  253:4    0   8G  0 lvm  /var
  └─rootvg-rootlv 253:5    0   8G  0 lvm  /
sdb                 8:16   0  20G  0 disk
└─sdb1              8:17   0  20G  0 part /mnt
sdc                 8:32   0  32G  0 disk
[root@rhel8 ~]#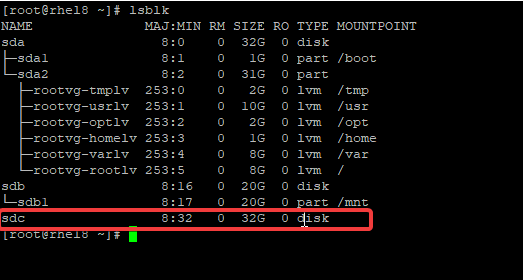
In this case, the block device sdc, is what we want to create our PV on.
2. create a PV by using the command “pvcreate”
[root@rhel8 ~]# pvcreate /dev/sdc

  Physical volume "/dev/sdc" successfully created.
[root@rhel8 ~]#
3. verify that the PV has been created.
[root@rhel8 ~]# pvs

PV VG Fmt Attr PSize PFree /dev/sda2 rootvg lvm2 a– <31.00g 0 /dev/sdc lvm2 — 32.00g 32.00g

[root@rhel8 ~]
To get full information on the PV, use the command,
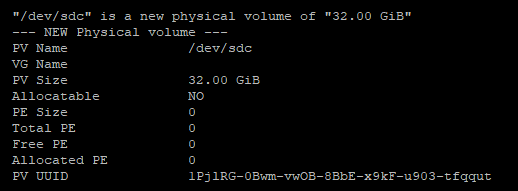
[root@rhel8 ~]# pvdisplay

— Physical volume —
PV Name /dev/sda2
VG Name rootvg
PV Size <31.00 GiB / not usable 3.00 MiB Allocatable yes (but full) PE Size 4.00 MiB Total PE 7935 Free PE 0 Allocated PE 7935 PV UUID DN6KZy-9GeQ-ab3U-B4mq-3bHp-k78C-JTpnZf "/dev/sdc" is a new physical volume of "32.00 GiB" --- NEW Physical volume --- PV Name /dev/sdc VG Name PV Size 32.00 GiB Allocatable NO PE Size 0 Total PE 0 Free PE 0 Allocated PE 0 PV UUID 1PjlRG-0Bwm-vwOB-8BbE-x9kF-u903-tfqqut [root@rhel8 ~]#
A volume group is also a management technique used by LVM. The idea is that a volume group must be created on a physical volume. More so, one can have more than one physical volume with various sizes and types.
With volume group, all the physical volumes can be combined as one big disk or a pool and logical volumes with different sizes can be chopped from the volume group.
One can technically say that a volume group is a combination or addition of many physical volumes to become one big disk (VG)
Note that volume group can also be created from one physical volume.
The utility used in creating a volume group is “vgcreate”
If the physical volume is not initially created and you want to create the volume group probably from one block device, vgcreate will automatically initialize the block device as a physical volume (PV).
1. verify the Physical volume (s) you want to create the volume group (VG) on, by using the “pvs” command
[root@rhel8 ~]# pvs

PV VG Fmt Attr PSize PFree
/dev/sda2 rootvg lvm2 a– <31.00g 0 /dev/sdc lvm2 --- 32.00g 32.00g [root@rhel8 ~]
2. create the VG by using the command “vgcreate”
vgcreate <VG-name> <PV>[root@rhel8 ~]# vgcreate rhel8VG /dev/sdc
Volume group "rhel8VG" successfully createdNOTE: The default physical extent size (4 mb) will be used. To use any desired physical extent like 16 mb, use the option this way.
[root@rhel8 ~]# vgcreate  -s 16M rhel8VG /dev/sdc

  Volume group "rhel8VG" successfully created
[root@rhel8 ~]# vgcreate -s 16M rhel8VG /dev/sdc
Volume group "rhel8VG" successfully created3. verify the volume group has been created.
[root@rhel8 ~]# vgs

VG #PV #LV #SN Attr VSize VFree rhel8VG 1 0 0 wz–n- <32.00g <32.00g rootvg 1 6 0 wz–n- <31.00g 0

[root@rhel8 ~]
To get the full information of the VG, use the command “vgdisplay”
[root@rhel8 ~]# vgdisplay

— Volume group —
VG Name rhel8VG
System ID
Format lvm2
Metadata Areas 1
Metadata Sequence No 1
VG Access read/write
VG Status resizable
MAX LV 0
Cur LV 0
Open LV 0
Max PV 0
Cur PV 1
Act PV 1
VG Size <32.00 GiB PE Size 4.00 MiB Total PE 8191 Alloc PE / Size 0 / 0 Free PE / Size 8191 / <32.00 GiB VG UUID vMuuzb-KkeO-Kyw1-HLtG-y4fw-e4JT-Dr3YYh
Physical extent is a block size. That is, how the Physical volume is divided into chunks/blocks of data. LVM manages extent in such a way that the PE has the same size as the logical extents for the volume group, So when a LV is created, the logical volume get it’s extent from the VG. So when data is stored on the LVs, it’s stored in block/chunk/ sizes.
The default extent size is 4 mb which will work for most applications, for some applications, the smaller the block size, the faster the application. Changing the physical extent sometimes has to do with the application specification.
As the PV and VG are technique used by LVM, Logical volume (LV) is also a technique used by LVM.
LV is the main reason why we have the physical volume and volume group in place. The idea is to make storage management easier and flexible as we mentioned earlier.
Logical volumes with various sizes can be created on a volume group. It can be compared to creating a partition on the hard drive. Hence, one can technically say that a Logical Volume is a virtual partition. Unlike the traditional way of creating partitions, standard partition as it is called in Linux, creating logical volumes can be very easy to manage.
If for instance, there is a need to resize a volume, logical volume can be easily extended or reduced[link] as the case may be.
“No volume group (VG), no logical volume (LV)”
The utility used in creating LV is “lvcreate”
1. Verify the Volume group you want to create the logical volume on by using the command “vgs”
2. create the LV by using the command,
lvcreate -L <LV-size> -n <LV-name> <VG>[root@rhel8 ~]# lvcreate -L 10G -n rhel8LV rhel8VG
Logical volume "rhel8LV" created.
[root@rhel8 ~]#understanding the flags,
L = The size of the Logical volume
n= Name of the logical volume
ACTION TIME
Now that you understand the LVM concept and terminologies, it will be a good idea to use LVM to create a partition/volume with an example.
NB: In our previous lesson, we have created a partition using standard partition
create a partition/volume of 40GB using LVM with two block devices and mount it on /tekneed
1. Verify the two block devices
[root@lab02 ~]# lsblk

NAME              MAJ:MIN RM SIZE RO TYPE MOUNTPOINT
sda                 8:0    0  32G  0 disk
├─sda1              8:1    0   1G  0 part /boot
└─sda2              8:2    0  31G  0 part
  ├─rootvg-tmplv  253:0    0   2G  0 lvm  /tmp
  ├─rootvg-usrlv  253:1    0  10G  0 lvm  /usr
  ├─rootvg-optlv  253:2    0   2G  0 lvm  /opt
  ├─rootvg-homelv 253:3    0   1G  0 lvm  /home
  ├─rootvg-varlv  253:4    0   8G  0 lvm  /var
  └─rootvg-rootlv 253:5    0   8G  0 lvm  /
sdb                 8:16   0  20G  0 disk
└─sdb1              8:17   0  20G  0 part /mnt
sdc                 8:32   0  32G  0 disk
sdd                 8:48   0  64G  0 disk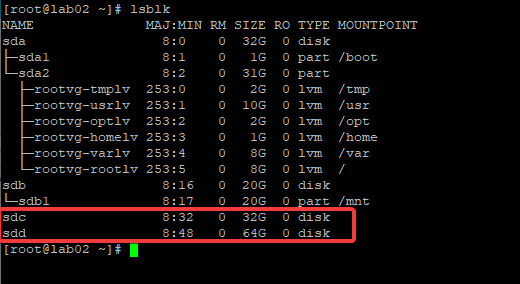
We are going to be using sdc and sdd
2. Create the physical volumes on sdc and sdd
[root@lab02 ~]# pvcreate /dev/sdc /dev/sdd

WARNING: dos signature detected on /dev/sdc at offset 510. Wipe it? [y/n]: y
  Wiping dos signature on /dev/sdc.
  Physical volume "/dev/sdc" successfully created.
  Physical volume "/dev/sdd" successfully created.
[root@lab02 ~]#
3. create the volume group, tekneedVG on the two PVs
[root@lab02 ~]# vgcreate tekneedVG /dev/sdc /dev/sdd

  Volume group "tekneedVG" successfully created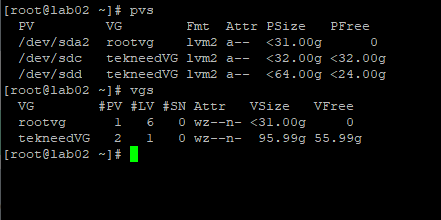
[root@lab02 ~]#4. verify the PV and VG created
[root@lab02 ~]# pvs

PV VG Fmt Attr PSize PFree
/dev/sda2 rootvg lvm2 a– <31.00g 0 /dev/sdc tekneedVG lvm2 a-- <32.00g <32.00g /dev/sdd tekneedVG lvm2 a-- <64.00g <64.00g [root@lab02 ~]# vgs VG #PV #LV #SN Attr VSize VFree rootvg 1 6 0 wz--n- <31.00g 0 tekneedVG 2 0 0 wz--n- 95.99g 95.99g
5. create the LV, tekneedLV
[root@lab02 ~]# lvcreate -L 40G -n tekneedLV tekneedVG

  Logical volume "tekneedLV" created.
[root@lab02 ~]#
6. verify
root@lab02 ~]# lvs

LV VG Attr LSize Pool Origin Data% Meta% Move Log Cpy%Sync Convert
homelv rootvg -wi-ao—- 1.00g
optlv rootvg -wi-ao—- 2.00g
rootlv rootvg -wi-ao—- <8.00g tmplv rootvg -wi-ao---- 2.00g usrlv rootvg -wi-ao---- 10.00g varlv rootvg -wi-ao---- 8.00g tekneedLV tekneedVG -wi-a----- 40.00g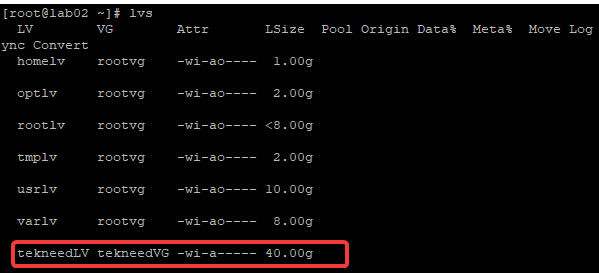
7. Format the LV with the ext4 file system.
[root@lab02 ~]# mkfs.ext4 /dev/tekneedVG/tekneedLV

mke2fs 1.44.3 (10-July-2018)
Discarding device blocks: done
Creating filesystem with 10485760 4k blocks and 2621440 inodes
Filesystem UUID: 07ad0279-4061-44d2-a650-adce5ffad4d3
Superblock backups stored on blocks:
        32768, 98304, 163840, 229376, 294912, 819200, 884736, 1605632, 2654208,
        4096000, 7962624

Allocating group tables: done
Writing inode tables: done
Creating journal (65536 blocks): done
Writing superblocks and filesystem accounting information: done

[root@lab02 ~]#
8. create the mount point
[root@lab02 ~]# mkdir /tekneed9. Map the LV to the mount point
[root@lab02 ~]# mount /dev/tekneedVG/tekneedLV /tekneed

[root@lab02 ~]#
10. verify it is mounted
[root@lab02 ~]# df -h

Filesystem                       Size  Used Avail Use% Mounted on
devtmpfs                         2.0G     0  2.0G   0% /dev
tmpfs                            2.0G     0  2.0G   0% /dev/shm
tmpfs                            2.0G   25M  1.9G   2% /run
tmpfs                            2.0G     0  2.0G   0% /sys/fs/cgroup
/dev/mapper/rootvg-rootlv        7.9G   61M  7.4G   1% /
/dev/mapper/rootvg-usrlv         9.8G  1.5G  7.9G  16% /usr
/dev/mapper/rootvg-tmplv         2.0G  6.1M  1.8G   1% /tmp
/dev/mapper/rootvg-varlv         7.9G  268M  7.2G   4% /var
/dev/mapper/rootvg-optlv         2.0G  6.0M  1.8G   1% /opt
/dev/mapper/rootvg-homelv        976M  2.8M  906M   1% /home
/dev/sda1                        976M   92M  817M  11% /boot
/dev/sdb1                         20G   45M   19G   1% /mnt
tmpfs                            392M     0  392M   0% /run/user/0
/dev/mapper/tekneedVG-tekneedLV   40G   49M   38G   1% /tekneed
[root@lab02 ~]#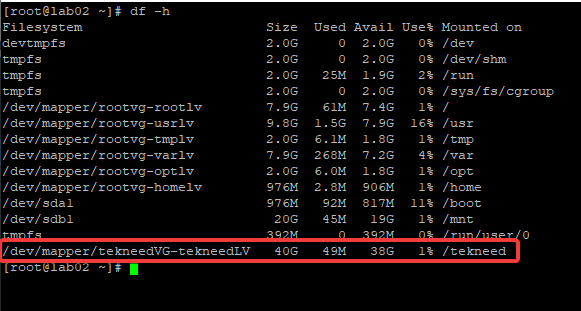
11. copy the LV UUID and input it into the fstab to make the volume persistent after reboot.
[root@lab02 ~]# blkid |grep tekneedLV

/dev/mapper/tekneedVG-tekneedLV: UUID="07ad0279-4061-44d2-a650-adce5ffad4d3" TYPE="ext4"
[root@lab02 ~]#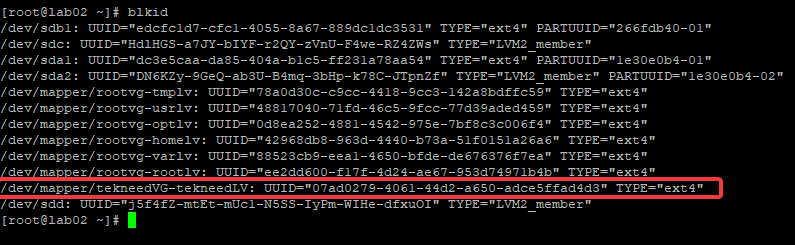
12. input the UUID into the fstab
[root@lab02 ~]# vim /etc/fstab
[root@lab02 ~]#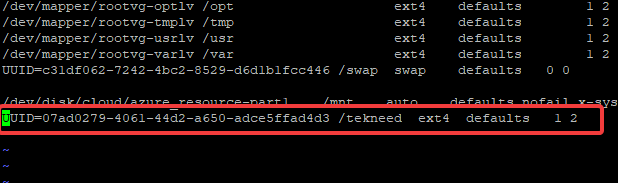
13. Do a mount all to be sure your mount point was successfully added to the fstab.
[root@lab02 ~]# mount -aCheers!!!
Now that you have successfully created a volume using LVM, you should also know how to encrypt a volume/drive in Linux
How To Encrypt a Drive/Partition In Linux
In The next lesson, you will learn how to resize a partition/Volume in Linux
Your feedback is welcomed. If you love others, you will share with others
Leave a Reply