
Last updated: April 2024
In this lesson, you will understand everything about the basic storage management in Linux with examples. You will learn how to create a standard and LVM partition, format a device with a filesystem type, manually & automatically mount a device, etc.
UNDERSTANDING BASIC STORAGE CONFIGURATION & MANAGEMENT IN LINUX
In Linux, there are basically two methods a disk or drive can be partitioned. One way is by using the standard partitioning method, and the other is by using the LVM partitioning method.
Let’s start with the standard partition.
A standard partition is a method in Linux a drive/disk is splitted/partitioned.
Disks topology in Linux is in the form of (sda, sdb, sdc, sdn..), from first disk to the last disk respectively, and can be partitioned in a standard method as (sda1, sda2, sdb1, sdb2, sdn1, sdn2, etc).
To list all the disks with their partitions on a Linux system, use the command, “lsblk” (list blocks)
[root@HQDEV1 ~]# lsblk

NAME          MAJ:MIN RM  SIZE RO TYPE MOUNTPOINT
sda             8:0    0   15G  0 disk
├─sda1          8:1    0    1G  0 part /boot
└─sda2          8:2    0   14G  0 part
  ├─rhel-root 253:0    0 12.5G  0 lvm  /
  └─rhel-swap 253:1    0  1.5G  0 lvm  [SWAP]
sdb             8:16   0    5G  0 disk
└─sdb1          8:17   0    1G  0 part /test1
sr0            11:0    1  7.3G  0 rom  /run/media/root/RHEL-8-1-0-BaseOS-x86_64
From the screen-shot above, you can see that the disk, “sda” is partitioned to sda1 and sda2, while the “sdb” disk is partitioned to sdb1 only. It is very possible to use only one partitioning method which can be standard or LVM, or both partitioning methods. You will understand better as we move on in this subject matter.
The utilities that can be used to create a standard partition in Linux are “fdisk” and “gdisk”. We will see how these utilities can be used with examples in the “ACTION TIME” section.
Going forward, there are some important storage concepts we need to understand before we proceed. They are filesystem, mount point, and “/etc/fstab” file.
A filesystem in this context is a way of arranging, or rather, a system of arranging files on a drive. Just as books can be arranged in a shelve horizontally or vertically, a filesystem is also a system files can be arranged on a device.
There are a lot of filesystems available in Linux. The most commonly used ones are; xfs, ext4, ext3, ext2, btrfs and gfs2. So, files can be arranged on a disk in any of these following systems.
The xfs filesystem is the default filesystem in RHEL 7 and above. Xfs has been considered to be a very good filesystem for a basic storage. It is flexible and has good tuning options.
The ext (2,3, and 4) were the default filesystems in RHEL6 and below. It uses a flat index file and not very scalable as compared to xfs, while btrfs is a copy-on-write filesystem. One advantage of using brtfs filesystem is to eradicate the need for journaling.
The gfs2 filesystem is used for active active clustering. For active passive type of clustering, any of the ext filesystems or the xfs filesystem can be used.
When a disk is partitioned, a filesystem has to be created on the partition before it can be used. In other words, a disk has to be partitioned with one particular filesystem.
To know the filesystem of a particular partition, use the command,
blkid |grep <partition>OR
fsck -N <partition>To see the type of filesystem on sdb1 for example, run the command,
[root@HQDEV1 ~]# blkid |grep /dev/sdb1

/dev/sdb1: LABEL="tekneed_fs" UUID="fe48facc-c481-4429-93d2-77e4ac0afc89" TYPE="ext4" PARTLABEL="Linux filesystem" PARTUUID="245ddd05-cdcb-4128-ba75-28eb026dcbaf"
[root@HQDEV1 ~]#

OR
[root@HQDEV1 ~]# fsck -N /dev/sdb1

fsck from util-linux 2.32.1
[/usr/sbin/fsck.ext4 (1) -- /dev/sdb1] fsck.ext4 /dev/sdb1
To create a filesystem, use the command,
mkfs.<file-system type> /dev/<block or partition>For example, to create the ext3 fileystem on /sdb1, use the command,
[root@HQDEV1 ~]# mkfs.ext3 /dev/sdb1In the “ACTION TIME”[link] section, we will see how all of these are done with examples.
To see more options of mkfs utility, please see the man page or use the command,
mkfs.<fileystem-type> --helpexample is #mkfs.ext4 --helpAnother important concept is mount point.
A mount point is a special directory or a path where drives or partitions are mounted on.
If you followed the “Learn Linux from scratch” series course on this site, where we discussed filesystem hierarchy and structure, you would know that the default mount point in Linux is “/mnt”.
You can mount any device on this directory if you don’t wish to create a mount point.
To see all the drives and partitions mounted on a Linux system, use the command,
[root@HQDEV1 ~]# df -hT

Filesystem            Type      Size  Used Avail Use% Mounted on
devtmpfs              devtmpfs  886M     0  886M   0% /dev
tmpfs                 tmpfs     904M     0  904M   0% /dev/shm
tmpfs                 tmpfs     904M  9.7M  894M   2% /run
tmpfs                 tmpfs     904M     0  904M   0% /sys/fs/cgroup
/dev/mapper/rhel-root xfs        13G  4.4G  8.2G  35% /
/dev/sda1             xfs      1014M  180M  835M  18% /boot
tmpfs                 tmpfs     181M  1.2M  180M   1% /run/user/42
tmpfs                 tmpfs     181M  4.6M  177M   3% /run/user/0
/dev/sr0              iso9660   7.4G  7.4G     0 100% /run/media/root/RHEL-8-1-0-BaseOS-x86_64
From the output of the command above, you can see the drives and partitions(filesystems), its type, sizes, used and available sizes and mount points.
How To Create A Mount Point In Linux
To create a mount point, use the “mkdir” command.
For example, to create a mount point “/tekneed/victor”, use the command,
[root@HQDEV1 ~]# mkdir /tekneed/victorsometimes, you may want to use the “-p” option which means (no error if existing, make parent directories as needed)
[root@HQDEV1 ~]# mkdir -p /tekneed/victorHow To Manually Mount a disk or a partition In Linux
After a mount point has been created, the next thing is to mount the drive/partition or map a drive/partition to the mount point.
To manually mount a disk or partition, use the command,
mount /dev/<drive-or-partition> <mount-point>For example, to mount the partition, (sdb1) on the mount point, (/tekneed/victor), use the command,
[root@HQDEV1 ~]# mount /dev/sdb1 /tekneed/victorSometimes, when a system reboots, a partition or a device number/topology may change. For example, “/dev/sdb1” may change to “/dev/sdc1”.
To avoid this and make the device numbers persistent after a reboot, always mount devices/partitions with their labels or UUIDs.
To mount a device/partition with a label, use the command,
mount LABEL=<label-name> <mount-point>We will see how all of these are done with examples in the “ACTION TIME” section.
How To Unmount a Device Or Partition In Linux
As an administrator, if you wish to unmount a device or a partition, use the command,
# umount /dev/<device-or-partition>for example,
[root@HQDEV1 ~]# umount /dev/sdc2The last concept we need to understand is the”/etc/fstab” file
The “/etc/fstab” file is a very important file in Linux. Populating filesystems in this file is one way out of the two ways that is used to automatically mount filesystems or devices in Linux.
In the process of the system booting, the “/etc/fstab” file is read and the options specified in this file is used to mount the device/filesystems.
Some of the parameters in this file are populated by default during system installation, while others can be self populated by the administrator.
To view the “/etc/fstab” file, use the command,
# cat /etc/fstab 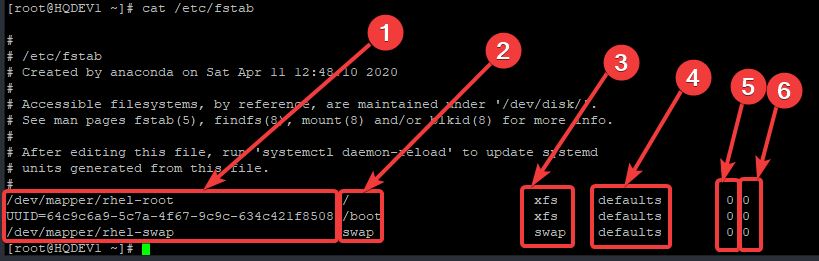
Now, let’s understand the parameters in this file.
1. The first column
The first column is used to specify the device name. A device name in this column can be specified either by a device name itself, device UUIDs or label names.
An example of specifying a device name in the fstab using the device name can be
/dev/sdb1An example using the device UUID to specify a device can be
UUID=64c9c6a9-5c7a-4f67-9c9c-634c421f8508An example using a label name to specify a device can be
LABEL=tekneed_fs2. The second column
The second column is used to specify the drive/partition’s mount point[link]
3. The third column
The third column is used to specify the device/partition’s filesystem type[link]. For swap[link], the filesystem type is swap. Other filesystem type can be ext4, ext3, etc.
4. The fourth column
The fourth column is used to specify the device/partition’s mount options.
There are various mount options such as;
(i) auto and noauto: The “auto” mount option signifies that the drive/filesystem will be mounted automatically at boot time, while the “noauto” option signifies otherwise.
More so, the command, “mount -a” will work with this parameter set to auto.
If the parameter is set to “noauto”, the administrator will have to manually mount the device/filesystem after the system has completed the boot process.
(ii) user and nouser: The “user” option signifies that users on the system will be able to mount the drive/filesystem, while “nouser” signifies that only one user, which is the root user will be able to mount the drive/filesystem.
If the parameter in this column is set to “user”, the files on the device/partition will automatically be in-executable. To make the files or binaries on the device executable, you need to use the “exec” option as well.
(iii) exec and noexec: The “exec” mount option signifies that the files/binaries that resides on the drive/filesystem should be executable while the “noexec” option signifies otherwise.
The “noexec” option is suitable for security purposes. Drives or filesystem like “/tmp” may have the “noexec” option, especially when the system is internet facing.
(iv) sync and async: The “sync” option signifies that the I/O or changes on the filesystem be done synchronously or instantly, while the “async” option signifies that the I/O or changes on the filesystem be done asynchronously or not immediately, possibly when activities on the filesystem is no longer at its peak.
Hence why, sometimes, you get a message such as “device is busy” or “wait”. The sysnc option can be suitable on a floppy disk and not necessarily an internal disk.
(v) ro and rw: The “ro” option signifies that the drive/filesystem should be a read only, while the “rw” mount option signifies that the drive/filesystem should be a read write.
(vi) suid and nosuid: This option signifies that the the drive/filesystem should support SUID and SGID bit, while the “nosuid” option signifies otherwise.
(vii) defaults: This option signifies that the filesystem should use default mount options which include auto, exec, rw, suid, async, dev, and nouser.
5. The fifth column
The fifth column is used to specify the device dump option. If the value is set to be 0, it means that the filesystem cannot be dumped or backed up with the dump utility , but if it is set to 1 and above, it means the filesystem can be dumped or backed up.
6. The sixth column
The sixth column is used to specify if the device filesystem be checked(fsck) for errors at boot time or not.
If the value is set to be 0, it means that the filesystem should not be checked, but if the value is set to 1 and above, it means that the filesystem should be checked.
The value should take an order starting with the root filesystem with the highest priority of value 1, which means that the root filesystem be checked first, while other filesystems can be set to 2, which means they can be checked afterwards.
It is a best practice to always specify a filesystem in the fstab with their UUIDs because “/dev/sdb1” for example can change to “/dev/sdc1” after a system reboot which the fstab file will not be able to read the supposed populated filesystem.
But when a device or partition is specified with a UUID, it won’t matter if the device naming convention/topology changes or doesn’t after a system reboot because every UUID is unique with every filesystems and will be read in the fstab file.
Having understood these concepts, let’s get to action by making the device, “/dev/sdb1” ready for use on the directory, “/test1”
ACTION TIME
How To Create A Partition With fdisk Using Standard Partitioning Method In Linux
To create a partition of 1GB on on the drive, (sdb),
Follow the steps below
1. Verify the disk that is to be partitioned
[root@HQDEV1 ~]# lsblk /dev/sdb

NAME MAJ:MIN RM SIZE RO TYPE MOUNTPOINT
sdb    8:16   0   5G  0 disk
2. Partition the disk using fdisk utility
[root@HQDEV1 ~]# fdisk /dev/sdb

Welcome to fdisk (util-linux 2.32.1).
Changes will remain in memory only, until you decide to write them.
Be careful before using the write command.

Device does not contain a recognized partition table.
Created a new DOS disklabel with disk identifier 0x57c3975a.

Command (m for help):
NB: you can impute the letter m (Menu) for help, to see all the available options.
3. Impute the letter n to add a new partition and press the enter key.
Command (m for help): n
Partition type
   p   primary (0 primary, 0 extended, 4 free)
   e   extended (container for logical partitions)
Select (default p):
4. Impute the letter p for a primary partition type and press the enter key
Select (default p): p
Partition number (1-4, default 1):
5. Press the enter key to leave the partition number at default, which is 1
First sector (2048-10485759, default 2048):6. Press the enter key to leave the first sector at default
Last sector, +sectors or +size{K,M,G,T,P} (2048-10485759, default 10485759):
7. specify the partition size, (+1G) and press the enter key
NB: The whole drive will be partitioned if you don’t specify a size.
Last sector, +sectors or +size{K,M,G,T,P} (2048-10485759, default 10485759): +1GPress Enter key
Created a new partition 1 of type 'Linux' and of size 1 GiB.

Command (m for help):
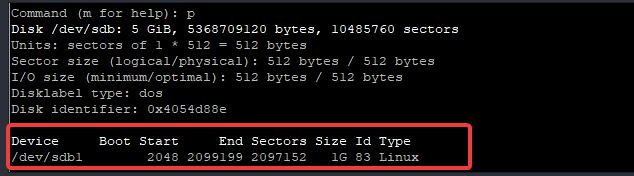
8. impute the letter p to print all your settings before saving and press the enter key
Command (m for help): p
Disk /dev/sdb: 5 GiB, 5368709120 bytes, 10485760 sectors
Units: sectors of 1 * 512 = 512 bytes
Sector size (logical/physical): 512 bytes / 512 bytes
I/O size (minimum/optimal): 512 bytes / 512 bytes
Disklabel type: dos
Disk identifier: 0x4054d88e

Device     Boot Start     End Sectors Size Id Type
/dev/sdb1        2048 2099199 2097152   1G 83 Linux

Command (m for help):
You can impute the letter m for help, if you don’t know the next letter to impute.
If you get the error, “device is busy”, you may restart your system
NB: By default, a drive is partitioned to a Linux filesystem PARTITION TYPE. However, there is still a need to format a device or partition to a FILESYSTEM TYPE. To change the partition type, impute the letter t
9. Impute the letter w to save the settings and press the enter key
Command (m for help): w
The partition table has been altered.
Calling ioctl() to re-read partition table.
Syncing disks.
10. Verify the newly created partition
[root@HQDEV1 ~]# lsblk /dev/sdb

NAME   MAJ:MIN RM SIZE RO TYPE MOUNTPOINT
sdb      8:16   0   5G  0 disk
└─sdb1   8:17   0   1G  0 part
[root@HQDEV1 ~]#y
Usually, the next step after creating a partition on a device is to format the partition with a filesystem type. So, let’s do this.
How To Format A Device With A Filesystem Type In Linux
To Format a device with ext4 filesystem type for example, use the command,
mkfs.ext4 </dev/device-name>To format a device with a label as we mentioned in the “UNDERSTANDING THE SUBJECT MATTER” section above, use the command
mkfs.ext4 -L <label-name> <device>1. To format the device, /dev/sdb1 we just partitioned above with ext4 filesystem type using a label, use the command,
[root@HQDEV1 ~]# mkfs.ext4 -L tekneed_fs /dev/sdb1

mke2fs 1.44.6 (5-Mar-2019)
Creating filesystem with 262144 4k blocks and 65536 inodes
Filesystem UUID: fe48facc-c481-4429-93d2-77e4ac0afc89
Superblock backups stored on blocks:
        32768, 98304, 163840, 229376

Allocating group tables: done
Writing inode tables: done
Creating journal (8192 blocks): done
Writing superblocks and filesystem accounting information: done

[root@HQDEV1 ~]#
2. Verify the filesystem by using the command,
[root@HQDEV1 ~]# blkid /dev/sdb1

/dev/sdb1: LABEL="tekneed_fs" UUID="fe48facc-c481-4429-93d2-77e4ac0afc89" TYPE="ext4" PARTLABEL="Linux filesystem" PARTUUID="245ddd05-cdcb-4128-ba75-28eb026dcbaf"
OR
[root@HQDEV1 ~]# fsck -N /dev/sdb1

fsck from util-linux 2.32.1
[/usr/sbin/fsck.ext4 (1) -- /dev/sdb1] fsck.ext4 /dev/sdb1
[root@HQDEV1 ~]#
Usually, the next step after formatting a device with a filesystem type is to mount the device/partition. So, let’s do this.
How To Create A Mount Point & Manually Mount A Drive Or Partition In Linux
To create a mount point, (/test1) for example, use the command,
[root@HQDEV1 ~]# mkdir -p /test1To manually mount a device or map a mount point to the partition, /dev/sdb1 we have created, use the command,
[root@HQDEV1 ~]# mount /dev/sdb1 /test1Sometimes, you may want to mount a device/partition with a label or UUID as we mentioned in “UNDERSTANDING THE SUBJECT MATTER section above.
To do this, use the command,
[root@HQDEV1 ~]# mount LABEL=tekneed_fs /test1verify the device is mounted
[root@HQDEV1 ~]# df -h |grep test1

/dev/sdb1              976M  2.6M  907M   1% /test1
Many times, administrators don’t want to always have to manually mount a device/partition.
Usually, an administrator will want to make a device/partition automatically mounted after a reboot. So, let’s do this.
How To Automatically Mount A Device/Partition Using The “/etc/fstab’ File
To make the mount point persistent, you need to populate the fstab file.
To populate the fstab file of the partiion, /dev/sdb1 we created above,
Take the following steps.
1. Open the “/etc/fstab” file
[root@HQDEV1 ~]# vi /etc/fstab2. Populate the file as it is below

3. run the command,
[root@HQDEV1 ~]# mount -aNow, the device, /dev/sdb1 is ready for use. We can begin to create files and directories or use this device via the mount point.
Let’s also use the gdisk utility to create a partition.
How To Create A Partition With gdisk Using Standard Partitioning Method
To create a partition of 100 MB on on the drive, (sdb),
Take the following steps.
1. install the gdisk utility if it is not installed on your system.
[root@HQDEV1 ~]# yum install gdisk -y
Updating Subscription Management repositories.
Red Hat Enterprise Linux 8 for x86_64 - AppStream (RPMs)                      529 kB/s |  18 MB     00:35

Complete!
2. Partition the disk using the gdisk utility
[root@HQDEV1 ~]# gdisk /dev/sdb

GPT fdisk (gdisk) version 1.0.3

Partition table scan:
  MBR: MBR only
  BSD: not present
  APM: not present
  GPT: not present

Command (? for help):
3. impute the letter n to add a new partition and press the enter key.
Command (? for help): n
Partition number (2-128, default 2):
4. Press the enter key to leave the first sector at default
Partition number (2-128, default 2):
First sector (34-10485726, default = 2099200) or {+-}size{KMGTP}:
press the enter key again to get to the last sector
Last sector (2099200-10485726, default = 10485726) or {+-}size{KMGTP}:5. specify a partition size (+100M) and press the enter key. If you don’t specify any size, the whole disk will be partitioned
NOTE:
M is for megabyte,
K for kilobyte,
G for gigabyte
T for terabyte, and
P for petabyte.
Last sector (2099200-10485726, default = 10485726) or {+-}size{KMGTP}: +100Mpress the enter key
Last sector (2099200-10485726, default = 10485726) or {+-}size{KMGTP}: +100M
Current type is 'Linux filesystem'
Hex code or GUID (L to show codes, Enter = 8300):
6. Press the enter key to leave the partition type at Linux filesystem or press L to show other partition type.
press the enter key
Changed type of partition to 'Linux filesystem'

Command (? for help):
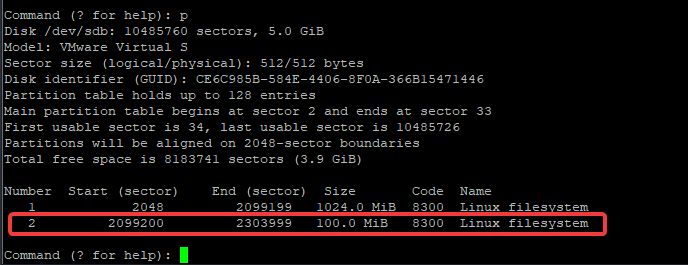
7. Enter the key P to print the settings and press the enter key
Command (? for help): p
Disk /dev/sdb: 10485760 sectors, 5.0 GiB
Model: VMware Virtual S
Sector size (logical/physical): 512/512 bytes
Disk identifier (GUID): CE6C985B-584E-4406-8F0A-366B15471446
Partition table holds up to 128 entries
Main partition table begins at sector 2 and ends at sector 33
First usable sector is 34, last usable sector is 10485726
Partitions will be aligned on 2048-sector boundaries
Total free space is 8183741 sectors (3.9 GiB)

Number  Start (sector)    End (sector)  Size       Code  Name
   1            2048         2099199   1024.0 MiB  8300  Linux filesystem
   2         2099200         2303999   100.0 MiB   8300  Linux filesystem

Command (? for help):
8. Enter the key w to save the settings and press the enter key
Command (? for help): w

Final checks complete. About to write GPT data. THIS WILL OVERWRITE EXISTING
PARTITIONS!!

Do you want to proceed? (Y/N): y
OK; writing new GUID partition table (GPT) to /dev/sdb.
The operation has completed successfully.
[root@HQDEV1 ~]#
9. Verify the partition
[root@HQDEV1 ~]# lsblk /dev/sdb

NAME   MAJ:MIN RM  SIZE RO TYPE MOUNTPOINT
sdb      8:16   0    5G  0 disk
├─sdb1   8:17   0    1G  0 part
└─sdb2   8:18   0  100M  0 part
[root@HQDEV1 ~]#
As an administrator, you may want to delete a standard partition, let’s see how to do this.
How To Delete A Standard Partition In Linux Using the fdisk Utility
For example, to delete the sdb2 partition from the sdb drive,
Take the following steps.
1. Verify the drive and its partitions
[root@HQDEV1 ~]# lsblk /dev/sdb

NAME   MAJ:MIN RM  SIZE RO TYPE MOUNTPOINT
sdb      8:16   0    5G  0 disk
├─sdb1   8:17   0    1G  0 part
└─sdb2   8:18   0  100M  0 part
[root@HQDEV1 ~]#
2. Initialize the fdisk utility on sdb drive
[root@HQDEV1 ~]# fdisk /dev/sdb

Welcome to fdisk (util-linux 2.32.1).
Changes will remain in memory only, until you decide to write them.
Be careful before using the write command.


Command (m for help):
3. impute the letter d, to delete a partition and press the enter key
Command (m for help): d
Partition number (1,2, default 2):
4. specify the partition number, since it is partition 2 we want to delete, press the enter key to leave it at default which is 2
Command (m for help): d
Partition number (1,2, default 2):

Partition 2 has been deleted.

Command (m for help):
5. print the changes before saving by entering the letter p and press the enter key
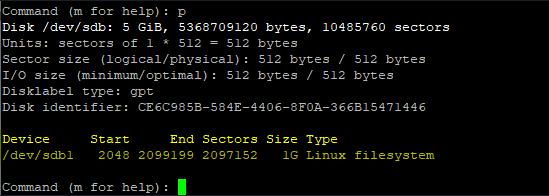
Command (m for help): p
Disk /dev/sdb: 5 GiB, 5368709120 bytes, 10485760 sectors
Units: sectors of 1 * 512 = 512 bytes
Sector size (logical/physical): 512 bytes / 512 bytes
I/O size (minimum/optimal): 512 bytes / 512 bytes
Disklabel type: gpt
Disk identifier: CE6C985B-584E-4406-8F0A-366B15471446

Device     Start     End Sectors Size Type
/dev/sdb1   2048 2099199 2097152   1G Linux filesystem
6. Enter the letter, w to save the settings and press enter key
Command (m for help): w
The partition table has been altered.
Calling ioctl() to re-read partition table.
Syncing disks.

[root@HQDEV1 ~]#
7. verify that sdb2 has been deleted
[root@HQDEV1 ~]# lsblk /dev/sdb

NAME   MAJ:MIN RM SIZE RO TYPE MOUNTPOINT
sdb      8:16   0   5G  0 disk
└─sdb1   8:17   0   1G  0 part
[root@HQDEV1 ~]#
How to unmount a device/partition In Linux With Examples
To unmount the partition, sdb1 we created, use the command,
[root@HQDEV1 ~]# umount /dev/sdb1Now that we understand how to partition a drive using the standard partition method in Linux, let’s understand how to partition a drive using the LVM method
More so, let’s see how we can encrypt filesystems in Linux
Encrypting Filesystem In Linux
Your feedback is welcomed. If you love others, you will share with others.
Leave a Reply