
Last updated: January 2021
Learn the step by step process of how to reset root password on Linux (Red hat enterprise 8 / CentOS 8). you will also understand how the process flows.
Contents
How to reset root password on Linux, step by step process will not only be discussed in this tutorial, you will also understand the work flow of the process.
UNDERSTANDING THE SUBJECT MATTER
Working on, and troubleshooting several Linux servers either as a Linux engineer, administrator or even on test environments may require having to know several passwords for different systems, hence, very possible for one to forget the most important password of a system, the root password.
I remember vividly one period I was on site to deploy several servers. My team and I had completed the deployment. We tried to login to one of the Linux servers to continue with the configuration and we were denied with an error message of incorrect password.
The best option was to reset the root password for the deployment to continue. Of course, I could have re-installed the server since it was a fresh deployment and we had not handed over, but that would be a long process.
What if it were a production server or even test or quality assurance servers that have critical information? will re-installation be the best option? Of course, capital NO.
Hence why I have decided to write on this subject matter in case you find yourself in my little situation or in whatsoever situation where you need to recover/reset the root password and there is no access to sudo root, you can use the steps given here to solve your problem. So, no worries.
In this tutorial, I am not only going to show you the step by step process, but I will also explain how the step by step process connects/work.
Resting the root password, of course, without sudo access cannot be done via SSH. You would need to have access to the console where the boot loader can be accessed.
This reminds me of when I did this on a Linux server deployed on Azure, I had to do it by using a rescue VM because the serial console was messing up. No worries, I will write a nice article on how to perform this activity on Azure.
Moving forward, I am going to show you four different methods of resting/recovering the root password in the “ACTION TIME” section. I prefer to always use method 1, maybe because I am used to it. Any method would work, it’s just about preference.
For the newbies, I will briefly explain what “chroot” is for clarity sake.
Briefly, chroot is a tool that is used to change the root filesystem and (it’s processes/child processes/) to a different location(directory). You can learn more about chroot
From one of the tutorials on this site, “Linux boot process“, if you look from step 7-10, you will notice that after the Linux kernel is initiated, the next process is followed by the initiation of initrd/initramfs.
The initrd/initramfs, from the name, means “initial RAM filesystem”. This filesystem is an initial/temporary root filesystem that is mounted by the kernel but loaded into the RAM (memory).
The initramfs contains minimal files, important modules and drivers such as (LVM, RAID, Multipathing, networking, etc) necessary to activate and mount the real root filesystem (/root) after the OS has been started.
Now, for the root password to be reset/recovered, you will have to break into the system by interrupting the boot process at the initrd stage. At this stage, the real root filesystem can be mounted on “/sysroot” or on the real root partition “/” depending on how you break in.
Meanwhile, editing the password means writing into the password configuration file in /etc directory. The “/etc” directory, following the Linux filesystem structure, of course, is under “/”, hence why the “/” partition needs to be accessed/mounted whichever way you decide to break into the system.
If you broke into the system in a way that “/sysroot” will be mounted on the real root filesystem, you will need to introduce a tool to mount “/” on the real root filesystem. This tool is called “chroot”. Like I explained above, chroot is used to change the root filesystem to a different directory.
The command is used this way.
# chroot /sysrootWhat this means is, open a new shell and make /sysroot seem like the real real root filesystem partition, hence we can edit the root password.
On the other hand, if you broke into the system in a way that the real root filesystem is mounted on “/”, there will be no need for the chroot tool. We will look at the different ways we can break into the system in the “ACTION TIME” section.
Going forward, breaking into the system requires booting into single user/emergency mode. At this stage, the real root filesystem is mounted as read only (ro).
Usually, when a system is booting, at first, the root filesystem is mounted as ro so that filesystem checks (fsck) can be done. After fsck is done, ro becomes rw. This can easily be seen on the kernel line at the boot menu.

Just as I said, breaking into the system requires booting into single user where root filesystem is mounted as read only (ro), and to be able to reset the password or even do any write activities on a filesystem, a write permission is needed.
The write permission can be given before booting to single user or after booting to single user by remounting the filesystem with a rw permission which will therefore gives us access to change the root permission.
Having explained how the subject matter works, let’s put the subject matter into action. Moreover, you may want to look at the different methods of how to boot to single user mode separately.
ACTION TIME
Step By Step Process Of How To Reset The Root Password On RHEL 8 / CentOS 8 System
First Method
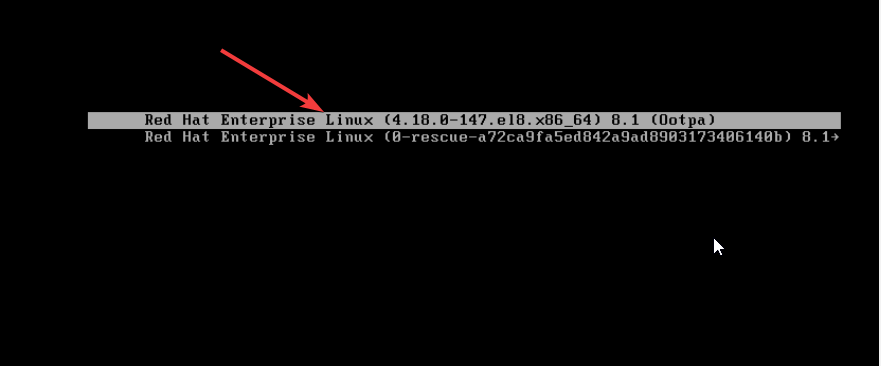
1. Power on the system, as soon as the boot process gets to the grub menu, interrupt the grub menu by pressing the key, “e” (which means edit) on the kernel you are using.
2. Use the down arrow key to scroll down to the line, “linux”. On the line, use the right arrow key to move to the line “ro”
“ro” means (read only), root filesystem permission needs to be changed to rw (read write) for root to be able to make changes
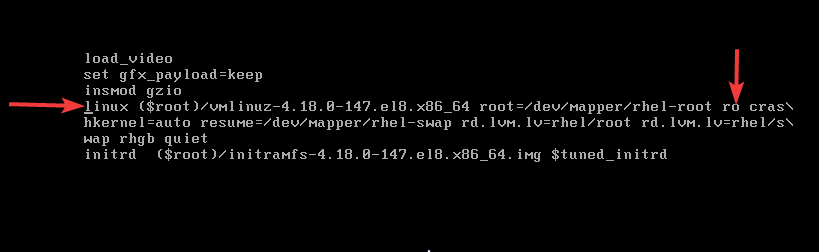
3. Just as it is highlighted in yellow, replace ro with
rw init=/sysroot/bin/bash
4. Press the key, “ctrl+x” to boot the system into single user / emergency mode
ctrl+x
At this point, you will notice that /sysroot is mounted on the real root filesystem, we need “/” to be mounted on the real root filesystem as explained in “UNDERSTANDING THE SUBJECT MATTER” section.
confirm by using the command,
# mount |grep sysroot
4b. mount the root filesystem on “/” by making “/sysroot” seem as “/” with the use of chroot tool
# chroot /sysroot4c. change the root password by using the command,
# passwd root4d. relabel selinux context to make the changes permanent
# touch /.autorelabel4e. unmount “/” by exiting,
# exit4f. use the command exit, to log out
# exit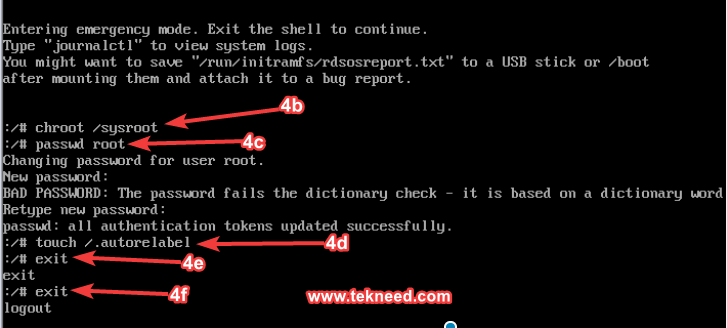
5. Reboot the system
# reboot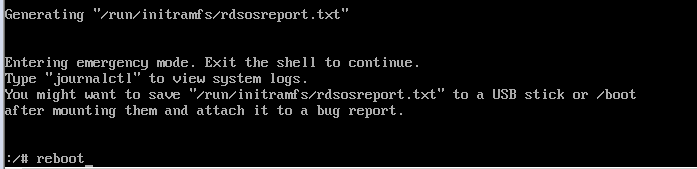
6. Login with your new password.
Second Method
1. Power on the system, as soon as the boot process gets to the grub menu, interrupt the grub menu by pressing the key, “e” (which means edit) on the kernel you are using.
2. use the down arrow key to scroll down to the line, “linux”. On the line, use the right arrow key to move to the end of the line and enter, “rd.break” just as highlighted in yellow
entering rd.break allows you to break into the system
rd.break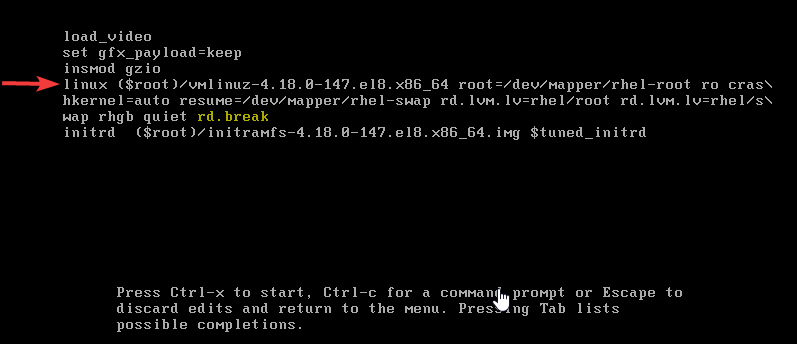
3. press ctrl+x to boot the system into single user mode
ctrl+x
3b. Now that you are in single user mode, the root filesystem needs to have the rw permission to be able to write.
you can verify with the command,
mount |grep sysroot
remount the root filesystem with rw (read write) access and verify again
mount -o remount,rw /sysrootmount |grep sysroot
3c. mount the root filesystem on “/” by making “/sysroot” seem as “/” with the use of chroot tool as explained in the “UNDERSTANDING THE SUBJECT MATTER” section
chroot /sysroot3d. Change the root password
echo <new-password> | passwd --stdin root3e. relabel selinux context to make the changes permanent
touch /.autorelabel3f. use the command “ctrl+d” to unmount “/”
ctrl+d3g. use the command. “ctrl+d” to leave the single user mode
ctrl+d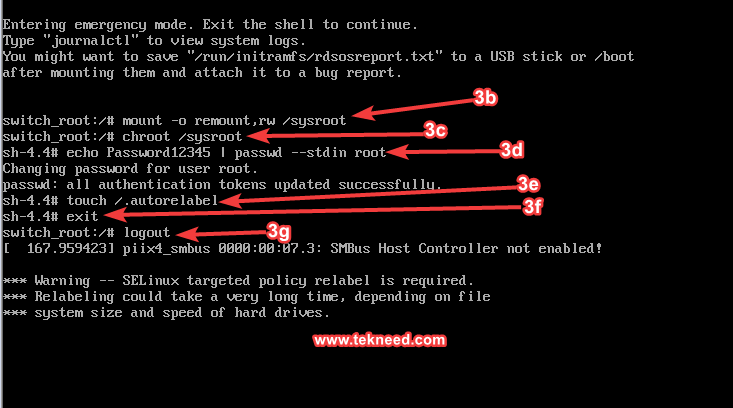
5. After the completion of selinux rebelling, log in with the new password.
Third Method
1. Power on the system, as soon as the boot process gets to the grub menu, interrupt the grub menu by pressing the key, “e” (which means edit) on the kernel you are using.
2. use the down arrow key to scroll down to the line, “linux”. On the line, use the right arrow key to move to the end of the line and enter, “init=/bin/bash” just as highlighted in yellow
This method will do without /sysroot

3. press ctrl+x to boot the system into single user mode
ctrl+x
usually, root filesystem is mounted in read only permission in single user mode. so we need to remount it as read write (rw)
4. remount “/” as rw
# mount -o remount,rw /
5. change the root password
# passwd root
6. relabel selinux context to make the changes permanent
# touch /.autorelabel
7. reboot the system with the command,
# exec /sbin/initThe command, reboot doesn’t work in this mode and rebooting may take some time as well because all the filesystems are being relabelled by selinux
8. login with the new password.
Fourth Method
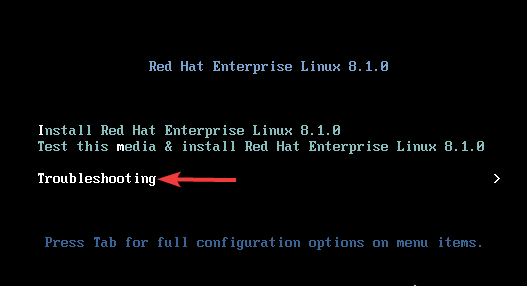
1. Boot your system with an installation media (ISO or CD), and use your arrow key to scroll down to “Troubleshooting”, then press the enter key.
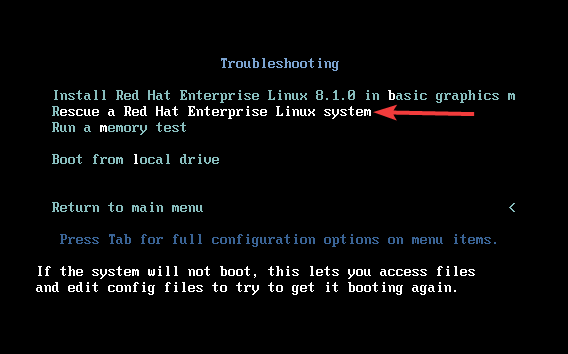
2. Pressing the enter key will give you a page in the screenshot below, scroll to “Rescue a Red Hat Enterprise Linux System and press enter
3. pressing enter will give you a page in the screenshot below, press 1 to continue.
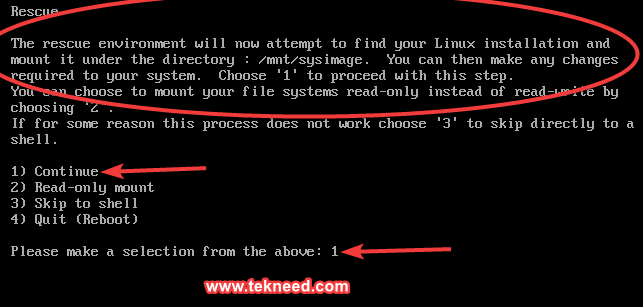
4. pressing 1 will provide a rescue shell to work with.

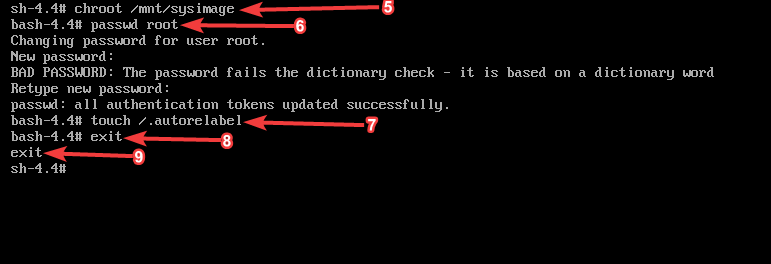
5. enter the command, “chroot /mnt/sysimage” to make changes to root
# chroot /mnt/sysimage6. Change the root password
# passwd root7. relabel selinux context to make the changes permanent
# touch /.autorelabel8. use the exit command to unmount the logical root filesystem
9. use the exit command to logout and reboot
10. Remove the installation media and login with your new password
Your feedback is welcomed. If you love others, you will share to others.
Leave a Reply