
Last updated: September 2020
UNDERSTANDING THE SUBJECT MATTER
In part 1 of the Linux operating system boot process, step 9, I mentioned that the Linux boot loader loads the operating system. In this article, I will discuss extensively on the boot loader.
As the name implies, a boot loader is a program that starts up or loads the operating system.
In the time past, the Linux operating system’s boot loader was Lilo (Linux Loader), but as tech evolves, Lilo was replaced with grub (grand unified bootloader), the likes of RHEL6 and CentOS 6 uses grub as their boot loaders, but in modern Linux operating systems, the likes of RHEL7, RHEL8, CentOS 7, CentOS 8, the grub boot loader has been replaced with grub2 boot loader.
grub2 is a powerful boot loader and it has a boot menu where a user has the options to choose which kernel or operating system to boot.
If a user does not choose anyone, the boot loader after some seconds continues to boot the default operating system.
As an administrator, you may have been in a position where you would need to boot with a Linux kernel that is different from the default as a result of the fact that an application, after a kernel update, refuses to function properly or the operating system it’s self begins to misbehave.
As a result, you may boot the system with the old kernel. The only program that allows you to do this is the boot loader, from the boot loader menu.
When you power on your system, you get to see your boot loader at the point when you get to the image below.
In this case, my grub2 has only one kernel to boot with in the boot menu.
To make changes to the boot menu or grub2, you will have to edit the grub2 configuration files.
grub2’s configuration files is in the path, “/etc/default/grub” and “/etc/grub.d”
Let’s look at the “/etc/grub.d” path.
[root@HQEBPRD ~]# cd /etc/grub.d/

[root@HQEBPRD grub.d]# ls

00_header  01_menu_auto_hide  10_linux      20_ppc_terminfo  30_uefi-firmware  41_custom
00_tuned   01_users           20_linux_xen  30_os-prober     40_custom         README
[root@HQEBPRD grub.d]#
You can see the grub2 configuration file in this path.
If you are not a grub expert or if you don’t know what you are doing, do not tamper with the configuration files in this directory. The scripts in this path are very sensitive and I advise you not to touch them.
If a user needs to make changes to grub2, it is advisable the changes are made in the “/etc/default/grub” file.
Lets take a look at this file.
[root@HQEBPRD ~]# cat /etc/default/grub

GRUB_TIMEOUT=5
GRUB_DISTRIBUTOR="$(sed 's, release .*$,,g' /etc/system-release)"
GRUB_DEFAULT=saved
GRUB_DISABLE_SUBMENU=true
GRUB_TERMINAL_OUTPUT="console"
GRUB_CMDLINE_LINUX="crashkernel=auto resume=/dev/mapper/rhel-swap rd.lvm.lv=rhel/root rd.lvm.lv=rhel/swap rhgb quiet"
GRUB_DISABLE_RECOVERY="true"
GRUB_ENABLE_BLSCFG=true
[root@HQEBPRD ~]#
you can see the parameters in the file.
The first line, “GRUB_TIMEOUT=5” indicates the grub2 time out in the boot menu. If a user refuses to select a particular kernel or operating system to boot with, after 5 seconds, grub2 will start the default kernel.
If you think 5 seconds is too short, and you need to make changes, just edit the line by changing “5” to your desired time.
Another important line in this configuration file is the “GRUB_CMDLINE_LINUX” line. This parameter is what the kernel uses to boot. In other words, the parameters in here will be passed to the kernel at boot time. It can also be edited depending on what you want.
For example, if you need to disable the C state of the system, you can add the c state parameter in that line. More so, if you don’t want rhgb (red hat graphical boot) to be quiet, you can remove the “rhgb quiet” line. This is mostly done when configuring kdump.
Going forward, making changes to the configuration files we have talked about only will not suffice, you will need to rebuild one very important grub2 configuration file which is (grub.cfg) after all the changes are made to make a permanent modification.
There is another very important grub configuration file that you must be aware of. It is the “grub.cfg” file. it is found in “/etc/grub2.cfg” which is a symlink to “/boot/grub2/grub.cfg“. The contents in these two files, of course, are the same thing.
Let’s take a look at the file.
[root@HQEBPRD ~]# cat /boot/grub2/grub.cfg

#
# DO NOT EDIT THIS FILE
#
# It is automatically generated by grub2-mkconfig using templates
# from /etc/grub.d and settings from /etc/default/grub
#

### BEGIN /etc/grub.d/00_header ###
set pager=1

if [ -f ${config_directory}/grubenv ]; then
  load_env -f ${config_directory}/grubenv
elif [ -s $prefix/grubenv ]; then
  load_env
fi
if [ "${next_entry}" ] ; then
   set default="${next_entry}"
   set next_entry=
   save_env next_entry
   set boot_once=true
else
   set default="${saved_entry}"
fi

......................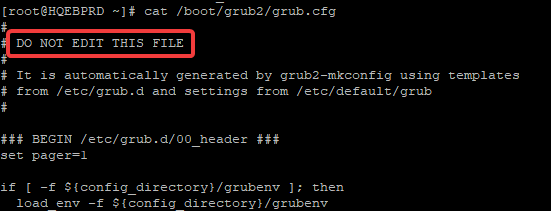
you can see that this script is automatically generated and you are not meant to edit it, again only if you are a grub expert, you can tamper with it.
This file knows how to automatically generates itself, the other grub configuration files are a directive of this file. The contents in this file can be automatically be overwritten as many times as possible.
If any modification that has to do with grub is made or if a new kernel is installed or upgraded, this file knows how to create a script line for the new kernel. hence, it is recommended that you do not edit this file because it automatically edits or generates itself.
Going forward, anytime changes are made in the grub configuration files, you will need to rebuild this file, the grub.cfg file. Rebuilding the grub.cfg file makes the changes in grub permanent.
To backup the old configuration file, use the command,
[root@HQEBPRD ~]# cp /boot/grub2/grub.cfg /boot/grub2/grub.cfg_old

[root@HQEBPRD ~]#
To rebuild the grub.cfg, i.e grub configuration file, use the command,
[root@HQEBPRD ~]# grub2-mkconfig -o /boot/grub2/grub.cfg

Generating grub configuration file ...
done
OR
[root@HQEBPRD ~]# grub2-mkconfig > /boot/grub2/grub.cfg

Generating grub configuration file ...
done
OR
[root@HQEBPRD ~]# grub2-mkconfig

Generating grub configuration file ...
#
# DO NOT EDIT THIS FILE
#
# It is automatically generated by grub2-mkconfig using templates
# from /etc/grub.d and settings from /etc/default/grub
#

### BEGIN /etc/grub.d/00_header ###
set pager=1

if [ -f ${config_directory}/grubenv ]; then
  load_env -f ${config_directory}/grubenv
elif [ -s $prefix/grubenv ]; then
  load_env
fi
if [ "${next_entry}" ] ; then
   set default="${next_entry}"
   set next_entry=
   save_env next_entry
   set boot_once=true
else
   set default="${saved_entry}"
fi

if [ x"${feature_menuentry_id}" = xy ]; then
  menuentry_id_option="--id"
else
  menuentry_id_option=""

............................
On your system, of course, not a production system, you can remove “rhgb quiet” line, rebuild grub2 configuration files and reboot your system to see what happens.
If you have more than one kernel installed on your system, you can choose the kernel to boot with when the system is starting up.
At system startup, when the boot process displays the boot loader menu, you can scroll to the desired kernel you want the system to boot with and press the enter key. The system will boot with that particular kernel.
In the Linux boot process part 1, I discussed on how targets can be switched in an operational environment. In this subject matter, we will look at the step by step process of switching between targets using the boot loader menu.
So apparently, you can switch between targets in two ways. One, which is from the operational mode and the second, which is from the boot menu.
STEP 1
Power on the system
STEP 2
When the boot loader is initiated, on the kernel Line you want to boot with, press the key “e” which means edit.
Step 3
Scroll down to the line, “linux16” or “linux” depending on your Linux version or distribution, and at the end of the line, enter the command,
- systemd.unit=rescue.target (to change to rescue mode)
- systemd.unit=emergency.target (to change to emergency mode)
- systemd.unit=multi-user.target (to change to multi-user mode)
In my case, I entered the line, “systemd.unit=rescue.target”
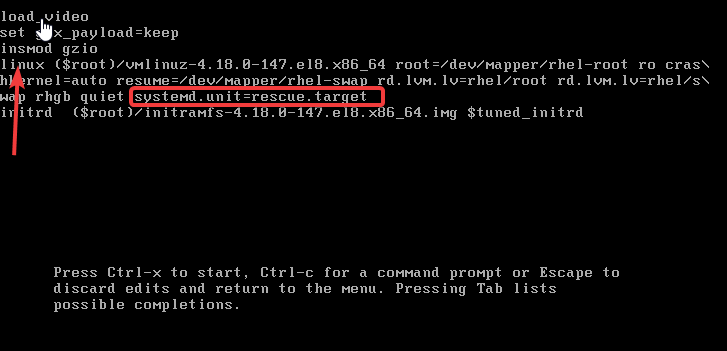
Step 4
After the changes have been made, press “ctrl+x” to boot the system into the set mode and give the root password.
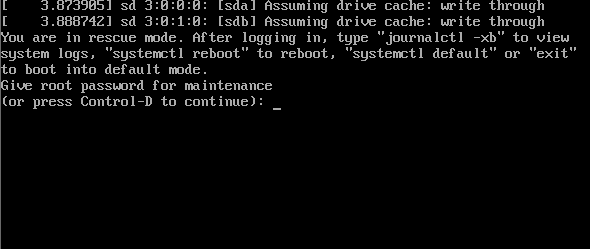
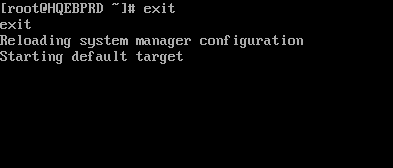
Step 5
To leave the mode, enter the command, “exit”
Your feedback is welcomed. If you love others, you will share with others.
Leave a Reply