
Last updated: January 2021
In this lesson, you will understand everything about the basic network management in Linux. You will also know how to set a static IP using different NetworkManager utilities such as nmcli and nmtui.
UNDERSTANDING NETWORK MANAGEMENT IN LINUX
The two services responsible for managing network in Linux are network-scripts(network service) and NetworkManager service.
The network service is one of the utilities used to manage network in Linux but deprecated in distributions like RHEL 8, CentOS 8, etc.
Configuring and managing network interfaces with network service requires creating scripts manually. Scripts such as (ifcfg-*). Hence, one needs to be conversant with network scripts while using the network service to manage network.
some of the network service commands are
- systemctl start network.service
- systemctl stop network.service
- systemctl restart network.service
As the name implies, NetworkManager is one of the utilities that is used to manage network, including network interface cards (NIC) in Linux.
Configuring and managing network with NetworkManager does not require creating scripts manually unlike when using network-scripts. NetworkManager was introduced to easily manage network, eradicate the need for creating scripts and make network configuration simple and automatic as possible. Unfortunately, some users don’t see it this way.
Prior to RHEL 7 and CentOS 7, the network-scripts (network service) was used to manage network. To start, stop or restart the network service, the command, “service network start”, “service network stop”, and “service network restart” are used respectively. As IT evolves and the likes of RHEL 7 and CentOS 7 came by, NetworkManager service was introduced with systemd and became the default service used to manage network.
In RHEL 7, and above, the NetworkManager service is now used to manage network by default. If you run the network-scripts commands such as, “service network start”, “service network stop” or any other network-scripts related command, network is started, stopped or triggered via “systemctl” and managed by NetworkManager.
However, one can decide to use the network-scripts (network service) to manage network by stopping and disabling the NetworkManager service. Many administrators for some reason disables NetworkManager so that network can be managed via network-scripts(network service) while some just add the parameter “NM_Controlled=no” at the end of the network card configuration file so that the network card is not managed by NetworkManager.
Yes, both the network-scripts(network service) and the NetworkManager service can be used to manage the network, they cooperate and are well integrated with each other, kudos to RHEL developers but the NetworkManager takes precedence over the network service if both services are up and running.
In RHEL 8, the network-scripts (network service) has totally been deprecated, the NetworkManager service is now fully used to manage network, hence, network-related scripts commands such as, “service network restart” or systemctl restart network” will not work. However, Red Hat still supports network-scripts, so, if one wishes to use network-scripts (network sesrvice) in RHEL 8, it is very possible. click here to see how it can be done
Compared to when NetworkManager was initially introduced, there has been a lot of improvement on NetworkManager and it is now very stable.
The essence of the introduction of NetworkManager service was to automatically manage network, if one is not used to the ifcg-* config file, configuring a NIC will be somewhat difficult but with NetworkManager, network can be automatically managed via its related utilities which are
1. nmcli (network manager command line interface)
2. nmtui (netwok manager text user interface)
3. Using the GNOME desktop GUI
A NIC as the name implies is a network card where network functionalities, properties, and addresses such as IPs, DNS[link], gateway, etc can be configured on.
By default, every NIC has its own properties and other network properties / connections can be configured on a NIC.
Linux has a way of naming a NIC. In Red Hat Enterprise Linux, a NIC can be named (eth0, eth1, ethN…). This type of NIC naming exists in the old versions of Red Hat and it is called the UDEV naming.
A NIC can also be named with respect to the card attributes, this type of naming is known as BIOS naming in the form (em1, em2, emN…) or (p2p1, p3p2, pNpN…).
Another form of BIOS naming is the physical naming of a NIC, example is (ens22, ens24, etc).
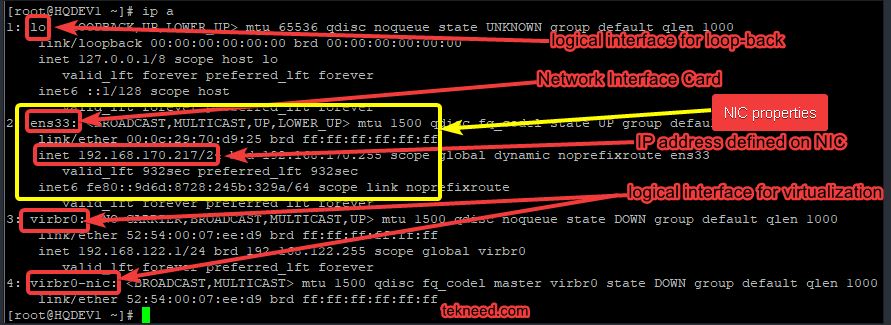
To see the network cards available on a Linux system, use the command,
[root@HQDEV1 ~]# ip a

1: lo: <LOOPBACK,UP,LOWER_UP> mtu 65536 qdisc noqueue state UNKNOWN group default qlen 1000
    link/loopback 00:00:00:00:00:00 brd 00:00:00:00:00:00
    inet 127.0.0.1/8 scope host lo
       valid_lft forever preferred_lft forever
    inet6 ::1/128 scope host
       valid_lft forever preferred_lft forever
2: ens33: <BROADCAST,MULTICAST,UP,LOWER_UP> mtu 1500 qdisc fq_codel state UP group default qlen 1000
    link/ether 00:0c:29:70:d9:25 brd ff:ff:ff:ff:ff:ff
    inet 192.168.170.217/24 brd 192.168.170.255 scope global dynamic noprefixroute ens33
       valid_lft 932sec preferred_lft 932sec
    inet6 fe80::9d6d:8728:245b:329a/64 scope link noprefixroute
       valid_lft forever preferred_lft forever
3: virbr0: <NO-CARRIER,BROADCAST,MULTICAST,UP> mtu 1500 qdisc noqueue state DOWN group default qlen 1000
    link/ether 52:54:00:07:ee:d9 brd ff:ff:ff:ff:ff:ff
    inet 192.168.122.1/24 brd 192.168.122.255 scope global virbr0
       valid_lft forever preferred_lft forever
4: virbr0-nic: <BROADCAST,MULTICAST> mtu 1500 qdisc fq_codel master virbr0 state DOWN group default qlen 1000
    link/ether 52:54:00:07:ee:d9 brd ff:ff:ff:ff:ff:ff
The configuration file for a network card in Red Hat Enterprise Linux is in the location, (/etc/sysconfig/network-scripts/ifcfg-*).
To see the configuration file for the NIC, ens33 in the screen-shot above,
For clarity, navigate to the location, (/etc/sysconfig/network-scripts/ifcfg-*).
[root@HQDEV1 ~]# cd /etc/sysconfig/network-scripts/list the contents in this directory
[root@HQDEV1 network-scripts]# ls

ifcfg-ens33
view the NIC configuration file.
[root@HQDEV1 network-scripts]# cat ifcfg-ens33

TYPE="Ethernet"
PROXY_METHOD="none"
BROWSER_ONLY="no"
BOOTPROTO="dhcp"
DEFROUTE="yes"
IPV4_FAILURE_FATAL="no"
IPV6INIT="yes"
IPV6_AUTOCONF="yes"
IPV6_DEFROUTE="yes"
IPV6_FAILURE_FATAL="no"
IPV6_ADDR_GEN_MODE="stable-privacy"
NAME="ens33"
UUID="08ebcfb0-c6ac-481c-b93a-27ba9a83fc20"
DEVICE="ens33"
ONBOOT="yes"
HWADDR=00:0c:29:70:d9:25
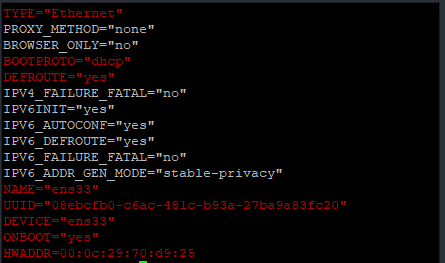
Let’s understand the basic parameters in this file highlighted in red.
The basic parameters are the ones highlighted in red above. They are listed below with their basic explanations.
TYPE=”Ethernet”
This parameter signifies the type of network interface, in our case, the interface type is Ethernet. You will get to know more about the other types in the advanced course of networking in another lesson.
BOOTPROTO=”dhcp”
This parameter signifies the IP protocol, i.e, how IP should be obtained. If it is set to DHCP as it is in our case, it means IP should be obtained automatically from a DHCP server. Other values for this parameter can be
- BOOTPROTO=”none” (Ip will be not be gotten from DHCP because boot time protocol is set to be none. In this case, an administrator will need to define an IP on the system.)
- BOOTPROTO=”bootp” ( the bootstrap protocol will be used).
DEFROUTE=”yes”
This signifies the system should be used as a default router, This behavior can be nullified by setting the value to “no”.
NAME=”ens33″
This signifies the connection name. In our case, the connection name is ens33. Connection name is different from a device name. However, a connection can have the same name as the device name/network interface name. You will get to know what a connection is as we go on in this subject matter.
UUID=”08ebcfb0-c6ac-481c-b93a-27ba9a83fc20″
This is a unique identifier of the network interface. It’s a way of identifying a NIC with an ID, and a UUID is unique to an interface. A network interface functions with or without its UUID.
DEVICE=”ens33″
This signifies the network interface name. Like I mentioned above, this name is given by the operating system and the OS has an algorithm to which a NIC is named.
ONBOOT=”yes”
This signifies the Network interface should be active at boot time. In our case, when the system is booted, the network interface too will come up as the system is coming up. This behavior can be nullified by setting the value to “no”
HWADDR=00:0c:29:70:d9:25
This parameter signifies the MAC/hardware address of the Network interface card.
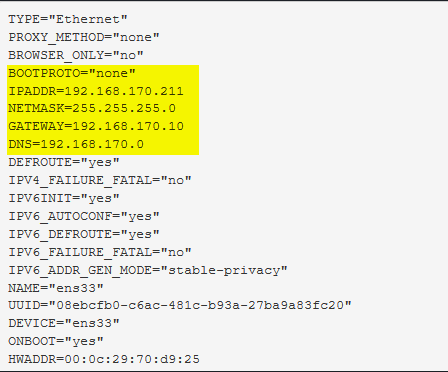
Of course, if BOOTPROTO is set to be none, it means that an IP address would manually be defined on the NIC. The NIC configuration file with a manual definition of IP addresses can be as what we have below.
[root@HQDEV1 ~]# cat /etc/sysconfig/network-scripts/ifcfg-ens35

TYPE=Ethernet
BOOTPROTO=none
IPADDR=192.168.170.219
PREFIX=24               OR  NETMASK=255.255.255.0
GATEWAY=192.168.170.10
DNS1=8.8.8.8
DEFROUTE=yes
NAME=ens35
DEVICE=ens35
ONBOOT=yes
IPADDR=192.168.170.219
This parameter signifies the IP address(IPv4) that is defined on the network interface. Sometimes, more that one IPv4 address can be defined on a network interface. An example of such is;
IPADDR0=192.168.170.219
IPADDR0=192.168.170.220
IPADDR0=10.10.10.22PREFIX=24
This signifies the subnet mask that is defined on the network interface. It can also be defined as (NETMASK=255.255.255.0) for a class C subnet mask. Sometimes, more than one subnet mask can be defined on a network interface. An example of such is;
PREFIX0=24
PREFIX1=22
PREFIX2=32
OR
NETMASK0=255.255.255.0
NETMASK1=255.255.0.0
NETMASK2=255.0.0.0GATEWAY=192.168.170.10
This parameter signifies the gateway address that is defined on the network interface. Sometimes, more than one gateway address can be defined on a network interface. An example of such is;
GATEWAY0=192.168.170.10
GATEWAY1=192.168.150.22
GATEWAY2=10.10.33.22
DNS=8.8.8.8
This parameter signifies the DNS address that is defined on the network interface. Sometimes, more than one DNS can be defined on a network interface. An example of such is;
DNS1=10.10.10.0
DNS2=10.10.0.1
DNS3=8.8.8.8There are other parameters that can be added to a NIC’s configuration file which I will discuss in the advanced networking lesson.
Having understood a network interface configuration file, let’s understand the difference between a device and a connection.
In Linux, RHEL and CentOS, a device is a network card while a connection is the network properties defined on a device. There can be more than one connection on a device, the reason why you see a network card having more than one IP addresses defined on it.
The parameter, “NAME” in a network interface configuration file is a connection name, having other network properties defined on a device.
This will be clearer as we look at some examples in the “ACTION TIME” section.
Having understood network concept, let’s look at how an IP address can be assigned to a Linux system.
ACTION TIME
How To Set A Static IP Address In Linux (RHEL / CentOS 7&8)
Setting a static IP in RHEL 7 and 8 can be done by:
- Directly editing the network interface configuration file
- Using the nmcli (network manager command line interface) utility
- Using the nmtui (network manager text utility interface) utility
- Using the GUI (graphical user interface)
Set A Static IP address In RHEL 7 and RHEL 8 By Editing The Network Interface Configuration File
For example, if you are to set the following network addresses below
static IPv4 address= 192.168.170.211
Subnet mask = 255.255.255.0
Gateway or default route= 192.168.170.10
DNS= 192.168.170.0
Take the following steps
1. edit the network interface configuration file.
[root@HQDEV1 ~]# vi /etc/sysconfig/network-scripts/ifcfg-ens33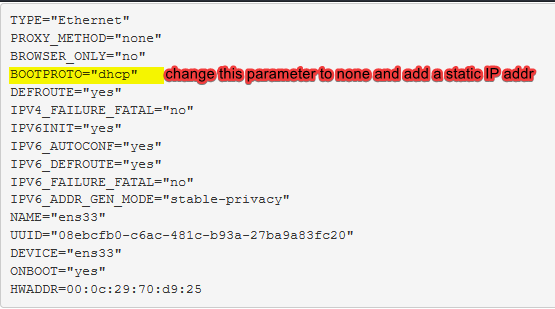
2. Restart NetworkManager
[root@HQDEV1 ~]# systemctl restart NetworkManagerOR restart the network interface
[root@HQDEV1 ~]# nmcli conn down ens33 && nmcli conn up ens33OR
[root@HQDEV1 ~]# nmcli conn reloadNOTE: you will lose connection if you are connected via SSH
In RHEL 7, you may also want to restart network service
[root@HQDEV1 ~]# systemctl restart network3. Verify the changes
[root@HQDEV1 ~]# ip a|grep ens33

2: ens33: <BROADCAST,MULTICAST,UP,LOWER_UP> mtu 1500 qdisc fq_codel state UP group default qlen 1000
    inet 192.168.170.211/24 brd 192.168.170.255 scope global dynamic noprefixroute ens33
Set a Static IP Adddress In RHEL 7 and RHEL 8 Using nmcli Utility
For example, if you are to set the following network addresses below
static IPv4 address= 192.168.170.211
Subnet mask = 255.255.255.0
Gateway or default route= 192.168.170.10
DNS= 192.168.170.0
Take the following steps
1 . set the IP address
[root@HQDEV1 ~]# nmcli conn mod ens33 ipv4.addresses 192.168.170.211/242. set the gateway
[root@HQDEV1 ~]# nmcli conn mod ens33 ipv4.gateway 192.168.170.103. set the DNS
[root@HQDEV1 ~]# nmcli conn mod ens33 ipv4.dns 192.168.170.04. set bootproto to be manual instead of DHCP
[root@HQDEV1 ~]# nmcli conn mod ens33 IPv4.method manual5. You may Restart NetworkManager
[root@HQDEV1 ~]# systemctl restart NetworkManagerOR restart the network interface
[root@HQDEV1 ~]# nmcli conn down ens33;nmcli conn up ens33OR
[root@HQDEV1 ~]# nmcli conn reloadNOTE: you will lose connection if you are connected via SSH
In RHEL 7, you may also want to restart network service
[root@HQDEV1 ~]# systemctl restart networkSet a Static IP Address In RHEL 7 and RHEL 8 Using nmtui
For example, if you are to set the following network addresses below
static IPv4 address= 10.10.10.15
Subnet mask = 255.255.255.0
Gateway or default route= 10.10.10.99
DNS= 10.0.1.3
Take the following steps
1. Run the nmtui command to initialize the text utility interface
[root@HQDEV1 ~]# nmtui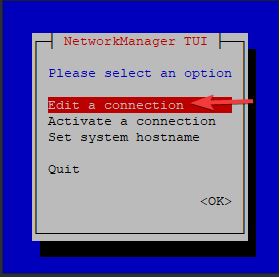
2. press the enter key, and the next parameter will be seen as shown below
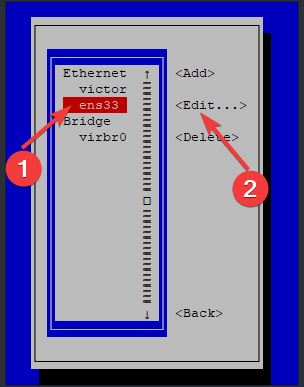
you can see the connections under Ethernet, scroll to which ever connection you will like to edit. If you wish to add a new connection, navigate the cursor to the “Add” tab.
3. Press the enter key when the cursor is on Edit and scroll to the manual tab, place the cursor on the “show” tab and press enter
N:B: “profile name” tab is where to add the connection name in case you wish to add a new connection.
4. Enter the IP address, gateway and DNS address
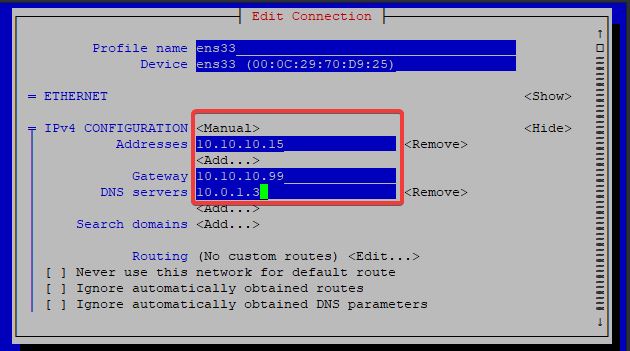
NB: To add more addresses, navigate the cursor to the “<Add>” tab and press the enter key, then enter the addresses
5. Navigate the cursor to the “<ok>” tab and press the enter key
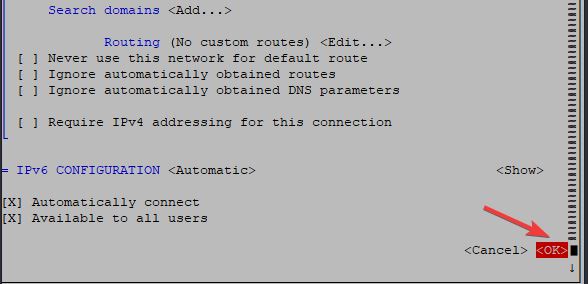
6. Navigate to the back tab and quit tab and press enter to quit.
7. You may Restart NetworkManager
[root@HQDEV1 ~]# systemctl restart NetworkManagerOR restart the network interface
[root@HQDEV1 ~]# nmcli conn down ens33 && nmcli conn up ens33OR
[root@HQDEV1 ~]# nmcli conn reloadNOTE: you will lose connection if you are connected via SSH
In RHEL 7, you may also want to restart network service
[root@HQDEV1 ~]# systemctl restart networkSet a Static IP Address In RHEL 7 and RHEL 8 Using GUI
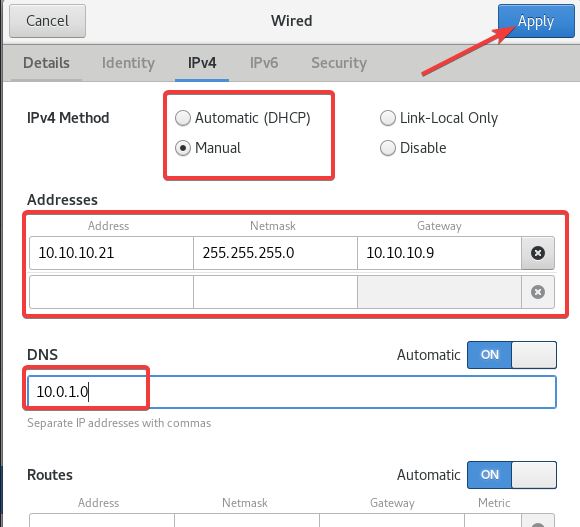
For example, if you are to set the following network addresses below
static IPv4 address= 192.168.170.211
Subnet mask = 255.255.255.0
Gateway or default route= 192.168.170.10
DNS= 192.168.170.0
Take the following steps
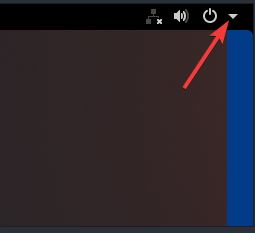
1. By the right hand corner, click on the down arrow button
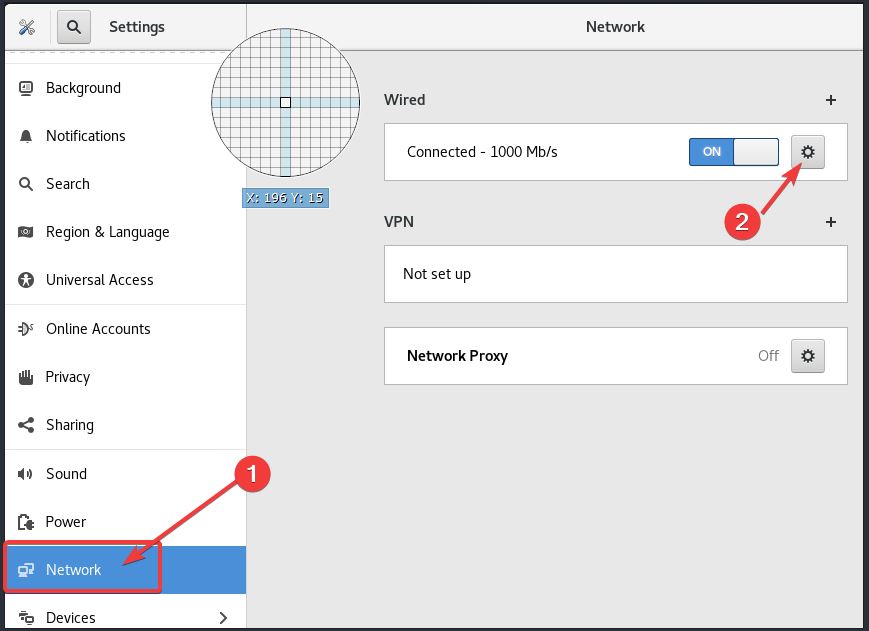
2. Click on the type of connection. In my case, it is “Wired Settings”

3. click on “Network” tab, followed by the settings symbol as shown in the screen-shot below.
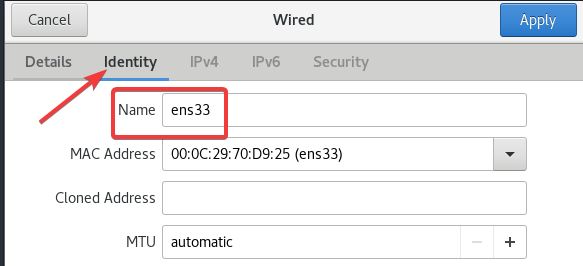
4. Click on Identity to be sure of the device, you can also click on details
5. click on IPv4, manual, and set the IPs and click on Apply
6. You may Restart NetworkManager
[root@HQDEV1 ~]# systemctl restart NetworkManagerOR restart the network interface
[root@HQDEV1 ~]# nmcli conn down ens33 && nmcli conn up ens33NOTE: you will lose connection if you are connected via SSH
In RHEL 7, you may also want to restart network service
[root@HQDEV1 ~]# systemctl restart networkOther Important Configuration files In Linux
Other important configuration files related to networking in Linux are;
1. /etc/hostname
This file consists of the hostname. To see the system hostname, you can concatenate this file by running the command,
[root@HQDEV1 ~]# cat /etc/hostname

HQDEV1
OR
[root@HQDEV1 ~]# hostname

HQDEV1
OR
[root@HQDEV1 ~]# hostnamectl status

   Static hostname: HQDEV1
         Icon name: computer-vm
           Chassis: vm
        Machine ID: ac8d2820677c4537b9bd58871d389b82
           Boot ID: 42afa4ccac2847d983725ba414b2a890
    Virtualization: vmware
  Operating System: Red Hat Enterprise Linux 8.1 (Ootpa)
       CPE OS Name: cpe:/o:redhat:enterprise_linux:8.1:GA
            Kernel: Linux 4.18.0-147.el8.x86_64
      Architecture: x86-64
[root@HQDEV1 ~]#
As an administrator, there are sometimes you may want to change a hostname, click here to see the step by step process of how to change a hostname in RHEL 7 & 8
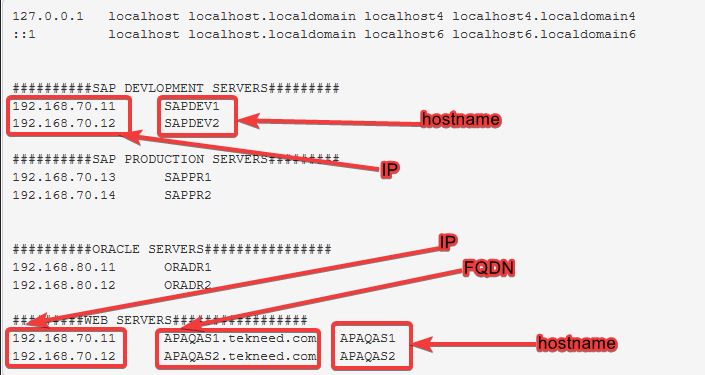
2. /etc/hosts
This file consists of a hostname and IP address, basically, it’s used to map a hostname to an IP address. In Linux, a hostname is mapped to an IP address by either using the “/etc/hosts” file or by the use of a DNS server[link]. For a large network environment, the DNS server is suitable for mapping.
The system checks the “/etc/hosts” file first to resolve, before checking an active DNS server configured on the system. So, it may not be necessary to populate the “/etc/host” file if there is already an active DNS server on the system.
The “/etc/hosts” file by default looks like this,
[root@HQDEV1 ~]# cat /etc/hosts

127.0.0.1   localhost localhost.localdomain localhost4 localhost4.localdomain4
::1         localhost localhost.localdomain localhost6 localhost6.localdomain6

The file can be populated like this,
3. /etc/resolv.conf
This file contains the name server or DNS addresses and it is automatically generated by networkmanager and not meant to be touched. However, a user may also populate this file with DNS addresses, but you must know what you are doing.
The file can be populated like this.
# Generated by NetworkManager
nameserver 192.168.170.2
nameserver 192.168.70.122
nameserver 8.8.8.8
OR
# Generated by NetworkManager
search tekneed.com tekneed.org
nameserver 192.168.170.2
nameserver 192.168.70.122
nameserver 8.8.8.8
Moving forward, let’s see how a we can permanently add a secondary IP address in Linux and how we can temporarily add a secondary IP address in Linux
Your feedback is welcomed. If you love others, you will share with others
“Unfortunately, some users don’t see it this way.”
“As IT evolves … NetworkManager service was introduced with systemd and became the default service.”
1) NetworkManager existed well before systemd, it is from 2004.
2) systemd is not an evolution, and is not a simple another “init system”. It is a middle layer between the kernel and the other process, making a whole new architecture for a GNU/Linux box. So different, it should be called with another name, like another OS (for example like Android), so nobody confuses with it. Sadly, commercial interest prevails, and RedHat still calls their creature “Linux”, but it is not.
1. edit the network interface configuration file:
DNS should be DNS1 or it will not work.
Thanks for the guide
You are welcome
Using method 2, we should first check the name of the ethernet interface using e.g.:
1. ifconfig -a
2. ip link show
3. nmcli connection show
4. nmtui (as a Device)
Using Method 3 – nmtui
After adding your network configuration, go back to the initial page when you entered ‘nmtui’ on the cli, and then when on that page,
1. select ‘Activate a connection’ and then hit enter,
you will see the connection you just set up. Hit ‘Activate’ once and then hit enter on ‘deactivate’ and then select ‘back’ and hit enter,
Next select
2. Set system hostname
after setting the hostname,
click ‘OK’ and then another ‘OK’
Next,
3. Select ‘Quit’, and hit enter
4. Next restart your Network by running
‘systemctl restart NetworkManager’ after running the restart command.
Reboot your system and then go back to check all newly set configurations are still in place after the reboot.
Run # ip a
Run # ip route show default
Run # cat /etc/resolv.conf
to verify that your network configuration has the right ip address, gateway, dns and also run hostname to verify that your hostname is set up correctly.
Once you confirm that the changes you made are still there after rebooting then you are good to proceed to the next question.
DO NOT FORGET TO REBOOT YOUR SYSTEM after tackling this particular question. Make sure you recheck all settings after the reboot.