
Last updated: June 2020
In this lesson, you will learn the different methods and the proper method of how to add a secondary IP address on Linux to a NIC. Virtual IP/Alias IP & Connection also mean the same as a secondary IP.
Contents
UNDERSTANDING THE SUBJECT MATTER
Adding a secondary IP to a NIC can be done in many ways, one of the very old ways of doing this is by creating a virtual NIC (slave NIC) from the original NIC (master NIC).
However, using this method is becoming obsolete and not recommended anymore but still works anyways, hence why in this lesson, I will show you the different ways of adding a secondary IP to a network card and the right method to use. You will also know the advantages of using some methods over others.
The different ways of doing this are
- Directly editing the NIC configuration file.
- Adding a connection to a NIC using the nmcli or nmtui utility.
- Creating a slave NIC from the master NIC.
ACTION TIME
1. Add A Secondary IP To A Network Card In RHEL 7 & 8 By Editing The NIC Configuration File
This method of adding a secondary IP to a NIC is a replacement of the old method of creating a slave NIC from the master NIC.
For example, to add a secondary IP address, 192.168.70.215/24,
Take the following steps.
1. Edit the NIC configuration file and add the secondary IP or IPs as seen in the screen-shot below.
[root@HQDEV1 ~]# vi /etc/sysconfig/network-scripts/ifcfg-ens33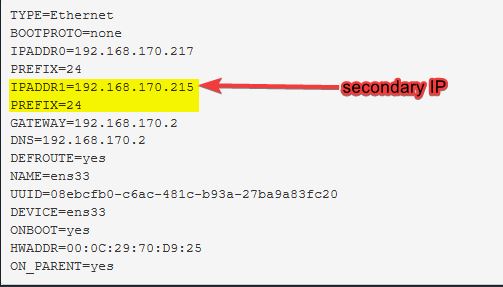
2. Bring down the NIC
[root@HQDEV1 ~]# nmcli conn down ens33OR
[root@HQDEV1 ~]# ifdown ens333. Bring up the NIC
[root@HQDEV1 ~]# nmcli conn up ens33OR
[root@HQDEV1 ~]# ifup ens334. Verify the secondary IP is active

2. Add A Secondary IP To A Network Card In RHEL 7 & 8 By Adding A Connection
This method of adding a secondary IP to a NIC is also a replacement of the old way of creating a slave NIC from the Original NIC. It involves adding a connection to a NIC. A connection can be added by using the nmcli or nmtui utility.
One advantage of using this method is that a user does not necessarily need to use the primary IPs and the secondary IPs at a time. The IPs can be used one after the other by switching between connections with the help of the “NetworkManager” service.
To add a connection to a NIC using nmcli, use the command,
nmcli conn add con-name <connection-name> ifname <NIC> type ethernet ip4 <IP/subnetmask>For example, to add the connection, “victor” with the IP address, 192.168.70.219/24,
Take the following steps.
1. Add the connection with the secondary IP address
[root@HQDEV1 ~]# nmcli conn add con-name victor ifname ens33 type ethernet ip4 192.168.170.219/24

Connection 'victor' (091ef5cb-611a-415a-be82-7bd88364ecbb) successfully added.
2. Verify if the config file for the connection is created in network configuration path (/etc/sysconfig/network-scripts)
[root@HQDEV1 ~]# ls /etc/sysconfig/network-scripts/

ifcfg-ens33  ifcfg-victor
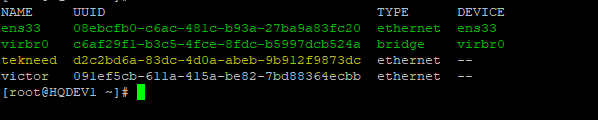
3. verify the connection.
[root@HQDEV1 ~]# nmcli conn show

NAME    UUID                                  TYPE      DEVICE
ens33   08ebcfb0-c6ac-481c-b93a-27ba9a83fc20  ethernet  ens33
virbr0  9676829d-f003-4199-b6a5-53e63a177cff  bridge    virbr0
victor  091ef5cb-611a-415a-be82-7bd88364ecbb  ethernet  --
[root@HQDEV1 ~]#
NB: This command only shows the connections or NIC network manager is managing.
4. Bring down the default or running connection.
[root@HQDEV1 ~]# nmcli conn down ens33N:B: The next connection in line will be automatically switched to.
5. Bring up the added connection
[root@HQDEV1 ~]# nmcli conn up victor6. verify the active IP address
[root@HQDEV1 ~]# ip a
........
2: ens33: <BROADCAST,MULTICAST,UP,LOWER_UP> mtu 1500 qdisc fq_codel state UP group default qlen 1000
    link/ether 00:0c:29:70:d9:25 brd ff:ff:ff:ff:ff:ff
    inet 192.168.170.219/24 brd 192.168.170.255 scope global noprefixroute ens33
       valid_lft forever preferred_lft forever
    inet6 fe80::b98a:1bbb:1b89:8320/64 scope link noprefixroute
       valid_lft forever preferred_lft forever
How To add a connection to a NIC using nmtui
For example, to add the connection, “tekneed” with the IP address, 192.168.70.201/24, gateway, 192.168.170.10 and DNS, 192.168.170.2
Take the following Steps
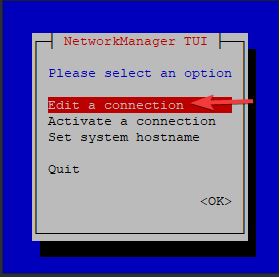
1. Initialize the text utility interface by running the command,
[root@HQDEV1 ~]# nmtuion “Edit a connection” tab, press the Enter key
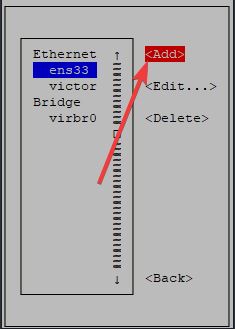
2. Place the cursor on the desired NIC, navigate to “Add” and press the enter key.
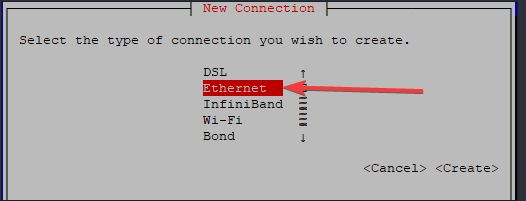
3. select the type of connection, navigate to “create” button and press the enter key
4. Fill in the profile name which is the connection name, the device and the necessary IP addresses.
5. scroll down, click ok button, back and exit button
6. verify the connection
[root@HQDEV1 ~]# nmcli conn show

NAME     UUID                                  TYPE      DEVICE
ens33    08ebcfb0-c6ac-481c-b93a-27ba9a83fc20  ethernet  ens33
virbr0   c6af29f1-b3c5-4fce-8fdc-b5997dcb524a  bridge    virbr0
tekneed  d2c2bd6a-83dc-4d0a-abeb-9b912f9873dc  ethernet  --
victor   091ef5cb-611a-415a-be82-7bd88364ecbb  ethernet  --
7. bring up the new connection
[root@HQDEV1 ~]# nmcil conn up tekneed

Connection successfully activated (D-Bus active path: /org/freedesktop/NetworkManager/ActiveConnection/5)
8. Verify the secondary IP address
[root@HQDEV1 ~]# ip a

2: ens33: <BROADCAST,MULTICAST,UP,LOWER_UP> mtu 1500 qdisc fq_codel state UP group default qlen 1000
    link/ether 00:0c:29:70:d9:25 brd ff:ff:ff:ff:ff:ff
    inet 192.168.70.201/24 brd 192.168.70.255 scope global noprefixroute ens33
       valid_lft forever preferred_lft forever
    inet6 fe80::9179:9b47:8eff:cf71/64 scope link noprefixroute
       valid_lft forever preferred_lft forever
3. Add A Secondary IP To A Network Card In RHEL 7 & 8 By Creating A Slave NIC From A Master NIC
Like I said in the “UNDERSTANDING THE SUBJECT MATTER” section, this method is becoming obsolete and not recommended anymore.
If you want to successful switch between IPs, it is recommended you use other methods.
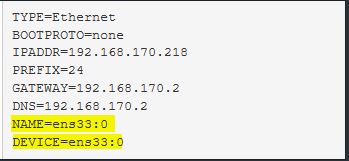
For example, to add a secondary IP address, 192.168.70.218/24, gateway, 192.168.170.2, and DNS, 192.168.170.2
Take the following Steps
1. create the configuration file for the secondary/Alias IP
[root@HQDEV1 ~]# vi /etc/sysconfig/network-scripts/ifcfg-ens33:0To work smarter, you can copy the ifcfg-ens33 configuration file and edit the important parameters
2. Bring down the master NIC
[root@HQDEV1 ~]# nmcli conn down ens33OR
[root@HQDEV1 ~]# ifdown ens33OR
[root@HQPRD2 ~]# ifconfig ens33 down3. Bring up the master NIC
[root@HQDEV1 ~]# nmcli conn up ens33OR
[root@HQDEV1 ~]# ifup ens33OR
[root@HQPRD2 ~]# ifconfig ens33 up4. You may restart NetworkManager
[root@HQDEV1 ~]# systemctl restart NetworkManagerIn RHEL 7, you may also restart network
[root@HQDEV1 ~]# systemctl restart network5. Verify
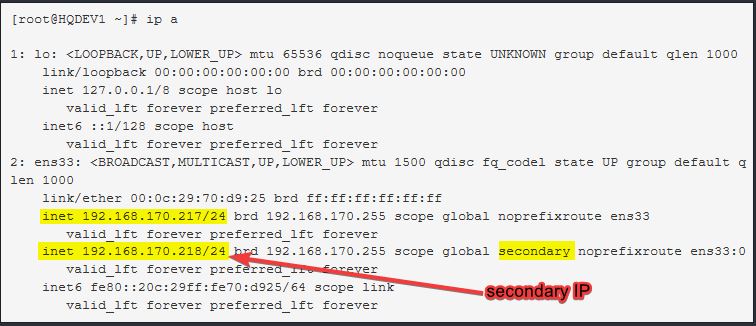
6. You can also ping the secondary IP
As an administrator, while doing some network test, adding a temporary IP addresses to a NIC may come in handy, click on this link to be able to achieve this.
Your feedback is welcomed. If you love others, you will share with others.
Leave a Reply