
Last updated: January 2021
Learn how you can boot to single user mode in Linux on a Red Hat Enterprise Linux Server 7 & 8 and a CentOS server 7&8. -Understand what single user mode is
Contents
In this tutorial, you will understand what single user mode is and how to boot a Linux system to single user mode.
UNDERSTANDING THE SUBJECT MATTER
From the word single, single user mode is the mode in a Linux system where only one user, the root is allowed to perform system tasks. Single user mode is also referred to as runlevel 1 and can be called emergency or maintenance mode.
Booting in this mode can be done in many ways. In one of the articles on this site, I discussed how a system runlevel/runtarget can be changed from an operational/command mode and how it can also be changed from the boot menu.
However, both methods will require the input of the root password. In this subject matter, we will look at how to boot into a single user mode (runlevel 1) without the imputing the root password.
In single user mode, the system is booted to a minimal environment with filesystems(local filesystems) being mounted, but without network services, the full operating system is not functional in this mode and most services will be manually started.
This mode is basically used for maintenance like we earlier said, and troubleshooting such as, resetting a lost root password, repairing bad filesystems (fsck), editing the fstab file to make the system boot properly, stopping services disrupting the system from booting, etc
Going forward, with these methods we are going to use in the “ACTION TIME” section, the root filesystem, after being mounted will have a read only (ro) permission.
To be able to make any changes, the root filesystem permission needs to be changed to read-write (rw).
More so, using some of these methods will make the root filesystem to be mounted on /sysroot.
To be able to perform some tasks and make some changes, the root filesystem is required to be mounted on “/”, hence it will require the use of chroot tool to be able to mount the root filesystem on “/” logically.
Having understood what single user mode is, let’s look at the different ways of how to boot the Linux system into single user mode and change the root filesytem read only permission to read-write.
For me, I always prefer to use method 1, but it’s all about preference, whichever method you choose to use will work perfectly.
ACTION TIME
How To Boot To Single User Mode On RHEL / CentOS 7&8
First Method
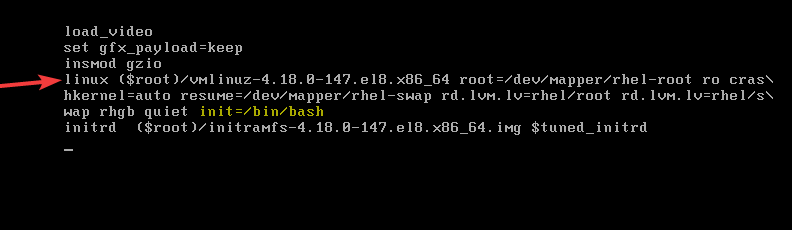
1. Power on the system, as soon as the boot process gets to the grub menu, interrupt the grub menu by pressing the key, “e” (which means edit) on the kernel you are using.
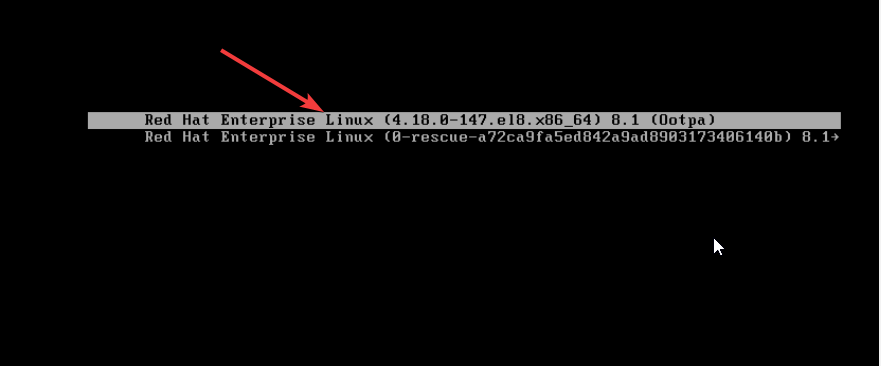
2. Use the down arrow key to scroll down to the line, “linux” or “linux16” for RHEL 7. On the line, use the right arrow key to move to the line “ro”
“ro” means (read only), root filesystem permission needs to be changed to rw (read write) for root to be able to make changes
3. Just as it is highlighted in yellow, replace ro with
rw init=/sysroot/bin/bash
4. Press the key, “ctrl+x” to boot the system into single user / emergency mode
ctrl+x
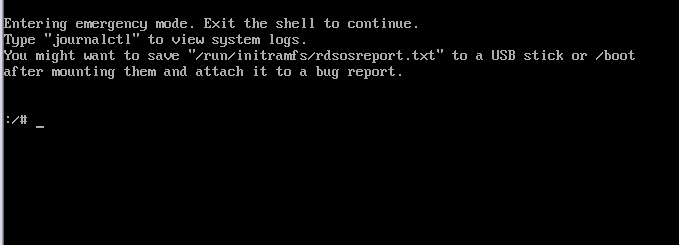
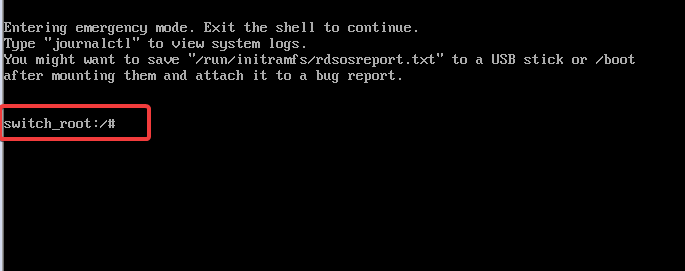
5. And boom!!! you are in single user mode/emergency mode where you can perform your maintenance
Let’s ascertain all we have said about the real root filesystem in single user mode being mounted on /sysroot depending on the method you use.
- To verify all the mounted filesystem, use the command,
# mount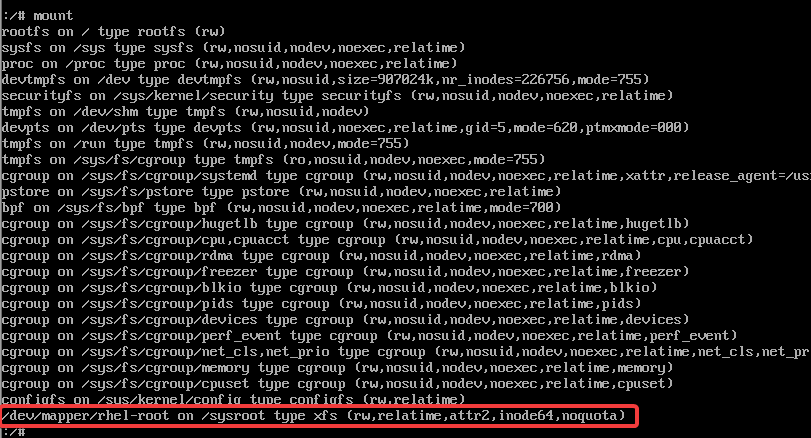
you can see the root filesystem mounted on /sysroot as rw. Don’t forget we already edited the linux line as rw, hence why it is mounted as rw.
6. To mount the real root partition, use the command,
# chroot /sysrootAt this point, the system is minimally available, hence restricted to some functions/commands. you can perform activities just like you are already logged in to the fully functional system.
7. To unmount the root partition, enter the command exit
# exit8. To leave the single user mode, enter the command exit again
# exit9. reboot the system.
# rebootSecond Method
1. Power on the system, as soon as the boot process gets to the grub menu, interrupt the grub menu by pressing the key, “e” (which means edit) on the kernel you are using.
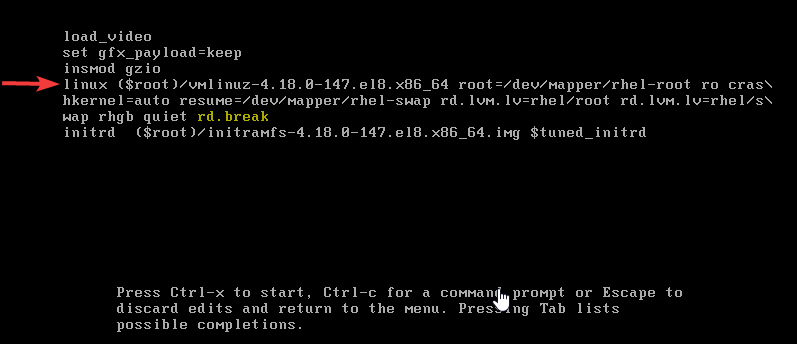
2. use the down arrow key to scroll down to the line, “linux” or “linux16” for RHEL 7. On the line, use the right arrow key to move to the end of the line and enter, “rd.break” just as highlighted in yellow
entering rd.break allows you to break into the system
3. press ctrl+x to boot the system into single user mode
ctrl+x
4. And boom!!! you are in single user mode.
Let’s ascertain all we have said about the real root filesystem in single user mode being mounted on /sysroot
- To verify all the mounted filesystem, use the command,
# mount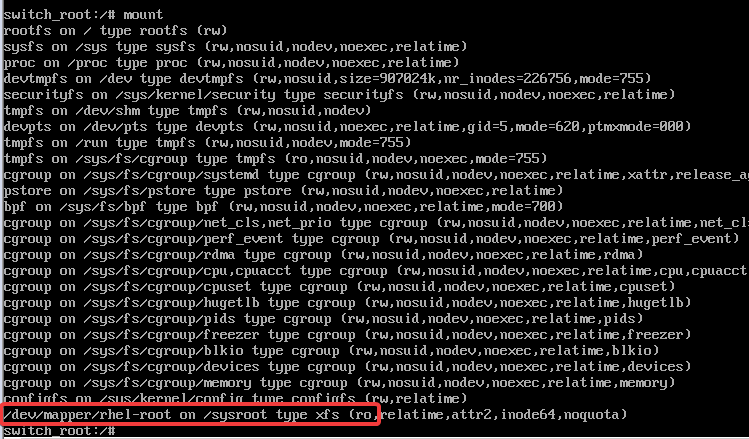
you can see the root filesystem mounted on /sysroot as ro. Compared to the first method, it was rw because we already passedd the argument before booting into single user mode.
5. To remount /sysroot as rw, use the command,
# mount -o remount,rw /sysroot6. To verify the new permission, use the command,
# mount |grep sysroot
7. To mount the real root filesystem, use the command,
# chroot /sysroot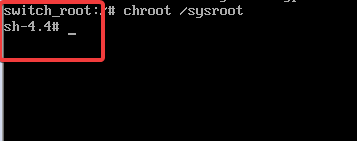
At this point, the system is minimally available, hence restricted to some functions/commands. you can perform activities just like you are already logged in to the fully functional system.
You can also see the shell changing, meaning create a new shell and make /sysroot appear as /
8. To unmount the root partition, enter the command exit
# exit9. To leave the single user mode, enter the command, exit
# exitThird Method
1. Power on the system, as soon as the boot process gets to the grub menu, interrupt the grub menu by pressing the key, “e” (which means edit) on the kernel you are using.
2. use the down arrow key to scroll down to the line, “linux” or “linux16” for RHEL 7. On the line, use the right arrow key to move to the end of the line and enter, “init=/bin/bash” just as highlighted in yellow
3. press ctrl+x to boot the system into single user mode
ctrl+x
4. Verify the root filesystem permission
Using this method eradicates the root filesytem being mounted on /sysroot. The root filesystem is mounted directly on “/”

you can see the root filesystem mounted on “/” but as read only
5. To remount the root filesystem as rw, use the command,
# mount -o remount,rw /6. verify the new permission.
# mount
At this point, the system is minimally available, hence restricted to some functions/commands. you can perform activities just like you are already logged in to the fully functional system.
Troubleshooting Tasks That Can Be Done In Single User Mode With Examples
Editing The Fstab
Some filesystems defined in the fstab can prevent the system from booting, to make changes to fstab, do the following.
1. boot into single usermode as done above
2. mount the real rootfilesystem depending on the way you boot to single user mode
# chroot /sysroot3. Make changes to fstab,
in my case, I want to edit the tekneed filesystems that are preventing my system from booting by commenting it out (#). It happens mostly when you have a remote filesystem.
#
# /etc/fstab
# Created by anaconda on Tue Dec 17 03:28:04 2019
#
# Accessible filesystems, by reference, are maintained under '/dev/disk/'.
# See man pages fstab(5), findfs(8), mount(8) and/or blkid(8) for more info.
#
# After editing this file, run 'systemctl daemon-reload' to update systemd
# units generated from this file.
#
/dev/mapper/rhel-root   /                       xfs     defaults        0 0
UUID=a67fe375-f3c3-4907-b292-8b819a175cfd /boot                   xfs     defaul                                                                                        ts        0 0
/dev/mapper/rhel-swap   swap                    swap    defaults        0 0
UUID=9754f82c-0dfa-4f47-97c8-2af6deee5005 swap  swap    defaults       0 0
#UUID=b1155831-004d-4fd7-bb53-049daca07639 /tekneed       ext4    defaults     1                                                                                         2
#UUID=0f3d903b-0926-40c1-b2c5-61f8b1bbf8b7 /tekneed2      ext4    defaults                                                                                               1 2

4. Use the exit command to log out and reboot your system.
Performing a filesystem check
Filesystems can be repaired in single user mode by doing the following.
1. boot into single user mode as done above
2. remount the real rootfilesystem to give it a read write (rw) permission
# mount -o remount,rw /sysroot3. repair a filesystem.
# xfs_repair /<file system>NB: fsck can be run against root file system by appending the command, “fsck.mode=force” on the kernel line. Moreso, repairing root filesystem is very effective when you boot into a rescue shell with the installation media (ISO or CD).
Resetting / recovering root password
Filesystems can be repaired in single user mode by doing the following.
1. boot into single user mode as done above
2. remount the real root filesystem to give it a read write (rw) permission
# mount -o remount,rw /sysroot3. mount the real root filesystem, use the command,
# chroot /sysroot4. change the root password
# passwd rootenter the new password twice.
5. Logout by using the command, exit twice
# exit# exit6. Reboot the system
# rebootreboot and log in with your new password.
Questions and contributions are welcomed in the comment section.
Your feedback is welcomed. If you love others, you will share with others
Excellent helpful tutorial
Thanks for the feedback, Alessandra.
At RHEL 7 this isn’t going to work. You need to stay at /sysroot and run the following commands:
# mount -o rw,remount /sysroot
# /sysroot/sbin/vgscan -v –mknodes <– this will create the /dev/mapper files so you can perform the xfs_repair
# /sysroot/sbin/vgchage -ay <– this will activate the vgs so that you can repair them.
Now if you can list /dev/mapper and see your lvs. YOu can also do the xfs_repair by the disk device name
xfs_repair -n /dev/dm-6
or
xfs_repair /dev/mapper/vgsys-var
I hope this helps. I have tried everything else and this was the only way it worked. I was getting lvmeted errors if I did the chroot /sysroot.