
Last updated: February 2021
understand how to extend or reduce LVM partition in Linux. You will also learn how to extend a volume group using “vgextend” from a physical volume (step by step process)
Contents
UNDERSTANDING THE SUBJECT MATTER
Sequel to our previous lessons, (understanding and managing LVM in Linux), let’s now look at how we can effectively extend and reduce logical volumes in Linux.
Just as we have mentioned, Logical Volumes(LV) are created from Volume Groups(VG), while Volume Groups are created from Physical Volumes(PV).
Therefore, when it comes to extending a LV to a particular size, there must be a free/available space of that particular size on the VG. If the available size on the VG is not up to the size needed, a PV has to be available for the VG to tap from.
And as we have mentioned when discussing a PV, a PV can be created from a block device or from a partition. So, sometimes, when performing the activity of increasing a LVM partition, you may have to partition a drive or provision an entire LUN on the server and create a PV from it. The later is mostly done in a production environment.
When a VG taps from a PV, what is being done is a VG extension, hence the command, “vgextend” is used.
More so, when a LV taps from a VG, what is being done is LV extension, hence the command “lvextend” is used.
There are various ways or formats a VG and a LV can be extended.
Having understood this concept, let’s see how we can increase and shrink LVM partition or volumes in Linux
ACTION TIME
How To Extend / Increase a Logical Volume (LV) Partition In Linux (RHEL 7&8)
The activity in this scenario is to increase the logical volume (tekneed_lv) to 7GB.
Take the following steps
1. verify the size of the LV we want to increase
[root@HQDEV1 ~]# lvs

  LV         VG         Attr       LSize   Pool Origin Data%  Meta%  Move Log Cpy%Sync Convert
  root       rhel       -wi-ao---- <12.50g
  swap       rhel       -wi-ao----   1.50g
  tekneed_lv tekneed_vg -wi-ao----   4.00g
(tekneed_lv) is 4gb and we want to increase it to 6G
2.verify the size of the VG to see if there is still available space left
[root@HQDEV1 ~]# vgs

  VG         #PV #LV #SN Attr   VSize   VFree
  rhel         1   2   0 wz--n- <14.00g       0
  tekneed_vg   1   1   0 wz--n-  <5.00g 1020.00m
The VG (tekneed_vg) is left with only 1020mb(1G) and we need about 1GB more on the VG to make the free space 2GB at least.
NB: If there is still a free space of up to 2GB on the VG, go to step 7b
3. check if there is any available block device or partition we can create a PV from to add to the VG
NB: sometimes, especially in a production environment, you may need to provision a LUN to create a PV from
[root@HQDEV1 ~]# lsblk

NAME                      MAJ:MIN RM  SIZE RO TYPE MOUNTPOINT
sda                         8:0    0   15G  0 disk
├─sda1                      8:1    0    1G  0 part /boot
└─sda2                      8:2    0   14G  0 part
  ├─rhel-root             253:0    0 12.5G  0 lvm  /
  └─rhel-swap             253:1    0  1.5G  0 lvm  [SWAP]
sdb                         8:16   0    5G  0 disk
└─sdb1                      8:17   0    5G  0 part
  └─tekneed_vg-tekneed_lv 253:2    0    4G  0 lvm  /victor
sdc                         8:32   0    3G  0 disk
sr0                        11:0    1  7.3G  0 rom  /run/media/root/RHEL-8-1-0-BaseOS-x86_64
[root@HQDEV1 ~]#
In our case, the sdc drive is free for us to use and it’s 3GB
NB: you may partition the whole sdc drive to sdc1 as LVM partition type or not. In RHEL 7 & above, it is not necessary to do this anymore except you need to partition part of the block device so you can use the rest for something else.
So, let’s create a PV from sdc
4. Create a PV from sdc
[root@HQDEV1 ~]# pvcreate /dev/sdc

  Physical volume "/dev/sdc" successfully created.
[root@HQDEV1 ~]#
Now, let’s extend the VG from the PV.
5. Extend the VG
[root@HQDEV1 ~]# vgextend tekneed_vg /dev/sdc

  Volume group "tekneed_vg" successfully extended
6. Verify the new VG size available/free
[root@HQDEV1 ~]# vgs

  VG         #PV #LV #SN Attr   VSize   VFree
  rhel         1   2   0 wz--n- <14.00g    0
  tekneed_vg   2   1   0 wz--n-   7.99g 3.99g
Now we have 3.99g free space, we can now extend/increase the LV from the VG
7a. Extend/increase the LV size by 2G to make it 6GB
[root@HQDEV1 ~]# lvextend -L +2G /dev/tekneed_vg/tekneed_lv /dev/sdc

  Size of logical volume tekneed_vg/tekneed_lv changed from 4.00 GiB (1024 extents) to 6.00 GiB (1536 extents).
  Logical volume tekneed_vg/tekneed_lv successfully resized.
[root@HQDEV1 ~]#
7b. If the available space on the VG is enough and there is no need for VG extension, use the following command to increase or extend a LV
[root@HQDEV1 ~]# lvextend -L +2G /dev/tekneed_vg/tekneed_lv8. verify the new LV size
[root@HQDEV1 ~]# lvs

  LV         VG         Attr       LSize   Pool Origin Data%  Meta%  Move Log Cpy%Sync Convert
  root       rhel       -wi-ao---- <12.50g
  swap       rhel       -wi-ao----   1.50g
  tekneed_lv tekneed_vg -wi-ao----   6.00g
The new LV size is now 6G but we need to resize the filesystem so that it can take the new volume extension.
9. Let’s verify the filesystem before we resize it
[root@HQDEV1 ~]# df -h

Filesystem                         Size  Used Avail Use% Mounted on
devtmpfs                           886M     0  886M   0% /dev
tmpfs                              904M     0  904M   0% /dev/shm
tmpfs                              904M  9.7M  894M   2% /run
tmpfs                              904M     0  904M   0% /sys/fs/cgroup
/dev/mapper/rhel-root               13G  4.4G  8.2G  35% /
/dev/sda1                         1014M  180M  835M  18% /boot
tmpfs                              181M  1.2M  180M   1% /run/user/42
tmpfs                              181M  4.6M  177M   3% /run/user/0
/dev/sr0                           7.4G  7.4G     0 100% /run/media/root/RHEL-8-1-0-BaseOS-x86_64
/dev/mapper/tekneed_vg-tekneed_lv  3.9G   16M  3.7G   1% /victor
You can see that the filesystem is yet to be increased, now let’s resize the filesystem
10. Resize the filesystem.
If your filesystem is ext4, ext3, or ext2, use the command below,
[root@HQDEV1 ~]# resize2fs /dev/tekneed_vg/tekneed_lv

resize2fs 1.44.6 (5-Mar-2019)
Filesystem at /dev/tekneed_vg/tekneed_lv is mounted on /victor; on-line resizing required
old_desc_blocks = 1, new_desc_blocks = 1
The filesystem on /dev/tekneed_vg/tekneed_lv is now 1572864 (4k) blocks long.
If your filesystem is xfs, you may use the command below,
# xfs_growfs /dev/tekneed_vg/tekneed_lvYou can also use the fsadm utility to resize any kind of file system if you don’t want to use the xfs_growfs or the resize2fs utilities
11. Now verify the filesystem size again
[root@HQDEV1 ~]# df -h

Filesystem                         Size  Used Avail Use% Mounted on
devtmpfs                           886M     0  886M   0% /dev
tmpfs                              904M     0  904M   0% /dev/shm
tmpfs                              904M  9.7M  894M   2% /run
tmpfs                              904M     0  904M   0% /sys/fs/cgroup
/dev/mapper/rhel-root               13G  4.4G  8.2G  35% /
/dev/sda1                         1014M  180M  835M  18% /boot
tmpfs                              181M  1.2M  180M   1% /run/user/42
tmpfs                              181M  4.6M  177M   3% /run/user/0
/dev/sr0                           7.4G  7.4G     0 100% /run/media/root/RHEL-8-1-0-BaseOS-x86_64
/dev/mapper/tekneed_vg-tekneed_lv  5.9G   16M  5.6G   1% /victor
you can now see that the filesystem has increased.
Now let’s see how we can reduce a LV.
How To Reduce / Shrink a Logical Volume (LV) Partition In Linux (RHEL 7&8)
The activity in this scenario is to reduce the logical volume (tekneed_lv) to 2G
You need to verify the used size of the LV before reducing it to avoid loss of data.
Take the following steps to reduce a LV
1. unmount the LV partition or filesystem
[root@HQDEV1 ~]# umount /dev/tekneed_vg/tekneed_lv2. Do a filesystem check using “fsck” to be sure the drive is healthy and will survive a shrink
NB: Currently, you can’t shrink the xfs filesystem
[root@HQDEV1 ~]# e2fsck -f /dev/tekneed_vg/tekneed_lv

e2fsck 1.44.6 (5-Mar-2019)
Pass 1: Checking inodes, blocks, and sizes
Pass 2: Checking directory structure
Pass 3: Checking directory connectivity
Pass 4: Checking reference counts
Pass 5: Checking group summary information
/dev/tekneed_vg/tekneed_lv: 11/393216 files (0.0% non-contiguous), 45166/1572864 blocks
[root@HQDEV1 ~]#
NB: It is not a best practice to continue with a filesystem reduction if even one out of the five filesystem checks fail
3. Reduce the filesystem to the desired size you want to reduce it to. In our case, 2GB
[root@HQDEV1 ~]# resize2fs /dev/tekneed_vg/tekneed_lv 2G

resize2fs 1.44.6 (5-Mar-2019)
Resizing the filesystem on /dev/tekneed_vg/tekneed_lv to 524288 (4k) blocks.
The filesystem on /dev/tekneed_vg/tekneed_lv is now 524288 (4k) blocks long.
4. Reduce the LV size to the desired size you want to reduce it to. In our case, 2GB
[root@HQDEV1 ~]# lvreduce -L 2G /dev/tekneed_vg/tekneed_lv

  WARNING: Reducing active logical volume to 2.00 GiB.
  THIS MAY DESTROY YOUR DATA (filesystem etc.)
Do you really want to reduce tekneed_vg/tekneed_lv? [y/n]: y
  Size of logical volume tekneed_vg/tekneed_lv changed from 6.00 GiB (1536 extents) to 2.00 GiB (512 extents).
  Logical volume tekneed_vg/tekneed_lv successfully resized.
[root@HQDEV1 ~]#
You may or may not do a filesystem check again before mounting the drive / filesystem
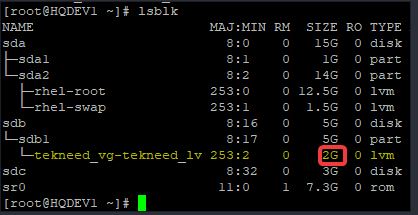
5. Verify the new partition or drive size
[root@HQDEV1 ~]# lsblk

NAME                      MAJ:MIN RM  SIZE RO TYPE MOUNTPOINT
sda                         8:0    0   15G  0 disk
├─sda1                      8:1    0    1G  0 part /boot
└─sda2                      8:2    0   14G  0 part
  ├─rhel-root             253:0    0 12.5G  0 lvm  /
  └─rhel-swap             253:1    0  1.5G  0 lvm  [SWAP]
sdb                         8:16   0    5G  0 disk
└─sdb1                      8:17   0    5G  0 part
  └─tekneed_vg-tekneed_lv 253:2    0    2G  0 lvm
sdc                         8:32   0    3G  0 disk
sr0                        11:0    1  7.3G  0 rom  /run/media/root/RHEL-8-1-0-BaseOS-x86_64
[root@HQDEV1 ~]#
5. Mount the filesystem
[root@HQDEV1 ~]# mount /dev/tekneed_vg/tekneed_lv /victor/OR
[root@HQDEV1 ~]# mount -a6. verify the mounted filesystem
[root@HQDEV1 ~]# df -h

Filesystem                         Size  Used Avail Use% Mounted on
devtmpfs                           886M     0  886M   0% /dev
tmpfs                              904M     0  904M   0% /dev/shm
tmpfs                              904M  9.7M  894M   2% /run
tmpfs                              904M     0  904M   0% /sys/fs/cgroup
/dev/mapper/rhel-root               13G  4.4G  8.2G  35% /
/dev/sda1                         1014M  180M  835M  18% /boot
tmpfs                              181M  1.2M  180M   1% /run/user/42
tmpfs                              181M  4.6M  177M   3% /run/user/0
/dev/sr0                           7.4G  7.4G     0 100% /run/media/root/RHEL-8-1-0-BaseOS-x86_64
/dev/mapper/tekneed_vg-tekneed_lv  2.0G   12M  1.8G   1% /victor
[root@HQDEV1 ~]#
Your feedback is welcomed. If you love others, you will share with others
Thanks the article was very useful