Last updated: October 2021
Contents
What Is Ansible Inventory?
Ansible inventory, from the word inventory is a file inventory that consists the managed hosts or group of managed hosts ansible tasks operates on.
The managed hosts can be specified using their IP addresses or the FQDN (Fully qualified domain name) in the ansible inventory file.
Ansible control node will operate on the managed hosts using a connection plugin and the default connection plugin for ansible is the SSH plugin.
The SSH plugin is sufficient to carry all ansible operations or tasks for Linux machines but may not be suitable for other operating systems such as windows or windows related devices, containers, etc because SSH is not installed in these instances.
Other plugins will have to be used for these instances. Not to go out of the scope of the study, we are going to be using only the default connection plugin in this lesson which is the SSH plugin.
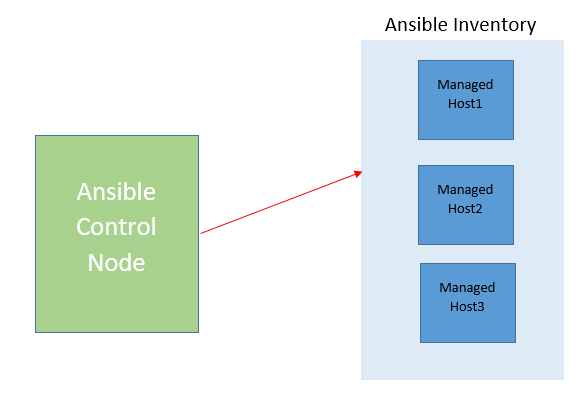
The diagram below simply explains the relationship between the ansible control node and the ansible inventory file.

What Are The Types Of Inventories In Ansible
There are two types of ansible inventories which are the static inventory and the dynamic inventory.
Dynamic inventories are written in python codes, specifying the managed hosts while static inventories are simply written in INI or YAML data structure, specifying the managed hosts.
In this lesson, we will only look at the static inventory written in INI data syntax. As we go on in this course, we will look at how to define other types of inventories.
Let’s start with creating a custom static inventory with the INI data structure.
How To Build a Static Inventory Using The INI Format
Building a static inventory file using the INI data structure is very straightforward.
The managed hosts’ information in an inventory file can either be in a single line, in a group, or in a nested group.
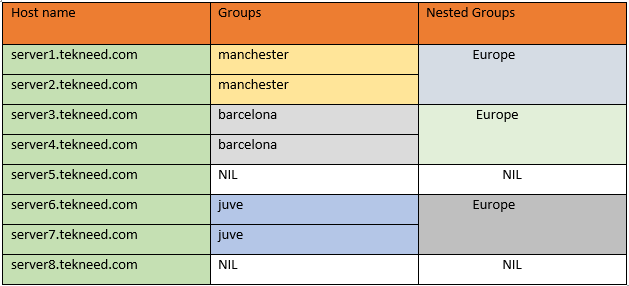
For clarity, let’s use the table below to build an ansible inventory file. I believe football lovers like me will understand much more how I came about the groupings in this table. lol. If you don’t like football, please don’t ask me. lol.

From the table above, server1 to server8 will be the managed hosts.
Now, let’s see how to create an inventory in a single line first, that is, creating an inventory, hosts by hosts
To create an inventory file for servers1-8 in a single line, follow these steps.
1. In your home directory, create an inventory file.
NB: The inventory file can be created in any location and not necessarily your home directory.
[root@DRDEV1 ~]# vim static-ini-inventoryserver1.tekneed.com
server2.tekneed.com
server3.tekneed.com
server4.tekneed.com
server5.tekneed.com
server6.tekneed.com
server7.tekneed.com
server8.tekneed.com
2. verify that the ansible inventory has been built
[root@DRDEV1 ~]# ansible --list-hosts all -i static-ini-inventory
hosts (8):
server1.tekneed.com
server2.tekneed.com
server3.tekneed.com
server4.tekneed.com
server5.tekneed.com
server6.tekneed.com
server7.tekneed.com
server8.tekneed.com
from the output, you can see that the managed hosts are displayed individually. The -i option specifies the inventory file.
To create an ansible inventory file for servers1-8, and put them in a group using the table above, take the following steps.
1. create an inventory file in your home directory
[root@DRDEV1 ~]# vim static-ini-inventoryserver5.tekneed.com
server8.tekneed.com
[manchester]
server1.tekneed.com
server2.tekneed.com
[barcelona]
server3.tekneed.com
server4.tekneed.com
[juve]
server6.tekneed.com
server7.tekneed.com
2. Verify that the ansible inventory has been built and grouped.
[root@DRDEV1 ~]# ansible --list-hosts manchester -i static-ini-inventory
hosts (2):
server1.tekneed.com
server2.tekneed.com[root@DRDEV1 ~]# ansible --list-hosts barcelona -i static-ini-inventory
hosts (2):
server3.tekneed.com
server4.tekneed.com[root@DRDEV1 ~]# ansible --list-hosts juve -i static-ini-inventory
hosts (2):
server6.tekneed.com
server7.tekneed.com[root@DRDEV1 ~]# ansible --list-hosts ungrouped -i static-ini-inventory
hosts (2):
server5.tekneed.com
server8.tekneed.comIt is also good to know that the IP’s of the server, instead of the FQDN can be used as well.
For example, if there is another group called madrid with the IPs of 192.168.170.140 – 192.168.170.147, the ansible inventory file can be populated in range to make it easy as shown below.
[madrid]
192.168.170.[140:147]Similarly, servers1-8 we populated in the inventory file above can also be populated in a range as shown below
server[1:8].tekneed.comTo create an ansible inventory file for servers1-8 in a nested group using the table above, take the following steps.
NB: A nested group is a group in a group
1 . Create an inventory file in your home directory
[root@DRDEV1 ~]# vim static-ini-inventoryserver5.tekneed.com
server8.tekneed.com
[manchester]
server1.tekneed.com
server2.tekneed.com
[barcelona]
server3.tekneed.com
server4.tekneed.com
[juve]
server6.tekneed.com
server7.tekneed.com
[Europe:children]
manchester
barcelona
juve
2. verify that the inventory has been built and nested-grouped
[root@DRDEV1 ~]# ansible --list-hosts Europe -i static-ini-inventory
hosts (6):
server1.tekneed.com
server2.tekneed.com
server3.tekneed.com
server4.tekneed.com
server6.tekneed.com
server7.tekneed.comNote that the parameter, children, must be added to create a nested group.
Grouping or nest-grouping managed hosts makes administration easy because you can easily execute a task on all the hosts that are grouped or nest-grouped than executing a task on hosts individually.
You can see that it is up to you to build your ansible inventory file the way you wish to. You can either work hardly smartly or you work hardly hardly. The choice is yours. Above all, it also depends on the architecture of your environment.
To see the display of your ansible inventory file graphically, use the command below.
# ansible-inventory --graphHaving understood how to create a custom static inventory using the INI format, let’s see how to create a default static inventory.
How To create a Default Static Inventory Using The INI Format
One can also create a default static inventory. In this case, the managed host inventories will be populated in /etc/ansible/hosts.
The path, “/etc/ansible/hosts” is the default path for ansible hosts file
To populate the managed hosts inventories in /etc/ansible/hosts file, take the following steps.
1 . open the file, and at the end of the line, add the managed hosts.
[root@DRDEV1 ~]# vim /etc/ansible/hosts............
# Here's another example of host ranges, this time there are no
# leading 0s:
## db-[99:101]-node.example.com
server5.tekneed.com
server8.tekneed.com

[manchester]
server1.tekneed.com
server2.tekneed.com

[barcelona]
server3.tekneed.com
server4.tekneed.com

[juve]
server6.tekneed.com
server7.tekneed.com
[Europe:children]
manchester
barcelona
juve

2. verify that the inventory has been created.
[root@DRDEV1 ~]# ansible --list-hosts all

  hosts (8):
    server5.tekneed.com
    server8.tekneed.com
    server1.tekneed.com
    server2.tekneed.com
    server3.tekneed.com
    server4.tekneed.com
    server6.tekneed.com
    server7.tekneed.com
You can see that we did not use the -i option to specify the inventory file like we did when we created a custom inventory since it is a default path for ansible hosts.
Working With Ansible Patterns
Ansible pattern is how we choose, select or determine the set of hosts we want the Ansible operations or tasks to operate against. This pattern can be selected while using the Ansible ad-hoc command or the playbook.
This is similar to using wildcards in Linux
Let’s see some examples of how some sets of hosts can be selected using the example above.
*To select all the hosts in the inventory file, the * character can also be replaced with all, hence the command below can be used.
[root@drdev1 ~]# ansible --list-hosts '*'

  hosts (8):
    server5.tekneed.com
    server8.tekneed.com
    server1.tekneed.com
    server2.tekneed.com
    server3.tekneed.com
    server4.tekneed.com
    server6.tekneed.com
    server7.tekneed.com
*To select the hosts that ends with .tekneed.com, the * character with the Ansible command below can be used
[root@drdev1 ~]# ansible --list-hosts '*.tekneed.com'

  hosts (8):
    server5.tekneed.com
    server8.tekneed.com
    server1.tekneed.com
    server2.tekneed.com
    server3.tekneed.com
    server4.tekneed.com
    server6.tekneed.com
    server7.tekneed.com
*To select the hosts that are common to manchester group or part of manchester group and not part of the Europe group, the ! character with the command below can be used
[root@admindrdev1 ~]# ansible 'manchester,!Europe' --list-hosts

[WARNING]: No hosts matched, nothing to do

hosts (0):*To select the hosts that are common to or part of the manchester group and also part of the Europe group, the & character with the Ansible command below can be used
[root@drdev1 ~]# ansible 'manchester,&Europe' --list-hosts

  hosts (2):
    server1.tekneed.com
    server2.tekneed.com
*To select hosts that are common to or part of the manchester group and barcelona group, the Ansible command below can be used.
[root@drdev1 ~]# ansible 'manchester,&barcelona' --list-hosts

[WARNING]: No hosts matched, nothing to do

  hosts (0):
You can click here to know more about how Ansible pattern works.
In the next lesson, we will look at how to manage ansible configuration files.
Class Activity
Build a custom inventory in your /home/lisa directory with just 10 states in your country and group them into three groups named group1, group2, and group3.
Make a fourth group using group1 and group2 only. You can share your answers and your challenges in the comment section below.
If you like this article, you can support us by
1. sharing this article.
2. Buying the article writer a coffee (click here to buy a coffee)
3. Donating to push our project to the next level. (click here to donate)
If you need personal training, send an email to info@tekneed.com
Click Here To Watch Video On How To Create Ansible Inventory
RHCE Exam Practice Question & Answer On Creating Ansible Inventory
Your feedback is welcomed. If you love others, you will share with others
Leave a Reply