Last updated: September 2026
In this Article, You will learn how to create the Kubernetes Kubeconfig file (VKS, TKGI, AKS, EKS, OpenShift, Vanilla k8s, Rancher)
Understanding The Subject Matter
When working with Kubernetes, there are situations where you need to provide access to a third-party application or another team without exposing your personal kubeconfig file. Monitoring solutions such as Elastic, Prometheus, Grafana, or custom automation scripts usually require only limited access to the Kubernetes API server.
Instead of sharing an administrator kubeconfig, Kubernetes allows us to create a ServiceAccount with only the required permissions and generate a dedicated kubeconfig file that authenticates using that ServiceAccount.
In this guide, you will learn how to create a clean kubeconfig file from scratch for a ServiceAccount and verify that it can access your Kubernetes cluster successfully
Before jumping into the practical steps, it is important to understand what a Kubernetes kubeconfig file actually is.
A kubeconfig file is simply a configuration file used by kubectl and other Kubernetes clients to connect to a Kubernetes cluster. Rather than containing the cluster itself, it stores the information required to communicate securely with the Kubernetes API Server.
A kubeconfig normally contains three important sections:
- Cluster
- User
- Context
Let’s understand each of them.
1. Cluster Section
The Cluster section tells kubectl where the Kubernetes API Server is located.
It contains:
- API Server URL
- Cluster Certificate Authority (CA)
Example
clusters:
- cluster:
    server: https://10.10.77.24:6443
    certificate-authority-data: LS0tLS1CRUdJTi...
The API Server is the central management component of Kubernetes. Every kubectl command eventually communicates with the API Server.
The certificate-authority-data allows kubectl to verify that it is connecting to the genuine Kubernetes API Server and not an attacker
2. User Section
The User section specifies how authentication will occur.
Authentication can be performed using:
- Client certificates
- OpenID Connect
- Username and Password
- Bearer Token
- ServiceAccount Token
For ServiceAccounts, Kubernetes uses a JWT token.
Example
users:
- name: prom-user
  user:
    token: eyJhbGc...
Whenever kubectl sends a request to the API Server, this token is attached to prove the identity of the caller.
3. Context Section
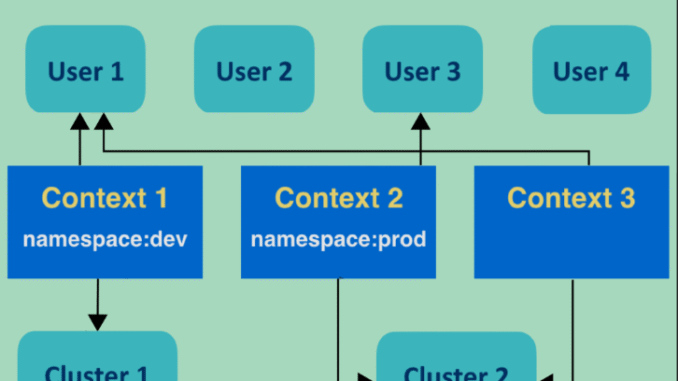
A Context links together:
- One Cluster
- One User
- Optional Namespace
Example
contexts:
- context:
    cluster: production
    user: prom-user
    namespace: monitoring
Think of a Context as a profile that tells kubectl:
“Use this user to connect to this cluster.”
Without a Context, kubectl would not know which cluster and user to use together.
What is WCP?
If you are working with VMware Tanzu or VMware Kubernetes Service (VKS), you may notice usernames similar to:
wcp:10.10.77.24:administratorOR
wcp:10.10.77.24:prom-userWCP stands for Workload Control Plane.
It is VMware’s Kubernetes control plane running on the vSphere Supervisor Cluster.
The wcp: prefix is simply a username format used by VMware to identify users authenticating through the Supervisor Cluster. It is not a Kubernetes requirement.
For ServiceAccounts, you can keep the same naming format or use any descriptive username. Kubernetes only requires that the username referenced in the Context matches the username defined under the Users section.
For example, both of the following are valid.
users:
- name: elastic-user
OR
users:
- name: wcp:10.10.77.24:prom-user
The important thing is consistency. For VMware Tanzu VKS, I’ll advise one uses the second format with wcp.
Kubernetes Kubeconfig File Lab Environment
The following environment is used throughout this guide.
| Component | Value |
|---|---|
| Kubernetes Distribution | VMware Kubernetes Service (VKS) |
| Kubernetes Version | v1.34.x |
| Authentication | ServiceAccount Token |
| Client | kubectl |
| Operating System | Linux |
Prerequisites
Before proceeding, ensure you have:
- kubectl installed
- Cluster administrator privileges
- A ServiceAccount already created
- Appropriate RBAC permissions assigned
- Access to the Kubernetes API Server
ACTION TIME
Now that we understand how kubeconfig works, let’s create one.
Step 1 – Obtain the API Server Address
Retrieve the API Server from your existing kubeconfig.
[tekneed_Victor@vmwarepkscli01 ~]$ kubectl cluster-info

Kubernetes control plane is running at https://10.10.77.24:6443
CoreDNS is running at https://10.10.77.24:6443/api/v1/namespaces/kube-system/services/kube-dns:dns/proxy

To further debug and diagnose cluster problems, use 'kubectl cluster-info dump'.
OR
[tekneed_Victor@vmwarepkscli01 ~]$ kubectl config view --raw --minify

apiVersion: v1
clusters:
- cluster:
    certificate-authority-data: LS0tLZbTN1bW0zcWE4B..........
    server: https://10.10.77.24:6443
  name: 10.10.77.24
contexts:
- context:
    cluster: 10.10.77.24
    namespace: drp-settlement-01
    user: wcp:10.10.77.24:tekneed_Victor@vsphere.local
  name: drp-settlement-01
current-context: drp-settlement-01
kind: Config
preferences: {}
users:
- name: wcp:10.10.77.24:tekneed_Victor@vsphere.local
  user:
    token: eyJraWQiOiIyMjg0ODcyMkMzRjQ0QjhCQU..........
We can see that the API server/endpoint is https://10.10.77.24:6443
Step 2 – Retrieve the Cluster Certificate
[tekneed_Victor@vmwarepkscli01 ~]$ kubectl config view --raw --minify \
> -o jsonpath='{.clusters[0].cluster.certificate-authority-data}'

LS0tLZbTN1bW0zcWE4B.........
This outputs a long Base64 string.
Copy the entire output exactly as displayed.
Do not add spaces or line breaks.
OR better still, because kubernetes can always complain manytimes regarding the output, one can juat use this command “kubectl config view – -raw – -minify” and output it to a file. which we will do below.
Step 3 – Retrieve the ServiceAccount Token
This must have been created and stored somewhere. If you don’t know how to create a service account and generate a token, please click here
ryJraWQigtyyensjmw123nkszRjQjlsn3GNSNM........
Step 4 – Create the Kubernetes kubeconfig File
[tekneed_Victor@vmwarepkscli01 ~]$ vi prom-user-kubeconfig.yaml
apiVersion: v1
kind: Config

clusters:
- name: production
  cluster:
    server: https://<API_SERVER>
    certificate-authority-data: <BASE64_CA>

users:
- name: prom-user
  user:
    token: <SERVICEACCOUNT_TOKEN>

contexts:
- name: production
  context:
    cluster: production
    user: prom-user

current-context: production
Like I mentioned, depending on your kubernetes distibution ( VKS, TKGI, AKS, EKS, Vanilla K8S, OpenShift), I’ll rather use the command below to get kubeconfig configuration that kubectl is currently using, output it to a file and edit the ServiceAccount name, and the token – It saves you from getting a lot of error
[tekneed_Victor@vmwarepkscli01 ~]$ kubectl config view --raw --minify > prom-user-kubeconfig.yaml--raw tells kubectl to show the actual values, including sensitive data.
-- minify shows only the configuration related to your current context. Without minify, Kubernetes just picks everything in your ~/.kube/config file which can contain many clusters, users and contexts. [tekneed_Victor@vmwarepkscli01 ~]$ vi prom-user-kubeconfig.yamlapiVersion: v1
clusters:
- cluster:
certificate-authority-data: LS0tLZbTN1bW0zcWE4B..........
server: https://10.10.77.24:6443
name: 10.10.77.24
contexts:
- context:
cluster: 10.10.77.24
namespace: drp-settlement-01
user: wcp:10.10.77.24:prom-user
name: prom-user
current-context: drp-settlement-01
kind: Config
preferences: {}
users:
- name: wcp:10.10.77.24:prom-user
user:
token: IyMjg0ODcyMkMzRjQ0QjhCQUeyJraWQiOi..........Step 5 – Verify the Configuration
[tekneed_Victor@vmwarepkscli01 ~]$ kubectl --kubeconfig prom-user-kubeconfig.yaml get nodes

NAME                                                     STATUS   ROLES           AGE   VERSION
drp-settlement-01 -b-np-6rtw-eraf-bgwr   Ready    <none>          26d   v1.34.2+vmware.2
drp-settlement-01-kw-6rtw-fgwr-swhj   Ready    <none>          26d   v1.34.2+vmware.2
drp-settlement-01-r-kw-dwrt-swyu-gqet   Ready    <none>          26d
..........
Leave a Reply