
Last updated: February 2022
In this lesson, you will learn what Ansible loop is and how to use and manage loops in ansible playbook.
Contents
UNDERSTANDING THE SUBJECT MATTER
What Is Loop In Ansible
Just as we have loops in programming, Ansible also allows looping. Ansible loop allows the repetition of tasks as many times as possible. Tasks such as creating multiple users, changing the ownership on files, installing multiple packages, etc.
Using Ansible loop is a very big advantage for administrators. It eradicates the need to write multiple plays or tasks that uses the same module, which can be sometimes tedious.
With the use of loop, the codes in a playbook become fewer and it makes the playbook tidier, easier to read and understand.
For example, if three users are to be created with the user module, the administrator doesn’t need to write three tasks to create the three users. With the use of loop, the admin will only need to write one task, which is enough to do this. This one task will iterate over a list of the three users.
Loop, many times is used at the task level and not at the play level.
How To Use Ansible Loop
Loop uses one of the Ansible plugins called lookup to make possible the loop process. The lookup plugin is of different types and there are quite a number of them.
To see the types of lookup plugins, use the command,
[lisa@drdev1 ~]$ ansible-doc -t lookup -l

aws_account_attribute Look up AWS account attributes
aws_secret            Look up secrets stored in AWS Secrets Manager

........
You can also search for a particular plugin string type.
To get detailed information about a lookup plugin, use the command,
# ansible-doc -t lookup <lookup-plugin>For example, to get detailed information about the “list” lookup plugin type, use the command,
[lisa@drdev1 ~]$ ansible-doc -t lookup list

> LIST    (/usr/lib/python3.6/site-packages/ansible/plugins/lookup/list.py)

        this is mostly a noop, to be used as a with_list loop when you dont want the
        content transformed in any way.
......
Before ansible 2.5, the keyword used to create loops is with_<lookup>.
For example, to create a loop with the “list” lookup plugin, the keyword would be “with_list”.
To create a loop with the “dict” lookup plugin, the keyword would be “with_dict”
Similarly, to create a loop with the “item” lookup plugin, the keyword would be “with_item”. However, the keyword, “with_<lookup>” has now been replaced by the keyword, “loop” form ansible 2.5 upward but “with_lookup” has not been deprecated, hence can still be used as of the time this article is written till God knows when.
The keywords, with_<lookup> and loop are used at a task level and not at a play level.
Moving on. let’s understand what an item is in Ansible.
What Is Ansible Item
Item is every single value inside of a loop. It is a variable automatically created by ansible.
Having understood what a loop is, let’s look at how to use Ansible loops in the “ACTION TIME” section below.
ACTION TIME
Step By Step Guide Of How To Use Ansible Loop In Playbooks
Let’s start with looping over a simple list, then we also look at how to loop over a list of hashes or dictionaries, etc.
Iterating Over a Simple list
Ordinarily, without using loop, to create three users with the names, kehinde, alex and oyin, our playbook file will be as below.
- name: create new users
  hosts: hqdev1.tekneed.com
  tasks:
     - name: create new user1
       user:
         name: kehinde
         state: present

     - name: create new user2
       user:
         name: alex
         state: present

     - name: create new user3
       user:
         name: oyin
         state: present
Now, to create these same three users using the Ansible loop, follow the steps below.
1. create a playbook with variables and with loops.
[lisa@drdev1 ~]$ vim play12.yml- name: create new users
hosts: hqdev1.tekneed.com
vars:
newusers:
- kehinde
- alex
- oyin
tasks:
- name: create new users
user:
name: "{{ item }}"
state: present
loop: "{{ newusers }}"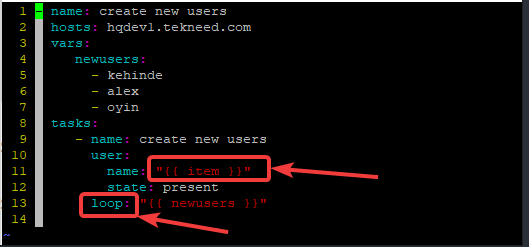
NB: The value for the name(argument/key) will refer to item. Like I mentioned in the “UNDERSTANDING THE SUBJECT MATTER” SECTION, an item is all the values in a loop, hence, this task will iterate over the lists of users, which are defined as variables, and the loop will be referencing the variable.
2. Run the playbook
[lisa@drdev1 ~]$ ansible-playbook play12.yml

PLAY [create new users]
ok: [hqdev1.tekneed.com]
......
The playbook can also be written as below
- name: create new users
  hosts: hqdev1.tekneed.com
  tasks:
     - name: create new users
       user:
         name: "{{ item }}"
         state: present
       loop:
         - kehinde
         - alex
         - oyin
Iterating over a list of hashes or dictionaries
An example of creating a playbook to iterate over list of hashes is as below
1. create a playbook.
[lisa@drdev1 ~]$ vim play13.yml- name: Add users to groups
hosts: hqdev1.tekneed.com
tasks:
- name: add users to their groups
user:
name: "{{ item.name }}"
groups: "{{ item.groups }}"
loop:
- name: kehinde
groups: wheel
- name: alex
groups: finance
- name: oyin
groups: financeThis can be useful when items have two values, in this case, the user and the group, hence one will have to pass an array of dictionaries. The task will iterate over the list of users and groups.
The playbook above can also be written in JSON format as shown below.
- name: Add users to groups
  hosts: hqdev1.tekneed.com
  tasks:
    - name: add users to their groups
      user:
        name: "{{ item.name }}"
        groups: "{{ item.groups }}"
      loop:
        - { name: 'kehinde', groups: 'wheel' }
        - { name: 'alex', groups: 'finance' }
        - { name: 'oyin', groups: 'finance' }
More so, just as I mentioned in the “UNDERSTANDING THE SUBJECT MATTER” section above, the keyword “with_lookup” can still be used because it is not deprecated yet. Hence, the keyword, “loop” can be replaced with the keyword, “with_items” as shown below
- name: Add users to groups
  hosts: hqdev1.tekneed.com
  tasks:
    - name: add users to their groups
      user:
        name: "{{ item.name }}"
        groups: "{{ item.groups }}"
      with_items:
        - { name: 'kehinde', groups: 'wheel' }
        - { name: 'alex', groups: 'finance' }
        - { name: 'oyin', groups: 'finance' }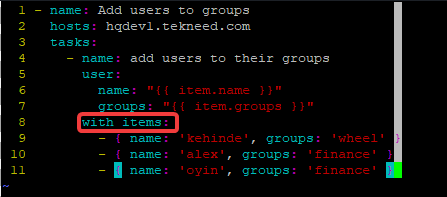
2. Run the playbook
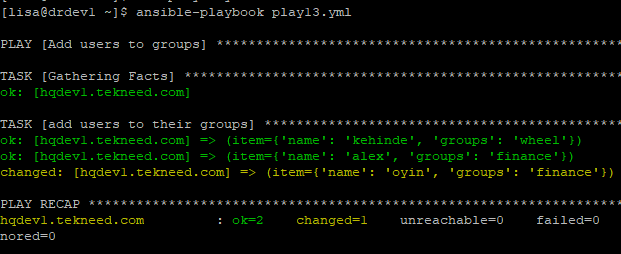
Running Tasks Conditionally In Ansible
Ansible tasks can be run conditionally. That is, a condition has to be satisfied or met before the tasks can run. For example, “the httpd package should be installed only when the managed host is CentOS”.
The condition here is if the OS is not CentOS, the httpd package should not be installed. The “when” directive is used to run a conditional task.
Let’s understand further with the simple playbook below.
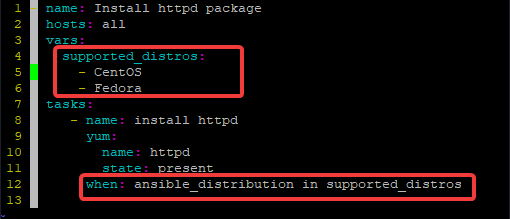
1. create a playbook to install the httpd package if the managed hosts are Centos and Fedora only.
- name: Install httpd package
  hosts: all
  vars:
    supported_distros:
      - CentOS
      - Fedora
  tasks:
     - name: install httpd
       yum:
         name: httpd
         state: present
       when: ansible_distribution in supported_distros
2. Run the playbook
[lisa@drdev1 ~]$ ansible-playbook play15.yml

PLAY [Install httpd package] ************************************************************
.......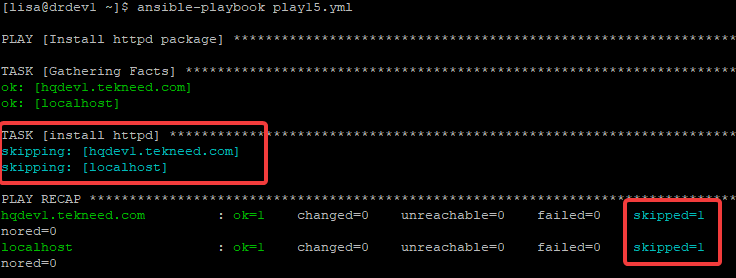
You can see that the task is skipped because the managed hosts are RHEL and not CentOS nor Fedora.
More so, you don’t need to encapsulate the ansible_distribution variable. Actually, it’s a fact and Ansible already knows it’s a variable. The same goes for some other Ansible operators and facts.
Some other examples of operators for conditional tasks are; (ansible_machine == “x86_64”), (min_memory < 132), (min_memory is defined), (min_memory >= 112), etc.
The operator, ansible_machine ==”x86_64 simply means, (when the architecture of the managed host is x86_64) and the operator, min_memory < 132 means, (when the minimum memory is less than 132).
One can always get to see how to use the ansible facts if one is not too familiar with the keys or directives. We already learnt this in the “managing facts” lesson.
One can also run tasks with multiple conditions. Let’s understand further by creating a playbook with multiple conditions.
1. create a playbook to install the httpd package when the managed host is CentOS 8 or when the managed host is Fedora 28.
[lisa@drdev1 ~]$ vim play16.yml- name: Install httpd package
hosts: all
tasks:
- name: install httpd
yum:
name: httpd
state: present
when: >
( ansible_distribution == "CentOS"
and ansible_distribution_major_version == "8" )
or
( ansible_distribution == "Fedora"
and ansible_distribution_major_version == "28" )
2. Run the playbook
[lisa@drdev1 ~]$ ansible-playbook play16.yml

PLAY [Install httpd package]
.........
Using Loop and Conditional Task Together
loops and conditional tasks can be combined. Let’s see an example by creating a playbook below.
1. create a playbook that installs nmap if the space in the root directory is greater than 500MB.
[lisa@drdev1 ~]$ vim play15.yml- name: Install nmap
hosts: hqdev1.tekneed.com
tasks:
- name: install nmap
yum:
name: nmap
state: present
loop: "{{ ansible_mounts }}"
when: item.mount == "/" and item.size_available > 500000000
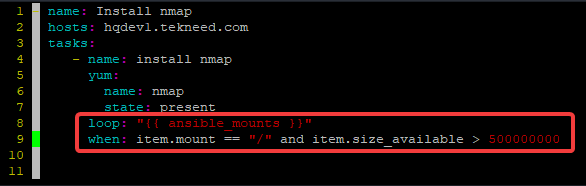
What will happen is that the yum module will install the nmap package and the task will iterate/loop over the “{{ ansible_mounts }}” variable using the directives/keys that are specified for ansible_mounts, in this case, item.mount and item.size_available.
The {{ ansible_mounts }} variable is a fact, and to effectively use facts that you are you are not familiar with, like I mentioned in the managing facts lesson, it is best you use the setup module in the command line or the debug module in the playbook to get the information you need on the facts.
For example, to get the ansible_mounts facts information using the setup module, use the command below.
[lisa@drdev1 ~]$ ansible hqdev1.tekneed.com -m setup |moresearch for the string, “ansible_mounts” to see the different keys for it
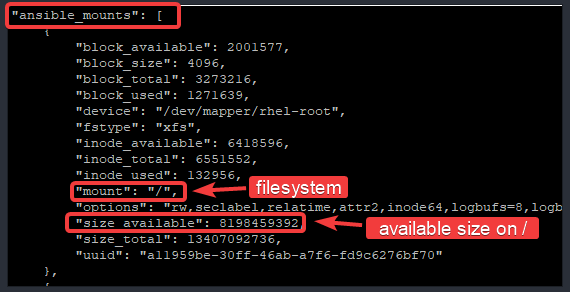
You can now see the different keys for the ansible_mounts facts
2. Run the playbook.
[lisa@drdev1 ~]$ ansible-playbook play15.yml

PLAY [Install nmap] ******************************************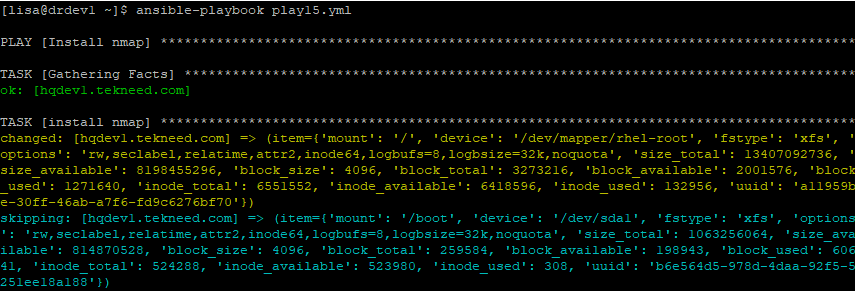
To know more about loop, you can seen here.
Class Activity
Write an Ansible playbook to create the group named tekneed and the users, tekneed1, tekneed2, and tekneed3. The playbook should also add the three users in the tekneed group. (The use of loop should be used to perform these actions).
If you like this article, you can support us by
1. sharing this article.
2. Buying the article writer a coffee (click here to buy a coffee)
3. Donating to push our project to the next level. (click here to donate)
If you need personal training, send an email to info@tekneed.com
Click Here To Watch The Video On How To Use Ansible Loop
RHCE Exam Practice Question On Using Ansible Loop
Your feedback is welcomed. If you love others, you will share with others
Leave a Reply