
Last updated: August 2021
In this lesson, we will look at what Network bonding (NIC bonding) and what Network teaming (NIC teaming) is, we will also look at the difference between the two, and the step by step guide of how to configure Network teaming, and network bonding In Linux.
You may want to click here to understand the basics of networking in Linux if you do not have the understanding.
UNDERSTANDING THE SUBJECT MATTER
What is Network Teaming and Network Bonding (NIC Teaming & NIC Bonding)
NIC teaming and NIC bonding are often used interchangeably, however, they are different.
The combination of two or more network links to provide a bigger network throughput or redundancy is known by many names such as; (channel bonding, Ethernet bonding, channel teaming, NIC teaming, port trunking, port channel, link aggregation, etc).
This concept in Linux is commonly called bonding.
What Is The Difference Between Teaming and Bonding In Linux
Prior to Red Hat Enterprise Linux 7 (RHEL 7), the implementation of this concept of network aggregation for a bigger throughput and redundancy is called bonding.
As RHEL 7 came by, the implementation of this concept was changed from bonding to teaming, however, teaming came with its own driver, entirely different from bonding’s driver. Teaming also came with some feature differences from bonding, hence, teaming is an alternative to bonding and not a replacement of bonding.
Depending on the requirements and the features you need, one can either implement or configure network bonding or network teaming.
click here to see the differences between network bonding and network teaming features
So, in summary, it is safe to say that network teaming is a new way of implementing network aggregation for a bigger throughput & redundancy, and an alternative to network bonding.
Well, with the way attention has shifted from bonding to teaming, teaming will most likely become a replacement for bonding in the coming years, but until then, it’s just an alternative.
Understanding NIC Teaming Terminologies
To properly understand how NIC teaming works, let’s understand some of the teaming terminologies.
*Teamd: teamd is the user space daemon/service responsible for network teaming.
*Teamdctl: teamdctl is a utility or tool used to manage teaming
*Runners: runners are teamd modes. Runners are teaming modes that are mostly written in JSON format. For Network bonding, runners are called bond modes.
Let’s understand the different types of bond modes/teamd runners and how they work.
What are The Different Modes/Runners Of Network Bonding and Teaming In Linux
There are different types of modes / runners; which are active-backup, round-robin, lacp, load balancing, broadcast, and random.
Let’s understand how these modes or runners work.
a). activebackup: One interface/port will be active while the other interfaces/ports will be a backup for the active one in case it fails. A numeric way of specifying activebackup runner/mode is using the number, (1).
b). roundrobin: Packets will be transmitted over all the interfaces/ports in turn, i.e, turn by turn. This runner/mode will do or rather supports both load balancing and fault tolerance. This runner/mode can also be specified as (balance-rr). A numeric way of specifying the roundrobin runner is using the number, (0).
c). lacp: Known as dynamic link aggregation makes all the aggregated links/interfaces act as one for higher throughput. It is also known as 802.3ad. It uses the the 802.3ad protocol for link aggregation. It supports both fault tolerance, and load balancing. This runner can also be specified as 802.3ad.
A numeric way of specifying the lacp runner is using the number, (4).
To use this runner on the system, lacp(802.3ad) must also be configured on the network switch, hence the switch must support IEEE 802.3ad dynamic link.
d). loadbalance: The transmitted packets will be load balanced/distributed across all the interfaces/ports with active Tx load balancing and Berkeley Packet Filter (BPF)-based Tx port selectors.
There are two types of this mode.
(i) Adaptive transmit load balancing (tlb): A numeric way of specifying tlb is using the number, (5)
(ii) Adaptive load balancing (alb): A numeric way of specifying alb is using the number, (6).
You can Click here to know more about tlb and alb
e). broadcast: Packets will be broadcast/transmitted over all the interfaces/ports. A numeric way of specifying the broadcast runner is using the number, (3)
f). random: Packets will be transmitted on selected ports randomly.
g). xor: Known as exclusive OR. Here, the calculation is done in a way that the MAC address of the slave NIC is measured with the Mac address of the incoming packets, once there is a confirmed connection, the same NIC will be used for the destination MAC address.
This mode can also be specified as balance-xor. A numeric way of specifying this mode is using the number, (2)
Bonding Module/Driver
Bonding uses the bonding module or driver. The module has to be loaded before network bonding can be done.
To verify if the module is loaded, use the command,
# lsmod |grep bonding

bonding               122351  0
If the module is not loaded, use the command below to load the module
# modprobe bondingThe good thing about bonding is that if you are not really sure of the bond mode that will be suitable for your system or network environment, you can edit the bonding information in the sysfs filesystem in the location, /sys/class/net without having to edit the bond configuration file, just restart the interface, and the new configuration happens immediately.
When you finally get the mode that will be suitable for your system, you can then edit the bond configuration file, and add the bonding mode to it.
The sysfs filesystem, as we already learnt, is a virtual file system that presents the current situation of whatsoever that is happening in the kernel in form of files and directories, and these objects (files and directories) can be manipulated just as you would manipulate any other type of filesystems with the different Linux utilities.
The sysfs is mounted on /sys directory.
To view all the bonds on the system, either up or down, use the command,
# cat /sys/class/net/bonding_mastersDoes Bonding Support Direct Cable Connection?
Bonding does not support direct cable connection, either straight cabling or crossover cabling only except a smart device; such as a network switch is used in between.
If one needs to loop two systems, or rather connect two systems together peer- to-peer with a straight cable or cross-over cable, bonding will only work if there is a switch involved.
Click here to know more about the root cause.
ACTION TIME
How To Configure Network Teaming or NIC Teaming In RHEL 7 & RHEL 8 Using nmcli
1. Install teamd if it is not installed on your system.
NOTE: Installing teamd may not be necessary on some systems.
[root@localhost ~]# yum install teamd NetworkManager-team -y

Updating Subscription Management repositories.
Red Hat Enterprise Linux 8 for x86_64 - BaseOS (RPMs)                                      1.5 MB/s |  34 MB     00:22
...........................
2. Create the team interface, in this case, team1
The command below will create the team1 interface and it’s configuration file using the active-backup runner.
#nmcli conn add type team con-name <connection-name> ifname <device-name> config '{"runner":{"name":"<runners-mode>"}}'Use the example as it is below to create team1
[root@localhost ~]# nmcli conn add type team con-name team1 ifname team1 config '{"runner":{"name":"activebackup"}}'

Connection 'team1' (ac40d71b-90c0-45db-8ab4-865eb5649b66) successfully added.
OR
# nmcli connection add type team con-name team1 ifname team1 team.runner activebackupThe command above will create team1 configuration file.
3. Add NIC interfaces to the team.
In this case, the NIC interfaces will be ens33, and ens38
# nmcli conn add type team-slave con-name <connection-name> ifname <device-name> master <teamed-interface>Use the example below to add the NIC interfaces to the team
[root@localhost ~]# nmcli conn add type team-slave con-name ens33 ifname ens33 master team1

Warning: There is another connection with the name 'ens33'. Reference the connection by its uuid '27c148ab-8248-4d63-af11-30eb5f6502f5'
Connection 'ens33' (27c148ab-8248-4d63-af11-30eb5f6502f5) successfully added.
....................
[root@localhost ~]# nmcli conn add type team-slave con-name ens38 ifname ens38 master team1
Connection 'ens38' (4871ff61-6cb0-4e0d-b7b1-9c828ccbeb21) successfully added.
......................The command above will create the ens33 and ens38 configuration files.
4. Configure IP settings for the teamed interface, in this case, team1
[root@localhost ~]# nmcli conn modify team1 ipv4.addresses 192.168.170.199/24[root@localhost ~]# nmcli conn mod team1 ipv4.gateway 192.168.170.2[root@localhost ~]# nmcli conn mod team1 ipv4.dns 192.168.170.2[root@localhost ~]# nmcli conn modify team1 ipv4.method manual5. You may want to restart the NIC interfaces, and NetworkManager.
[root@localhost ~]# systemctl restart NetworkManagerFor RHEL 7, you may want to restart network service
[root@localhost ~]# systemctl restart network[root@localhost ~]# nmcli conn down ens33 && nmcli conn up ens33
Connection 'ens33' successfully deactivated (D-Bus active path: /org/freedesktop/NetworkManager/ActiveConnection/1)
Connection successfully activated (D-Bus active path: /org/freedesktop/NetworkManager/ActiveConnection/6)
[root@localhost ~]# nmcli conn down ens38 && nmcli conn up ens38

Connection 'ens38' successfully deactivated (D-Bus active path: /org/freedesktop/NetworkManager/ActiveConnection/4)
....................
[root@localhost net]# nmcli conn down team1 && nmcli conn up team1
Connection 'team1' successfully deactivated (D-Bus active path: /org/freedesktop/NetworkManager/ActiveConnection/2)
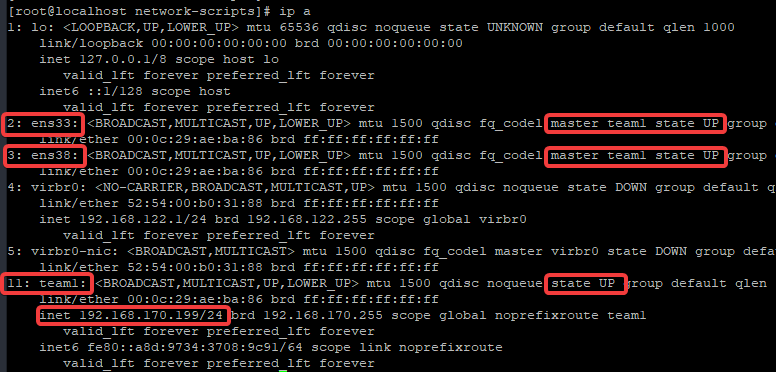
................6. You can verify that the interfaces are up
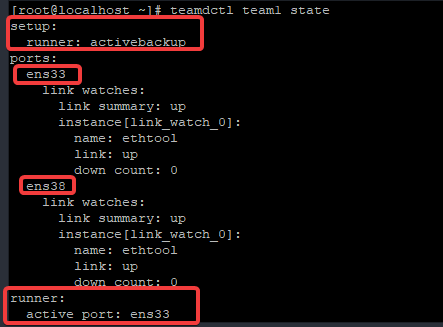
7. You can also use the teamdctl utility to verify the state of the teamed interface.
[root@localhost ~]# teamdctl team1 state

setup:
  runner: activebackup
ports:
  ens33
    link watches:
      link summary: up
      instance[link_watch_0]:
        name: ethtool
        link: up
        down count: 0
  ens38
    link watches:
      link summary: up
      instance[link_watch_0]:
        name: ethtool
        link: up
        down count: 0
runner:
  active port: ens33
8. Let’s test the ports redundancy by disconnecting the active ports.
[root@localhost ~]# nmcli conn down ens33

Connection 'ens33' successfully deactivated (D-Bus active path: /org/freedesktop/NetworkManager/ActiveConnection/9)
*Let’s verify the teamed interface state again.
[root@localhost net]# teamdctl team1 state

setup:
  runner: activebackup
ports:
  ens38
    link watches:
      link summary: up
      instance[link_watch_0]:
        name: ethtool
        link: up
        down count: 0
runner:
  active port: ens38
You can see that the active port is now ens38.
How To Configure Network Teaming or NIC Teaming Using Network Scripts In RHEL 7 & RHEL 8
1. Install teamd
NOTE: Installing teamd may not be necessary on some systems.
[root@localhost ~]# yum install teamd NetworkManager-team -y

Updating Subscription Management repositories.
.............
2. Create the slaves configuration file.
In this case, the slaves, i.e, the NICS that will be teamed together are ens33 and ens38.
*Create ens33 configuration file.
[root@localhost ~]# vim /etc/sysconfig/network-scripts/ifcfg-ens33NAME=ens33
DEVICE=ens33
ONBOOT=yes
TEAM_MASTER=team1
DEVICETYPE=TeamPort*create ens38 configuration file.
[root@localhost ~]# vim /etc/sysconfig/network-scripts/ifcfg-ens38NAME=ens38
DEVICE=ens38
ONBOOT=yes
TEAM_MASTER=team1
DEVICETYPE=TeamPort3. Create the team configuration file, in this case, team1
[root@localhost ~]# vim /etc/sysconfig/network-scripts/ifcfg-team1BOOTPROTO=none
DEFROUTE=yes
DEVICE=team1
NAME=team1
IPADDR=192.168.170.199
PREFIX=24
GATEWAY=192.168.170.2
DNS1=192.168.170.2
ONBOOT=yes
DEVICETYPE=Team
TEAM_CONFIG="{\"runner\":{\"name\":\"activebackup\"}}"4a. On RHEL 7, restart NetworkManager and network.
[root@localhost ~]# systemctl restart NetworkManager[root@localhost ~]# systemctl restart network4b. On RHEL 8, restart NetworkManager.
[root@localhost ~]# systemctl restart NetworkManager5. You may want to restart all the interfaces associated with the teaming.
[root@localhost ~]# nmcli conn down ens33 && nmcli conn up ens33[root@localhost ~]# nmcli conn down ens38 && nmcli conn up ens38[root@localhost ~]# nmcli conn down team1 && nmcli conn up team16. Verify your configuration.
How To Configure Network Teaming or NIC Teaming Using nmtui In RHEL 7 & RHEL 8
*Install teamd (Note that installing teamd may not be necessary on some systems.
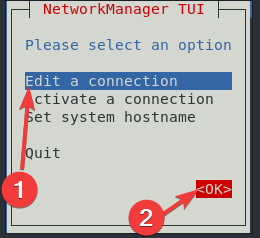
[root@localhost ~]# yum install teamd NetworkManager-team -y1. Initialize nmtui using the nmtui utility.
[root@localhost ~]# nmtui*Navigate to “Edit a connection” tab, and also navigate to ok, and press the enter key.
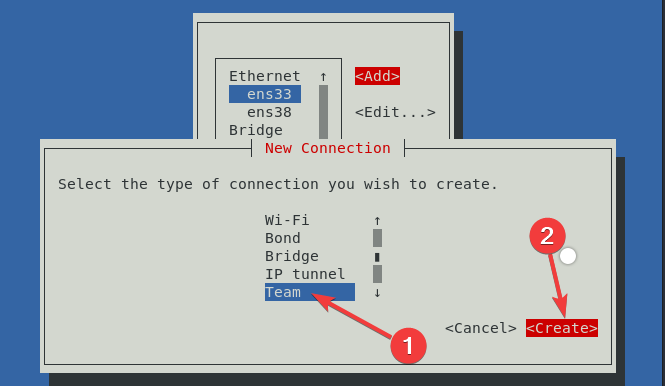
2. Navigate to one of the NICs you want to team, and also navigate to Add, and hit the enter key.
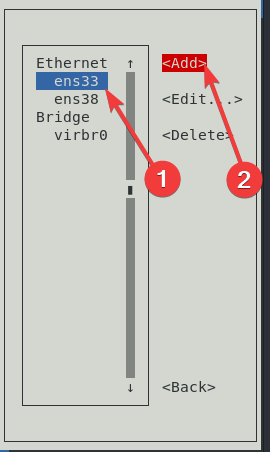
3. Choose the type of connection you wish to create.
If it is bonding, choose bond, if it is teaming, choose team. In this case, we will choose Team.
*Navigate to Create, and press the enter key.
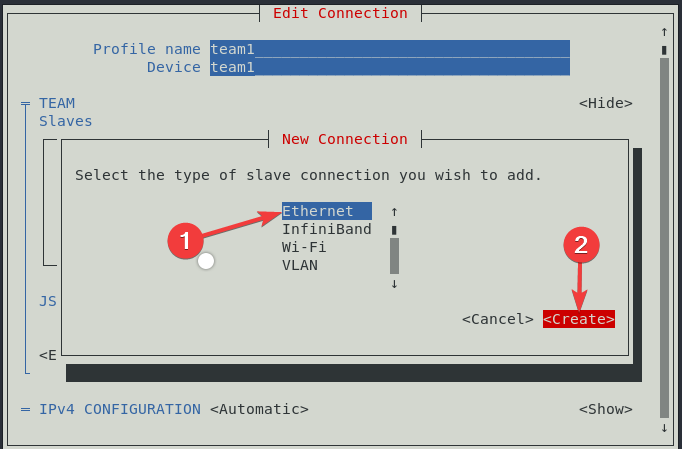
4. Give the profile name and the Device name of the team interface.
* Then, navigate to add, and press the enter key to add the slave interfaces.
In this case, the profile and device names for the team is team1

*Select the type of slave connection, also navigate to create, and hit the enter key.
In this case, our type of slave connection is Ethernet.
5. Give the profile names, and the device names for the slaves.
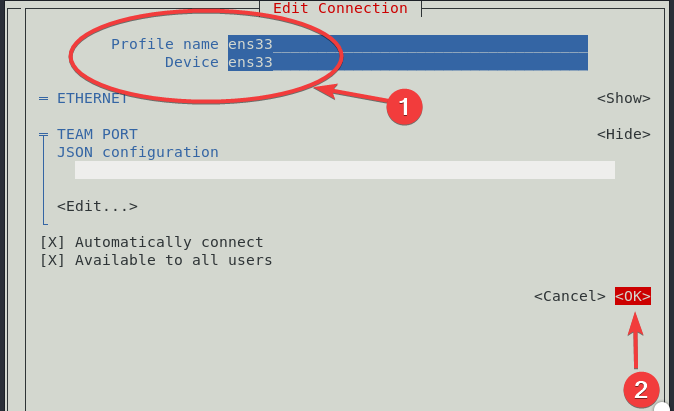
*Do same for ens38. (Note that slaves, sometimes may be automatically added to the box when you add one, you should remove the slaves you don’t wish to team)
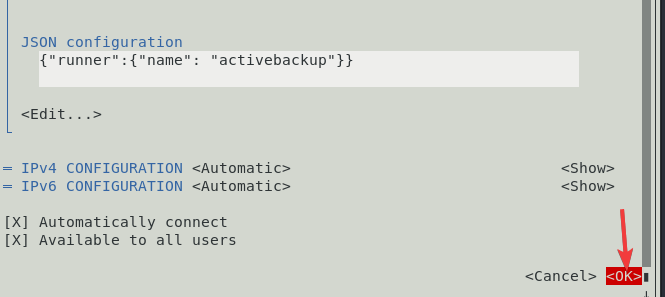
*Navigate to edit, and press enter, to add the type of runner you wish. In this case, we are using activebackup.
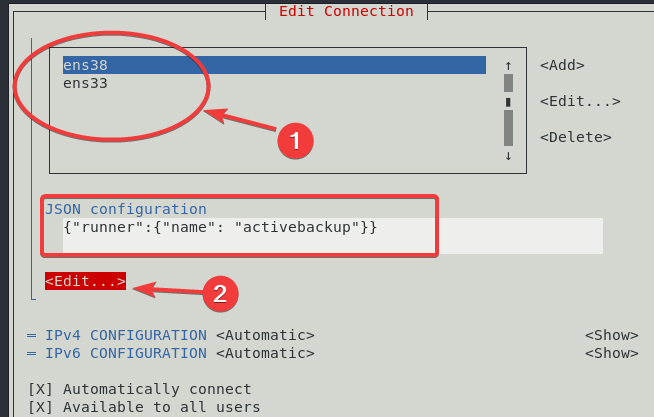
*navigate to IPV4 configuration, change to manual, and include the IP.
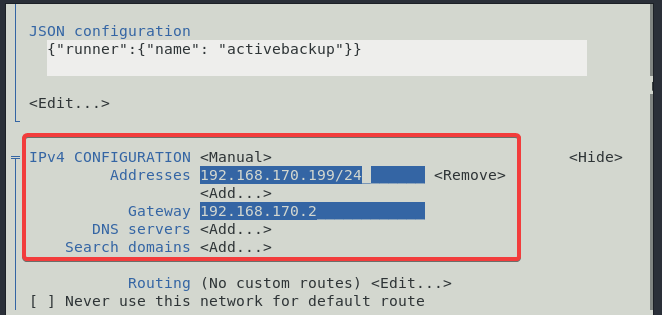
*Navigate to ok, and press the enter key.
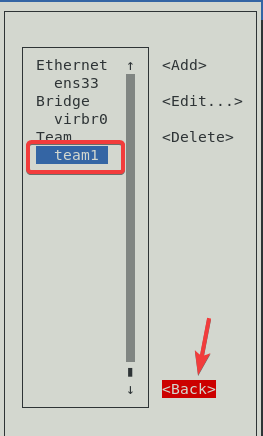
6. You will see that the team has been created, navigate to back, and press enter to quit using nmtui.
7a. On RHEL 7, restart NetworkManager and network.
[root@localhost ~]# systemctl restart NetworkManager[root@localhost ~]# systemctl restart network7b. On RHEL 8, restart NetworkManager.
[root@localhost ~]# systemctl restart NetworkManager8. You may want to restart all the interfaces associated with the teaming.
[root@localhost ~]# nmcli conn down ens33 && nmcli conn up ens33[root@localhost ~]# nmcli conn down ens38 && nmcli conn up ens38[root@localhost ~]# nmcli conn down team1 && nmcli conn up team19. Verify your configuration.
How To Configure Network Bonding or NIC Bonding Using Network Scripts In RHEL 7 & RHEL 8
1. Verify the NICs on the system.
[root@localhost ~]# ip a

1: lo: <LOOPBACK,UP,LOWER_UP> mtu 65536 qdisc noqueue state UNKNOWN group defaul                          t qlen 1000
    link/loopback 00:00:00:00:00:00 brd 00:00:00:00:00:00
    inet 127.0.0.1/8 scope host lo
       valid_lft forever preferred_lft forever
    inet6 ::1/128 scope host
       valid_lft forever preferred_lft forever
2: ens33: <BROADCAST,MULTICAST,UP,LOWER_UP> mtu 1500 qdisc fq_codel state UP gro                          up default qlen 1000
    link/ether 00:0c:29:ae:ba:86 brd ff:ff:ff:ff:ff:ff
    inet 192.168.170.199/24 brd 192.168.170.255 scope global dynamic noprefixrou                          te ens33
       valid_lft 1754sec preferred_lft 1754sec
    inet6 fe80::95bc:ea87:3b13:8677/64 scope link noprefixroute
       valid_lft forever preferred_lft forever
3: ens38: <BROADCAST,MULTICAST,UP,LOWER_UP> mtu 1500 qdisc fq_codel state UP gro                          up default qlen 1000
    link/ether 00:0c:29:ae:ba:90 brd ff:ff:ff:ff:ff:ff
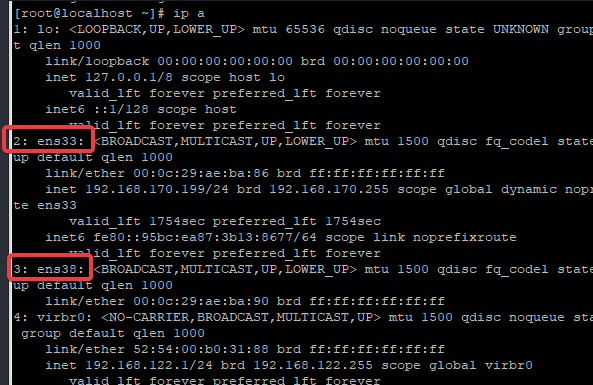
In my case, I will be bonding the NICs ens33, and ens38
2. Edit the NICs configuration file as below.
If you don’t have a solid understanding of network configuration file, and you would like to do, please click here
*Edit the ens33 NIC configuration file
[root@localhost ~]# vim /etc/sysconfig/network-scripts/ifcfg-ens33TYPE=Ethernet
NAME=ens33
UUID=600adde9-314b-4503-83dd-f039b7e258e7
DEVICE=ens33
ONBOOT=yes
MASTER=bond1
SLAVE=yesIf you add the parameter, NM_CONTROLLED=no to the configuration file, it should also be added to other interfaces associated with the bond, including the bond interface as well. This means that network manager will not control the interface.
*Edit the ens38 NIC configuration file.
[root@localhost ~]# vim /etc/sysconfig/network-scripts/ifcfg-ens38TYPE=Ethernet
NAME=ens38
UUID=600adde9-314b-4503-83dd-f45347e258e7
DEVICE=ens38
ONBOOT=yes
MASTER=bond1
SLAVE=yes3. Create the bond configuration file, in this case, bond1
[root@localhost ~]# vim /etc/sysconfig/network-scripts/ifcfg-bond1DEVICE=bond1
NAME=bond1
IPADDR=192.168.170.199
PREFIX=24
GATEWAY=192.168.170.2
DNS1=192.168.170.2
BONDING_OPTS="mode=0 miimon=100"NOTE: BONDING_OPTS=”bonding parameters separated by spaces”
In the bonding options, we chose roundrobin and miimon=100 (Polling intervals 100 ms). The mode can be specified numerically or alphabetically.
4. Restart NetwokManager service or network service or the NIC interface
*On RHEL 7, restart NetworkManager, afterwards, network services
[root@localhost ~]# systemctl restart NetworkManager[root@localhost ~]# systemctl restart network*You may also need to restart the NIC interfaces.
[root@localhost ~]# nmcli conn down ens33 && nmcli conn up ens33[root@localhost ~]# nmcli conn down ens38 && nmcli conn up ens38[root@localhost ~]# nmcli conn down bond1 && nmcli conn up bond1*On RHEL 8, restart NetworkManager,
[root@localhost ~]# systemctl restart NetworkManager*you may also need to restart the NIC interfaces.
[root@localhost ~]# nmcli conn down ens33 && nmcli conn up ens33

Connection 'ens33' successfully deactivated (D-Bus active path: /org/freedesktop/NetworkManager/ActiveConnection/2)
Connection successfully activated (D-Bus active path: /org/freedesktop/NetworkManager/ActiveConnection/6)
[root@localhost ~]# nmcli conn down ens38 && nmcli conn up ens38
Connection 'ens38' successfully deactivated (D-Bus active path: /org/freedesktop/NetworkManager/ActiveConnection/3)
Connection successfully activated (D-Bus active path: /org/freedesktop/NetworkManager/ActiveConnection/7)[root@localhost ~]# nmcli conn down bond1 && nmcli conn up bond1
Connection 'bond1' successfully deactivated (D-Bus active path: /org/freedesktop/NetworkManager/ActiveConnection/1)
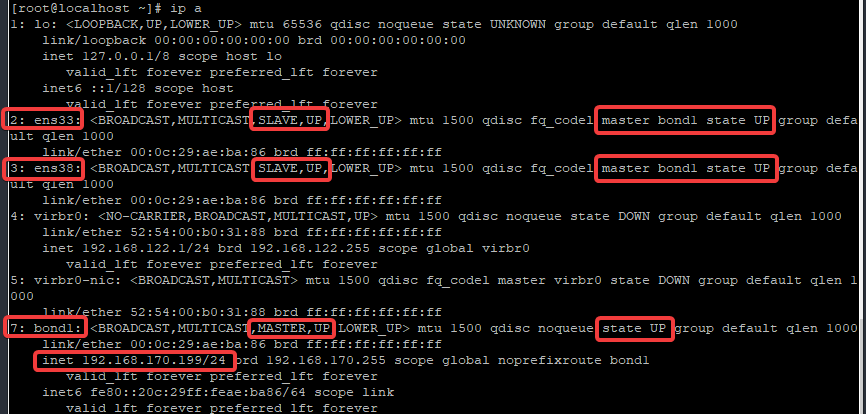
Connection successfully activated (master waiting for slaves) (D-Bus active path: /org/freedesktop/NetworkManager/ActiveConnection/8)5. Verify that the NIC interfaces are up
[root@localhost ~]# ip a

.........
2: ens33: <BROADCAST,MULTICAST,SLAVE,UP,LOWER_UP> mtu 1500 qdisc fq_codel master bond1 state UP group default qlen 1000
    link/ether 00:0c:29:ae:ba:86 brd ff:ff:ff:ff:ff:ff
3: ens38: <BROADCAST,MULTICAST,SLAVE,UP,LOWER_UP> mtu 1500 qdisc fq_codel master bond1 state UP group default qlen 1000
    link/ether 00:0c:29:ae:ba:86 brd ff:ff:ff:ff:ff:ff
...............................
7: bond1: <BROADCAST,MULTICAST,MASTER,UP,LOWER_UP> mtu 1500 qdisc noqueue state UP group default qlen 1000
    link/ether 00:0c:29:ae:ba:86 brd ff:ff:ff:ff:ff:ff
    inet 192.168.170.199/24 brd 192.168.170.255 scope global noprefixroute bond1
       valid_lft forever preferred_lft forever
    inet6 fe80::20c:29ff:feae:ba86/64 scope link
       valid_lft forever preferred_lft forever
6. Verify the bonding state
[root@localhost ~]# cat /proc/net/bonding/bond1

Ethernet Channel Bonding Driver: v3.7.1 (April 27, 2011)

Bonding Mode: load balancing (round-robin)
MII Status: up
MII Polling Interval (ms): 100
Up Delay (ms): 0
Down Delay (ms): 0

Slave Interface: ens33
MII Status: up
Speed: 1000 Mbps
Duplex: full
Link Failure Count: 0
Permanent HW addr: 00:0c:29:ae:ba:86
Slave queue ID: 0

Slave Interface: ens38
MII Status: up
Speed: 1000 Mbps
Duplex: full
Link Failure Count: 0
Permanent HW addr: 00:0c:29:ae:ba:90
Slave queue ID: 0
You may also want to watch the state by using the command below.
# watch -n .1 cat /proc/net/bonding/bond0*The bond interface can also be seen in /sys/class/net dorectory.
[root@localhost ~]# ls /sys/class/net/

bond1  bonding_masters  ens33  ens38  lo  virbr0  virbr0-nic
How To Configure Network Bonding or NIC Bonding Using The nmcli Utility In RHEL 7 & RHEL 8
1. Create the bond interface.
[root@localhost ~]# nmcli con add type bond con-name bond1 ifname bond1 bond.options "mode=balance-rr,miimon=100"

Connection 'bond1' (5a599d3c-ce29-4a1e-a3fd-ab880227c384) successfully added.
In this case, round robin mode, also known as balance-rr is used.
2. Configure the slave interfaces.
In this case, the slave interfaces are ens33, and ens34
*Add ens33 as slave to bond1
[root@localhost ~]# nmcli con add type bond-slave con-name ens33 ifname ens33 master bond1

Connection 'ens33' (8513ef70-3ceb-4a54-ae41-d989908c53ab) successfully added.
*Add ens38 as slave to bond1
[root@localhost ~]# nmcli con add type bond-slave con-name ens38 ifname ens38 master bond1

Connection 'ens38' (5773062f-4051-4bf0-825f-af2f816dff57) successfully added.
3. Configure IP addresses on the bond interface.
[root@localhost ~]# nmcli conn modify bond1 ipv4.addresses 192.168.170.199/24[root@localhost ~]# nmcli conn mod bond1 ipv4.gateway 192.168.170.2[root@localhost ~]# nmcli conn mod bond1 ipv4.dns 192.168.170.2[root@localhost ~]# nmcli conn modify bond1 ipv4.method manual4a. On RHEL 7, Restart NetworkManager and network service
[root@localhost ~]# systemctl restart NetworkManager[root@localhost ~]# systemctl restart network4b. On RHEL 8, restart NetworkManager
[root@localhost ~]# systemctl restart NetworkManager5. You may also want to restart all the interfaces associated with the bond.
[root@localhost ~]# nmcli conn down ens33 && nmcli conn up ens33[root@localhost ~]# nmcli conn down ens38 && nmcli conn up ens38[root@localhost net]# nmcli conn down bond1 && nmcli conn up bond16. Verify your IP address and the bond created.
[root@localhost net]# ip a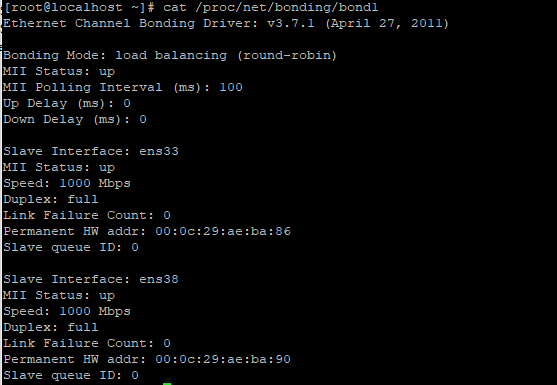
Deleting a Teamed & Bond Interfaces
Sometimes, you might delete a teamed or a bond configuration file, and the interfaces doesn’t get to be deleted when you list the network properties , for example, by using the “ip a” command, one of the ways to completely delete the interface is by doing the following below.
*bring down the teamed or bond connection.
[root@localhost ~]# nmcli conn down team1*delete the teamed or bond interface
[root@localhost ~]# nmcli conn delete team1

Connection 'team1' (858f2c8b-15ef-4b9f-814d-0fdf34b517a9) successfully deleted.
If the steps above doesn’t work, for bonding, you should remove the bonding interface in /sys/class/net/bonding_masters by using the commands,
[root@localhost ~]# ip link set bond1 down [root@localhost]# ip link delete dev bond1The command above will remove the bond form the bonding_masters file, and form /proc/net/bonding.
*Another way to remove a bond from the bonding_masters file is to use the command below.
[root@localhost net]# echo -bond1 > /sys/class/net/bonding_mastersThe nmcli utility can also be used to display a connected and disconnected connections as shown below.


Tutorial Video On How To Configure Network Teaming In Linux
Click To Watch Video On How To Configure Network Bonding In Linux
Your feedback is welcomed. If you love others, you will share with others.
Leave a Reply