
Last updated: April 2021
In this study, you will learn how to configure yum local repository, and dnf local repository.
Contents
- UNDERSTANDING THE SUBJECT MATTER
- ACTION TIME
- Step by step process of how to configure yum local repo in RHEL 7/CentOS 7
- Install a package with rpm without your system connected to the internet
- Configure yum local repo in RHEL/CentOS 7 remotely
- Configure yum local repo on RHEL 8/CentOS 8
- Configure yum remote repository with FTP in RHEL 8/CentOS 8
- Configure yum remote repository with httpd in RHEL 8/CentOS 8 using HTTP
- TUTORIAL VIDEO (Configure yum/dnf local repository on RHEL 8)
- TUTORIAL VIDEO (Configure yum & remote FTP based local Repo in RHEL 7)
- TUTORIAL VIDEO (Configure yum & remote http based based local Repo in RHEL 7)
- TUTORIAL VIDEO (Configure yum & remote FTP based based local Repo in RHEL 8)
- TUTORIAL VIDEO (Configure yum & remote http based based local Repo in RHEL 8)
UNDERSTANDING THE SUBJECT MATTER
A repository as we explained in detail in one of the articles on this site, is like a room that hosts different packages or software. A Local repository can be configured on a Linux system if the system is not subscribed or registered with its distribution.
More so, if the system is not internet-facing, packages or software can still be installed with a package manager without the use of internet connection if a local repository is configured.
A local repository can be configured by using the Linux ISO or DVD. It can also be configured remotely by pointing it to an FTP or HTTP remote server where the ISO is located.
In this article, we are going to configure yum local repository, both with the use of ISO and remotely on a Red Hat Enterprise Linux 7 and 8 systems, as they do not follow the same process.
Let’s take a look at the default Red Hat repository file on an RHEL 8 system, we will see what it contains.
[root@rhel8 ~]# cd /etc/yum.repos.d/

[root@rhel8 yum.repos.d]# ls

iso_repo.repo  redhat.repo

[root@rhel8 yum.repos.d]#cat redhat.repo
[root@rhel8 yum.repos.d]# cat redhat.repo
#
# Certificate-Based Repositories
# Managed by (rhsm) subscription-manager
#
# *** This file is auto-generated. Changes made here will be over-written. ***
# *** Use "subscription-manager repo-override --help" if you wish to make changes. ***
#
# If this file is empty and this system is subscribed consider
# a "yum repolist" to refresh available repos
#
[ossm-0-for-rhel-8-x86_64-source-rpms]
name = Red Hat OpenShift Service Mesh for RHEL 8 x86_64 (Source RPMs)
baseurl = https://cdn.redhat.com/content/dist/layered
/rhel8/x86_64/ossm/0/source/SRPMS
enabled = 0
gpgcheck = 1
gpgkey = file:///etc/pki/rpm-gpg/RPM-GPG-KEY-redhat-release
sslverify = 1
sslcacert = /etc/rhsm/ca/redhat-uep.pem
sslclientkey = /etc/pki/entitlement/91372506959463076-key.pem
sslclientcert = /etc/pki/entitlement/91372577959463076.pem
metadata_expire = 86400
enabled_metadata = 0
[rhel-8-for-x86_64-supplementary-eus-rpms]
name = Red Hat Enterprise Linux 8 for x86_64 - Supplementary - Extended Update Support (RPMs)
baseurl = https://cdn.redhat.com/content/eus/rhel8/
$releasever/x86_64/supplementary/os
enabled = 0
gpgcheck = 1
gpgkey = file:///etc/pki/rpm-gpg/RPM-GPG-KEY-redhat-release
sslverify = 1
sslcacert = /etc/rhsm/ca/redhat-uep.pem
sslclientkey = /etc/pki/entitlement/9137250677959463076-key.pem
sslclientcert = /etc/pki/entitlement/917250677959463076.pem
metadata_expire = 86400
enabled_metadata = 0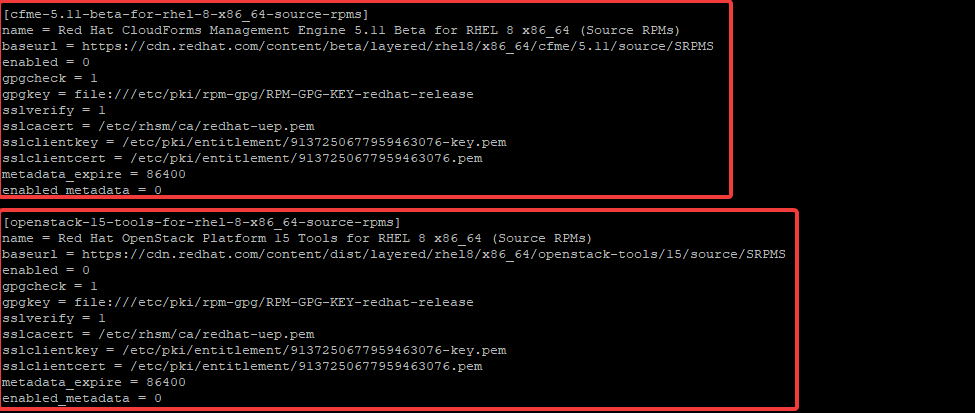
From the redhat.repo file above, You can see that there is two repository’s information.
The first starts from “[ossm-0-for-rhel-8-x86_64-source-rpms]” and ends at “enabled_metadata=0”, while the second starts from “[rhel-8-for-x86_64-supplementary-eus-rpms]” and ends at “enabled_metadata=0”, though there may be more when you check yours on your system.
What do these fields mean?
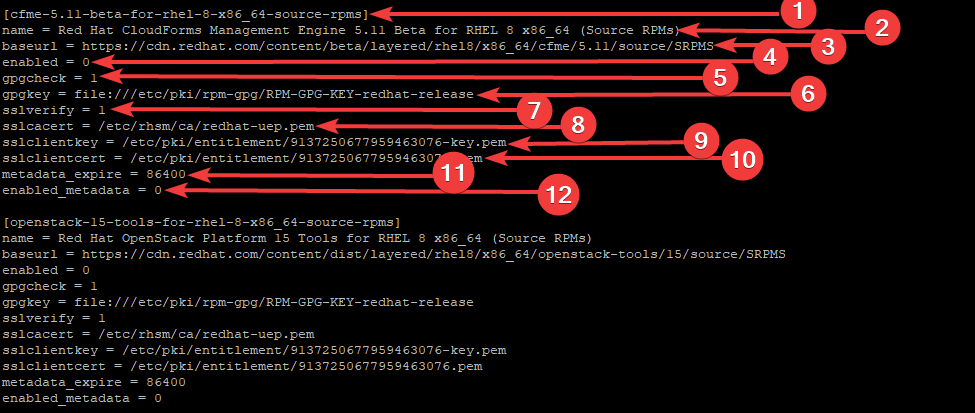
Not to go out of scope, I will be explaining only the fields that we need to configure yum local repository
The first field represents a unique repository ID.
You can give any repo ID you wish if you are configuring a local repository but do not allow it to conflict with an already given repo ID on the system.
Please note that there shouldn’t be a space when specifying an ID. For example, specifying an ID can be in the format below,
[my_repo]
The name field is the name of the repository. If you are configuring your own local repository, you can give any name you wish. It is advisable you give a name you can easily relate to.
The baseurl is the repository’s URL. That is, the repository location where the packages are in. It can be located on an HTTP, FTP, NFS, etc servers.
If it is located on an HTTP server, it is used in the format below,
http://path-to-repo
OR
https://path-to-repo [if ssl is configured].
If it is located on an FTP server, it is used in the format below,
ftp://path-to-repo
If it is located locally on the system, which is in our case, it is used in the format below,
file:///path-to-repo
The enabled field means you either want to enable or disable a repository. If the value is set to 1, it means the repository will be enabled but if it is set to 0, it means the repository will be disabled.
This function can also be useful, especially if you have a single package you do not want to update from a particular repository when you want to perform an update, you can easily disable such repository.
Also, another way a repository can be turned on is using the command,
subscription-manager repo --enable <repo>
To turn off, use the command,
subscription-manager repos --disable <repo>
The gpgcheck fied is used to check the genuinity or authenticity of the packages in a repository. In the default Red Hat repository file, “gpgcheck=1” by default.
If gpgcheck is equal to 1, it means the function is enabled. but if it is equal to 0, it means the function is disabled and the authenticity of the package will not be checked.
For the configuration of a local repository using the ISO downloaded directly from Red Hat, there may be no need to enable this field because the ISO image is coming from the right source.
As such, the packages are genuine. However, if the repository is from a third party, enabling the gpgcheck is advisable.
Having understood the meaning of the attributes in a repository configuration file, it is obvious that one doesn’t need to use all the attributes in setting up a local repository as it is used in the repo above.
The first three important fields that are necessary for creating a local repository are the “repo ID”, “gpgcheck” and the “baseurl”. You may also consider adding the “name” and the “enabled” field which is what we are going to do in the “ACTION TIME” section.
If you do not specify a repository name in the file, by default, the system will take the file name as the repo name.
In addition, it is not necessary the fields must follow each other as it is above, they can be arranged as you deem fit.
In conclusion, the repository file will have to be created in the “/etc/yum.repos.d” location and must have a “.repo” extension.
Red Hat Enterprise Linux 7 ISO image has only one file that contains the packages, but in Red Hat Enterprise Linux 8 ISO, there are two files that contain the packages. They are the AppStream file and the baseOS file.
The APPstream file contains the packages that have to do with applications while the BaseOS file contains the packages that are OS related.
Hence why the configuration of a local repository on RHEL 7 with ISO is slightly different from the configuration of a local repository on RHEL 8.
ACTION TIME
How To Configure yum Local Repository In Red Hat 7 / CentOS 7 Using The ISO Image
Steps
1. Copy the ISO image into the the system. Usually I use FileZilla or WinsSCP to do this.
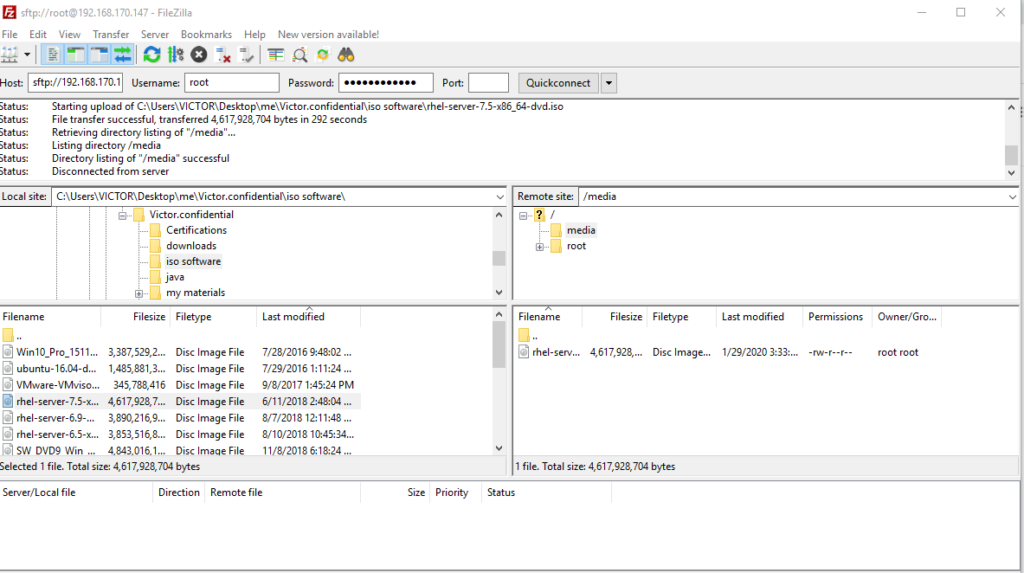
In my case, I copied the ISO in “/media”
2. confirm that the ISO is in the system
[root@lab01 ~]# cd /media/
[root@lab01 media]# ls

rhel-server-7.5-x86_64-dvd.iso

[root@lab01 media]#
3. Create a mount point for the ISO.
[root@lab01 ~]# mkdir /mnt/iso_dir
[root@lab01 ~]#
4. Mount the ISO
[root@lab01 ~]# mount /media/rhel-server-7.5-x86_64-dvd.iso /mnt/iso_dir/

mount: /dev/loop0 is write-protected, mounting read-only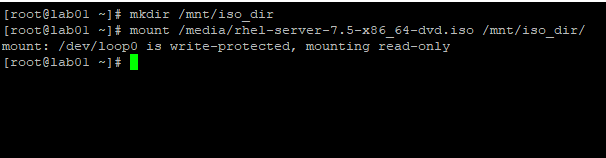
NOTE: You can also copy the ISO files to any directory by using the command (cp -va /mnt/localrepo_dir /<any-path>). If you wish, you can unmount the ISO or delete it when the file is copied
5. Verify the packages file.
[root@lab01 ~]# cd /mnt/iso_dir/

[root@lab01 iso_dir]# ls
addons            GPL       media.repo               RPM-GPG-KEY-redhat-release
EFI               images    Packages                 TRANS.TBL
EULA              isolinux  repodata
extra_files.json  LiveOS    RPM-GPG-KEY-redhat-beta
[root@lab01 iso_dir]#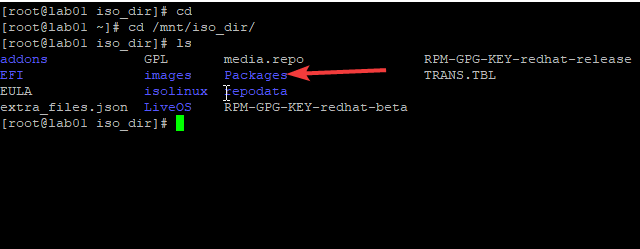
you notice that we only have one Packages file as discussed in “UNDERSTANDING THE SUBJECT MATTER” section.
6. create the repository configuration file in the “/etc/yum.repos.d” directory and make sure it has the “.repo” extension.
[root@lab01 ~]# vim /etc/yum.repos.d/my_local_repo.repo[my_local_repo]
baseurl=file:///mnt/iso_dir
gpgcheck=0
enable=1
name=my local repository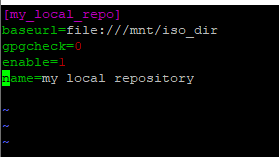
7. confirm the repository has been configured.
[root@lab01 yum.repos.d]# yum repolist

Loaded plugins: langpacks, product-id, search-disabled-repos, subscription-
              : manager
This system is not registered with an entitlement server. You can use subscription-manager to register.
Repository 'my_local_repo' is missing name in configuration, using id
repo id                              repo name                            status
my_local_repo                        my_local_repo                        5,099
repolist: 5,099
[root@lab01 yum.repos.d]#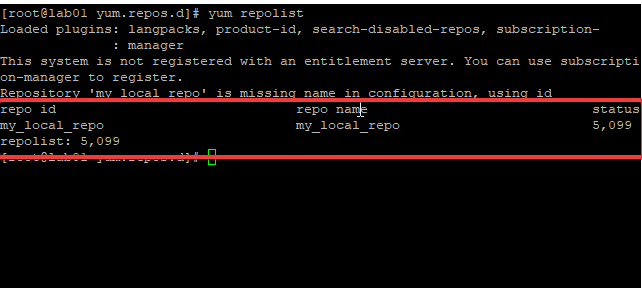
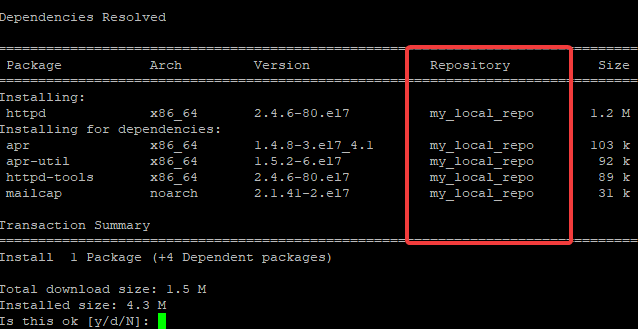
8. Install A Package With The yum Package Manger. for example, the httpd package just for verification as well
[root@lab01 yum.repos.d]# yum install httpd


--> Running transaction check
---> Package httpd.x86_64 0:2.4.6-80.el7 will be installed
--> Processing Dependency: httpd-tools = 2.4.6-80.el7 for package: httpd-2.4.6-80.el7.x86_64
--> Processing Dependency: /etc/mime.types for package: httpd-2.4.6-80.el7.x86_64
--> Processing Dependency: libapr-1.so.0()(64bit) for package: httpd-2.4.6-80.el7.x86_64
--> Processing Dependency: libaprutil-1.so.0()(64bit) for package: httpd-2.4.6-80.el7.x86_64
--> Running transaction check
---> Package apr.x86_64 0:1.4.8-3.el7_4.1 will be installed
---> Package apr-util.x86_64 0:1.5.2-6.el7 will be installed
---> Package httpd-tools.x86_64 0:2.4.6-80.el7 will be installed
---> Package mailcap.noarch 0:2.1.41-2.el7 will be installed
--> Finished Dependency Resolution

Total download size: 1.5 M
Installed size: 4.3 M
Is this ok [y/d/N]: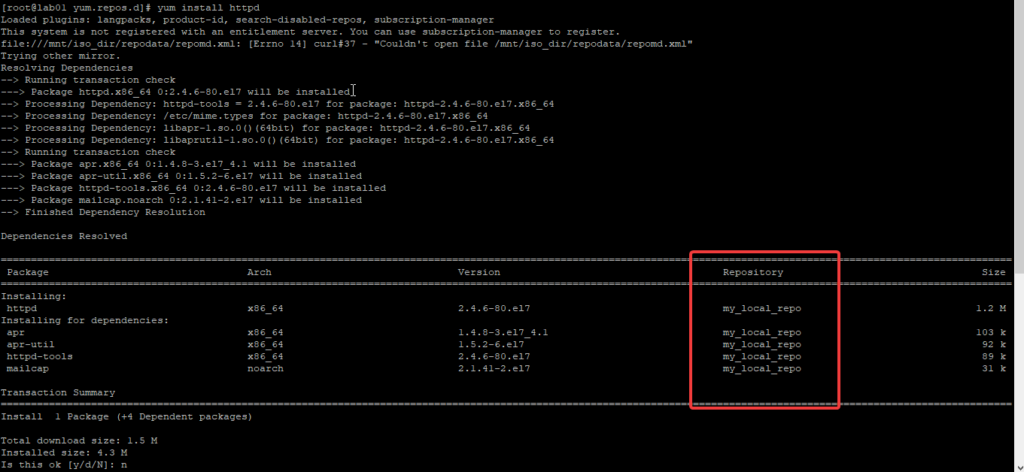
How To Install A Package With The rpm Package Manager Without Your System Connected To The Internet
You do not necessarily need to set up a local repository before you can install a package with the rpm package manager if your system is not registered or connected to the internet.
All you need to do is to mount the ISO, change directory to the packages file and run the rpm install command.
If you have been using Linux for a while, you should know that you may not need to change directory to the packages file, just specify the path as it is in the below command.
[root@lab01 ~]# rpm -ivh /mnt/iso_dir/Packages/httpd-2.4.6-80.el7.x86_64.rpm

warning: /mnt/iso_dir/Packages/httpd-2.4.6-80.el7.x86_64.rpm: Header V3 RSA/SHA2               56 Signature, key ID fd431d51: NOKEY
error: Failed dependencies:
        /etc/mime.types is needed by httpd-2.4.6-80.el7.x86_64
        httpd-tools = 2.4.6-80.el7 is needed by httpd-2.4.6-80.el7.x86_64
        libapr-1.so.0()(64bit) is needed by httpd-2.4.6-80.el7.x86_64
        libaprutil-1.so.0()(64bit) is needed by httpd-2.4.6-80.el7.x86_64
[root@lab01 ~]#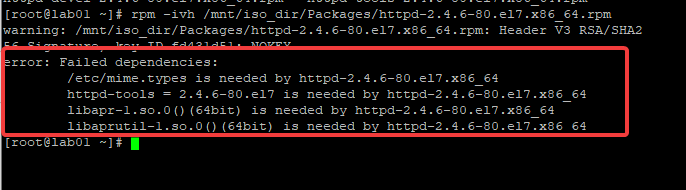
Installing the httpd package with rpm gave “dependency hell” issue as shown above. To be able to install, you will have to install the dependencies first. Hence why the yum package manager is better than the rpm (red hat package manager)
The same dependency hell scenario with rpm is also applied to RHEL 8.
You can also see Additional Article On Software Installation
How To Configure yum Local Repository In Red Hat 7 / CentOS 7 Remotely With FTP
In this scenario, we are going to configure yum repository using FTP server, and we will point a client system to the server
Server A – FTP repository server (Hostname=lab01, IP=192.168.170.165)
Server B – Client Server (Hostname=tekneed, IP=192.168.170.166)
Configuring Server A
steps
Follow through step 1 to step 7 on “How To Configure Local Repository On Red Hat / CentOS 7 Using The ISO Image” above
8. Install the vsftpd server
[root@lab01 iso_dir]# yum install vsftpd

Loaded plugins: langpacks, product-id, search-disabled-repos, subscription-manager
Resolving Dependencies
--> Running transaction check
---> Package vsftpd.x86_64 0:3.0.2-27.el7 will be installed
--> Finished Dependency Resolution

Dependencies Resolved

Installed:
  vsftpd.x86_64 0:3.0.2-27.el7

Complete!
9. copy the ISO contents in the /mnt/iso_dir path to the vsftpd document root
[root@lab01 iso_dir]# cp -a /mnt/iso_dir /var/ftp/pub10. verify the ISO content in the vsftpd document root
[root@lab01 ~]# ls /var/ftp/pub/iso_dir/

addons  extra_files.json  isolinux    Packages                 RPM-GPG-KEY-redhat-release
EFI     GPL               LiveOS      repodata                 TRANS.TBL
EULA    images            media.repo  RPM-GPG-KEY-redhat-beta
[root@lab01 ~]#
11. start the vsftpd service
[root@lab01 ~]# systemctl start vsftpdConfiguring Server B
Steps
12. create yum repository file
[root@tekneed ~]# vi /etc/yum.repos.d/remote.repo[remote]
baseurl=ftp://192.168.170.165/pub/iso_dir
gpgcheck=0
enable=1
name=remote repo
In this case, the remote server is an FTP server. You can see that the baseurl has changed. The IP of the remote server will be specified in the baseurl field. The server name can also be specified instead of the IP provided the name can be resolved via your DNS.
If your remote server is httpd server, replace baseurl as
baseurl:http://192.168.170.165/iso_dir13. Test the yum repository configuration
[root@tekneed ~]# yum repolist

Loaded plugins: langpacks, product-id, search-disabled-repos, subscription-manager
This system is not registered with an entitlement server. You can use subscription-manager to register.
repo id                                            repo name                                              status
remote                                             remote repo                                            5,152
repolist: 5,152
14. You can now begin to install packages
[root@tekneed ~]# yum install git

Loaded plugins: langpacks, product-id, search-disabled-repos, subscription-manager
This system is not registered with an entitlement server. You can use subscription-manager to register.
Resolving Dependencies
--> Running transaction check
How To Configure yum Local Repository On Red Hat 8 / CentOS 8 Using The ISO Image
1. copy the ISO into the the system. Usually I use FileZilla or WinsSCP to do this.
2. confirm that the ISO is in the system
[root@rhel8 ~]# cd /media/

[root@rhel8 media]# ls

local.repo  repofile  rhel-8.1-x86_64-dvd.iso

[root@rhel8 media]#
3. create a mount point
[root@rhel8 ~]# mkdir /mnt/localrepo_dir

[root@rhel8 ~]#
4. mount the ISO
[root@rhel8 ~]# mount /media/rhel-8.1-x86_64-dvd.iso /mnt/localrepo_dir/

mount: /mnt/localrepo_dir: WARNING: device write-protected, mounted read-only.
[root@rhel8 ~]#
NOTE: You can also copy the ISO files to any directory by using the command (cp -va /mnt/localrepo_dir /<any-path>). If you wish, you can unmount the ISO or delete it when the file is copied
5. Verify the packages files
[root@rhel8 ~]# cd /mnt/localrepo_dir/

[root@rhel8 localrepo_dir]# ls
AppStream  EULA              images      RPM-GPG-KEY-redhat-beta
BaseOS     extra_files.json  isolinux    RPM-GPG-KEY-redhat-release
EFI        GPL               media.repo  TRANS.TBL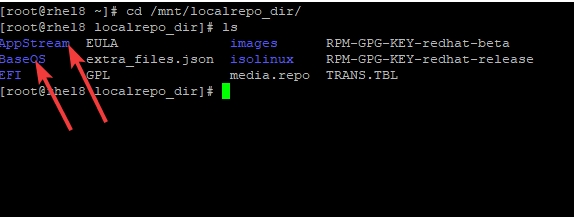
6. create the repository file in the “/etc/yum.repos.d” directory and make sure it has the extension “.repo”
[root@rhel8 ~]# vim /etc/yum.repos.d/iso_repo.repo[rhel8_Appstream]
baseurl=file:///mnt/localrepo_dir/AppStream
gpgcheck=0
name=Red Hat Ent Linux App_stream
enable=1
[rhel8_BaseOS]
baseurl=file:///mnt/localrepo_dir/BaseOS
gpgcheck=0
name=Red Hat Ent Linux BaseOS
enable=1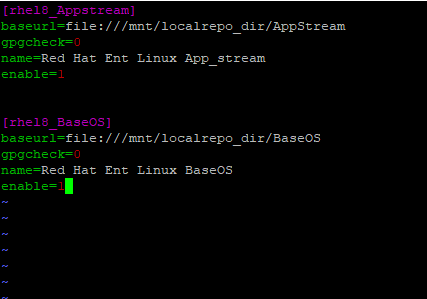
7. confirm the repository
[root@rhel8 ~]# yum repolist
Updating Subscription Management repositories.
Last metadata expiration check: 0:00:30 ago on Thu 30 Jan 2020 06:14:42 PM WAT.
repo id repo name status
rhel-8-for-x86_64-appstream-rpms Red Hat Enterprise Linux 8 for x86_64 - 8,502
rhel-8-for-x86_64-baseos-rpms Red Hat Enterprise Linux 8 for x86_64 - 3,390
rhel8_Appstream Red Hat Ent Linux App_stream 4,820
rhel8_BaseOS Red Hat Ent Linux BaseOS 1,661
[root@rhel8 ~]#OR
[root@rhel8 ~]# dnf repolist
Updating Subscription Management repositories.
Red Hat Ent Linux App_stream 3.1 MB/s | 3.2 kB 00:00
Red Hat Ent Linux BaseOS 2.7 MB/s | 2.8 kB 00:00
Red Hat Enterprise Linux 8 for x86_64 - BaseOS 3.2 kB/s | 4.1 kB 00:01
Red Hat Enterprise Linux 8 for x86_64 - AppStre 4.8 kB/s | 4.5 kB 00:00
repo id repo name status
rhel-8-for-x86_64-appstream-rpms Red Hat Enterprise Linux 8 for x86_64 - 8,502
rhel-8-for-x86_64-baseos-rpms Red Hat Enterprise Linux 8 for x86_64 - 3,390
rhel8_Appstream Red Hat Ent Linux App_stream 4,820
rhel8_BaseOS Red Hat Ent Linux BaseOS 1,661
[root@rhel8 ~]#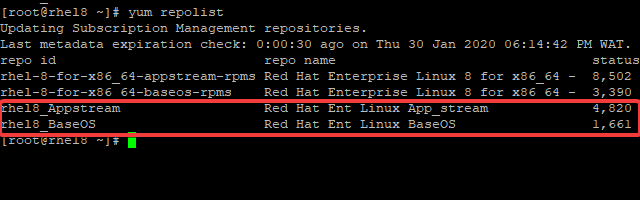
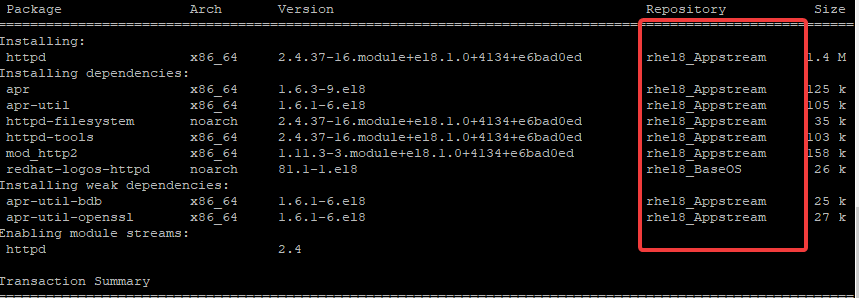
8. Install A Package With The yum or dnf Package Manger.
[root@rhel8 ~]# yum install httpd
Updating Subscription Management repositories.
Red Hat Enterprise Linux 8 for x86_64 - BaseOS (RPMs) 1.4 kB/s | 4.1 kB 00:02
Red Hat Enterprise Linux 8 for x86_64 - AppStream (RPMs) 5.6 kB/s | 4.5 kB 00:00
Dependencies resolved.
Total size: 2.0 M
Installed size: 6.0 M
Is this ok [y/N]:OR
[root@rhel8 ~]# dnf install httpd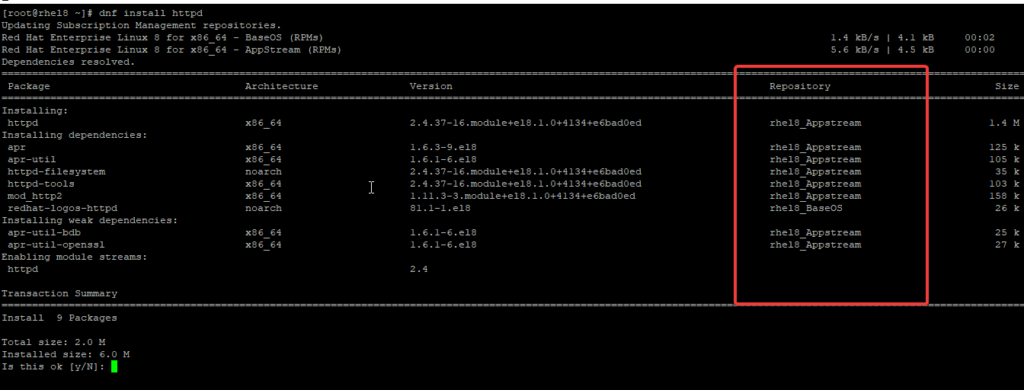
How To Configure yum Remote Repository With FTP Server In Red Hat 8 / CentOS 8 Remotely.
How To Configure yum Remote Repository With HTTP Server In Red Hat 8 / CentOS 8 Remotely.
Your feedback is welcomed. If you love others, you will share with others
hi Victor
In exam, my repo file did not work. I did the way that you explained, however it did not work in the exam.
here is the way that i did,
vim /etc/yum.repos.d/local.repo
[Appstrem] [Baseos]
name=appstream name=baseos
baseurl= given website baseurl= givenwebsite
gpgcheck=0 gpgcheck=0
enabled=1 enabled=1
it did not work as result i failed the exam. is there other way of doing repo. Please help me out?
Thank you
Hi Veronika.
I am so sorry about your exam. Trust me, there is no other simpler way of configuring yum local & remote repositories than the ones here. Other methods I have tried are complicated and not suitable for exam purposes.
If you did it the way you mentioned, then it should work.
Two things. Did you run the command, “yum repolist all” to see if the repositories were actually enabled or not after creating the repo file? Well, it wasn’t enabled because you said it didn’t work. You probably had a syntax error in your configuration file. Using a space where you shouldn’t can cause an error. During the course of this lesson, I mentioned the do’s and don’t in the video while creating the repo config file. I also answered a question related to this in the RHCSA exam practice questions and answer in this link (https://tekneed.com/rhcsa-8-exam-practice-question-17-yum-repository/). Please scroll down and click on the video link to watch.
Secondly, try what you did in the exam in your lab and see if it works, if it doesn’t, compare it to what I did in the exam practice question 17 video. You can pick your mistakes by doing that. If you are stuck, send an email to (rhcsa8premium@tekneed.com or tekneed1@gmail.com) with your RHCSA 8 exam practice questions & answers premium code. We will connect with you remotely via Team viewer or Zoom and sort it out with you.
If you don’t have the premium package, no worries, I will guide you here in this comment section till you get it right.
@Veronika
you did not say if you practiced to verify before exam. Did you verify it?
this is right:
# cat local.repo
[rhel8_Appstream]
baseurl=file:///mnt/localrepo_dir/AppStream
gpgcheck=0
name=Red Hat Ent Linux App_stream
enable=1


[rhel8_BaseOS]
baseurl=file:///mnt/localrepo_dir/BaseOS
gpgcheck=0
name=Red Hat Ent Linux BaseOS
enable=1
but she the 2 repo paired in one line!!!
[Appstrem] [Baseos]
name=appstream name=baseos
baseurl= given website baseurl= givenwebsite
gpgcheck=0 gpgcheck=0
enabled=1 enabled=1
[Appstrem] [Baseos] is wrong!
name=appstream name=baseos is wrong!
asnd so on…
isn’t it?
Hello there!
In my proxmox VM, cdrom device is /dev/sr0
As for you experience, which will be the cdrom device during exam?
I am very anxious and even small detail can make difference
Many thnx
Hello
as far as I can see, there is NO question abot IPV6, right?
Can I be trqnquil that IPV^ will not be part of EX200?
Many thnx
My best regarda
If you haven’t set up your dns server properly than your base repo url will not able to communicate with remote server.