
Last updated: November 2022
In this lesson, you will Learn What NFS is and the step by step process of how to configure NFS in Linux, RHEL/CentOS 7 & 8.
Contents
NFS, which is an acronym for (Network File system) is a distributed file system protocol.
NFS is server-client based, where the NFS server will be configured and clients can access files on the server over a network just as if they were on the server.
NFS is one of the file system standards for Network-attached storage (NAS), hence can be used as a storage solution. Clients can access and update NFS shared files depending on the permission given on the files
In this tutorial, we will configure NFS with two systems, one will be the NFS server while the second will be the NFS client.
System A (NFS Server)
Hostname: DRDEV1
IP address: 192.168.170.172
System B (NFS client)
Hostname: HQDEV1
IP address: 192.168.170.171
How To Setup NFS Server In Linux – RHEL/CentOS 7&8
1. Install NFS utility
if the utility is not already installed on your system, install by using the command below
NFS should be used on a trusted network
[root@DRDEV1 ~]# yum install nfs-utils2. Verify the status of rpcbind, if it is not running, start the service
[root@DRDEV1 ~]# systemctl status rpcbind[root@DRDEV1 ~]# systemctl start rpcbind3. start nfs-server service
For RHEL 8/CentOS 8, use the command below
[root@DRDEV1 ~]# systemctl start nfs-server.serviceFor RHEL 7/CentOS 7, use the command below
[root@DRDEV1 ~]# systemctl start nfs4. Create NFS shared directory.
In this case, our nfs shared directory is “softwaredownload”. You can choose to use an existing directory depending on the directory you want to share.
[root@DRDEV1 ~]# mkdir /sofwaredownload5. Export the share, i.e, export the shared directory by editing the “/etc/export” configuration file and add the client’s IP in the file.
[root@DRDEV1 ~]# vi /etc/exports/softwaredownload 192.168.170.171(rw,sync,no_root_squash)5. restart the rpcbind service and nfs-server
[root@DRDEV1 ~]# systemctl restart nfs-server[root@DRDEV1 ~]# systemctl restart rpcbind6. Allow NFS services in the firewall rule
[root@DRDEV1 ~]# firewall-cmd --add-service={nfs,rpc-bind,mountd} --permanent

success
[root@DRDEV1 ~]# firewall-cmd --reload
successOR
[root@DRDEV1 ~]# firewall-cmd --add-service=nfs --permanent

success
[root@DRDEV1 ~]# firewall-cmd --add-service=rpc-bind --permanent
success[root@DRDEV1 ~]# firewall-cmd --add-service=mountd --permanent
success[root@DRDEV1 ~]# firewall-cmd --reload
successNow we are done with NFS server configuration.
Let’s configure NFS client
How To Setup NFS Client In Linux – RHEL 7/CentOS 7&8
1. Install NFS utilities if it is not installed
[root@DRDEV1 ~]# yum install nfs-utils2. Verify the rpcbind status and start the service if it is not started
[root@DRDEV1 ~]# systemctl status rpcbind[root@DRDEV1 ~]# systemctl start rpcbind3. verify that the NFS shared directory from the server is available on the client.
[root@HQDEV1 ~]# showmount -e 192.168.170.172

Export list for 192.168.170.172:
/sofwaredownload 192.168.170.171,192.168.170.178,192.168.170.177,192.168.170.176,192.168.170.175,192.168.170.174
showmount -e <host-name> can be used if DNS resolution is working in your environment
If the IP is included on the server, you will see the client’s IP address from the showmount result in the export list. it’s possible other IPs from other clients too would show but the newly added IP will be the first IP to show.
NB: If the IP doesn’t show, restart the nfs-server and rpcbind service on both the client and the server. Also make sure that the client and server can ping each other.
If the IP doesn’t still show after the restart and you have the error “clnt_create: RPC: Unable to recieve”, no worries, you can do a mount test from the client to the server by using the command below
[root@HQDEV1 ~]# mount -t nfs 192.168.170.172:/ /mntNB: The root filesystem on the NFS server will not be mounted but only the files/directories that are shared.
[root@HQDEV1 ~]# cd /mnt/[root@HQDEV1 mnt]# ls
softwaredownload[root@HQDEV1 mnt]# umount /mnt4. Now that we can see the NFS shared directory on the client, create a mount point for NFS
[root@HQDEV1 ~]# mkdir /softwaredownload5. mount the NFS shared directory
mount -t nfs <nfs-server's-ip:/nfs-server-directory> </nfs-client-mount-point>[root@HQDEV1 ~]# mount -t nfs 192.168.170.172:/softwaredownload /softwaredownload6. Verify the NFS shared mount point
[root@HQDEV1 ~]# df -h |grep softwaredownload

192.168.170.172:/softwaredownload   13G  4.3G  8.3G  34% /softwaredownload
OR
[root@HQDEV1 ~]# mount |grep nfs

sunrpc on /var/lib/nfs/rpc_pipefs type rpc_pipefs (rw,relatime)
192.168.170.172:/softwaredownload on /softwaredownload type nfs4 (rw,relatime,vers=4.2,rsize=262144,wsize=262144,namlen=255,hard,proto=tcp,timeo=600,retrans=2,sec=sys,clientaddr=192.168.170.171,local_lock=none,addr=192.168.170.172)
7. To make the mount point persistent across reboot, Edit the fstab file
[root@HQDEV1 ~]# vi /etc/fstab192.168.170.172:/softwaredownload /softwaredownload nfs soft,nfsvers=4 0 0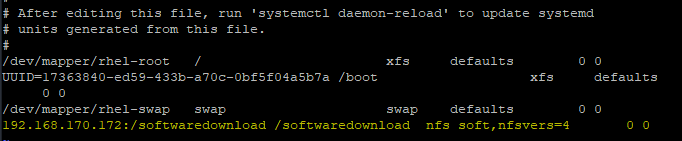
8. verify the shared directory is properly mounted
[root@HQDEV1 ~]# mount -aHow To Use Autofs To Mount NFS Shares In Linux – (autofs In Linux)
NFS shares can also be made persistent or mounted on the client by using automount (autofs services) which offers a better performance compared to using the fstab file.
Before we see the step by step guide of how to do this, let’s understand how automount works with NFS in Linux.
How automount/autofs Works In Linux
NFS shares can automatically be mounted on the client whenever it is required (on demand) and be unmounted whenever it is inactive or no longer required with the use of the autofs service, hence offering better performance;
one of which is reducing the booting time of the system because the system won’t find the NFS entries in the fstab file while booting. More so, if the NFS server is down, it won’t affect the system from booting/entering a maintenance mode.
The autofs service needs to be installed, and then configured on the system by using a master map file, and in turn, the master map file will reference a map file.
The master map file can be defined in one of the autofs configuration files (/etc/auto.master).
However, it is recommended most times that the master map file is defined as a drop-in file in (/etc/auto.master.d) because the files in the main configuration file (/etc/auto.master) sometimes may be overwritten if an update is done on the system.
The drop-in file must have an extension of (.autofs) and the same format/syntax that is going to be used in the configuration file of (/etc/auto.master) will also be used in the drop-in file entry.
Let’ see a format of a master map file entry in (/etc/auto.master) configuration file.
[root@DRDEV1 ~]# cat /etc/auto.master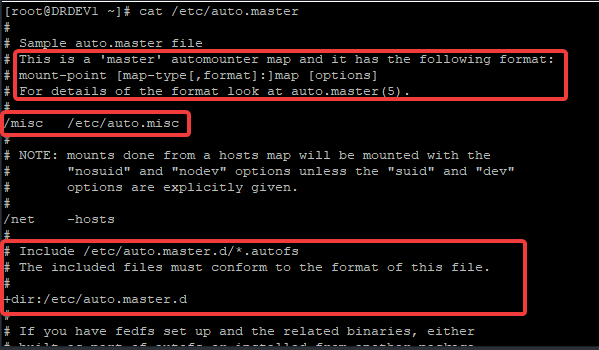
Automount maps can be direct or indirect. Hence, In a master map file entry, you can configure a direct or an indirect map mount type.
For a direct map, the client path’s mount point specified in the map file will be absolute.
For an indirect map, the client path’s mount point specified in the map file will not be absolute. A parent directory will be specified in the master map file while a sub-directory will be specified in the map file the master map file is referencing.
We will see how to specify this syntax in the step by step guide.
Step By Step Guide On How To Automount NFS Share In Linux – RHEL/CentOS 7&8
configure automount on NFS client (HQDEV1) using an indirect map and “/software/site1” as the mount point for the client. The NFS share is /softwaredownload
Similarly, use a direct map and “/direct/software” as the mount point for the client. The NFS share is /softwaredownload.
1. Install autofs
[root@HQDEV1 ~]# yum install autofs

Updating Subscription Management repositories.
Last metadata expiration check: 0:01:55 ago on Fri 18 Dec 2020 11:18:01 AM GMT.
Dependencies resolved.

Installing:
........
2. verify if you can connect to the NFS server and see the export lists from the client
[root@HQDEV1 ~]# showmount -e 192.168.170.172

Export list for 192.168.170.172:
/softwaredownload 192.168.170.171
/sofwaredownload  192.168.170.178,192.168.170.177,192.168.170.176,192.168.170.175,192.168.170.174
where 192.168.170.172 is the NFS server’s IP. The host name can also be used provided DNS resolution is working.
If you are having difficulties listing the exports list, you can test by mounting the shared directory on the client.
[root@HQDEV1 ~]# mount -t nfs 192.168.170.172:/ /mntNB: only the shared directories will be mounted and not the entire root filesystem.
[root@HQDEV1 ~]# cd /mnt/[root@HQDEV1 mnt]# ls
softwaredownload[root@HQDEV1 ~]# df -h |grep mnt
192.168.170.172:/softwaredownload 13G 5.9G 6.7G 48% /mnt[root@HQDEV1 ~]# umount /mnt3. create a master map file
Note: (This step is for an Indirect mapping)
create a drop in file in (/etc/auto.master.d)
NB: the file must have “.autofs” extension
[root@HQDEV1 ~]# vim /etc/auto.master.d/tekneed.autofs/software /etc/auto.tekneedNB: This entry in master map file (/etc/auto.master.d) tells autofs to look in the map file entry (/etc/auto.tekneed) and create mount-points in the /software directory if there is an activity in the /software directory.
4. put in the entry for “/etc/auto.tekneed”
NB2: tekneed.autofs must correspond with auto.tekneed. Whatever name you used as the master map file/drop-in file must correspond with the name that will be used in the drop-in file entry.
The entries here will reference step 3
[root@HQDEV1 ~]# vim /etc/auto.tekneedsite1 -rw,sync 192.168.170.172:/softwaredownloadThe format for the entry of this file is:
<mount point> <-mount options> <server-location>
which is similar to the fstab file format. This creates a new mount point at “/software/site1” and mounts the NFS share directory (/softwaredownload) exported by the server (192.168.170.172) with read and write permission & with immediate synchronization.
For an indirect mapping, a parent directory will be specified in the master map file while a sub-directory will be specified in the map file. autofs mounts the shares from the parent directory to the sub-directory.
Also note that the permission on the NFS share supersedes/takes precedence over the one specified with the mount option. Other mount options just as it can be used in the fstab can also be used here.
5. start and enable autofs
[root@HQDEV1 ~]# systemctl enable --now autofs6. Test your configuration
[root@HQDEV1 ~]# cd /software/site1[root@HQDEV1 site1]# ls
image_download iso_download(For a direct mapping)
From step 3, the master map file will be created as
[root@HQDEV1 ~]# vim /etc/auto.master.d/tekneed.autofs/- /etc/auto.tekneedThis entry in master map file (/etc/auto.master.d) tells autofs to look in the map file entry (/etc/auto.tekneed) and create mount-points in the absolute path specified in the entry for /etc/auto.tekneed file. That’s what direct map do.
4. put in the entry for “/etc/auto.tekneed”
[root@HQDEV1 ~]# vim /etc/auto.tekneed/direct/software -rw,sync,fstype=nfs4 192.168.170.172:/softwaredownloadThis creates a new mount point at /direct/software and mounts the NFS share directory (/softwaredownload) exported by the server (192.168.170.172) with read and write permission with immediate synchronization and with nfs version 4 filesystem type.
Other filesystem type can be specified as (-fstype=cifs, -fstype=xfs), etc.
5. start and enable autofs
[root@HQDEV1 ~]# systemctl enable --now autofsNB: You may restart autofs if it is already started
6. Test your configuration.
[root@HQDEV1 ~]# cd /direct/software/[root@HQDEV1 software]# ls
image_download iso_downloadUsing Wildcards For automount
wildcards can be useful with automount. If you have a number of directories and you don’t want to specify them one by one in the map file, or you envisage that other sub-directories will be added to the NFS share, you can make do of wildcards.
Using wildcards with examples (indirect map)
from step 3, the master map file can be created as
[root@HQDEV1 ~]# vim /etc/auto.master.d/tekneed.autofs/software /etc/auto.tekneed4. put in the entry for “/etc/auto.tekneed”
[root@HQDEV1 ~]# vim /etc/auto.tekneed* -rw,sync,fstype=nfs4 192.168.170.172:/softwaredownload/&This creates a new mount point starting form the /software directory and mounts the NFS share directory (/softwaredownload) exported by the server (192.168.170.172) with read and write permission with immediate synchronization and with nfs version 4 filesystem type.
currently, the NFS share has two sub-directories which are “/image_download” and “/iso_download”. The wildcards (* and &) will take care of the other sub-directoires that may be added to the NFS shares.
5. start and enable autofs
[root@HQDEV1 ~]# systemctl enable --now autofsNB: you may restart NFS if it already started.
6. Test your configuration.
[root@HQDEV1 ~]# cd /software/[root@HQDEV1 software]# ls
[root@HQDEV1 software]#[root@HQDEV1 software]# cd iso_download
[root@HQDEV1 iso_download]# ls
file1 file2[root@HQDEV1 iso_download]# cd /software/image_download;ls
image_file1
Another scenario where wildcards can be useful is if we don’t want to specify the number of /home directories one by one in a reference file.
for example,
# vim /etc/auto.home
user1 -rw,sync 192.168.170.172:/home/user1
user2 -rw,sync 192.168.170.172:/home/user1
user3 -rw,sync 192.168.170.172:/home/user1
can be specified as
# vim /etc/auto.home
*  -rw,sync 192.168.170.172:/home/&
In conclusion, one of the benefits of automount is that other users that don’t have root privileges to execute the mount command can also access the shares when it is required because it is on-demand.
How To Unmount NFS Share
To unmount NFS share, use the “umount” command.
For example, to unmount the “softwaredownload” NFS share that is not using autofs, use the command below.
[root@HQDEV1 ~]# umount /softwaredownloadTutorial Video On How To Configure automounter (autofs) With NFS in Linux
Your feedback is welcomed. If you love others, you will share with others.
thank you
It is very complete and well explained
I am glad it was helpful. You are welcome!
The parent directory was successfully created, while the sub-directory which is site one didn’t! how to fix this please!
very well explained. Thank you.
You are welcome