
Last updated: July 2021
Learn what LDAP is, why LDAP, the LDAP structure, and the step by step process of how to configure LDAP on Linux, RHEL 7 & 8.
UNDERSTANDING THE SUBJECT MATTER
LDAP which is an acronym for LightWeight Directory Access Protocol is a protocol that is used by directory servers or services. Examples of directory servers/softwares are Active Directory(AD), Oracle Directory Server, OpenDJ, OpenLDAP or LDAP, Red Hat Directory Server, etc.
Briefly, a directory server or directory services can be used to organize the structure of an environment. It is used to provide authentication to users and groups and gives access to IT resources they need.
Microsoft Active Directory and OpenLDAP are one of the common directory servers/services.
They have different organizational structure/hierarchy because they are of different products, but of course, they are similar in a way and they almost do the same thing which is one of the reason why some organizations do not have Microsoft Active directory but has openldap/LDAP and they are fine with it.
In this Lesson, we will look at how to setup Openldap server, create ldap users and connect with clients.
when you enter your credentials, an API call is initiated. If your credentials are correct, (i.e, the LDAP/Directory sever found your credentials to be correct), you will be authenticated and authorized but if not, the call will be denied.
one of the advantages of Openldap/LDAP services is if you have hundreds or thousands of users/servers that needs to access a central server, instead of creating user accounts on individual servers, you can create the users on the sever with security policies you wish, or even put them in a group and every one of the users can login to the server from their servers (clients).
openldap is server-client based and makes the job of an administrator easy.
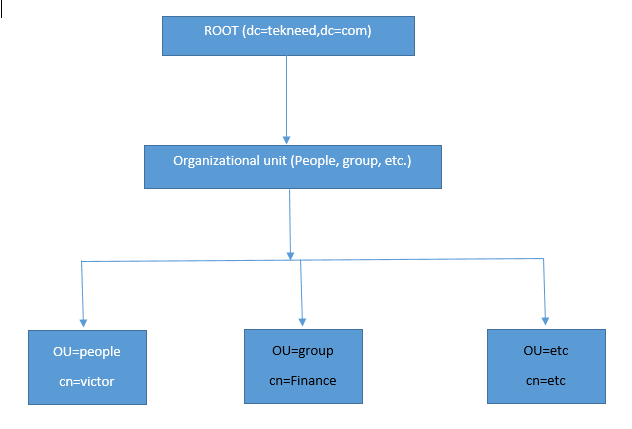
Openldap imitates the DNS structure. For example, “victor.tekneed.com” is a DNS structure and as it is called a fully qualified domain name. More so, tekneed.com is a top level domain.
In LDAP, “victor.tekneed.com” is interpreted as;
victor=cn (common name)
tekneed=dc (domain component)
.com=dc (domain component)
“tekneed.com” is the base context interpreted as (dc=tekneed,dc=com) which users will authenticate with. As we go on in this course, you will get to see how users will authenticate with the base context.
LDAP is hierarchical, starting from root, to OU (Organizational Unit) and to cn.
For our students, the tekneeders who want to take the RHCSA exam, you do not need to know how to configure LDAP server, what is important in the exam is how to connect a client to the LDAP server.
More so, NFS and automount FS services too may be required during the LDAP client setup, we will see how all these tools are used in this tutorial
There are different configuration files for openldap and can be found in the location, (/etc/openldap/slapd.d/cn=config/)
Having understood what LDAP is, let’s get to the step by step process of how to configure LDAP in Linux
ACTION TIME
we will use two servers for our configuration. One will be the LDAP server while the other will be the LDAP client.
Server A (LDAP server)
hostname: SPPRD
IP Address: 192.168.170.175
Server B (LDAP client)
hostname: EQPRD
How To Setup LDAP Server On RHEL 7/CentOS 7
1. Install the LDAP server
[root@SPPRD ~]# yum install openldap-servers openldap-clients openldap -y

Loaded plugins: langpacks, product-id, search-disabled-repos, subscription-manager
rhel-7-server-rpms                                              | 3.5 kB  00:00:00
Resolving Dependencies
--> Running transaction check
---> Package openldap.x86_64 0:2.4.44-20.el7 will be updated
---> Package openldap.x86_64 0:2.4.44-21.el7_6 will be an update
--> Finished Dependency Resolution
Updating:
 openldap           x86_64           2.4.44-21.el7_6             rhel-7-server-rpms           356 k
NB: openldap-clients will also install some ldap utilities we need for our configuration
2. LDAP user will automatically be created after installing openldap, setup LDAP adminstration password
[root@SPPRD ~]# slappasswd

New password:
Re-enter new password:
{SSHA}jIcf5iibFyYGd3/n3qdHpB4ambD9C4f2
[root@SPPRD ~]#
NB: copy and save the password key somewhere, probably on a notepad.
3. start the LDAP service
[root@SPPRD ~]# systemctl start slapd.serviceyou can enable LDAP service if you wish to
[root@SPPRD ~]# systemctl enable slapd.service

Created symlink from /etc/systemd/system/multi-user.target.wants/slapd.service to /usr/lib/systemd/system/slapd.service.4. verify that the LDAP server is running
[root@SPPRD ~]# systemctl status slapd.service

● slapd.service - OpenLDAP Server Daemon
   Loaded: loaded (/usr/lib/systemd/system/slapd.service; enabled; vendor preset: disabled)
   Active: active (running) since Thu 2020-07-30 17:21:55 PDT; 2min 15s ago
     Docs: man:slapd
           man:slapd-config
5. Create a self signed certificate for LDAP
[root@SPPRD ~]# openssl req -new -x509 -nodes -out /etc/pki/tls/certs/tekneedldap.pem -keyout /etc/pki/tls/certs/tekneedldapkey.pem -days 365

Generating a 2048 bit RSA private key
............+++
....................+++
writing new private key to '/etc/pki/tls/certs/tekneedldapkey.pem'
-----
You are about to be asked to enter information that will be incorporated
into your certificate request.
What you are about to enter is what is called a Distinguished Name or a DN.
There are quite a few fields but you can leave some blank
For some fields there will be a default value,
If you enter '.', the field will be left blank.
-----
Enter your details to generate the certificate
Country Name (2 letter code) [XX]:NG
State or Province Name (full name) []:Lagos
Locality Name (eg, city) [Default City]:Lagos
Organization Name (eg, company) [Default Company Ltd]:Teknned
Organizational Unit Name (eg, section) []:IT
Common Name (eg, your name or your server's hostname) []:SPPRD
Email Address []:info@tekneed.com
NB: Note the certificate path because we are going to add it to LDAP configuration file
. You can verify that the certificate has been created
[root@SPPRD ~]# ls -l /etc/pki/tls/certs/*.pem

-rw-r--r--. 1 root root 1704 Jul 31 05:01 /etc/pki/tls/certs/tekneedldapkey.pem
-rw-r--r--. 1 root root 1379 Jul 31 05:01 /etc/pki/tls/certs/tekneedldap.pem
6. Edit the openladap database configuration file.
[root@SPPRD ~]# cd /etc/openldap/slapd.d/cn\=config/

[root@SPPRD cn=config]# ls

cn=schema       olcDatabase={0}config.ldif     olcDatabase={1}monitor.ldif
cn=schema.ldif  olcDatabase={-1}frontend.ldif  olcDatabase={2}hdb.ldif
[root@SPPRD cn=config]#
openldap configuration files can be seen in the above location. The configuration file we are concerned about at the moment is “olcDatabase={2}hdb.ldif”
. Backup the configuration files before editing.
[root@SPPRD ~]# cp -r /etc/openldap/slapd.d/cn\=config /tmp. Now edit the configuration file.
[root@SPPRD ~]# vi /etc/openldap/slapd.d/cn\=config/olcDatabase={2}hdb.ldif
# AUTO-GENERATED FILE - DO NOT EDIT!! Use ldapmodify.
# CRC32 ca282392
dn: olcDatabase={2}hdb
objectClass: olcDatabaseConfig
objectClass: olcHdbConfig
olcDatabase: {2}hdb
olcDbDirectory: /var/lib/ldap
olcSuffix: dc=my-domain,dc=com
olcRootDN: cn=Manager,dc=my-domain,dc=com
olcDbIndex: objectClass eq,pres
olcDbIndex: ou,cn,mail,surname,givenname eq,pres,sub
structuralObjectClass: olcHdbConfig
entryUUID: 10fc4888-670d-103a-9670-155130969070
creatorsName: cn=config
createTimestamp: 20200731000354Z
entryCSN: 20200731000354.142281Z#000000#000#000000
modifiersName: cn=config
modifyTimestamp: 20200731000354Z
The parameters to edit in this file are:
. look for the line oclSuffix and edit the line to your domain as highlighted in yellow below
. look for the line oclRootDN and edit the line to your domain as highlighted in yellow below as well
. Include the LDAP Admin password at the end of the file as highlighted in yellow below
. Include a TLS certificate file for the domain at the end of the file as highlighted in yellow below
. Include the certificate key file for the domain at the end of the file as highlighted in yellow below
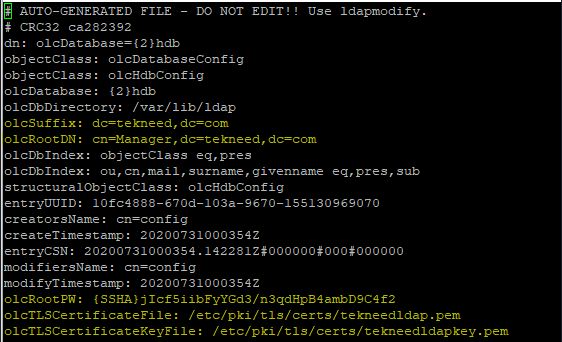
you can copy and paste below
# AUTO-GENERATED FILE - DO NOT EDIT!! Use ldapmodify.
# CRC32 ca282392
dn: olcDatabase={2}hdb
objectClass: olcDatabaseConfig
objectClass: olcHdbConfig
olcDatabase: {2}hdb
olcDbDirectory: /var/lib/ldap
olcSuffix: dc=tekneed,dc=com
olcRootDN: cn=Manager,dc=tekneed,dc=com
olcDbIndex: objectClass eq,pres
olcDbIndex: ou,cn,mail,surname,givenname eq,pres,sub
structuralObjectClass: olcHdbConfig
entryUUID: 10fc4888-670d-103a-9670-155130969070
creatorsName: cn=config
createTimestamp: 20200731000354Z
entryCSN: 20200731000354.142281Z#000000#000#000000
modifiersName: cn=config
modifyTimestamp: 20200731000354Z
olcRootPW: {SSHA}jIcf5iibFyYGd3/n3qdHpB4ambD9C4f2
olcTLSCertificateFile: /etc/pki/tls/certs/tekneedldap.pem
olcTLSCertificateKeyFile: /etc/pki/tls/certs/tekneedldapkey.pem
. save the file
7. Restart the sever
[root@SPPRD ~]# systemctl restart slapd8. edit the openldap monitor configuration file to allow access for monitoring.
[root@SPPRD ~]# cd  /etc/openldap/slapd.d/cn\=config/

[root@SPPRD cn=config]# ls

cn=schema       olcDatabase={0}config.ldif     olcDatabase={1}monitor.ldif
cn=schema.ldif  olcDatabase={-1}frontend.ldif  olcDatabase={2}hdb.ldif
[root@SPPRD ~]# vi /etc/openldap/slapd.d/cn\=config/olcDatabase={1}monitor.ldiflook for the line olcAccess and change it to your domain name as highlighted in yellow below
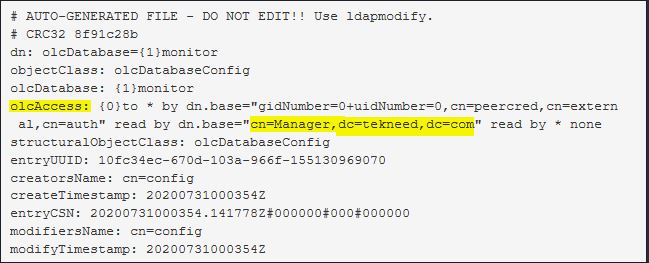
. save the file
9. Test the configuration/changes that has been made so far in the configuration file
[root@SPPRD cn=config]# slaptest -u

5f23760d ldif_read_file: checksum error on "/etc/openldap/slapd.d/cn=config/olcDatabase={1}monitor.ldif"
5f23760d ldif_read_file: checksum error on "/etc/openldap/slapd.d/cn=config/olcDatabase={2}hdb.ldif"
config file testing succeeded
[root@SPPRD cn=config]#
Ignore the “checksum error” you might see. If you see “config file succeeded” at the end of the file, the configuration changes made is fine
10. configure a database for LDAP.
usually, openldap has a sample database in the location, “/usr/share/openldap-servers/DB_CONFIG.example”. We can use it
. copy the DB_CONFIG.example file to the location, “/var/lib/ldap” as DB_CONFIG file.
[root@SPPRD ~]# cp /usr/share/openldap-servers/DB_CONFIG.example /var/lib/ldap/DB_CONFIG
. Add the following LDAP schemas, i.e, (LDAP database structure) to the LDAP database.
[root@SPPRD ~]# ldapadd -Y EXTERNAL -H ldapi:/// -f /etc/openldap/schema/cosine.ldif

SASL/EXTERNAL authentication started
SASL username: gidNumber=0+uidNumber=0,cn=peercred,cn=external,cn=auth
SASL SSF: 0
adding new entry "cn=cosine,cn=schema,cn=config"
[root@SPPRD ~]# ldapadd -Y EXTERNAL -H ldapi:/// -f /etc/openldap/schema/nis.ldif

SASL/EXTERNAL authentication started
SASL username: gidNumber=0+uidNumber=0,cn=peercred,cn=external,cn=auth
SASL SSF: 0
adding new entry "cn=nis,cn=schema,cn=config"
[root@SPPRD ~]# ldapadd -Y EXTERNAL -H ldapi:/// -f /etc/openldap/schema/inetorgperson.ldif

SASL/EXTERNAL authentication started
SASL username: gidNumber=0+uidNumber=0,cn=peercred,cn=external,cn=auth
SASL SSF: 0
adding new entry "cn=inetorgperson,cn=schema,cn=config"
NB: These three schemas we have added, cosine, nis, and inetorgperson are necessary for LDAP to function well.
11. create a “base.ldif” file for your domain, i.e, a format of how you want the database to be
it can be created in “/root”
[root@SPPRD ~]# vi /root/base.ldifdn: dc=tekneed,dc=com
objectClass: top
objectClass: dcObject
objectclass: organization
o: tekneed com
dc: tekneed
dn: cn=Manager,dc=tekneed,dc=com
objectClass: organizationalRole
cn: Manager
description: Directory Manager
dn: ou=People,dc=tekneed,dc=com
objectClass: organizationalUnit
ou: People
dn: ou=Group,dc=tekneed,dc=com
objectClass: organizationalUnit
ou: Group
NB: The file is sensitive, so edit with extra caution
12. Create a base object for LDAP
The base object is the standard format in openldap and objects can be first name, last name, phone numbers, email ID, etc.
. The migration tool is needed to create a base object, hence we install the migration tool
The migration tool is going to be used to migrate/convert the local users to openldap database/format.
[root@SPPRD ~]# yum install migrationtools

Loaded plugins: langpacks, product-id, search-disabled-repos, subscription-manager
Resolving Dependencies
--> Running transaction check
---> Package migrationtools.noarch 0:47-15.el7 will be installed
--> Processing Dependency: ldif2ldbm for package: migrationtools-

Dependency Installed:
  openldap-servers.x86_64 0:2.4.44-21.el7_6

Complete!
The installed migration tools can be found in “/usr/share/migrationtools“
[root@SPPRD ~]# cd /usr/share/migrationtools/

[root@SPPRD migrationtools]# ls

migrate_aliases.pl              migrate_automount.pl        migrate_networks.pl
migrate_all_netinfo_offline.sh  migrate_base.pl             migrate_passwd.pl
migrate_all_netinfo_online.sh   migrate_common.ph           migrate_profile.pl
migrate_all_nis_offline.sh      migrate_fstab.pl            migrate_protocols.pl
migrate_all_nis_online.sh       migrate_group.pl            migrate_rpc.pl
migrate_all_nisplus_offline.sh  migrate_hosts.pl            migrate_services.pl
migrate_all_nisplus_online.sh   migrate_netgroup_byhost.pl  migrate_slapd_conf.pl
migrate_all_offline.sh          migrate_netgroup_byuser.pl
migrate_all_online.sh           migrate_netgroup.pl
[root@SPPRD migrationtools]#
. Edit the “migrate_common.ph” migration tool configuration file
[root@SPPRD migrationtools]# vi /usr/share/migrationtools/migrate_common.ph. search for the lines, “DEFAULT_MAIL_DOMAIN” and “Default base“. Edit the parameter to your domain name as highlighted in yellow below.
. Also search for the line, “EXTENDED SCHEMA“, and change it to 1 as highlighted in yellow below
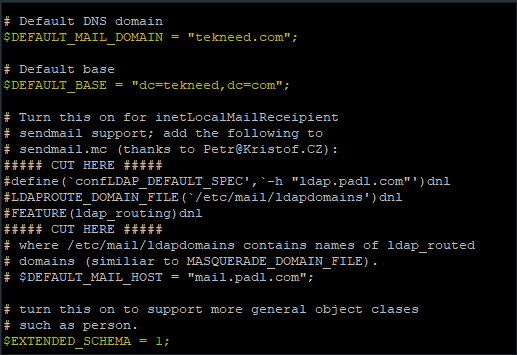
. save the file
Now that our migration tool is ready, let’s create some users for the purpose of this study, and convert them to openldap format which is “.ldif” ( ldap data interchange format)
12b. Let’s create two users for the purpose of this study
[root@SPPRD ~]# adduser jacob
[root@SPPRD ~]# passwd jacob
Changing password for user jacob.
New password:
BAD PASSWORD: The password fails the dictionary check - it is based on a dictionary word
Retype new password:
passwd: all authentication tokens updated successfully.
[root@SPPRD ~]# adduser dorcas
[root@SPPRD ~]# passwd dorcas
Changing password for user dorcas.
New password:
BAD PASSWORD: The password fails the dictionary check - it is based on a dictionary word
Retype new password:
passwd: all authentication tokens updated successfully.
[root@SPPRD ~]#
12c. copy the users information to “/root/passwd” and “/root/group” so we can migrate/convert the users from the location to openldap format.
since we do not need all the users in the/etc/passwd file, we can filter out the necessary users and not services users.
[root@SPPRD ~]# grep ":10[0-9][0-9]" /etc/passwd > /root/passwd[root@SPPRD ~]# grep ":10[0-9][0-9]" /etc/group > /root/group12d. verify the users that have been copied
[root@SPPRD ~]# cat /root/passwd

oluwatomisin:x:1000:1000:rhel7:/home/oluwatomisin:/bin/bash
jacob:x:1001:1001::/home/jacob:/bin/bash
dorcas:x:1002:1002::/home/dorcas:/bin/bash
[root@SPPRD ~]# cat /root/group

oluwatomisin:x:1000:oluwatomisin
jacob:x:1001:
dorcas:x:1002:
12e. Now convert the users file to ldif (ldap data interchange format) using the migration tool
you can navigate to the migrationtools directory
[root@SPPRD ~]# cd /usr/share/migrationtools/[root@SPPRD migrationtools]# ./migrate_passwd.pl /root/passwd /root/users.ldif[root@SPPRD migrationtools]# ./migrate_group.pl /root/group /root/groups.ldif12f. verify the conversion
[root@SPPRD migrationtools]# cat /root/users.ldif

dn: uid=jacob,ou=People,dc=tekneed,dc=com
uid: jacob
cn: jacob
sn: jacob
mail: jacob@tekneed.com
objectClass: person
objectClass: organizationalPerson
objectClass: inetOrgPerson
objectClass: posixAccount
objectClass: top
objectClass: shadowAccount
userPassword: {crypt}$1$4ghHxf0v$IcD4ZzNtrxeXVo5zVm9Lz/
shadowLastChange: 18474
shadowMin: 0
shadowMax: 99999
shadowWarning: 7
loginShell: /bin/bash
uidNumber: 1001
gidNumber: 1001
homeDirectory: /home/jacob

........
[root@SPPRD migrationtools]# cat /root/groups.ldif
dn: cn=jacob,ou=Group,dc=tekneed,dc=com
objectClass: posixGroup
objectClass: top
cn: jacob
userPassword: {crypt}x
gidNumber: 1001
..............13. export users converted to “.ldif” format to LDAP database
you need to export the three “.ldif” format which are base, users and group to LDAP database
[root@SPPRD migrationtools]# ldapadd -x -W -D "cn=Manager,dc=tekneed,dc=com" -f /root/base.ldif
Enter LDAP Password:
Enter the LDAP admin password you created
adding new entry "dc=tekneed,dc=com"

adding new entry "cn=Manager,dc=tekneed,dc=com"

adding new entry "ou=People,dc=tekneed,dc=com"

adding new entry "ou=Group,dc=tekneed,dc=com"
[root@SPPRD migrationtools]# ldapadd -x -W -D "cn=Manager,dc=tekneed,dc=com" -f /root/users.ldif
Enter LDAP Password:
adding new entry "uid=oluwatomisin,ou=People,dc=tekneed,dc=com"
adding new entry "uid=jacob,ou=People,dc=tekneed,dc=com"
adding new entry "uid=dorcas,ou=People,dc=tekneed,dc=com"
[root@SPPRD migrationtools]# ldapadd -x -W -D "cn=Manager,dc=tekneed,dc=com" -f /root/groups.ldif

Enter LDAP Password:
adding new entry "cn=oluwatomisin,ou=Group,dc=tekneed,dc=com"

adding new entry "cn=jacob,ou=Group,dc=tekneed,dc=com"

adding new entry "cn=dorcas,ou=Group,dc=tekneed,dc=com"
14. Test your configuration from the server end by fetching one of the user’s information
[root@SPPRD migrationtools]# ldapsearch -x cn=jacob -b dc=tekneed,dc=com

# extended LDIF
#
# LDAPv3
# base <dc=tekneed,dc=com> with scope subtree
# filter: cn=jacob
# requesting: ALL
#

# jacob, People, tekneed.com
dn: uid=jacob,ou=People,dc=tekneed,dc=com
uid: jacob
cn: jacob
sn: jacob
mail: jacob@tekneed.com
objectClass: person
objectClass: organizationalPerson
objectClass: inetOrgPerson
objectClass: posixAccount
objectClass: top
objectClass: shadowAccount
userPassword:: e2NyeXB0fSQxJDRnaEh4ZjB2JEljRDRaek50cnhlWFZvNXpWbTlMei8=
shadowLastChange: 18474
shadowMin: 0
shadowMax: 99999
shadowWarning: 7
loginShell: /bin/bash
uidNumber: 1001
gidNumber: 1001
homeDirectory: /home/jacob

# jacob, Group, tekneed.com
dn: cn=jacob,ou=Group,dc=tekneed,dc=com
objectClass: posixGroup
objectClass: top
cn: jacob
userPassword:: e2NyeXB0fXg=
gidNumber: 1001

# search result
search: 2
result: 0 Success

# numResponses: 3
# numEntries: 2
Now, we are done with the LDAP server setup. However, we need to connect to the server via LDAP client. Hence, we need to prepare the server for the client
1. Allow LDAP service in the firewall rule.
[root@SPPRD ~]# firewall-cmd --add-service=ldap --permanent

success
[root@SPPRD ~]# firewall-cmd --reload
success2. Configure NFS to make it ready for LDAP client
[root@SPPRD ~]# yum install nfs-utils

Loaded plugins: langpacks, product-id, search-disabled-repos, subscription-manager
my_local_repo                                                                         | 4.3 kB  00:00:00
...
3. start the NFS server
[root@SPPRD ~]# systemctl start nfs4. start “rpcbind” service
[root@SPPRD ~]# systemctl start rpcbind5. Allow NFS service in the firewall rule
[root@SPPRD ~]# firewall-cmd --add-service={nfs,rpc-bind,mountd} --permanent

success
[root@SPPRD ~]# firewall-cmd --reload
successHow To Setup LDAP Client On RHEL 7 & Connect To LDAP Server
1. Install the LDAP client and utilities
[root@EQPRD ~]# yum install openldap-clients nss-pam-ldapd -y

Loaded plugins: langpacks, product-id, search-disabled-repos, subscription-manager
rhel-7-server-rpms                                                      | 3.5 kB  00:00:00
(1/3): rhel-7-server-rpms/7Server/x86_64/group                          | 631 kB  00:00:04
(2/3): rhel-7-server-rpms/7Server/x86_64/updateinfo
2. LDAP client can be configured using the CLI or TUI. In this course, we will use the TUI utility.
[root@EQPRD ~]# authconfig-tui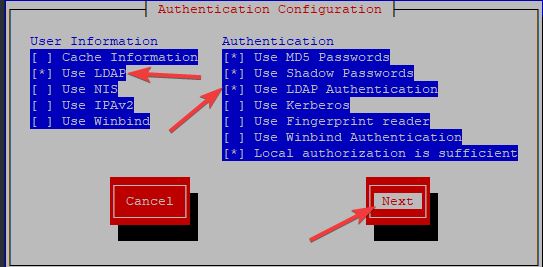
. clicking on next will take you to the next page below
If DNS resolution is working, you can use FQDN
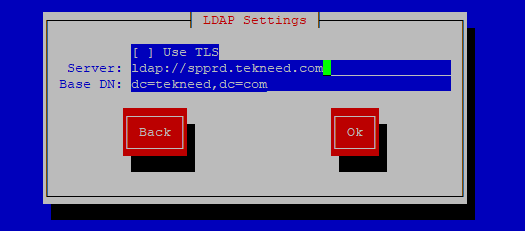
. If you enable TLS, tick the TLS option. In our case, we did not, so we leave out the option click on ok
3. verify you can authenticate to the LDAP server by spooling out the information of a user from the LDAP server
[root@EQPRD ~]# getent passwd dorcas

dorcas:x:1002:1002:dorcas:/home/dorcas:/bin/bash
[root@EQPRD ~]# getent passwd jacob
jacob:x:1001:1001:jacob:/home/jacob:/bin/bash[root@EQPRD ~]# getent passwd oluwatomisin
oluwatomisin:x:1000:1000:oluwatomisin:/home/oluwatomisin:/bin/bash[root@EQPRD ~]# getent group dorcas
dorcas:*:1002:4. Now that we can successfully authenticate, switch user to one of the users on the LDAP server
[root@EQPRD ~]# su - dorcas
su: warning: cannot change directory to /home/dorcas: No such file or directory
-bash-4.2$
According to the warning, home directory is not present yet, hence the user’s data can’t be displayed.
5. Let’s verify
-bash-4.2$ pwd

/root
-bash-4.2$ whoami
dorcasTo access the home directory/files of an LDAP user, the user’s home directory has to be imported from the LDAP server and it can be done by using NFS.
If you are dealing with a lot of clients, using autoFS will be realistic compared to using NFS. As We go on, we will see the step by step process of how to confgure autoFS with LDAP
How To Authenticate/Connect To LDAP server On RHEL 7 Using NFS
6. Install the NFS utilities on the client
[root@EQPRD ~]# yum install nfs-utils

Loaded plugins: langpacks, product-id, search-disabled-repos, subscription-manager
my_local_repo                                                                         | 4.3 kB  00:00:00
...
6b. start “rpcbind” service
[root@EQPRD ~]# systemctl start rpcbind7. On the NFS server, edit the”/etc/export” configuration file, you may also add the client’s IP in the file
[root@SPPRD ~]# vi /etc/exports/home/ *(rw)NB: This should be done on the NFS server
8. Confirm the NFS share
[root@EQPRD ~]# showmount -e 192.168.170.177

Export list for 192.168.170.177:
/home *
9. mount NFS share
[root@EQPRD ~]# mount 192.168.170.177:/home /home10. Verify the users in /home directory
[root@EQPRD ~]# ls -l /home

total 0
drwx------. 4 dorcas       dorcas       112 Aug  1 12:54 dorcas
drwx------. 2 victor       victor        62 Jul 31 06:11 jacob
drwx------. 2 oluwatomisin oluwatomisin  62 Jul 30 11:00 oluwatomisin
[root@EQPRD ~]#
11. Now, switch user to one of the LDAP users again.
[root@EQPRD ~]# su - dorcas

Last login: Mon Aug  3 17:00:55 PDT 2020 on pts/0
[dorcas@EQPRD ~]$
[dorcas@EQPRD ~]$ pwd

/home/dorcas
[dorcas@EQPRD ~]$ ls
3 tekneed tekneed1 tekneed2
You can see now that we can access the home directory of the user, “dorcas”. If you create a file, the file will also automatically reflect on the server as well.
How To Authenticate/Connect To LDAP Server On RHEL 7 Using AutoFS
This procedure will involve mapping the home directory using autoFS
1. From step 8 above, verify that the home directory has been exported from your server
[root@EQPRD ~]# showmount -e 192.168.170.177

Export list for 192.168.170.177:
/home *
2. If “/home” has been manually mounted (with NFS), unmount it
[root@EQPRD ~]# umount /home3. verify you can still authenticate to the server with an LDAP user
[root@EQPRD ~]# su - dorcas

su: warning: cannot change directory to /home/dorcas: No such file or directory
-bash-4.2$
4. Install the “autofs” package
[root@EQPRD ~]# yum install autofs

Loaded plugins: langpacks, product-id, search-disabled-repos, subscription-manager
This system is not registered with an entitlement server. You can use subscription-manager to register.
Resolving Dependencies
--> Running transaction check
5. Edit the autofs configuration file and add the home directory and the home directory map file as highlighted in yellow below
[root@EQPRD ~]# vi /etc/auto.master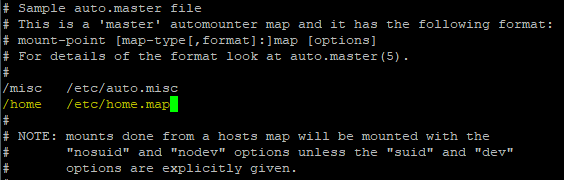
6. create the home directory map file
[root@EQPRD ~]# vi /etc/home.map* -fstype=auto 192.168.170.187:/home/&
The first column (*) means every user folders will be mounted
The second column (fstype) is the filesystem option. Auto or any other option can be used
The third column(192.168.170.187:/home/&) is the NFS share path
7. start the autofs service
[root@EQPRD ~]# systemctl start autofs8. Login with an ldap user
[root@EQPRD ~]# su - dorcas

Last login: Wed Aug  5 12:19:47 PDT 2020 on pts/0
[dorcas@EQPRD ~]$ pwd
/home/dorcas[dorcas@EQPRD ~]$ whoami
dorcas[dorcas@EQPRD ~]$ ls
3 tekneed tekneed1 tekneed2 test1
[dorcas@EQPRD ~]$We have seen how to authenticate to an LDAP server on RHEL 7, Let’s see the step by step process of how we can authenticate to LDAP server on RHEL 8
1. Install the openldap client and other client utilities.
[root@DRQAS1 ~]# dnf install openldap-clients sssd sssd-ldap oddjob-mkhomedir openssl-perl -y2. setup LDAP client authentication with the LDAP server using the sssd service
edit the “/etc/sssd/sssd.conf” file. Create the file if it doesn’t exist.
For a TLS communication, edit the file as below
[root@DRQAS1 ~]# vi /etc/sssd/sssd.conf[sssd]
config_file_version = 2
services = nss, pam,autofs
domains = default
[nss]
homedir_substring = /home
[pam]
[domain/default]
id_provider = ldap
autofs_provider = ldap
auth_provider = ldap
chpass_provider = ldap
ldap_uri = ldap://192.168.170.208
ldap_search_base = dc=tekneed,dc=com
ldap_id_use_start_tls = True
ldap_tls_cacertdir = /etc/openldap/certs
cache_credentials = True
ldap_tls_reqcert = allowFor an SSL communication, edit the file as below
[domain/default]
id_provider = ldap
autofs_provider = ldap
auth_provider = ldap
chpass_provider = ldap
ldap_uri = ldaps://192.168.170.208:636
ldap_chpass_uri = ldaps://192.168.170.208:636
ldap_search_base = dc=tekneed,dc=com
ldap_id_use_start_tls = False
ldap_tls_cacertdir = /etc/openldap/certs
cache_credentials = True
ldap_tls_reqcert = demand
entry_cache_timeout = 600
ldap_network_timeout = 3
ldap_connection_expire_timeout = 60
For a non TLS and SSL communication which is what we have, edit the file as below.
[sssd]
config_file_version = 2
services = nss, pam,autofs
domains = default

[nss]

homedir_substring = /home

[pam]

[domain/default]
id_provider = ldap
autofs_provider = ldap
auth_provider = ldap
chpass_provider = ldap
ldap_uri = ldap://192.168.170.208
ldap_search_base = dc=tekneed,dc=com
ldap_tls_cacertdir = /etc/openldap/certs
cache_credentials = True
ldap_tls_reqcert = allow
3. Change the permission and the ownership on the file
[root@DRQAS1 ~]# chmod 600 /etc/sssd/sssd.conf[root@DRQAS1 ~]# chown root:root /etc/sssd/sssd.conf4. Edit the ldap.conf file and add the server information as it is below
[root@DRQAS1 ~] vi /etc/openldap/ldap.confBASE dc=tekneed,dc=com
URI ldap://192.168.170.208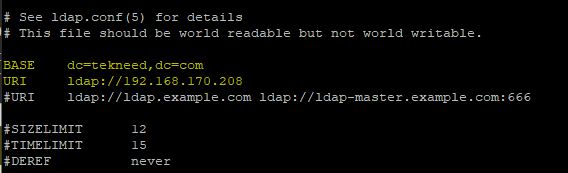
5. Use “authselect” to confgure the system
[root@DRQAS1 ~]# authselect select sssd with-mkhomedir --force

Profile "sssd" was selected.
The following nsswitch maps are overwritten by the profile:
- passwd
- group
- netgroup
- automount
- services

Make sure that SSSD service is configured and enabled. See SSSD documentation for more information.

- with-mkhomedir is selected, make sure pam_oddjob_mkhomedir module
  is present and oddjobd service is enabled
  - systemctl enable oddjobd.service
  - systemctl start oddjobd.service
6. Start and enable the SSSD service
[root@DRQAS1 ~]# systemctl start sssd[root@DRQAS1 ~]# systemctl enable sssd7. Start and enable the oddjobd service
[root@DRQAS1 ~]# systemctl start oddjobd.service[root@DRQAS1 ~]# systemctl enable oddjobd.service
Created symlink /etc/systemd/system/multi-user.target.wants/oddjobd.service → /usr/lib/systemd/system/oddjobd.service.8. Verify any LDAP user.
[root@DRQAS1 ~]# id jacob

uid=1001(jacob) gid=1001(harry) groups=1001(harry)
[root@DRQAS1 ~]# id dorcas
uid=1002(dorcas) gid=1002(dorcas) groups=1002(dorcas)9. Login as an LDAP user
[root@DRQAS1 ~]# su - dorcas

Creating home directory for dorcas.

[dorcas@DRQAS1 ~]$ pwd

/home/dorcas
You wouldn’t be able to list the contents in here if you try to. Let’s configure NFS so we can be able to access the home directory of LDAP users just as we did with RHEL 7
How To Authenticate/Connect To LDAP User On RHEL 8 Using NFS
10. On the LDAP server, configure NFS share using step 2,3,4 & 5
11. on the LDAP client, configure NFS share using step 6, 7, 8, 9 & 10
12. switch user to LDAP user again and do “ls”
[root@DRQAS1 ~]# su - dorcas

Last login: Thu Aug 20 22:39:16 WAT 2020 on pts/1
[dorcas@DRQAS1 ~]$ ls

3  tekneed  tekneed1  tekneed2  test1
Your feedback is welcomed. If you love others, you will share with others
please let me know the configuration for “How windows machine can authenticate to linux machine”
kerberos