
Last updated: February 2023
In this lesson, you will learn how to deploy application in OpenShift container platform and the different methods of how it can be done using ad hoc with examples.
Understanding The Subject Matter
Hi everyone! Victor is here again. I welcome you to this chapter, which is about deploying your first application on OpenShift. We will be using ad hoc, i.e., the basic command lines to deploy applications, after which we will use the declarative approach (YAML) to deploy applications in subsequent chapters.
In one of the previous chapters, we learnt about some Kubernetes and OpenShift components/objects/features such as; node, pod, etc. In this chapter, we’ll also learn about some other OpenShift objects/components/features such as;
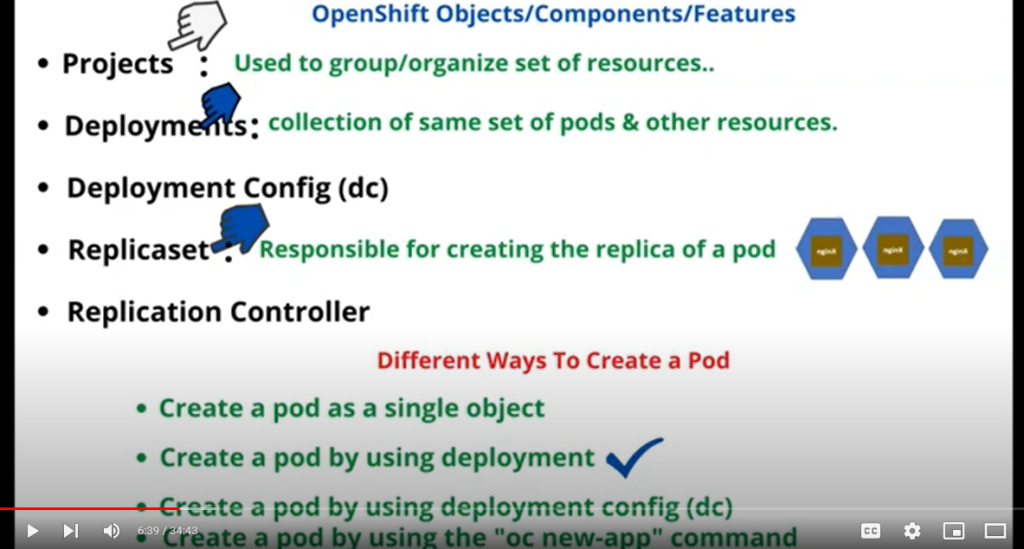
*project
*Deployment
*Deployment config (dc)
*Replica set, and
*Replication Controller.
In this lesson, we will be deploying our first application, and as we have learned in one of the previous lessons, applications or container images reside in a pod. So, deploying an application simply means creating a pod.
To deploy application in OpenShift, the first thing you need to do is login to the OpenShift cluster by using the command below;
[victor@sno ~]$ oc login -u kubeadmin -p gQVgL-5NxSx-UJ62i-CCMVH https://api.crc.testing:6443

Login successful.

You have access to 65 projects, the list has been suppressed. You can list all projects with 'oc projects'

Using project "default"
From the output above, you can see that I am able to login with the user, “kubeadmin” and it displays “login successful”. The output also displays a message that I have access to 65 projects, and I’m currently using the “default” project. So, what is project in OpenShift?
What Is Project In OpenShift?
Project is an organizational feature of OpenShift that allows you to group your resources. Some technologies call it by different names, such as; organization unit, resource group, and in Kubernetes, it is called namespace. And don’t forget that OpenShift is built on top of Kubernetes, so you will always get to see project, and namespace used interchangeably.
To see all the projects available on an OpenShift cluster, use the command below,
[victor@sno ~]$ oc projects

You have access to the following projects and can switch between them with ' project <projectname>':

    *default
    kube-node-lease
    kube-public
    kube-system
    openshift
    openshift-apiserver
......................
You can see that we have a whole lot of projects available, and you can also see that the asterics (*) is on default, hence, we are using the default project on this cluster. You can also use the word count command (oc projects |wc)to know the number of projects available. Let’s see how we can create a new project in OpenShift.
Creating Project In OpenShift
To create a new project, with the name, “app-project” in OpenShift, use the command below.
[victor@sno ~]$ oc new-project app-project

Now using project "app-project" on server "https://api.crc.testing:6443".

You can add applications to this project with the 'new-app' command. For example, try:

    oc new-app rails-postgresql-example

to build a new example application in Ruby. Or use kubectl to deploy a simple Kubernetes application:

    kubectl create deployment hello-node --image=k8s.gcr.io/e2e-test-images/agnhost:2.33 -- /agnhost serve-hostname
And Like it was mentioned above, one can always use the command, “oc projects” to confirm that the project has been created, even after it is written boldly that you are currently on the project you just created.
Like I mentioned earlier, deploying an application simply means creating a pod.
Creating Pod In OpenShift Cluster
There are different ways a pod can be created in OpenShift. Just as we learnt in my Kubernetes course, a pod can be created as an individual object and by using the deployment. The same is applicable to OpenShift. Basically, to create a pod in OpenShift, we can:
1. Create a pod as an individual object.
2. Create a pod by using deployment.
3. Create a pod by using deployment config (dc).
4. Create a pod by using the new-app option.
The “how and when” questions are probably running through your minds right now. You certainly want to know which way is best for creating the pods. Well, I’ll break it down for us by starting with what deployment is.
What Is Deployment In OpenShift/Kubernetes?
A deployment is a layer over a pod. It’s a collection of some sets of pods and other resources. Using deployment to create a pod manages the applications or pods in a holistic manner as the pods will be managed by deployment, accompanied with other resources and features that come with deployment, one of which is the replicaset.
What Is Replicaset In OpenShift/Kubernetes
A replicaset is a feature of an OpenShift/Kubernetes cluster that is responsible for the replication of a pod. If you want to increase or decrease the quantity of a pod, the replicaset allows you to do that, and with deployment, you don’t have to create the replicaset feature separately.
The replicaset will automatically be created and managed by the deployment. With deployment, you will also have the benefit of doing an automatic update, pod update, and you can also easily roll back to the previous update if the update is not compatible or runs into issues.
Creating a pod as a single object will not give you all these benefits of using deployment as mentioned above. To create a pod, as I’ve said, you can choose between creating a pod as an individual object and creating a pod using deployment. Most will agree that creating a pod with deployment is better and more realistic in a production environment than creating a pod as a single object.
However, there are some tests you might want to quickly carry out, and in such cases, we can create a pod as an individual object. Having understood what deployment is, let’s look at what deployment config is.
What Is Deployment Config (dc) & Replication Controller In OpenShift
Deployment config is strictly an OpenShift object. It is similar to the deployment object. Both do the same thing using a slightly different method. For example, one of the features that comes with creating deployment is replicaset, while that of deployment config is replication controller.
The replicaset and the replication controller do the same thing, which is managing the quantities of pods. The replicaset is simply the successor of the replication controller.
A common question I’m often asked is, “Do I use deployment or do I use deployment config?” Well, Red Hat has advised that we should try as much as possible to always use deployment, because deployment serves as a descendant of the deployment config. However, if you need a specific feature of the deployment config object, you can make use of the deployment config. Otherwise, make use of deployment.
I won’t go deep into their specific features or how they work until later, possibly in the second part of this course. But if you are curious to know how they work, click on this link to learn more about the deployment config.
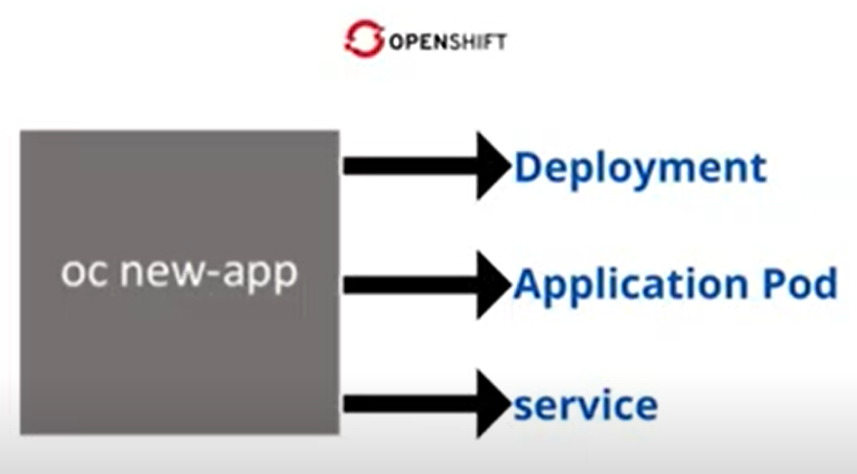
Using The “oc new-app” Option
A pod can be created by using the oc command with the “new-app” option. This is one of the easiest, and arguably the best way of creating a pod in an OpenShift cluster because the “oc new-app” command automatically creates a deployment which will be used to manage the pods.
In the older version of OpenShift, the new-app option usually creates a deployment config, but in the newer version, it now creates a deployment. And if you are wondering why you should use the new-app option to create a pod when you can create a pod using the deployment straight away since the new-app option also creates deployment .
The answer is that the new-app option does not only create deployment, it also creates service for you. I’ll talk about what services are in the next chapter. Alright, enough talk and theory; let’s do some practice.
ACTION TIME
Lets see the step by step guide of how to create pods in OpenShift using different methods.
How To Create Pod In OpenShift Cluster As an Individual Object
*To create a pod, with the name, “nginx-app”, as an individual object, use the command below.
[victor@sno ~]$ oc run nginx-app --image=nginx

pod/nginx-app created
The pod name will be “nginx-app”, and the nginx image will be downloaded automatically from docker hub.
*To verify that the pod has been created, you can use the command below.
[victor@sno ~]$ oc get pods

NAME        READY   STATUS              RESTARTS   AGE
nginx-app   0/1     ContainerCreating   0          10s
[victor@sno ~]$ oc get pods

NAME        READY   STATUS    RESTARTS   AGE
nginx-app   1/1     Running   0          96s
You can see now that the pod is created and already running.
If you want to get more information about the pod, you can output the display to a wider information by using the command below.
[victor@sno ~]$ oc get pods -o wide

NAME        READY   STATUS    RESTARTS   AGE   IP            NODE                 NOMINATED NODE   READINESS GATES
nginx-app   1/1     Running   0          98m   10.217.0.70   crc-5nvrm-master-0   <none>           <none>
You can see the name of the pod, and the status of the pod, which reads “running”. You can also see the internal IP of the pod, and of course you can see the node where the pod is running. And don’t forget that we are using a single node cluster, meaning that we have both our master node and our worker node running on the same node.
To get a better information about the pod, one can also use the command below.
[victor@sno ~]$ oc describe pod nginx-app

Name:         nginx-app
Namespace:    app-project
Priority:     0
Node:         crc-5nvrm-master-0/192.168.126.11
Start Time:   Mon, 15 Aug 2022 12:52:44 +0100
Labels:       run=nginx-app
Annotations:  k8s.v1.cni.cncf.io/network-status:
........................................
Like I mentioned that in Kubernetes, the organization of resources is done by namespace, while in OpenShift it’s called project. I also said that we’re going to be using these names interchangeably. You can see that its displayed as namespace above. So this is the project or namespace, and the name is app-project.
You can see the start time as well as the labels. Later on in this course, we’re going to talk about labels and annotations. So, if you scroll down more, you can see the status of the pod, the internal IP of the pod, the containers that is in the pod, and the event which is the logs. You can see that at a time the image was being pulled and then, it was successfully pulled.
You can see that at a time the container was being created and at a time the container was being started.
After the creation of an application pod, the ideal thing is to test if the application was successfully deployed. If you use the curl command with the pod IP (curl 10.217.0.70), you will not get an ouput because we haven’t created an endpoint/service. We will look at how to create a service and understand this better in subsequent lessons but for now, a way we can test if nginx was successfully deployed is to login to the crc node.
How To Login to OpenShift local/crc node
We can test if nginx web service was successfully deployed by logging into the worker node where the nginx was deployed on. In our case, since we are using a single cluster node, the nginx web server that was deployed will definitely reside on just one node, which is the OpenShift local/crc node.
Hence, we need to login to the crc node.
*To get the crc node IP, we can use the command below.
[victor@sno ~]$ crc ip

192.168.130.11
*To login to the crc node, ssh into the node with the user, “core” by using the command below.
[victor@sno ~]$ ssh -i /home/victor/.crc/machines/crc/id_ecdsa core@"192.168.130.11"

client_global_hostkeys_private_confirm: server gave bad signature for RSA key 0: error in libcrypto
Red Hat Enterprise Linux CoreOS 410.84.202206080346-0
  Part of OpenShift 4.10, RHCOS is a Kubernetes native operating system
  managed by the Machine Config Operator (`clusteroperator/machine-config`).

WARNING: Direct SSH access to machines is not recommended; instead,
make configuration changes via `machineconfig` objects:
  https://docs.openshift.com/container-platform/4.10/architecture/architecture-rhcos.html

---
Last login: Mon Aug 15 12:39:23 2022 from 192.168.130.1
[core@crc-5nvrm-master-0 ~]$
*To test if nginx was successfully deployed, use the command below.
[core@crc-5nvrm-master-0 ~]$ curl 10.217.0.70

<!DOCTYPE html>
<html>
<head>
<title>Welcome to nginx!</title>
...................................
[core@crc-5nvrm-master-0 ~]$
Now you can see the output, “welcome to nginX”, meaning the nginX application was successfully deployed. If you understand basic web application like nginX or apache, then you know that getting an output like this in respose to a test means you’ve done the right thing.
I’ve mentioned in a previous lesson that the default container runtime that the openshift uses is the CRIO. Hence, let’s also check the other containers that are running in this container runtime by using the command below.
NB: The client tool used to query the CRIO container runtime is crictl. The one for docker is docker & the one for podman is also podman
[core@crc-5nvrm-master-0 ~]$ sudo crictl ps

CONTAINER           IMAGE                                                                                                                        CREATED              STATE               NAME                                          ATTEMPT             POD ID
a9a430e4615c7       af971b94364a4e60fe2ddf62f14528a4134eb683c9a42357e20644a7bacd218f                                                             39 seconds ago       Running             packageserver                                 117                 3bd90bd8f003d
2308ae30e95d9       21b22b8563a887aa14bf10e555e45bb10f561cc41af982f3c258a77ab8dfa22a                                                             About a minute ago   Running             console-operator                              108                 ad6d94da44629
....................
We can also use the grep comamnd to see the container we just created.
[core@crc-5nvrm-master-0 ~]$ sudo crictl ps |grep nginx-app

4a45215a47183       docker.io/library/nginx@sha256:790711e34858c9b0741edffef6ed3d8199d8faa33f2870dea5db70f16384df79                              2 hours ago         Running             nginx-app                                     0                   79fafd833f802
We can now exit out of the crc node.
[core@crc-5nvrm-master-0 ~]$ exit

logout
Connection to 192.168.130.11 closed.
[victor@sno ~]$
Having learnt how to create a pod as a single object, let’s learn how to create a pod using deployment.
Before then, let’s delete the pod we created.
*To delete a pod, use the command below.
[victor@sno ~]$ oc delete pod nginx-app

pod "nginx-app" deleted
*Verify if the pod has been deleted
[victor@sno ~]$ oc get pods

No resources found in app-project namespace.
How To Create Pod In OpenShift Cluster Using Deployment
To create a pod, with the name, “nginx-app” by using deployment, use the command below.
[victor@sno ~]$ oc create deployment nginx-app --image=nginx

deployment.apps/nginx-app created
The image will automatically be pulled from docker hub
*To verify that the deployment has been created, use the command below.
[victor@sno ~]$ oc get deployment

NAME        READY   UP-TO-DATE   AVAILABLE   AGE
nginx-app   0/1     1            0           12s
*To verify that the pod has been created, use the command below.
[victor@sno ~]$ oc get pods

NAME                        READY   STATUS        RESTARTS        AGE
nginx-app-69795fb77-xblwt   1/1     Running       0               2m23s
You see that the pod has been created, and it’s being given a random name at the suffix. The prefix, on the other hand, reads that this pod was actually created from creating this deployment, and that means that the pod is going to be managed by the deployment. You can see that the pod is running.
If you want to get more information about the pod, you can use the commands we used above while we created a pod as a single/individual object.
With the “oc describe pod” command, you can see the name of the deployment, the namespace, the labels. You will also see that we have the replicas which always come with creating a pod using deployment. You will also the strategy type.
Having learnt how to create a pod as a single object, let’s learn how to create a pod using deployment config.
How To Create Pod In OpenShift Cluster Using Deployment Config(dc)
To create a pod by using the deployment config, use the command;
[victor@sno ~]$ oc create dc nginx-app --image=nginx

deploymentconfig.apps.openshift.io/nginx-app created
I abbreviated deployment config as “dc” but you can write it in full if you so wish. I’ve named this deployment config, nginx-app and nginx image will be pulled from docker hub by default.
*To verify that deployment config has been created, use the command below.
[victor@sno ~]$ oc get dc

NAME        REVISION   DESIRED   CURRENT   TRIGGERED BY
nginx-app   1          1         1         config
*To verify that the pod has been created, use the command below.
[victor@sno ~]$ oc get pods

NAME                 READY   STATUS        RESTARTS       AGE
nginx-app-1-deploy   0/1     Completed     0              32s
nginx-app-1-tnqrq    1/1     Running       0              27s
You can see both the deployer pod and the application pod
*To get more information about the pod, you can use the command below.
[victor@sno ~]$ oc describe pod nginx-app-1-tnqrq

Name:         nginx-app-1-tnqrq
Namespace:    app-project
Priority:     0
Node:         crc-5nvrm-master-0/192.168.126.11
Start Time:   Thu, 18 Aug 2022 16:26:30 +0100
Labels:       deployment=nginx-app-1
              deployment-config.name=nginx-app
              deploymentconfig=nginx-app
Annotations:  k8s.v1.cni.cncf.io/network-status:
                [{
                    "name": "openshift-sdn",
……….
The deployment config object can only have one deployer pod running; multiple deployers end up conflicting.
Having learnt how to create a pod as a single object, let’s learn how to create a pod using the new-app option.
How To Create Pod In OpenShift Cluster Using “oc new-app” Option
To create a pod, with the name, “nginx-app” using the oc new-app command, use the command below.
[victor@sno ~]$ oc new-app --image=nginx --name=nginx-app

warning: Cannot find git. Ensure that it is installed and in your path. Git is required to work with git repositories.
--> Found container image b692a91 (2 weeks old) from Docker Hub for "nginx"

    * An image stream tag will be created as "nginx-app:latest" that will track this image

--> Creating resources ...
    imagestream.image.openshift.io "nginx-app" created
    deployment.apps "nginx-app" created
    service "nginx-app" created
--> Success
    Application is not exposed. You can expose services to the outside world by executing one or more of the commands below:
     'oc expose service/nginx-app'
    Run 'oc status' to view your app.
*To verify that the pod has been created, use the command below.
[victor@sno ~]$ oc get pods

NAME                        READY   STATUS        RESTARTS        AGE
nginx-app-69795fb77-xblwt   1/1     Running       0               2m23s
*To verify that deployment has been created by using the new-app option, use the command below.
[victor@sno ~]$ oc get deployment

NAME        READY   UP-TO-DATE   AVAILABLE   AGE
nginx-app   1/1     1            1           4m18s
*To verify that a service has been created by using the new-app option, use the command below.
[victor@sno ~]$ oc get service

NAME        TYPE        CLUSTER-IP    EXTERNAL-IP   PORT(S)   AGE
nginx-app   ClusterIP   10.217.5.14   <none>        80/TCP    5m31s
*You can also get more information about a service by using the command below.
[victor@sno ~]$ oc describe service nginx-app

Name:              nginx-app
Namespace:         app-project
Labels:            app=nginx-app
                   app.kubernetes.io/component=nginx-app
                   app.kubernetes.io/instance=nginx-app
Annotations:       openshift.io/generated-by: OpenShiftNewApp
Selector:          deployment=nginx-app
Type:              ClusterIP
IP Family Policy:  SingleStack
IP Families:       IPv4
IP:                10.217.5.14
IPs:               10.217.5.14
Port:              80-tcp  80/TCP
TargetPort:        80/TCP
Endpoints:         10.217.0.139:80
Session Affinity:  None
Events:            <none>
When we created our nginx application pod, we had to log into the CRC before we were able to determine if nginx had been successfully deployed or not. Ideally, one should not have to log into a node where an application has been deployed before testing or accessing the web applications.
Hence, in the next chapter, we’re going to see how to access an application externally without having to log into the node where the application resides. That entails comprehending what a service is, how it is routed, and how OpenShift networking technology operates.
Other Essential Commands In OpenShift Container Platform For this Chapter
*To delete a project, use the command below.
[victor@sno ~]$ oc delete project app-project

project.project.openshift.io "app-project" deleted
*To delete all the resources at once in a project, use the command below.
[victor@sno ~]$ oc delete all --all

pod "nginx-app" deleted
pod "nginx-app2-65d55c4c5d-9lk85" deleted
deployment.apps "nginx-app2" deleted
replicaset.apps "nginx-app2-65d55c4c5d" deleted
imagestream.image.openshift.io "nginx-app" deleted
*To rectify a selinux security context issue when application pod doesn’t run, follow the steps below
[victor@sno ~]$ oc adm must-gather

[victor@sno ~]$ oc adm inspect ns/app-project

[victor@sno ~]$ oc new-app --image=nginx --name=nginx-app

[victor@sno ~]$ oc adm policy add-scc-to-user anyuid -z default -n app-project
click the link below to watch the video on how to deploy application in openshift with examples.
Watch Video On How To Deploy Application In OpenShift
Your feedback is welcomed. If you love others, you will share with others
Leave a Reply