
Last updated: March 2023
In this lesson, you will learn what OpenShift Services resources are and how to create them.
Hi everyone! Victor here again. In this lesson, we will learn about one of the Kubernetes and OpenShift components called service. But before we start that, I will create a pod and increase the quantity of the pod so that you can have clarity on what I’m about to explain.
Of course, to create a pod, use the command,
[victor@sno ~]$ oc create deployment nginx-app --image=nginx

deployment.apps/nginx-app created
To confirm that the pod has been created, use the command,
[victor@sno ~]$ oc get pods

NAME                         READY   STATUS    RESTARTS   AGE
nginx-app-6f4c6d74d9-n59v2   1/1     Running   0          2m19s
Now that we have the pod created, the next thing we are going to do is create replicas of this pod, i.e., increase the quantity of the pod. Currently, we have just one pod running from this deployment.
To increase the quantity of the pod, we can use the command,
[victor@sno ~]$ oc scale deployment nginx-app --replicas 4

deployment.apps/nginx-app scaled
To verify that the quantity has been increased, use the command,
[victor@sno ~]$ oc get pods

NAME                         READY   STATUS    RESTARTS   AGE
nginx-app-6f4c6d74d9-6qrfs   1/1     Running   0          60s
nginx-app-6f4c6d74d9-n59v2   1/1     Running   0          4m30s
nginx-app-6f4c6d74d9-s7j9p   1/1     Running   0          60s
nginx-app-6f4c6d74d9-v4n7t   1/1     Running   0          60s
You can see that all four pods are running. They are the same copies and are all from the same deployment. These pods will be distributed across different nodes (in our case, the CRC node because we are running a single node cluster).
We can verify this with the command,
[victor@sno ~]$ oc get pods -o wide

NAME                         READY   STATUS    RESTARTS   AGE     IP            NODE                 NOMINATED NODE   READINESS GATES
nginx-app-6f4c6d74d9-6qrfs   1/1     Running   0          2m2s    10.217.0.60   crc-chf7b-master-0   <none>           <none>
nginx-app-6f4c6d74d9-n59v2   1/1     Running   0          5m32s   10.217.0.58   crc-chf7b-master-0   <none>           <none>
nginx-app-6f4c6d74d9-s7j9p   1/1     Running   0          2m2s    10.217.0.61   crc-chf7b-master-0   <none>           <none>
nginx-app-6f4c6d74d9-v4n7t   1/1     Running   0          2m2s    10.217.0.59   crc-chf7b-master-0   <none>           <none>
If you log into the CRC node, just like we did in our previous lesson, and run the curl command with any of the pod IPs, you will be able to successfully verify that nginx was successfully deployed.
The next thing we are going to do is scale down the number of pods to two. To do this, use the command,
[victor@sno ~]$ oc scale deployment nginx-app --replicas 2

deployment.apps/nginx-app scaled
Verify that the pod has been scaled
[victor@sno ~]$ oc get pods

NAME                         READY   STATUS    RESTARTS   AGE
nginx-app-6f4c6d74d9-s7j9p   1/1     Running   0          3m8s
nginx-app-6f4c6d74d9-v4n7t   1/1     Running   0          3m8s
This is one of the benefits of using deployment to create a pod; OpenShift automatically does the scaling and identifies which nodes to add the replicas of the pod to and which nodes to remove the replicas of the pod from. Also, these internal IPs are automatically given to these pods by OpenShift.
Having discussed how to use ad hoc to increase and decrease the quantity of a pod, let’s now learn what service is.
What Is Service In OpenShift & Kubernetes
We previously learned how to use ad hoc to create a pod and deploy a basic nginx application. However, we could only connect to this containerized application, or rather, to this pod, by having to log into the worker node (the CRC node in our own case) wherein the pod resides before we were able to access the application.
And at the end of the lesson, I noted that we needn’t have to always log into the node before an application can be accessed. In fact, it is impractical except for test purposes. Hence, you need to create a service. With service, you don’t need to login to the worker node where pods reside before you can access applications
Pods are ephemeral by their nature, meaning they die easily. And when a pod dies, its internal IP address dies along with it. And when the pod is being rescheduled and recreated automatically, the pod loses its static IP because the pod IPs are generated by OpenShift dynamically and randomly.
Hence, other components or applications that are meant to talk to the pod will not be able to talk to the pod because another IP may have been randomly assigned to the pod. So, to avoid this problem, Kubernetes and OpenShift use a component called service.
The static IP addresses are assigned to a service instead of a pod, and the service sends the request to the pod. So, a service can also act as a load-balancer by load balancing requests and sending them to the appropriate or less busy pods, depending on the request.
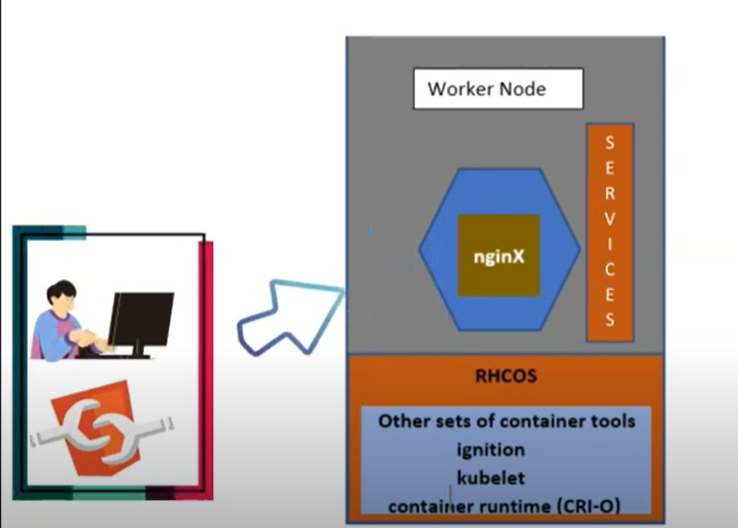
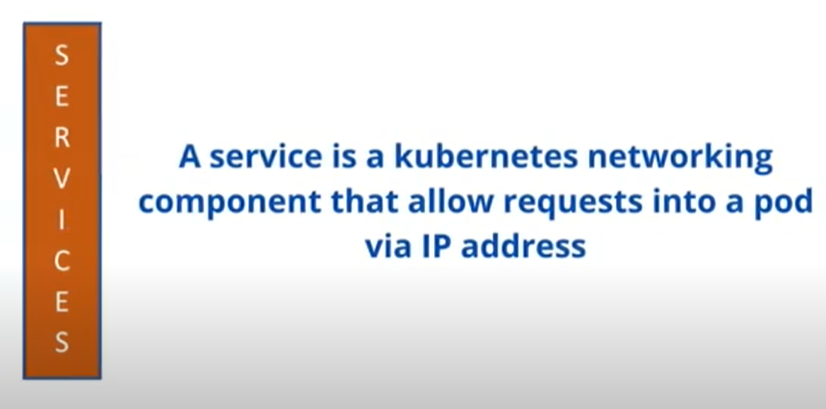
Service gives you access to a pod via an IP address and port. Service, unlike the pod, is not ephemeral in nature, meaning it doesn’t die or go down easily.
There are two types of services in OpenShift and Kubernetes. They are;
1. Internal service
2. External service
What Is Internal Service In OpenShift & Kubernetes
The internal service is used for internal communication within the cluster and doesn’t expose pods or applications to the external or outside world. It is good to use this type of service if you don’t want your applications, especially databases, to be exposed to the outside world.
The internal service is called the cluster IP. When you create an internal service for a deployment, the cluster IP will be attached to the deployment at the point of creation, and this IP will automatically be generated by OpenShift.
Let’s say, for example, you created a deployment that has three replicas of a pod.
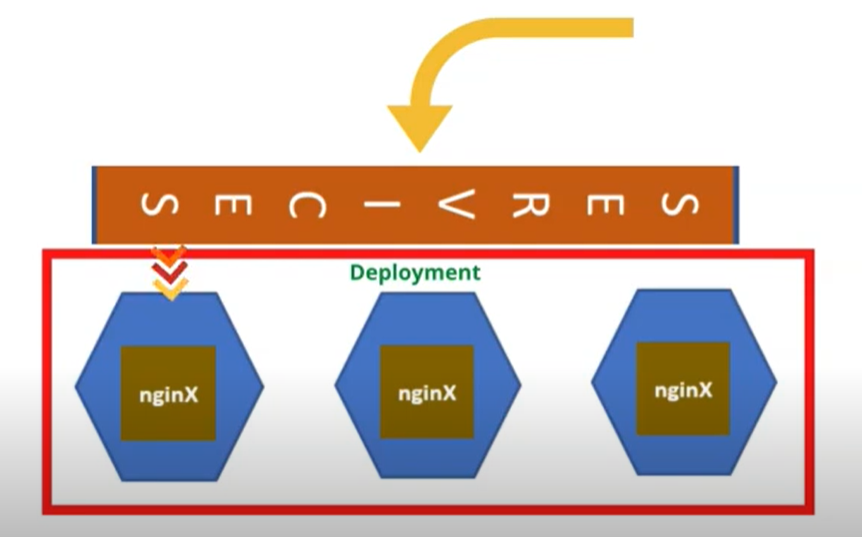
Instead of having to query just one single pod, a cluster IP can be created so that you can direct your request or query to the cluster IP and the cluster IP will forward the request to any of the pods and at the same time do the load balancing among the pods.
It can forward requests to the less busy pod. This is one of the automated and load-balancing features of Kubernetes and OpenShift service component.
Now, let’s go practical on this.
From the little exercise we performed above by scaling the quantity of the pod we created to two. Currently we have two pods running on the cluster and we have one deployment.
To get the IPs of the pod, of course, you can use the command,
[victor@sno ~]$ oc get pods -o wide

NAME                         READY   STATUS    RESTARTS   AGE     IP            NODE                 NOMINATED NODE   READINESS GATES
nginx-app-6f4c6d74d9-s7j9p   1/1     Running   0          4m33s   10.217.0.61   crc-chf7b-master-0   <none>           <none>
nginx-app-6f4c6d74d9-v4n7t   1/1     Running   0          4m33s   10.217.0.59   crc-chf7b-master-0   <none>           <none>
You can see the IPs of the pods, and for us to be able to test if nginx was successfully deployed, like we usually do, we need to log into the CRC node, and to do that, we need the CRC IP:
To get the CRC IP, of course, use the command,
[victor@sno ~]$ crc ip

192.168.130.11
To login to the CRC node, use the command,
[victor@sno ~]$ ssh -i /home/victor/.crc/machines/crc/id_ecdsa core@"192.168.130.11"

The authenticity of host '192.168.130.11 (192.168.130.11)' can't be established.
ED25519 key fingerprint is SHA256:Q1cMWKqhB3JC193Vv+1/3paVE7RsuJH0oCIrRKpcRcA.
This key is not known by any other names
Are you sure you want to continue connecting (yes/no/[fingerprint])? yes
...............
[core@crc-chf7b-master-0 ~]
The pods that we scaled are the same copy. Hence, we can do ‘curl’ on any of the internal IP of the pod.
[core@crc-chf7b-master-0 ~]$ curl 10.217.0.61

<!DOCTYPE html>
<html>
<head>
<title>Welcome to nginx!</title>
<style>
..................
Now, you can see that we were able to test that nginx was successfully deployed.
Let’s exit out of the CRC node
[core@crc-chf7b-master-0 ~]$ exit

logout
Connection to 192.168.130.11 closed.
Lets now create an internal service.
How To Create Internal Service In OpenShift
To create an internal service, use the command,
[victor@sno ~]$ oc expose deployment nginx-app --port=8080 --target-port=80

service/nginx-app exposed
The target port is 80. By default nginx uses port 80. Port 8080 will be exposed via port 80
*Verify that the service has been created.
[victor@sno ~]$ oc get service

NAME        TYPE        CLUSTER-IP    EXTERNAL-IP   PORT(S)    AGE
nginx-app   ClusterIP   10.217.5.20   <none>        8080/TCP   6s
You now see that we have a service, and the service TYPE, like I said, is the cluster IP. You can see the IP here, and you can also see the port, 8080/TCP.
Because this is an internal service, if we try using (curl 10.217.5.20:8080), we won’t be able to access the application. Internal service is not exposed to the outside world. You remember, right?
Hence, we, need to to login to the CRC node before we can test if the internal service is working via port 8080
[victor@sno ~]$ ssh -i /home/victor/.crc/machines/crc/id_ecdsa core@"192.168.130.11"

client_global_hostkeys_private_confirm: server gave bad signature for RSA key 0:
..............
  Part of OpenShift 4.12, RHCOS is a Kubernetes native operating system
  ............
[core@crc-chf7b-master-0 ~]$
[core@crc-chf7b-master-0 ~]$ curl 10.217.5.20:8080
<!DOCTYPE html>
<html>
<head>
<title>Welcome to nginx!</title>
<style>
html { color-scheme: light dark; }
...........So, you can see now that I have an output.
To get more information about a service, use the command,
[victor@sno ~]$ oc describe service nginx-app

Name:              nginx-app
Namespace:         app-project
Labels:            app=nginx-app
Annotations:       <none>
Selector:          app=nginx-app
Type:              ClusterIP
IP Family Policy:  SingleStack
IP Families:       IPv4
IP:                10.217.5.20
IPs:               10.217.5.20
Port:              <unset>  8080/TCP
TargetPort:        80/TCP
Endpoints:         10.217.0.59:80,10.217.0.61:80
Session Affinity:  None
Events:            <none>
[victor@sno ~]$
This gives more information about the service. You can see the namespace, which is “app-project”. You can also see the label being displayed as well. In the next chapter, I will explain what labels and selectors are. You can see the type of service which is the cluster IP. You can also the target-port, (the endpoints, which are the pod IPs), and the events/logs section.
So, this is how you create an internal service in OpenShift. Now, let’s talk about the external service.
What Is External Service In OpenShift & Kubernetes
External communication is handled by the external service, which exposes ports and applications to the outside world. Of course, your web applications need to be exposed to the outside world so that they can be accessed by the users. So, you can create an external service for this use case.
There are two types of external services:
1. NodePort
2. LoadBalancer
What Is NodePort External Service In OpenShift & Kubernetes
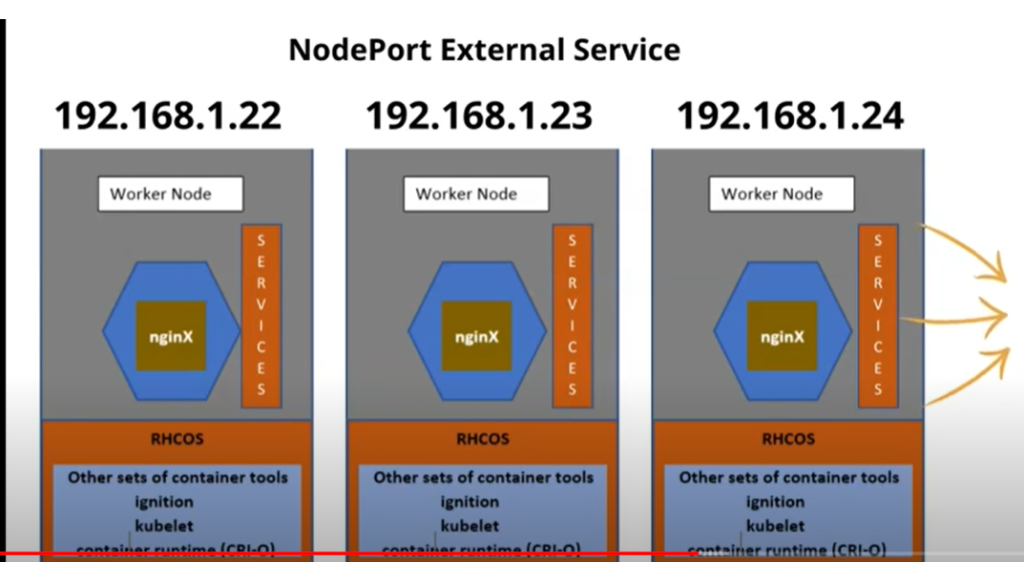
The NodePort external service opens an application to the outside world through the node the pod resides in, and that is why it is called NodePort. So, when a deployment is exposed through a node, one would have to access the application using the node’s IP and a port. Let’s see this in practice.
Let’s delete the former service that was created.
[victor@sno ~]$ oc delete service nginx-app

service "nginx-app" deleted
Now, Let’s create NodePort external service.
*To create the NodePort external service, use the command below:
[victor@sno ~]$ oc expose deployment nginx-app --type=NodePort --port=80

service/nginx-app exposed
*Verify that the NodePort external service has been created.
[victor@sno ~]$ oc get svc

NAME        TYPE       CLUSTER-IP    EXTERNAL-IP   PORT(S)        AGE
nginx-app   NodePort   10.217.5.73   <none>        80:32760/TCP   4s
Like I mentioned, you can only access the pod through the node where the pod resides and the pod resides in the CRC node in our case.
*To get the CRC IP, use the command below:
[victor@sno ~]$ crc ip

192.168.130.11
*Now, lets test if we can access the application via the node and the port.
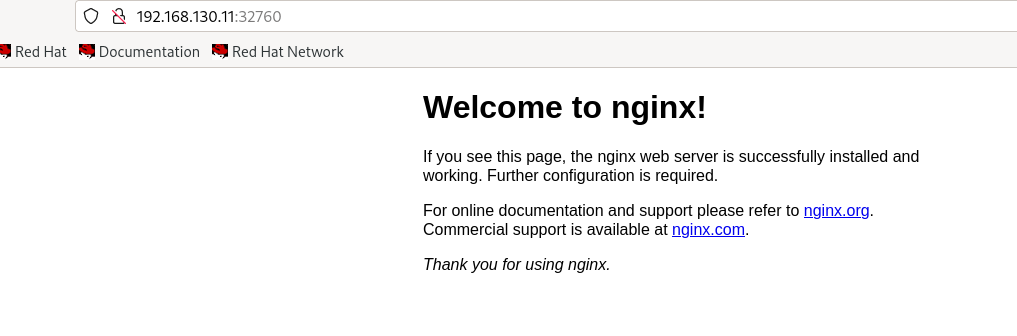
[victor@sno ~]$ curl 192.168.130.11:32760

<!DOCTYPE html>
<html>
<head>
<title>Welcome to nginx!</title>
<style>
.................
Note that I have used the random port that the service has given us (32760). You can always specify a port but for this use case, I’m going to use the random port that has been automatically given to us.
In the coming lessons, we’re going to look at how to specify a port.
I can also do this test on the web browser, as shown below.
What Is LoadBalancer External Service In OpenShift & Kubernetes
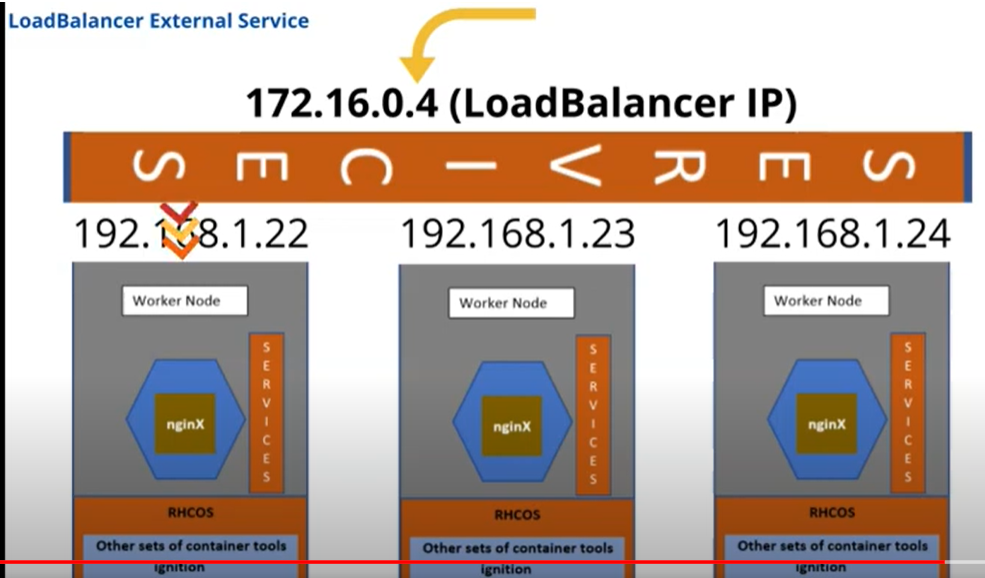
The LoadBalancer external service is mostly used on the cloud, and the cloud service providers are the ones who provide this LoadBalancer IP address. Unlike the NodePort external service, where requests are made through the node where the pod resides, for the LoadBalancer service, the request will be made to the LoadBalancer IP and the LoadBalancer balances the load among the nodes in the cluster and sends requests to the appropriate pods.
Let’s create the LoadBalancer external service.
*To create the LoadBalancer external service, use the command,
[victor@sno ~]$ oc expose deployment nginx-app --type=LoadBalancer --port=80

service/nginx-app exposed
*Verify that the LoadBalancer external service has been created.
[victor@sno ~]$ oc get svc

NAME        TYPE           CLUSTER-IP     EXTERNAL-IP   PORT(S)        AGE
nginx-app   LoadBalancer   10.217.4.151   <pending>     80:32642/TCP   5s
You can see the service type identified as LoadBalancer. You can also see the IP. You can see also that there is an external IP pending, the reason being is that we are not making use of a cloud service provider. Like I said, this deployment is happening on premise (CRC).
If we were using a cloud service provider, the IP address would show here where we have ‘pending’. The cloud service provider would have given us the IP address, and when you connect to the IP address that you have, you can always connect to any of the pods.
So, that’s how to create services in OpenShift and Kubernetes cluster. This is one of the basic networking technologies in OpenShift and Kubernetes. Before I bring this lesson to a close, I’m going to delete all the resources I have created in this project/namespace.
We can use the command below.
[victor@sno ~]$ oc delete all --all

pod "nginx-app-6f4c6d74d9-s7j9p" deleted
pod "nginx-app-6f4c6d74d9-v4n7t" deleted
service "nginx-app" deleted
deployment.apps "nginx-app" deleted
Concluding
Let me drive a point home here. I’ve said that one of the best ways to create a pod or to deploy an application in OpenShift is by using the “oc new-app” command, because this will automatically create a service.
Now lets see this in practice again.
Let’s create another pod using the “oc new-app” option.
[victor@sno ~]$ oc new-app --image=nginx --name=nginx-app

warning: Cannot find git. Ensure that it is installed and in your path. Git is required to work with git repositories.
--> Found container image 3f8a00f (2 weeks old) from Docker Hub for "nginx"

    * An image stream tag will be created as "nginx-app:latest" that will track this image

--> Creating resources ...
    imagestream.image.openshift.io "nginx-app" created
    deployment.apps "nginx-app" created
    service "nginx-app" created
--> Success
    Application is not exposed. You can expose services to the outside world by executing one or more of the commands below:
     'oc expose service/nginx-app'
    Run 'oc status' to view your app.
*Now, lets verify if a service has been automatically created
[victor@sno ~]$ oc get svc

NAME        TYPE        CLUSTER-IP    EXTERNAL-IP   PORT(S)   AGE
nginx-app   ClusterIP   10.217.5.33   <none>        80/TCP    35s
You can see that we have the service being created, and you can see the type of service, which is the cluster IP, also known as an internal service. So, that’s just the point I wanted to make here.
Thank you for reading. Please subscribe to our newsLetter and YouTube Channel. Like, comment, and keep sharing this.
Watch Video On Creating OpenShift Services Component
OpenShift services
Your feedback is welcomed. If you love others, you will share with others
Leave a Reply