Last updated: October 2026
Introduction – Kubernetes Egress Troubleshooting
When troubleshooting Kubernetes networking, it is important to understand whether the problem is related to DNS resolution, network connectivity, TLS, or the application itself.
A common mistake is to see that an application cannot reach an external endpoint and immediately conclude that Kubernetes egress is the problem.
That is not always the case.
An outbound request from a Kubernetes Pod can involve several different stages:
Pod
 |
 | DNS resolution
 ↓
Hostname → IP address
 |
 | TCP connection
 ↓
Destination IP:Port
 |
 | TLS handshake
 ↓
HTTPS connection
 |
 | HTTP request
 ↓
Application
 |
 | HTTP response
 ↓
Result
If the request fails, knowing which stage failed makes troubleshooting much easier.
In this article, we will use a Kubernetes netshoot Pod to test access to two external endpoints and demonstrate the difference between:
- DNS resolution
- Egress traffic
- TCP connectivity
- TLS connectivity
- HTTP/application-level failures
- DNS
NXDOMAINerrors
The hostnames, IP addresses, namespaces and other environment-specific information used in this example have been anonymised.
Understanding the Subject Matter
What Is Kubernetes Ingress?
Before discussing egress, it is important to understand ingress.
Ingress means traffic coming into an environment.
For example, an external client may access an application running inside Kubernetes:
External Client
      |
      | HTTPS
      ↓
Kubernetes Cluster
      |
      ↓
Ingress
      |
      ↓
Service
      |
      ↓
Pod
The traffic is entering the Kubernetes environment.
That is ingress traffic.
A Kubernetes Ingress resource can be used to expose HTTP/HTTPS applications and route requests to Services inside the cluster.
For example:
kubectl get ingress -Acan display Ingress resources across namespaces.
What Is Kubernetes Egress?
Egress is the opposite direction.
Egress means traffic leaving the Kubernetes environment.
For example, suppose an application running in a Pod needs to call an external API:
Pod
 |
 | HTTPS
 ↓
Kubernetes network
 |
 ↓
External API
The connection originates from inside Kubernetes and travels outward.
That is egress traffic.
A simple way to remember it is:
Ingress = traffic coming IN

Egress = traffic going OUT
However, there is an important distinction.
Egress traffic is a description of the traffic direction.
An Egress Kubernetes resource is something different. Some Kubernetes networking implementations provide specific Egress resources or CRDs, while standard Kubernetes does not universally provide a resource called Egress.
Therefore:
kubectl get egressmay work in one Kubernetes environment and fail in another.
For example:
error: the server doesn't have a resource type "egress"does not mean that the cluster has no outbound traffic.
It simply means that the Kubernetes API in that particular cluster does not expose a resource called egress.
You can check whether an Egress resource exists with:
kubectl api-resources | grep -i egress
OR
kubectl get egress
Understanding the Difference Between Egress Traffic and an Egress Resource
This distinction is extremely important during troubleshooting.
Consider this connection:
Pod
 |
 ↓
External API
That is egress traffic, regardless of whether the cluster has:
kubectl get egressavailable.
On the other hand:
kubectl get egress -Aspecifically asks the Kubernetes API for a resource named egress.
Those are two different concepts.
Action Time
Step 1: Identify the Test Pod
For troubleshooting, a networking utility Pod such as netshoot is very useful because it contains tools such as:
curlnslookupdigpingtracerouteipss
First, locate the Pod:
kubectl get pods -A | grep netshootExample:
NAMESPACE        NAME       READY   STATUS
app-uat      netshoot   1/1     Running
In this example, the Pod is called:
netshootand it is running in:
app-uatBecause the Pod is not in the default namespace, the namespace must be specified when executing commands against it.
Step 2: Understand kubectl exec
The following command is used to execute a command inside the Pod:
kubectl exec -it netshoot -n app-uat -- curl -iv https://api-gateway-uat.example.com/v0/collection/token/Let’s break it down.
kubectl
This is the Kubernetes command-line utility.
In many environments, an alias such as:
kis configured for kubectl.
Therefore:
kand:
kubectlrepresent the same command.
exec
exec tells Kubernetes:
Execute a command inside a container in the Pod.
-it
These options allocate an interactive terminal.
For a simple curl command they are not strictly necessary, but they are commonly used with interactive Pod commands.
netshoot
This is the name of the Pod.
-n app-uat
This specifies the namespace containing the Pod.
Without this:
kubectl exec -it netshoot ...Kubernetes normally searches the default namespace.
If the Pod is actually in app-uat, Kubernetes will return:
pods "netshoot" not found--
This is an important separator.
Everything before -- is interpreted as part of the kubectl exec command.
Everything after -- is the command to execute inside the container.
Therefore:
kubectl exec -it netshoot -n app-uat -- curl ...means:
Connect to the
netshootPod and runcurlinside the container.
curl
This is the actual program being executed inside the Pod.
That is important because we are testing connectivity from the Pod’s network location, rather than from the jump server.
-i
For curl, -i includes the HTTP response headers.
-v
-v means verbose.
It causes curl to display details such as:
- DNS resolution
- destination IP
- TCP connection
- TLS negotiation
- HTTP request
- HTTP response
This makes it particularly useful for troubleshooting.
Step 3: Test DNS Resolution
Before testing the complete HTTPS connection, we can test DNS independently.
Run:
nslookup api-gateway-uat.example.comAn example successful result might look like:
Server:         10.20.30.40
Address:        10.20.30.40#53

Non-authoritative answer:
api-gateway-uat.example.com
    canonical name = api-gateway-uat.example.12345.e.examplewaf.com.

Name:   api-gateway-uat.example.12345.e.examplewaf.com
Address: 104.0.119.25
The important part is that the hostname ultimately resolves to an IP address.
Understanding DNS CNAME
Notice that the hostname does not necessarily have to directly point to an IP address.
It may first point to another hostname:
api-gateway-uat.example.com
          |
          | CNAME
          ↓
api-gateway-uat.example.12345.e.examplewaf.com
          |
          ↓
104.0.119.25
A CNAME is essentially an alias.
It tells DNS:
This hostname should be treated as another hostname.
DNS then resolves that second hostname to the final IP address.
Therefore, when we see:
Address: 104.0.119.25we now know which IP address the client can attempt to connect to.
Step 4: Test the HTTPS Connection from the Pod
Now execute:
# kubectl exec -it netshoot -n app-uat -- curl -iv https://api-gateway-uat.example.com/v0/collection/token/The output might contain:
* Host api-gateway-uat.example.com:443 was resolved.
* IPv4: 104.0.119.25
* Trying 104.0.119.25:443...
This tells us several things.
First:
Host ... was resolvedmeans DNS resolution succeeded.
Then:
IPv4: 104.0.119.25tells us the IP address returned by DNS.
Then:
Trying 104.0.119.25:443means curl is attempting to establish a TCP connection to port 443.
Step 5: Check Whether TCP Connectivity Works
If the connection succeeds, curl will show something similar to:
* Established connection to api-gateway-uat.example.comThis is important.
At this point we know:
DNS
  ↓
Successful

TCP connection
  ↓
Successful
The Pod has successfully reached the destination IP on port 443.
Step 6: Check the TLS Handshake
Because the URL uses HTTPS, curl then performs a TLS handshake.
You may see:
* TLSv1.3 ...
* TLS handshake ...
Eventually, you may see:
* SSL connection using TLSv1.2or:
* SSL connection using TLSv1.3This tells us that the HTTPS/TLS connection was successfully established.
Curl may also display certificate information:
* Server certificate:
* subject: CN=*.example.com
* issuer: ...
* SSL certificate verified
This confirms that certificate validation succeeded.
Step 7: Look at the HTTP Request
After the TLS connection has been established, curl sends the HTTP request.
For example:
> GET /v0/collection/token/ HTTP/1.1
> Host: api-gateway-uat.example.com
> User-Agent: curl/8.x
> Accept: */*
Now we know that the request has gone beyond:
- DNS
- TCP
- TLS
and has reached the HTTP layer.
Step 8: Interpret an HTTP 500 Response Correctly
Suppose curl returns:
< HTTP/1.1 500with:
{
    "message": "login_failed"
}
It would be incorrect to immediately say:
Kubernetes egress is broken.
Why?
Because the server successfully responded.
The traffic got all the way through:
Pod
 ↓
DNS
 ↓
IP address
 ↓
TCP 443
 ↓
TLS
 ↓
HTTP request
 ↓
Remote application
 ↓
HTTP 500 response
The 500 is an HTTP/application-level response.
The remote server received the request and returned an error.
In this example, the API expected authentication or other request information that wasn’t supplied by the basic curl request.
Therefore:
Network connectivity worked, but the application request failed.
This distinction is extremely important when troubleshooting.
Step 9: Test the Second Endpoint
Now consider a second endpoint:
https://internal-proxy.example.com:9443We can test it with:
kubectl exec -it netshoot -n app-uat -- curl -iv https://internal-proxy.example.com:9443Suppose curl returns:
* Could not resolve host: internal-proxy.example.com
curl: (6) Could not resolve host
This is a completely different failure.
The request never reached port 9443.
Why?
Because DNS failed first.
The sequence was:
Pod
 ↓
DNS query
 ↓
NXDOMAIN
 ↓
STOP
There is no IP address available, so curl has nothing to connect to.
What Does NXDOMAIN Mean?
NXDOMAIN means:
Non-Existent Domain
In practical terms, the DNS server is saying:
“I cannot find this DNS name.”
For example:
nslookup internal-proxy.example.commight return:
Server:         10.20.30.40
Address:        10.20.30.40#53

** server can't find internal-proxy.example.com: NXDOMAIN
This does not mean:
- TCP is blocked
- port 9443 is blocked
- Kubernetes NetworkPolicy blocked the traffic
- the firewall blocked the traffic
- egress is broken
It means that DNS did not provide an IP address.
Step 10: Test DNS from Both the Jump Server and the Pod
This is an important troubleshooting technique.
Suppose the DNS lookup is performed from the jump server:
nslookup internal-proxy.example.comand returns:
** server can't find internal-proxy.example.com: NXDOMAINThen perform the same lookup from the Pod:
kubectl exec -it netshoot -n app-uat -- \
nslookup internal-proxy.example.com
Suppose the Pod also returns:
** server can't find internal-proxy.example.com: NXDOMAINNow we have a much stronger conclusion.
The hostname isn’t simply failing to resolve because of Kubernetes.
Both environments are unable to resolve it.
For example:
                 DNS lookup
                     |
          ┌──────────┴──────────┐
          ↓                     ↓
     Jump Server              Pod
          |                     |
          ↓                     ↓
       NXDOMAIN              NXDOMAIN
That tells us to investigate the DNS record itself or the DNS infrastructure responsible for that domain before blaming Kubernetes egress.
Comparing the Two Endpoints
This is where the troubleshooting becomes much clearer.
Endpoint 1 – DNS and Network Connectivity Work
api-gateway-uat.example.com
             |
             ↓
           DNS
             |
             ↓
       104.0.119.25
             |
             ↓
          TCP 443
             |
             ↓
        TLS handshake
             |
             ↓
        HTTP request
             |
             ↓
       HTTP 500
The request reached the remote application.
The HTTP 500 is an application-level issue.
Endpoint 2 – DNS Fails
internal-proxy.example.com
             |
             ↓
           DNS
             |
             ↓
          NXDOMAIN
             |
             X
          STOP
The request never reached:
TCP 9443Therefore, we cannot yet say whether port 9443 is reachable.
DNS Failure vs Egress Failure
These are often confused.
Imagine an application needs to connect to:
internal-proxy.example.com:9443There are several stages:
1. DNS
       ↓
2. IP address
       ↓
3. TCP connection
       ↓
4. TLS
       ↓
5. HTTP
       ↓
6. Application
Each stage can fail independently.
Scenario 1 – DNS failure
Hostname
   ↓
DNS
   ↓
NXDOMAIN
The connection never starts.
Scenario 2 – TCP failure
DNS works:
Hostname
   ↓
104.0.119.25
but:
104.0.119.25:9443
       ↓
Connection timed out
Now we can investigate:
- routing
- firewall
- NetworkPolicy
- security controls
- egress configuration
- destination availability
Scenario 3 – TLS failure
TCP works:
TCP connection establishedbut TLS fails:
certificate error
TLS handshake failure
Now we investigate certificates, TLS versions, SNI, trust stores, or the remote TLS configuration.
Scenario 4 – HTTP failure
TLS works:
HTTPS connection establishedbut the application returns:
HTTP/1.1 401or:
HTTP/1.1 403or:
HTTP/1.1 500Now the request has reached the application layer.
The problem may be authentication, authorization, request format, application logic, or another server-side issue.
Why curl -iv Is So Useful
The reason curl -iv is powerful for Kubernetes troubleshooting is that it exposes the different stages.
For example:
* Host ... was resolved.DNS
* Trying 104.0.119.25:443...TCP connection attempt
* Connected to ...TCP connection successful
* TLS handshake ...TLS negotiation
> GET /...HTTP request sent
< HTTP/1.1 500HTTP response received
Instead of simply saying:
“The application cannot connect.”
we can identify exactly where the failure occurs.
Understanding the Role of Egress IP
Some Kubernetes networking environments provide a mechanism for assigning or controlling an Egress IP.
For example, imagine a Pod has an internal address:
Pod IP: 100.64.x.xbut outbound traffic is configured to use:
Egress IP: 10.20.40.50Conceptually:
Pod
100.64.x.x
   |
   | outbound traffic
   ↓
Egress mechanism
   |
   | SNAT / source translation
   ↓
10.20.40.50
   |
   ↓
External system
The external system may therefore see the traffic coming from the configured Egress IP rather than directly from the Pod IP.
This is commonly useful when external systems use IP allowlists.
For example, an external API may permit:
10.20.40.50but not arbitrary Pod IP addresses.
An Important Point About Egress Testing
Testing:
curl https://external-api.example.comfrom a Pod demonstrates outbound connectivity.
It does not automatically prove which source IP was used.
If you need to verify the actual Egress IP, you need additional evidence, such as:
- the Kubernetes networking configuration;
- the Egress resource, if the environment provides one;
- packet capture;
- logs on the destination;
- an external service that reports the source IP;
- firewall/load-balancer logs.
Therefore:
curl succeededproves that the Pod reached the destination.
It does not by itself prove:
The traffic used Egress IP 10.20.40.50unless you have evidence showing that.
A Practical Kubernetes Egress Troubleshooting Workflow
When a Pod cannot reach an external application, don’t immediately start changing configuration.
Work through the layers.
Step 1 – Confirm the Pod
kubectl get pod netshoot -n app-uatStep 2 – Check DNS from the Pod
kubectl exec -it netshoot -n app-uat -- \
nslookup external-api.example.com
If it returns an IP:
Address: 104.0.119.25DNS is working for that hostname.
If it returns:
NXDOMAINinvestigate DNS before investigating egress connectivity.
Step 3 – Test TCP/HTTPS
kubectl exec -it netshoot -n app-uat -- \
curl -iv https://external-api.example.com
Look for:
Host ... was resolvedthen:
Trying ...then:
Connectedthen:
TLS handshakethen:
HTTP responseStep 4 – Test a Specific Port
If the application uses a non-standard port:
kubectl exec -it netshoot -n app-uat -- \
curl -iv https://internal-proxy.example.com:9443
Alternatively, if appropriate:
kubectl exec -it netshoot -n app-uat -- \
nc -vz internal-proxy.example.com 9443
This helps distinguish application-layer problems from basic TCP connectivity.
Step 5 – Compare DNS from Outside and Inside the Cluster
From the jump server:
nslookup external-api.example.comFrom the Pod:
kubectl exec -it netshoot -n app-uat -- \
nslookup external-api.example.com
If both fail:
Jump server → NXDOMAIN
Pod         → NXDOMAIN
then investigate the DNS record/domain itself.
If the jump server resolves it but the Pod does not:
Jump server → IP
Pod         → NXDOMAIN
then investigate Kubernetes DNS, DNS forwarding, CoreDNS, or the DNS configuration available to the Pod.
Useful Commands
Check Pods
kubectl get pods -AExecute into a Pod
kubectl exec -it <pod> -n <namespace> -- /bin/shRun curl from a Pod
kubectl exec -it <pod> -n <namespace> -- \
curl -iv https://example.com
Perform DNS lookup from a Pod
kubectl exec -it <pod> -n <namespace> -- \
nslookup example.com
View Pod DNS configuration
kubectl exec -it <pod> -n <namespace> -- \
cat /etc/resolv.conf
Check NetworkPolicies
kubectl get networkpolicy -ACheck whether the cluster exposes an Egress resource
kubectl api-resources | grep -i egressThe Most Important Troubleshooting Lesson
When an application cannot connect to an external endpoint, don’t simply ask:
“Is egress working?”
Break the connection into layers:
              OUTBOUND REQUEST
                     |
                     ↓
               DNS Resolution
                     |
              ┌──────┴──────┐
              |             |
           SUCCESS        FAILURE
              |          NXDOMAIN
              ↓
          IP Address
              |
              ↓
        TCP Connection
              |
         ┌────┴────┐
         |         |
      SUCCESS    FAILURE
         |       timeout/
         |       refused
         ↓
       TLS
         |
      ┌──┴──┐
      |     |
   SUCCESS FAILURE
      |
      ↓
     HTTP
      |
      ↓
  Application
This approach prevents different problems from being mixed together.
For example:
NXDOMAINis not the same as:
Connection timed outand neither is the same as:
HTTP 500They happen at different layers.
Conclusion
Kubernetes egress troubleshooting becomes much easier when the outbound connection is viewed as a sequence of events.
A Pod first needs to resolve the destination hostname. Once DNS provides an IP address, the Pod can attempt a TCP connection. For HTTPS, TLS must then succeed before the HTTP request can be sent. Finally, the remote application processes the request and returns an HTTP response.
The two test cases demonstrate this clearly.
For the first endpoint:
DNS
 ↓
IP address
 ↓
TCP
 ↓
TLS
 ↓
HTTP
 ↓
HTTP 500
The connection was successful all the way to the application. The 500 response was an application-level failure, not proof of a Kubernetes networking failure.
For the second endpoint:
DNS
 ↓
NXDOMAIN
 ↓
STOP
The hostname could not be resolved, both from the jump server and from the Kubernetes Pod. Therefore, the connection never reached the TCP stage, and it would be premature to conclude that port 9443 or Kubernetes egress was responsible.
The general troubleshooting principle is simple:
Find the first layer where the connection fails.
Once you know whether the failure is at DNS, TCP, TLS, HTTP, or the application layer, you have a much clearer path toward finding the actual cause.
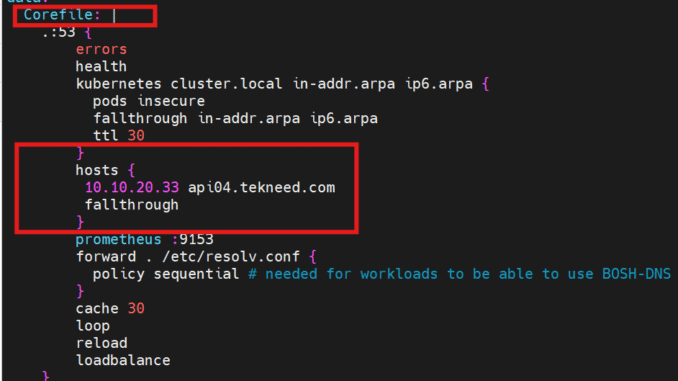
Sometimes, to keep a project moving forward while the permanent DNS record is being resolved, you may need to temporarily add a DNS record to Kubernetes CoreDNS. In this guide, I’ll walk you through the step-by-step process of adding a temporary DNS record, and verifying that it works
Step-by-step: How To add DNS records to Kubernetes CoreDNS
Important: Before editing CoreDNS, confirm the correct IP address for this hostname with the service or network team. It could be a load balancer IP, a Kubernetes Service IP, or another destination.
Step 1 – Back up the existing ConfigMap
Run this from your Kubernetes administration terminal:
[tekneed_Victor@tkgi01 ~]$ kubectl -n kube-system get configmap coredns -o yaml > coredns-backup-$(date +%Y%m%d-%H%M%S).yamlConfirm that the backup file exists:
[tekneed_Victor@tkgi01 ~]$ ls -lh coredns-backup-*.yaml
This gives you a copy of the current configuration in case you need to recover it.
Step 2 – Inspect the current CoreDNS configuration
[tekneed_Victor@tkgi01 ~]$ kubectl -n kube-system get configmap coredns -o yaml
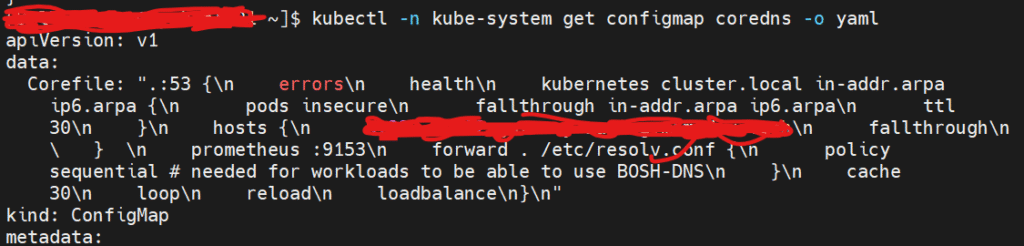
You may see the view in its escaped YAML representation, “\n” as seen below, rather than the usual readable, multi-line format
apiVersion: v1
data:
  Corefile: ".:53 {\n    errors\n    health\n    kubernetes cluster.local in-addr.arpa
    ip6.arpa {\n      pods insecure\n      fallthrough in-addr.arpa ip6.arpa\n      ttl.....
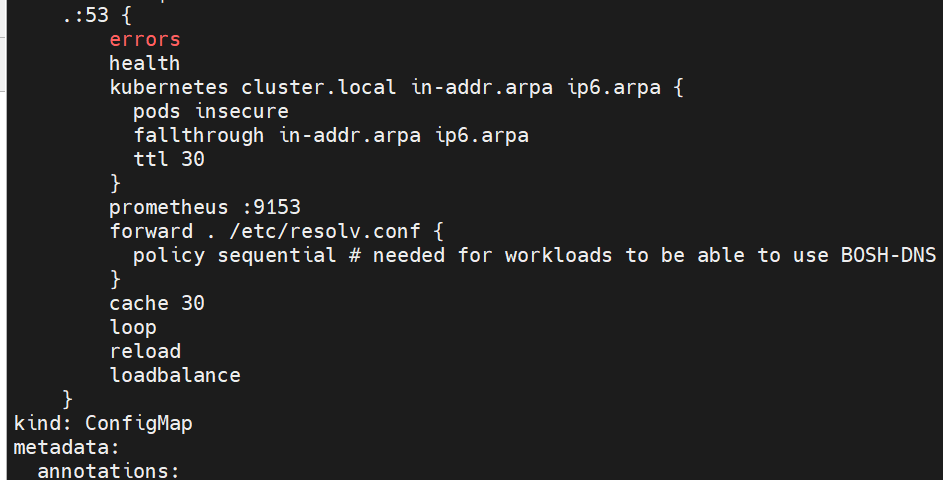
To display it in a more readable format, you can use the json format.
[tekneed_Victor@tkgi01 ~]$ kubectl -n kube-system get configmap coredns -o jsonpath='{.data.Corefile}'
.:53 {
    errors
    health
    kubernetes cluster.local in-addr.arpa ip6.arpa {
      pods insecure
      fallthrough in-addr.arpa ip6.arpa
      ttl 30
    }
    prometheus :9153
    forward . /etc/resolv.conf {
      policy sequential
    }
    cache 30
    loop
    reload
    loadbalance
}
Step 3 – Open the ConfigMap for editing
[tekneed_Victor@tkgi01 ~]$ kubectl -n kube-system edit configmap coredns
Your editor will open the ConfigMap, as it did previously.
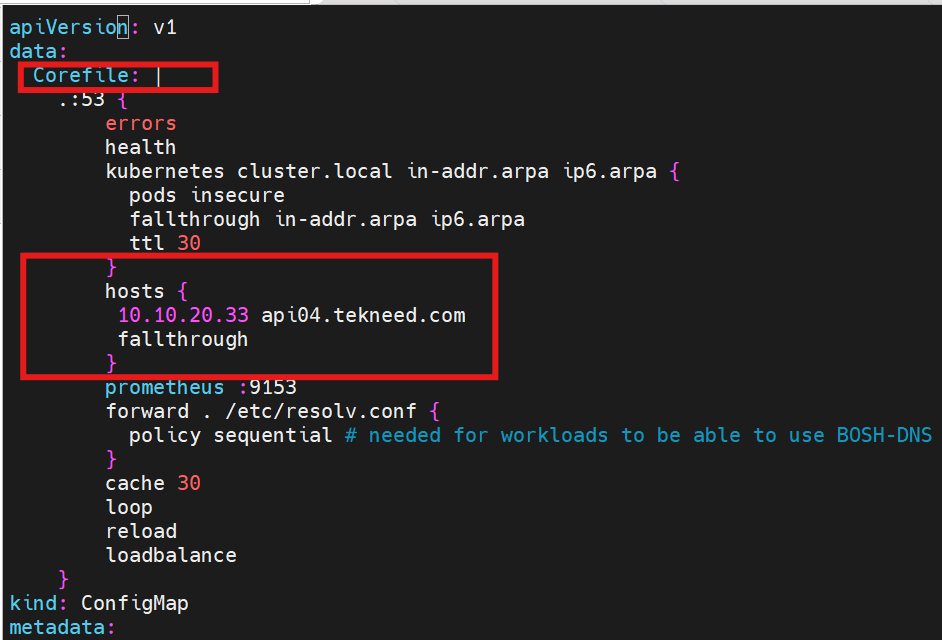
Find the data: → Corefile: section. Inside the .:53 { ... } block, locate the end of the kubernetes block and add the hosts block:
Your complete Corefile should look like this:
apiVersion: v1
data:
  Corefile: |
    .:53 {
        errors
        health
        kubernetes cluster.local in-addr.arpa ip6.arpa {
          pods insecure
          fallthrough in-addr.arpa ip6.arpa
          ttl 30
        }
        hosts {
         10.10.20.33 api04.tekneed.com
         fallthrough
        }
        prometheus :9153
        forward . /etc/resolv.conf {
          policy sequential # needed for workloads to be able to use BOSH-DNS
        }
        cache 30
.......
Save and exit
If your editor is vi or vim:
- Press
Esc. - Type
:wq - Press
Enter.
If Kubernetes accepts the change, the editor closes. If it reports an error, correct the error before proceeding.
If you see the quoted format and prefer to edit the configuration as normal multi-line text, you can replace only the Corefile value with the block-style representation. Use Corefile: | followed by the complete Corefile, properly indented beneath it just as below.
apiVersion: v1
data:
  Corefile: ".:53 {\n    errors\n    health\n    kubernetes cluster.local in-addr.arpa ip6.arpa {\n      pods insecure\n      fallthrough in-addr.arpa ip6.arpa\n      ttl 30\n    }\n    hosts {\n      10.10.20.33 api04.tekneed.com\n      fallthrough\n    }\n    prometheus :9153\n    forward . /etc/resolv.conf {\n      policy sequential # needed for workloads to be able to use BOSH-DNS\n    }\n    cache 30\n    loop\n    reload\n    loadbalance\n}\n"
Step 5 – Confirm that the record was saved
Run:
k -n kube-system get configmap coredns \
  -o jsonpath='{.data.Corefile}'
Check that your new hosts block appears in the output.
Step 6 – Allow CoreDNS to reload
Your Corefile already contains:
reloadWait several seconds before considering a restart. Check the CoreDNS pods:
[tekneed_Victor@tkgi01 ~]$ kubectl get pods -n kube-system | grep -i coredns

coredns-gff-y76                         1/1     Running   0              8d
coredns-gf4-hg6                         1/1     Running   0              8d
coredns-frh-675                         1/1     Running   0              8d
If the new record does not work, inspect the CoreDNS logs. Your cluster’s CoreDNS pods may use different labels, so first identify the pod names with the command above, then run:
k logs -n kube-system <coredns-pod-name> --tail=100For example,
[tekneed_Victor@tkgi01 ~]$ kubectl logs -n kube-system coredns-coredns-gff-y76 --tail=10
Look for configuration or plugin errors.
Do not restart CoreDNS immediately. First check whether the reload worked. If a restart becomes necessary, verify the actual deployment name and follow your cluster’s operational procedures, since restarting DNS can temporarily affect name resolution.
To restart coredns, use the command,
[tekneed_Victor@tkgi01 ~]$ kubectl rollout restart deployment coredns -n kube-systemYou can also check the restart status.
[tekneed_Victor@tkgi01 ~]$ kubectl rollout status deployment coredns -n kube-system

deployment "coredns" successfully rolled out
Step 7 – Test DNS resolution from your application namespace
Use your existing netshoot pod in your namespace to test (The netshoot pod contains the necessary network utilities)
[tekneed_Victor@tkgi01 ~]$ kubectl exec -it netshoot -n api-prod01 -- nslookup api04.tekneed.com

Server:         10.10.10.2
Address:        10.10.100.24#46

Name:   api04.tekneed.com
Address: 10.10.20.33
;; Got recursion not available from 10.10.100.24
Leave a Reply