
Last updated: March 2022
Contents
UNDERSTANDING THE SUBJECT MATTER
In our previous lesson, we understood what Ansible ad hoc command is, we also learnt that the ad hoc command is limited to the tasks it does and many times, not always idempotent and reusable.
We also used the ansible ad hoc command to execute some Ansible tasks like copying files, creating users, and so on.
In this lesson, we will learn how to use a playbook, which is the advanced and better way to run Ansible operations and tasks because playbook tasks are idempotent, reusable, and not limited in any way, compared to using the ad hoc commands.
What Is Ansible Playbook?
An Ansible playbook is a unit of scripts that contains Ansible instructions or tasks. These scripts are a simple line of codes in the human-readable form written in YAML (yet another markup language).
YAML, meaning yet another markup language, though, has been renamed to Ain’t markup language is a language like the likes of JSON that contains easily readable syntax, hence, your code or script becomes your documentation because they are easily readable.
A Playbook is very flexible. Like a popular saying, you lie on your bed the same way you lay it. In other words, if you write your playbook in a very neat and systematic way because a playbook executes just the way the plays and tasks are arranged, you can easily troubleshoot or debug your playbook if there is an issue.
Playbook by default runs step by step just as it is written, if a task fails, the playbook halts, hence the other tasks beneath will not run except you specify otherwise, i.e configure the playbook to ignore any failed tasks and continues to execute.
We will understand better as we go on in this course.
How Do I Write Ansible Playbook
Just as I have said, a playbook is a YAML data structure, and YAML syntax is written in form of a key-value pair with indentations, which means the data or key-value pair in a playbook will be nested. That is, have parent-child relationships and white spacings.
The structure or indentation of the key-value pair in a playbook is very important for a playbook to run successfully. If this is not correctly done, one will always encounter an error.
To begin writing a playbook/YAML script, one starts with three dashes (- – -), specifying it is a YAML file. However, it is not compulsory to this when writing a playbook.
A playbook must contain at least a play and a task. Of course, can contain more than one play and one task.
A play defines a host or group of hosts that will be mapped to a task or group of tasks.
More so, a task is an instruction or ansible operation that will be executed on the managed hosts with the use of modules and or arguments.
Using a good editor will also be of great help in writing a playbook.
Various editors that can be used to write a playbook. Editors such as notepad++, visual studio code, atom, vim, etc. In this course, we will be using the vim tool to write a playbook.
A well written basic playbook is shown in the format below
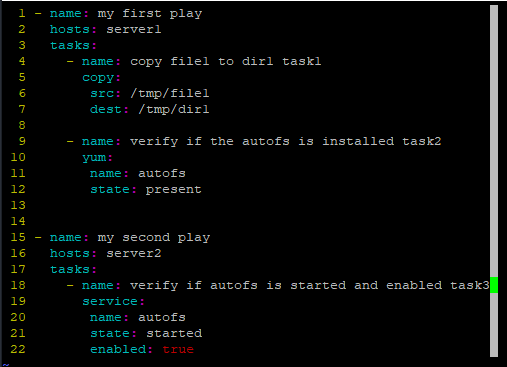
Let’s see the step by step guide of how to write a playbook as the image above by following the steps below.
You may want to set up your vim tool to always read lines and shows indentations just like mine.
Click here to see how to do the setup
1. create a playbook file that must contain a “.yml” extension. In this case, vim is the code editor.
# vim my-first-playbook.yml2. Add the first play which is the first item(parent item).
The first play will have a key called “name” and a pair. You can use any name you wish as the pair. The key-value pair is separated by a colon and space.
It is okay to use a name you can easily relate with, which is the best
NB: An item begins with a dash (-). Hence, the syntax must begin with a dash (-) and space, followed by the name of the item. The name of the item, in this case, is “name”. lol.
- name: my first play3. Add the lists of the item with their key-value pair. The item lists in this case are the hosts and tasks.
Don’t forget: The key-value pair in a playbook is always separated with a colon and space.
- name: my first play
  hosts: server1
  tasks:
There is no value for tasks and it’s fine. No issues with that.
4. Define your tasks with a module and arguments just as I mentioned above while explaining what a task is.
NB: not all modules require arguments depending on what you want to achieve. It is recommended that a task has a name which will be an item. The module and arguments are the item lists. The module is “copy” and the arguments are “src” and “dest” in this case.
The indentation level of arguments must be a child to the module, that is, have a spacing as it is done below. The same must apply to task names.
- name: my first play
  hosts: server1
  tasks:
    - name: copy file1 to dir1 task1
      copy:
       src: /tmp/file1
       dest: /tmp/dir1
At this junction, we have been able to successfully write a playbook with just one play and one task.
Moving forward, let’s add a second task to this play. Don’t forget that indentation is important like I mentioned before, hence the second task will be exactly under the first task as an item
5. Add a second task of the first play.
NB: Don’t forget that it is best that a task should have a name. More so, modules and arguments are used to execute tasks. In this case, the module is “yum” and the arguments are “name” and “state”. As I mentioned, arguments must be children to modules
- name: my first play
  hosts: server1
  tasks:
    - name: copy file1 to dir1 task1
      copy:
       src: /tmp/file1
       dest: /tmp/dir1

    - name: verify if the autofs is installed task2
      yum:
       name: autofs
       state: present
At this junction, we have been able to successfully write a playbook with a play and two tasks.
Moving forward, let’s add a second play and a third task. Don’t forget that if you don’t get the indentation right, the playbook will not run.
6. Add a second play and a third task under the second play.
- name: my first play
  hosts: server1
  tasks:
    - name: copy file1 to dir1 task1
      copy:
       src: /tmp/file1
       dest: /tmp/dir1

    - name: verify if the autofs is installed task2
      yum:
       name: autofs
       state: present


- name: my second play
  hosts: server2
  tasks:
    - name: verify if autofs is started and enabled task3
      service:
       name: autofs
       state: started
       enabled: true
At this junction, we have been able to successfully write a playbook with two plays and three tasks.
Now, you can see that the tasks are all children items under their parent items which is the play.
You can also see the spacings between the rows I gave to make my playbook very neat and easy to read and understand.
The spacings between the rows are not necessary, the important spacings are the white spacings, that is, the spacings between the colons but as a good coder, you should try and always space your tasks and play rows to make your code neat and understandable.
It is not necessary to name your plays and tasks, however, you should always endeavor to name them so that your playbook becomes easy-to-read documentation, more so, you can easily troubleshoot if there are any issues.
Running Ansible Playbooks
The essence of writing a playbook is to run it, hence the next step after writing a playbook is to run it.
To run an Ansible playbook, use the command,
# ansible-playbook <playbook>However, it is important to verify if the playbook syntax is correct before running a playbook, which takes us to the next section.
How To Check For a Playbook Syntax Error
To check for a playbook syntax error, use the command,
# ansible-playbook <playbook> --syntax-checkFor example, to check for the syntax error of the playbook we wrote above, use the command,
[lisa@drdev1 ~]$ ansible-playbook my-first-playbook.yml --syntax-check

playbook: my-first-playbook.yml
The output of the command must be as it is displayed above. If the output is otherwise, then the syntax is not correct. One will be pointed to the lines where the error is and one needs to make adjust accordingly.
Ansible Playbook Dry Run
You can also do an Ansible dry run before running a playbook. A dry run is a dummy run to verify if the playbook will successfully run or not before actually running the playbook itself.
To do a dry run, use the command,
# ansible-playbook <playbook> -CFor example, to do a dry run of the playbook we wrote above, use the command,
[lisa@drdev1 ~]$ ansible-playbook my-first-playbook.yml -CHow do I use Ansible playbook?
From the lesson we have learnt above so far, to use the Ansible playbook, you need to do the following:
1. write an Ansible playbook
2. Do an Ansible playbook syntax check
3. Do an Ansible playbook dry run if you wish (not necessary though)
4. Run Ansible playbook
What Is The Difference Between Ansible and Ansible Playbook
Ansible is a software or a tool used for automation while Ansible playbook is a line of codes or ansible features used for ansible tasks.
Having understood what a playbook is and how to write and run Ansible playbook, let’s see the step by step guide of to use the Ansible playbook to execute tasks with examples.
ACTION TIME
Step By Step Guide Of How To Write & Run Ansible Playbooks With Examples
NB: Please see the previous lessons on how to set up ansible configuration file, ansible control node, and inventory if you don’t know how to. These setups must be properly done, else your playbooks won’t run.
Also, see the UNDERSTANDING THE SUBJECT MATTER section to set up your vim tool to be able to edit a playbook efficiently.
For this example, the inventory file, in this case, is shown below.
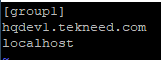
Let’s automate the installation of httpd package by creating an ansible playbook that will do the following:
*Install httpd package on group1 group
*start and enable the httpd package on group1 group
*Allow httpd firewall on group1 group
*on the Ansible control node, create a secondary httpd user with the name, apacheuser1 and add the user to a secondary group, wheel
NOTE: Always use the manual pages of the modules if you need to. i.e, (ansible-doc <module>)
1. use vim to create the playbook file with a .yml extension.
[lisa@drdev1 ~]$ vim my-second-playbook.yml2. The basic YAML syntax starts with three dashes (- – -) to indicate it’s a YAML file. If you wish, you can include the three dashes.
---3. create the first play which will be the first item and give it a name by adding a dash (-), space, and a name just as it is done below.
---
 - name: Install, start and enable httpd
*add the lists under the first item. In this case, the lists will be the hosts and the tasks.
- add the first list under the first item which is the hosts
---
 - name: Install, start and enable httpd
hosts: group1- add the second list under the first item, which is the tasks
 ---
 - name: Install, start and enable httpd
   hosts: group1
tasks:- add the first task, and give the first task a name
 ---
 - name: Install, start and enable httpd
   hosts: group1
   tasks:
- name: Install httpd- add the module that will do the work of the first task, which is the yum module in this case.
 ---
 - name: Install, start and enable httpd
   hosts: group1
   tasks:
     - name: Install httpd
yum:- add the arguments for the yum module as it is done below. I am saying again, please don’t forget indentations, you must get it right. See the UNDERSTANDING THE SUBJECT MATTER” section above if you are lost.
 ---
 - name: Install, start and enable httpd
   hosts: group1
   tasks:
     - name: Install httpd
       yum:
         name: httpd
- Add the second task
make sure the second task tally on the same line as the first task and make sure it starts with a dash (-). Don’t forget, indentation matters just as we have explained in “UNDERSTANDING THE SUBJECT MATTER” section.
- add the task name
---
 - name: Install, start and enable httpd
   hosts: group1
   tasks:
     - name: Install httpd
       yum:
         name: httpd

- name: start and enable httpd- add the task module, which is service
 ---
 - name: Install, start and enable httpd
   hosts: group1
   tasks:
     - name: Install httpd
       yum:
         name: httpd

     - name: start and enable httpd
service:- add the module arguments which are name, state and enabled.
---
 - name: Install, start and enable httpd
   hosts: group1
   tasks:
     - name: Install httpd
       yum:
         name: httpd

     - name: start and enable httpd
       service:
         name: httpd
         state: started
enabled: true- add the third task which is allowing httpd on the firewall
  ---
 - name: Install, start and enable httpd
   hosts: group1
   tasks:
     - name: Install httpd
       yum:
         name: httpd

     - name: start and enable httpd
       service:
         name: httpd
         state: started
         enabled: true

     - name: Allow httpd on firewall
       firewalld:
         service: httpd
         state: enabled
         permanent: true
         immediate: true
4. create/add the second play which will be, creating a secondary apache user on the control node.
NB: make sure the second play colon and white spacing tally with the first play
 ---
 - name: Install, start and enable httpd
   hosts: group1
   tasks:
     - name: Install httpd
       yum:
         name: httpd

     - name: start and enable httpd
       service:
         name: httpd
         state: started
         enabled: true

     - name: Allow httpd on firewall
       firewalld:
         service: httpd
         state: enabled
         permanent: true
         immediate: true


 - name: create a secondary apache user
*add the item lists, which will be hosts and tasks, then followed by the tasks, just as we did in the first play.
NB: Please see “UNDERSTANDING THE SUBJECT MATTER” section above for more understanding on how to create a playbook.
---
 - name: Install, start and enable httpd
   hosts: group1
   tasks:
     - name: Install httpd
       yum:
         name: httpd

     - name: start and enable httpd
       service:
         name: httpd
         state: started
         enabled: true

     - name: Allow httpd on firewall
       firewalld:
         service: httpd
         state: enabled
         permanent: true
         immediate: true


 - name: create a secondary apache user
   hosts: localhost
   tasks:
     - name: create apacheuser1 user
       user:
         name: apacheuser1
         group: wheel
Your playbook at the end will be as above. You can also see the screenshots below.

Now that we are done with writing our playbook, let’s run a syntax check.
5. Run a playbook syntax check
[lisa@drdev1 ~]$ ansible-playbook my-second-playbook.yml --syntax-check

playbook: my-second-playbook.yml
6. Do a dry run to see if the ansible tasks will be executed
[lisa@drdev1 ~]$ ansible-playbook my-second-playbook.yml -C

PLAY [Install, start and enable httpd] *********************************************
.......
From the output, it is evident that the ansible tasks will take effect, they were no failed tasks. lol. Well, let’s see.
Also, from the display colors, just as I mentioned in the previous lesson, one can tell that changes that will take effect on each host.
7. Run the playbook.
[lisa@drdev1 ~]$ ansible-playbook my-second-playbook.yml

PLAY [Install, start and enable httpd

.......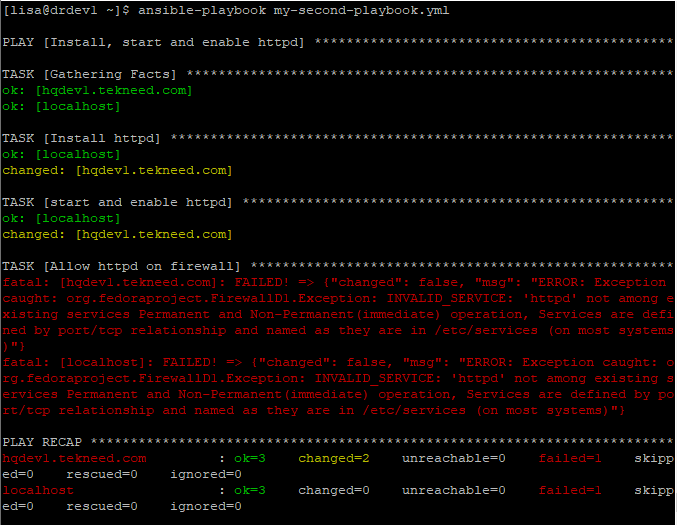
From the display, you can see that one task failed, which is “allowing httpd service in firewalld”.
The good thing about Ansible is that, it will tell the reasons for a failed task. In this case, the reason is “httpd not among existing services” which is true, only except you created/customized the httpd.xml service yourself.
You can also see that the last task did not run, which is creating a secondary apache user because the previous task failed. This ascertains our explanation in “UNDERSTANDING THE SUBJECT MATTER” section
Now, let’s fix our errors
REMEDIATION
*use the firewalld module documentation/manual page to get the correct service names or use the (firewalld-cmd – -get-services) command.
NB: searching for examples is a better idea when using module man pages.
[lisa@drdev1 ~]$ ansible-doc firewalld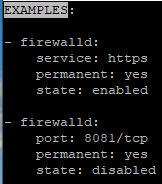
*In the playbook, change httpd to https and rerun the playbook
[lisa@drdev1 ~]$ ansible-playbook my-second-playbook.yml
Now, you can see that the task ran successfully and the apacheuser1 user has been created.
*login to the managed host and verify all the tasks and also on the localhost. You can also use the Ansible ad hoc command to verify also.
This brings us to the conclusion of this exercise.
Working With Wildcards & Patterns
In our previous lesson, we looked at working with the Ansible pattern, you should also know that the hosts in a playbook can be defined in a pattern.
For example, a playbook hosts block can be written as below,
---
-name: play1
 hosts:
   - server1.tekneed.com
   - 192.168.156.23
   - manchester,!barcelona
   - manchester,&barcelona
In summary, make sure you understand what you are doing, take your time to build your foundation. If you need personal training, you can contact us at “info@tekneed.com”, we will help you.
Class Activity
*Write a playbook to install the php package on managed hosts in the development host groups
*Verify that the php package has been installed using the ansible ad hoc commands
If you like this article, you can support us by
1. sharing this article.
2. Buying the article writer a coffee (click here to buy a coffee)
3. Donating to push our project to the next level. (click here to donate)
If you need personal training, send an email to info@tekneed.com
Click To Watch Video On Writing and Running Ansible Playbook
RHCE EX294 Exam Practice Question On Writing and Running Ansible Playbook
More: Click To Watch Video On How To Install Ansible
Your feedback is welcomed. If you love others, you will share with others
Thank you for this post on Ansible Playbook!
I think you meant, “colon and space”, not “column and space”.
Oh my!
Thank you for the correction Sanker. I actually meant colon. I will update it as soon as I can.