
Last updated: December 2022
In this lesson, you will learn how to install Zabbix on RHEL 8 (Red Hat Enterprise Linux systems). The same steps can also be used for CentOS 8, RHEL 9, and Rocky Linux 9 systems.
UNDERSTANDING THE SUBJECT MATTER
What is Zabbix?
Zabbix is an open-source monitoring tool that can be used to monitor IT infrastructure such as servers, networks, virtual machines, applications, cloud services, and databases.
Zabbix Installation methods
Zabbix can be installed in three different methods as of when writing this lesson.
1. Installation from source – You can compile Zabbix from source
2. Installation from containers – You can use Zabbix docker containers
3. Installation from packages – You can install Zabbix using packages from the official Zabbix repositories
In this lesson, we will be installing Zabbix using packages.
ZabbiX Requirements
Zabbix, as of when writing this article can only be installed on Linux opertaing system, and as a docker container.
Zabbix consists of three major components which are the Zabbix server, database and Zabbix front-end. These three components has to be configured before Zabbix can be used.
The sever that Zabbix will be installed on will need a web server, database, and PHP.
The web-server can be Apache or Nginx.
Zabbix, or rather, Zabbix server and Zabbix proxy supports database engines such as MySQL/mariadb, Oracle, postgreSQL, SQLite, and IBM DB2
So basically, Zabbix requires a LAMP stack or LEMP stack.
A web-server hosts/holds web applications, and a database engine hosts/holds databases
The package will install the webserver, in our case, apache and the zabbix server(written in PHP) and the zabbix server/app will overwrite most of the PHP and httpd configuration file if it is installed using packages.
For Zabbix system requirements, you can click on this link.
ACTION TIME
Step By Step Guide Of How To Install Zabbix On RHEL 8
***Configure Firewall and SELinux for Zabbix***
Open port 10051/tcp for zabbix-server, port 10050/tcp for zabbix-agent, and port 80/tcp for front-end. If you are using htttps, open port 443/tcp
*Add the firewall rules as shown below.
[root@mon ~]# firewall-cmd --add-port=10050/tcp --permanent

success
[root@mon ~]# firewall-cmd --add-port=10051/tcp --permanent

success
[root@mon ~]# firewall-cmd --add-port=80/tcp --permanent
success
[root@mon ~]# firewall-cmd --reload

success
For SELinux, I will put it in permissive mode. setting SELinux for Zabbix servers vary. This link will give you an insight of how to set yours
[root@mon ~]# setenforce permissive

[root@mon ~]# sestatus

SELinux status:                 enabled
SELinuxfs mount:                /sys/fs/selinux
SELinux root directory:         /etc/selinux
Loaded policy name:             targeted
Current mode:                   permissive
............................
NB: Note that this settings is not persistent. To make this peristent, edit “/etc/selinux/config” file and chage selinux settings to permissive. You may restart your system or leave it till when you want to restart for other reasons
***Download Packages For Zabbix Installation***
1. On the official zabbix website, navigate to “DOWNLOAD>Zabbix Packages”, and choose your platform
In our case, we have the following.
Zabbix VERSION: 6.0 LTS
OS DISTRIBUTION: Red Hat Enterprise Linux
OS VERSION: 8
ZABBIX COMPONENT: Server, Frontend, Agent
DATABASE: MySQL
WEB SERVER: Apache
This link can be used for the platform above.
This might not be applicable to your platform. Please choose yours accordingly. You can click on the video link at the end of this lesson if you need more clarity.
2. Install the Zabbix 6 official repository.
[root@mon ~]# rpm -Uvh https://repo.zabbix.com/zabbix/6.0/rhel/8/x86_64/zabbix-release-6.0-4.el8.noarch.rpm

Retrieving https://repo.zabbix.com/zabbix/6.0/rhel/8/x86_64/zabbix-release-6.0-4.el8.noarch.rpm
............................
Updating / installing...
   1:zabbix-release-6.0-4.el8         ################################# [100%]

...........................
[root@mon ~]# dnf clean all

Updating Subscription Management repositories.
17 files removed
*If you wish, you can search Zabbix to see some Zabbix official packages
[root@mon ~]# yum search zabbix

Updating Subscription Management repositories.
Last metadata expiration check: 0:35:37 ago on Tue 06 Dec 2022 15:33:02.
..............
zabbix-apache-conf.noarch : Automatic zabbix frontend configuration with apache
zabbix-get.x86_64 : Zabbix get
zabbix-java-gateway.x86_64 : Zabbix java gateway
......................
3. Install Zabbix server, Zabbix front-end and Zabbix agent
*For Zabbix seerver, you will install the package, (“zabbix-server-<your-database-engine>), just as we have it on Zabbix official website.
In our case, the zabbix server package will be “zabbix-server-mysql“
*For zabbix-frontend, ie. the web, you will install the package, (“zabbix-web-<your-database-engine>), just as we have it on Zabbix official website
In our case, the zabbix frontend package will be “zabbix-web-mysql”
*It is also nice for us to install Zabbix agent on the server so that it can help to monitor the server as well.
For Zabbix agent, you will install the package, “zabbix-agent”
Let’s install all these packages using the command below, just as we have it on Zabbix official website. The other packages too are necessary for the zabbix configuration. They do the functions as their names imply.
[root@mon ~]# dnf install zabbix-server-mysql zabbix-web-mysql zabbix-apache-conf zabbix-sql-scripts zabbix-selinux-policy zabbix-agent -y

Updating Subscription Management repositories.
Red Hat Enterprise Linux 8 for x86_64 - BaseOS (RPMs)       1.9 MB/s |  55 MB     00:29
......................
  zabbix-web-6.0.12-release1.el8.noarch
  zabbix-web-deps-6.0.12-release1.el8.noarch
  fping-3.16-1.el8.x86_64

Complete!

.......................
NB: You can install these packages one-by-one if your internet is slow, and you have errors in downloading the packages due to all mirrors tried without success.
*You can also install zabbix-get for troubleshooting.
[root@mon ~]# dnf install zabbix-get -y

Updating Subscription Management repositories.
Last metadata expiration check: 0:39:19 ago on Tue 06 Dec 2022 15:33:02.
Dependencies resolved.
...........................
Installing:
.....................
***Install and Configure database for Zabbix***
1. Install a database engine.
In this case, I will be using mariadb, a fork of mysql. So its just like you are using mysql.
NOTE: Please check with Zabbix, what the version your database engine should be. Your Zabbix server might not start if you are using the wrong version of a database engine. (I ran into this same issue)
I will be Installing mariadb, version, 10.8
*Add MariaDB, version 10.8 repository.
[root@mon ~]# curl -LsS -O https://downloads.mariadb.com/MariaDB/mariadb_repo_setup[root@mon ~]# bash mariadb_repo_setup --mariadb-server-version=10.8
# [info] Checking for script prerequisites.
# [info] MariaDB Server version 10.8 is valid
# [info] Repository file successfully written to /etc/yum.repos.d/mariadb.repo
# [info] Adding trusted package signing keys...
/etc/pki/rpm-gpg ~
~
# [info] Successfully added trusted package signing keys
# [info] Cleaning package cache...
Updating Subscription Management repositories.
31 files removed
*Install MariaDB, version 10.8 repository and install mariadb
[root@mon ~]# dnf install boost-program-options -y

Updating Subscription Management repositories.
MariaDB Server                                              151 kB/s | 605 kB     00:04
MariaDB MaxScale                                            2.9 kB/s | 8.5 kB     00:02
.................
[root@mon ~]# dnf module reset mariadb -y
Updating Subscription Management repositories.
Last metadata expiration check: 0:01:02 ago on Sun 11 Dec 2022 01:01:52 AM WAT.
Dependencies resolved.
.....................
[root@mon ~]# dnf install MariaDB-server MariaDB-client MariaDB-backup -y

Updating Subscription Management repositories.
Last metadata expiration check: 0:01:16 ago on Sun 11 Dec 2022 01:01:52 AM WAT.
Dependencies resolved.
............................
*start and enable mariadb
[root@mon ~]# systemctl enable --now mariadb

Created symlink /etc/systemd/system/multi-user.target.wants/mariadb.service → /usr/lib/systemd/system/mariadb.service.
*Verify mariadb version
[root@mon ~]# rpm -q MariaDB-server
MariaDB-server-10.8.6-1.el8.x86_64
2. Configure database for Zabbix
By default, MariaDB engine does not have a password for root user. Also by default, mariaDB engine installation has anonymous user, allowing to login into MariaDb without having to have a user account created for them. We will take care of these security concerns later. But for now, we just need to type “mysql” without having to specify a username and a password.
[root@mon ~]# mysql

Welcome to the MariaDB monitor.  Commands end with ; or \g.
Your MariaDB connection id is 3
Server version: 10.5.16-MariaDB MariaDB Server

Copyright (c) 2000, 2018, Oracle, MariaDB Corporation Ab and others.

Type 'help;' or '\h' for help. Type '\c' to clear the current input statement.
MariaDB [(none)]>
Zabbix needs a database, so lets create one for Zabbix.
*create a database with the name, zabbix. (You can choose any name you want)
MariaDB [(none)]> create database zabbix character set utf8mb4 collate utf8mb4_bin;

Query OK, 1 row affected (0.001 sec)
NB: The parameter, “set utf8mb4 collate utf8mb4_bin;” is important and required when creating a database for Zabbix installation.
*Verify that the database has been created
MariaDB [(none)]> show databases;

+--------------------+
| Database           |
+--------------------+
| information_schema |
| mysql              |
| performance_schema |
| zabbix             |
+--------------------+
4 rows in set (0.001 sec)
*Create a database user that will have access to the zabbix database we have just created.
we want the user to be able to add database configuration and history to the history tables.
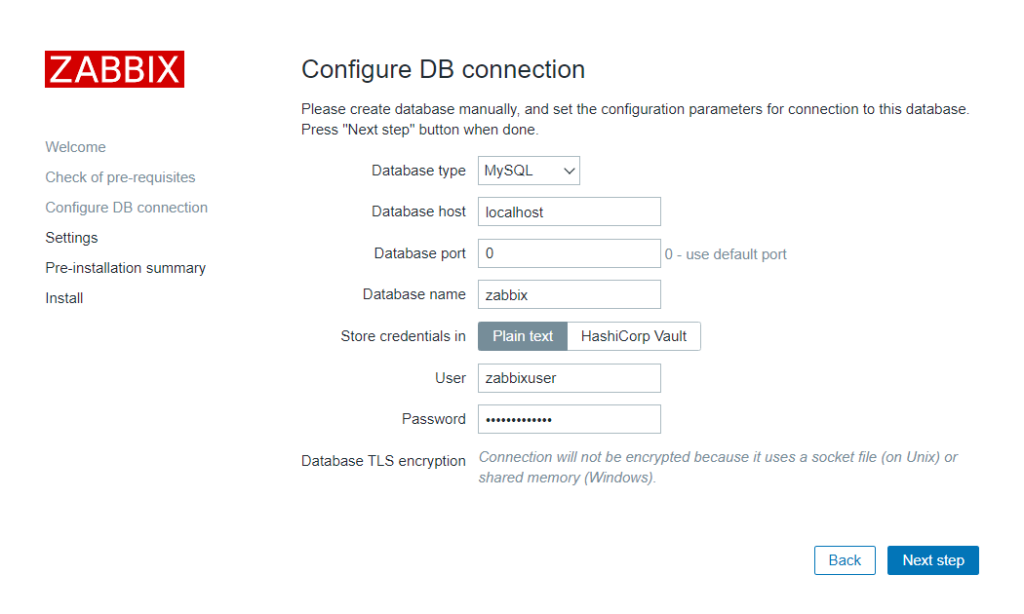
In this case, we are going to be creating the user, “zabbixuser” and we will grant all privileges to all tables with the * symbol to the “zabbixuser” user. The zabbixuser password will be “Password1234”
MariaDB [(none)]> grant all privileges on zabbix.* to zabbixuser@localhost identified by 'Password1234';

Query OK, 0 rows affected (0.001 sec)
OR
You can do it one after the other by creating the user first, and granting all privileges as done below.
MariaDB [(none)]> create user zabbixuser@localhost identified by 'Password@1234';

MariaDB [(none)]> grant all privileges on zabbix.* to zabbixuser@localhost;
*You can also verify that the user have been created.
MariaDB [(none)]> select user from mysql.user;

+-------------+
| User        |
+-------------+
| mariadb.sys |
| mysql       |
| root        |
| zabbix      |
| zabbixuser  |
+-------------+
5 rows in set (0.001 sec)
*Import database schema
Apparently, the database is empty. Hence, we need to import the schema. The schema file for zabbix is in “zabbix-sql-scripts” package we downloaded. The file contains the database schema.
Extract the schema file in “/usr/share/zabbix-sql-scripts/mysql/server.sql.gz” to the “zabbix” database we created. (You can simply do this with the zcat and pipe command)
[root@sno ~]# cd /usr/share/zabbix-sql-scripts/mysql/
[root@sno mysql]# ls

double.sql  history_pk_prepare.sql  proxy.sql  server.sql.gz
The schema file is server.sql.gz.
exit out of mysql and run the command below.
[root@sno mysql]# zcat /usr/share/zabbix-sql-scripts/mysql/server.sql.gz | mysql --default-character-set=utf8mb4 zabbix
NB: We rode on the fact that the root user does not have a password yet which is okay to run this command. You can also specify the zabbixuser and database below and enter the password when prompted or even use the root user, and password if you created one.
OR
[root@sno mysql]# zcat /usr/share/zabbix-sql-scripts/mysql/server.sql.gz | mysql --default-character-set=utf8mb4 -uzabbixuser -p zabbix

Enter password: Password@1234
*Verify that the schema have been imported to the database.
[root@sno mysql]# mysql

Welcome to the MariaDB monitor.  Commands end with ; or \g.
Your MariaDB connection id is 13
Server version: 10.5.16-MariaDB MariaDB Server

Copyright (c) 2000, 2018, Oracle, MariaDB Corporation Ab and others.

Type 'help;' or '\h' for help. Type '\c' to clear the current input statement.

MariaDB [(none)]>
*Type the command “use zabbix” to use the zabbix database.
MariaDB [(none)]> use zabbix;
Reading table information for completion of table and column names
You can turn off this feature to get a quicker startup with -A

Database changed
MariaDB [zabbix]>
*Type the command “show tables” to see the contents/tables in the database.
MariaDB [zabbix]> show tables;

+----------------------------+
| Tables_in_zabbix           |
+----------------------------+
| acknowledges               |
| actions                    |
| alerts
...............                    |       |
+----------------------------+
173 rows in set (0.002 sec)

MariaDB [zabbix]>
*** configure Zabbix server***
*exit out of the database server
*we need to edit the zabbix server configuration file. We can do a backup first.
[root@mon ~]# cp /etc/zabbix/zabbix_server.conf /etc/zabbix/zabbix_server.conf_bkup
*Edit the zabbix server configuration file with the datatbase name, database user, and database password.
[root@mon ~]# vi /etc/zabbix/zabbix_server.conf
Change the DBName to zabbix
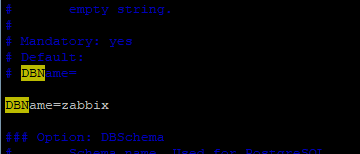
Change the DBUser to zabbixuser
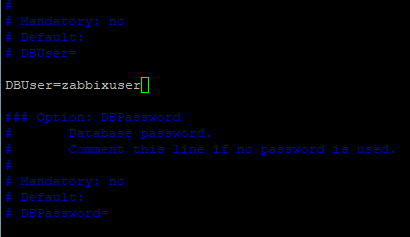
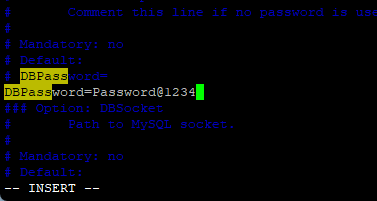
Enter the DBpassword as well
*Install the net-snmp dependency for zabbix-server to start
[root@mon mysql]# dnf install net-snmp -y

Updating Subscription Management repositories.
Last metadata expiration check: 0:06:48 ago on Sun 11 Dec 2022 01:12:05 AM WAT.
Dependencies resolved.
*Restart or start Zabbix server.
[root@mon ~]# systemctl restart zabbix-server
*Verify that the Zabbix server has been started
[root@mon ~]# systemctl status zabbix-server
● zabbix-server.service - Zabbix Server
Loaded: loaded (/usr/lib/systemd/system/zabbix-server.service; disabled; vendor preset: disabled)
Active: active (running) since Tue 2022-12-06 17:54:56 WAT; 7s ago
Process: 39148 ExecStart=/usr/sbin/zabbix_server -c $CONFFILE (code=exited, status=0/SUCCESS
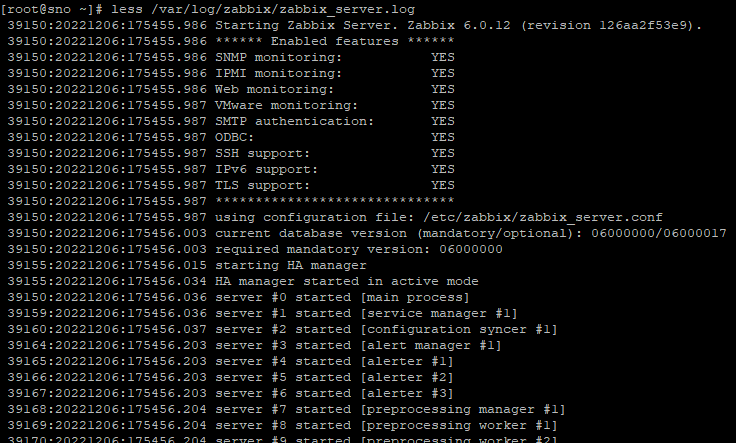
......*You can also check the logs to see that the server has been started.
[root@mon ~]# less /var/log/zabbix/zabbix_server.log

 39150:20221206:175455.986 Starting Zabbix Server. Zabbix 6.0.12 (revision 126aa2f53e9).
 39150:20221206:175455.986 ****** Enabled features ******
 ...............
*Restart and enable the apache, php-fpm a,nd zabbix-agent services.
[root@mon mysql]# systemctl enable --now zabbix-agent httpd php-fpm

Created symlink /etc/systemd/system/multi-user.target.wants/zabbix-agent.service → /usr/lib/systemd/system/zabbix-agent.service.
Created symlink /etc/systemd/system/multi-user.target.wants/httpd.service → /usr/lib/systemd/system/httpd.service.
Created symlink /etc/systemd/system/multi-user.target.wants/php-fpm.service → /usr/lib/systemd/system/php-fpm.service.
NB: almost all of the PHP parameters are overidden by zabbix configuration file because we installed zabbix using packages. Hence, we don’t need to touch the httpd and PHP config file except we want some other configurations.
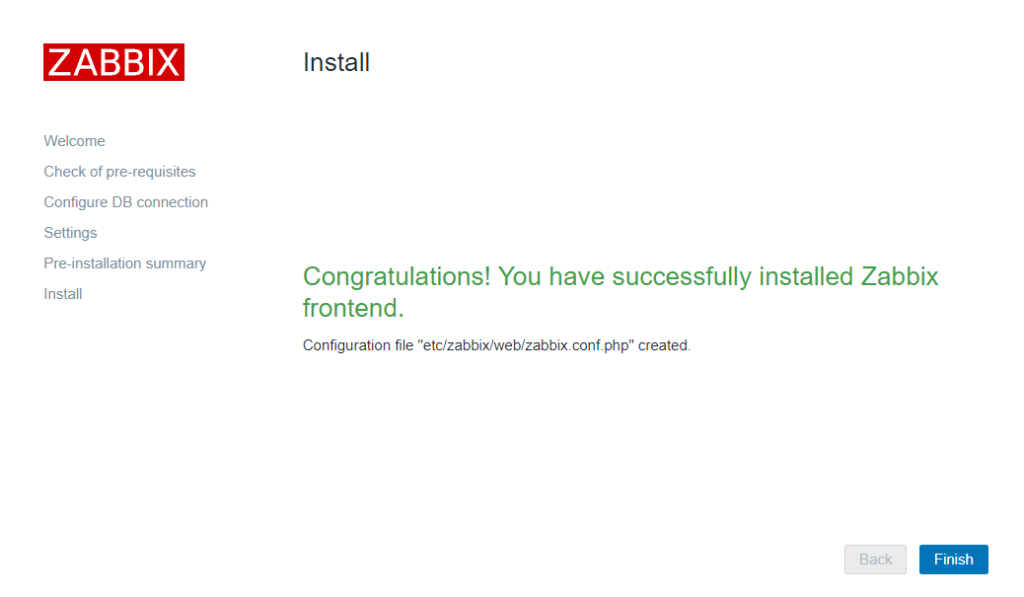
***Configure Zabbix Front end***
This will be done from the web
*On the web, enter the Zabbix server IP and add “/zabbix” as shown below.
192.168.37.14/zabbixThe configuration wizard will be brought up as shown below. (This will actually create a new configuration file)
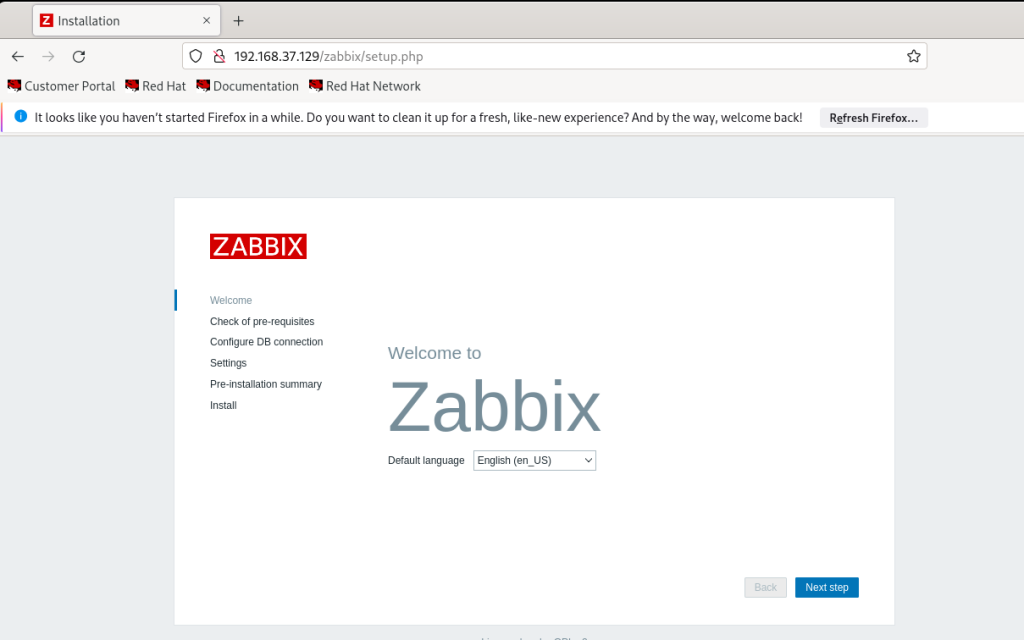

*Choose the default language and click on next step
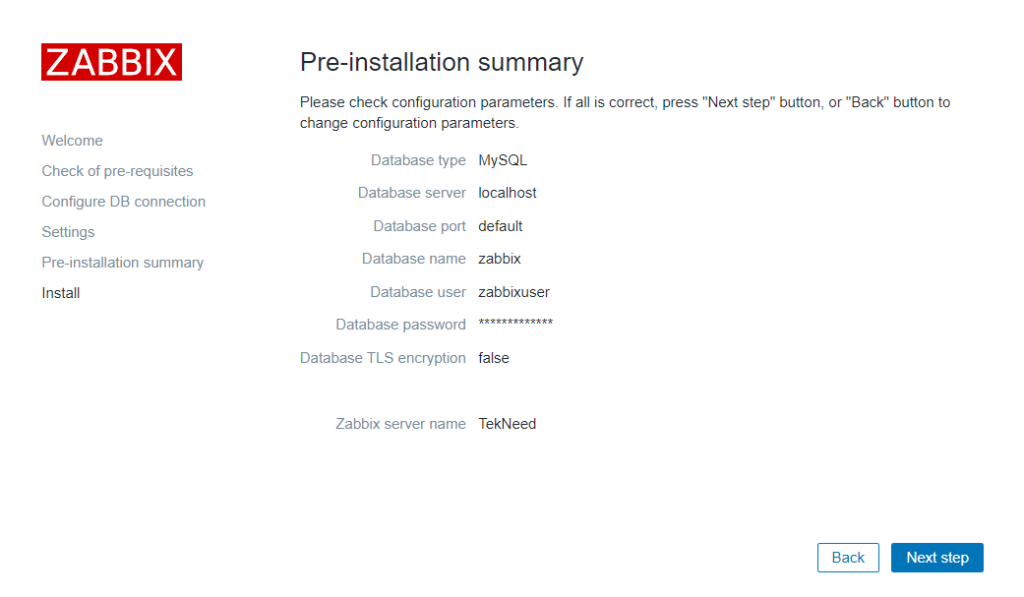
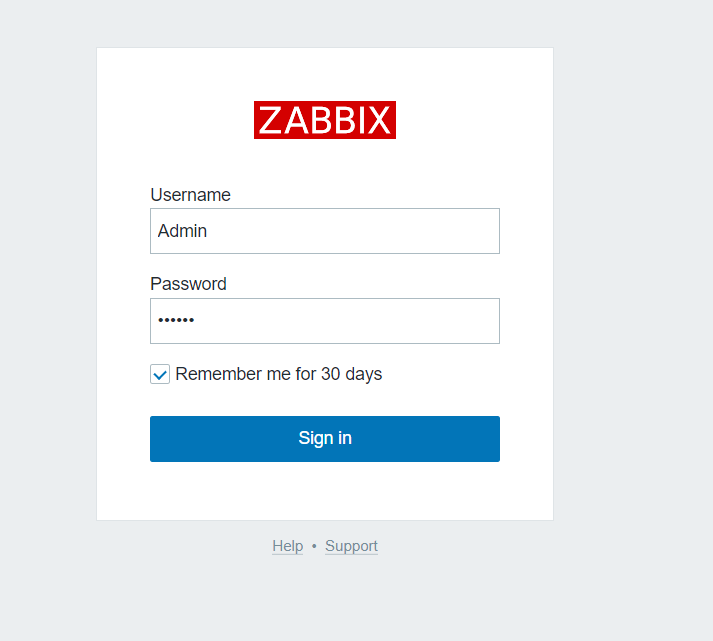
Username: Admin
password: zabbix
Don’t forget to change the default fornt-end password
***Securing MariaDB Installation***
[root@zabbix ~]# mariadb-secure-installation

NOTE: RUNNING ALL PARTS OF THIS SCRIPT IS RECOMMENDED FOR ALL MariaDB
      SERVERS IN PRODUCTION USE!  PLEASE READ EACH STEP CAREFULLY!

In order to log into MariaDB to secure it, we'll need the current
password for the root user. If you've just installed MariaDB, and
haven't set the root password yet, you should just press enter here.

Enter current password for root (enter for none):
OK, successfully used password, moving on...

Setting the root password or using the unix_socket ensures that nobody
can log into the MariaDB root user without the proper authorisation.

You already have your root account protected, so you can safely answer 'n'.

Switch to unix_socket authentication [Y/n] n
 ... skipping.

You already have your root account protected, so you can safely answer 'n'.

Change the root password? [Y/n] y
New password:
Re-enter new password:
Password updated successfully!
Reloading privilege tables..
 ... Success!


By default, a MariaDB installation has an anonymous user, allowing anyone
to log into MariaDB without having to have a user account created for
them.  This is intended only for testing, and to make the installation
go a bit smoother.  You should remove them before moving into a
production environment.

Remove anonymous users? [Y/n] y
 ... Success!

Normally, root should only be allowed to connect from 'localhost'.  This
ensures that someone cannot guess at the root password from the network.

Disallow root login remotely? [Y/n] y
 ... Success!

By default, MariaDB comes with a database named 'test' that anyone can
access.  This is also intended only for testing, and should be removed
before moving into a production environment.

Remove test database and access to it? [Y/n] y
 - Dropping test database...
 ... Success!
 - Removing privileges on test database...
 ... Success!

Reloading the privilege tables will ensure that all changes made so far
will take effect immediately.

Reload privilege tables now? [Y/n] y
 ... Success!

Cleaning up...

All done!  If you've completed all of the above steps, your MariaDB
installation should now be secure.

Thanks for using MariaDB!
[root@zabbix ~]#
Watch Video On How To Install Zabbix 6 On RHEL 8
Your feedback is welcomed. If you love others, you will share with others
Great How to document. Worked first time with no issues. Thanks!
You are welcome, Chad
Thank you for a great step by step installation. I’ve captured two issues with your steps.
1: The schema file location is at /usr/share/zabbix/sql-scripts/mysql/server.sql.gz
Above you’ve mentioned that it is at “zabbix-sql-scripts”. First dash should be a “/”.
2: When creating the db user, you first use ‘Password1234’, but from there on, you use ‘Password@1234’. This definitely will cause trouble to someone.
Thanks again. Great work!