Last updated: February 2022
In this lesson, you will learn what Ansible handler is, why and how you should use Ansible handler, and the step by step guide of how to use Ansible handler.
Contents
UNDERSTANDING THE SUBJECT MATTER
What Is Ansible Handler
Ansible handler is an Ansible task that is called by another Ansible task with the “notify” keyword provided there are any changes made to the task that is calling the handler.
Alright, let’s break it down slowly,
Let’s assume task A is supposed to allow port 443 in the firewall rule, more so, task A has a “notify” directive/keyword in its dictionary. If task A is successful, which means there is a change, it will call task B, which is the handler to probably restart the firewalld service for the changes to take effect.
On the other hand, if task A s not successful, it will not call task B, hence why we defined Ansible handler as a task that is called if there is a change in the task that is calling it. Handlers will not run on its own if it is not called
The keyword used to call an Ansible handler is “notify”, that is, the handler will be notified/called.
Why Do You Use Handlers In Ansible
Handlers are very important in creating Ansible playbook that has to do with, for example, a service that needs to be restarted after changes are made.
With the use of the Ansible handler, a user doesn’t need to create another unnecessary task that can be tedious. With the use of the “notify” keyword in a task, the task will notify a handler to effect the changes. This can be very effective when the playbook has many tasks referencing an handler
How Do You Use Handlers In Ansible
Ansible handlers are used by adding the “notify” keyword in a task that is going to notify an handler, and also creating the handler task itself.
Ansible handler is used at a task level and not at a play level, and will only run once, when it is called. The only time a keyword that is referencing a handler can be used at a play level is when you need to force the handler to run irrespective of the syntax error in the playbook.
The keyword ,in this case, is (“force_handlers” = yes). This will always force the Ansible handler to run.
Having understood what an Ansible handler is, let’s see the step by step guide of how to use the Ansible handler in a playbook.
ACTION TIME
Step By Step guide Of How To Use Ansible Handlers
To write a simple playbook that will restart the httpd service using the handler, follow the steps below:
1. create the playbook
[lisa@drdev1 ~]$ vim playbook3.yml- name: restarting httpd using handlers
hosts: hqdev1.tekneed.com
tasks:
- name: restart httpd
service:
name: httpd
state: restarted
notify: restart httpd
handlers:
- name: restart httpd
service:
name: httpd
state: restarted
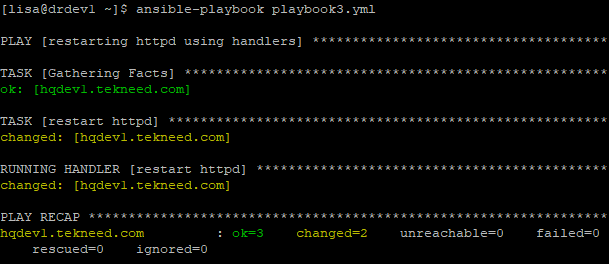
For the first task, the httpd service will be restarted, and the notify keyword will notify the handler(task), and because there is a change, the handler(task) will definitely run. This playbook will definitely restart the httpd service twice, hence this task will always run.
2. Run the playbook.
[lisa@drdev1 ~]$ ansible-playbook playbook3.yml

PLAY [restarting httpd using handlers] ************************************************
Let’s be more practical here.
If we are to allow a service or port on the firewall, the right thing to do is to reload or restart the firewall. The same goes for when changes are made in configuration files, the service associated to the file will be restarted.
Moving forward, let’s create a playbook that allows http on firewall, and then restart the firewalld service.
1. create the playbook
[lisa@drdev1 ~]$ vim playbook3.yml- name: allowing services on firewall
hosts: hqdev1.tekneed.com
tasks:
- name: allow http service on firewall
firewalld:
service: http
state: enabled
permanent: true
immediate: true
notify: restart firewall
handlers:
- name: restart firewall
service:
name: firewalld
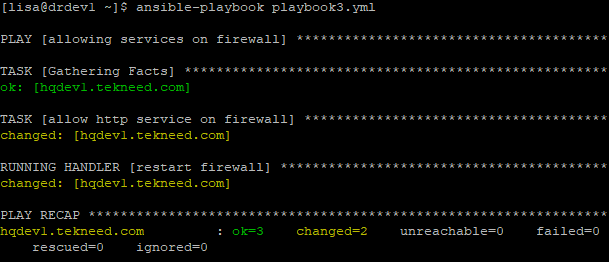
state: restartedThe first task will allow the http service on the firewall. Because the firewall service needs to be restarted after the changes, the notify directive will be added, hence will notify the handler to restart firewalld service if there are any changes made in the first task.
Normally, we could have created a separate task to restart the firewalld service but that won’t be necessary, it may be tedious and will make the playbook unnecessarily long, especially when the playbook is built with many tasks that need to be restarted or in that regard. Hence, the use of the “notify” keyword, which is enough to do the task because it will always reference the handler.
2. Run the playbook.
[lisa@drdev1 ~]$ ansible-playbook playbook3.yml

PLAY [allowing services on firewall] ***************************************************
......
If you run this playbook again, the handler will not run because there are no changes in the task calling the handler to run
You should also know that the notify keyword can have a list of items in a task as shown below. It all depends on how your playbook is written.
notify:
 - restart httpd
- restart autofsClass Activity
Using the Ansible handler, create a playbook that will install Apache, start and enable Apache, and edit the /etc/httpd/conf/httpd.conf configuration file to change the document root to /var/http-custom.
If you like this article, you can support us by
1. sharing this article.
2. Buying the article writer a coffee (click here to buy a coffee)
3. Donating to push our project to the next level. (click here to donate)
If you need personal training, send an email to info@tekneed.com
Click Here To Watch Video On How To Use Ansible Handler
RHCE EX200 Exam Practice Question On How To Use Ansible Handler
Your feedback is welcomed. If you love others, you will share with others
Leave a Reply