
Last updated: July 2021
This tutorial will teach you how to re-install Oms Agent for Linux on Azure. If OMS agent installation has been failing which may also cause other operations on your VM to fail, follow the step by step process to re-install the OMS agent.
UNDERSTANDING THE SUBJECT MATTER
OMS(Operation Management Suite) Linux agent or MMA (Microsoft Monitoring Agent) as formerly called, is now known as Azure Log Analytics agent.
re-installing the OMS Agent requires the waagent (Azure VM agent for Linux) to be up and running. Similarly, for windows, the guest VM agent (Azure VM agent for windows) must be up and running.
Not to go out of the scope of the study, our focus will be on Linux systems and the waagent.
waagent is the gateway for any operation that is to be performed on the VM. It must always be healthy. If not, many operations like backup, site recovery, automation, etc MAY be failing.
Having known this, let’s go through the step by step process in the “ACTION TIME” section. I will be using a Red Hat Enterprise Linux server 8 in my case.
ACTION TIME
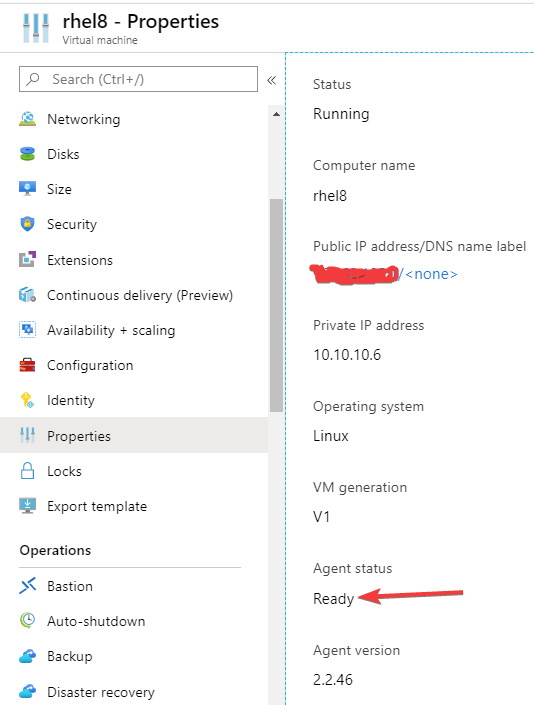
1. confirm the VM agent is in “Ready status”
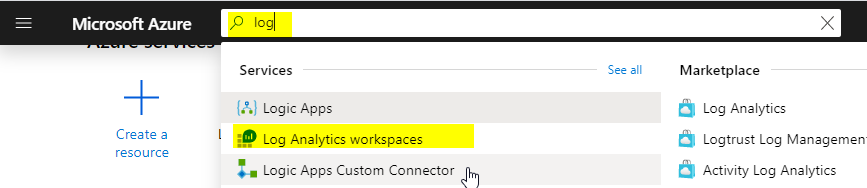
2. Disconnect the VM from its log analytics workspace if it is connected to any.
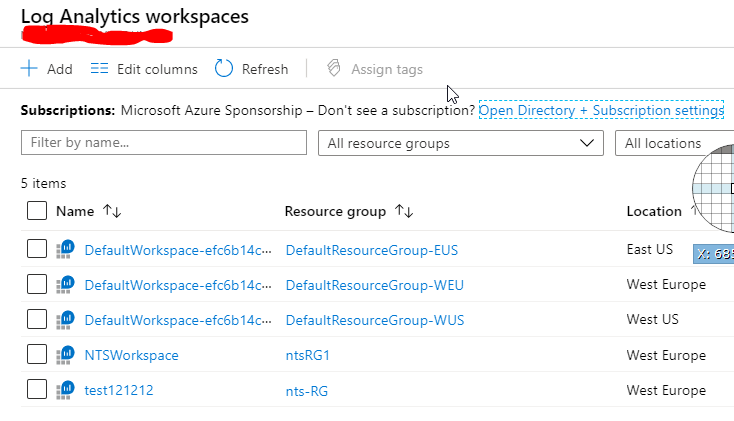
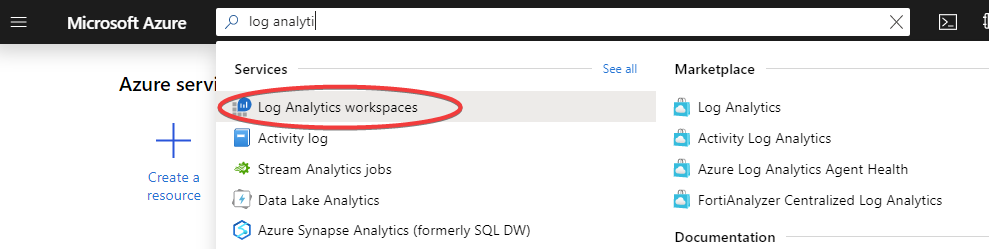
- In the search button, type log analytics workspace and click on the log analytics workspaces
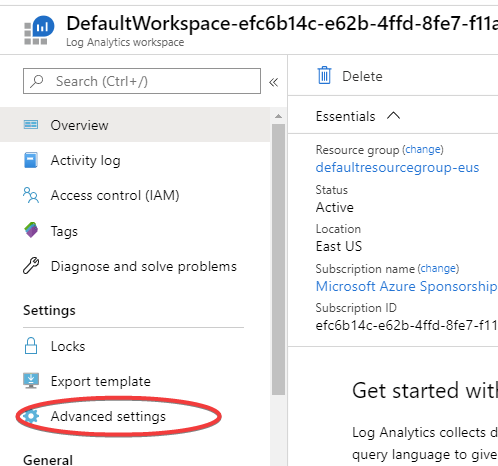
- click on the workspace
- on the blade, scroll down to Virtual machines > click on the VM > click on disconnect

NB: sometimes, you may not be able to disconnect or uninstall, log in to the Linux server and make sure the waagent is running.
see step 3 on how to start the waagent if it is not running.
3. Check the OMS extension. If it has failed, disconnect and uninstall.
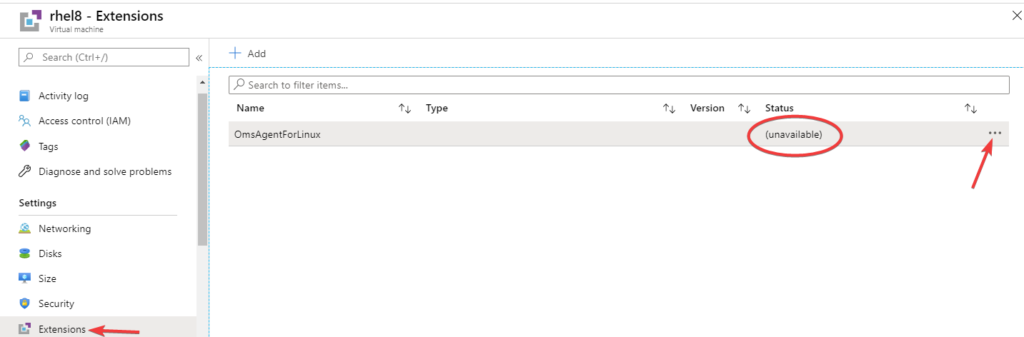
NB: sometimes, you may not be able to disconnect or uninstall, log in to the Linux server and make sure the waagent is running.
If Linux Diag Extension and DependencyAgentLinux Extension is also present, you may also need to remove/uninstall it if it is failing.
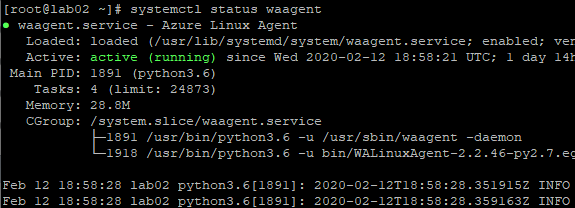
To verify if the waagent is running, use the command,
[root@lab02 ~]# systemctl status waagent

● waagent.service - Azure Linux Agent
   Loaded: loaded (/usr/lib/systemd/system/waagent.service; enabled; vendor prese>
   Active: active (running) since Wed 2020-02-12 18:58:21 UTC; 1 day 14h ago
 Main PID: 1891 (python3.6)
    Tasks: 4 (limit: 24873)
   Memory: 28.8M
   CGroup: /system.slice/waagent.service
           ├─1891 /usr/bin/python3.6 -u /usr/sbin/waagent -daemon
           └─1918 /usr/bin/python3.6 -u bin/WALinuxAgent-2.2.46-py2.7.egg -run-ex>

...........
If the waagent is not running, to start it, use the command,
[root@lab02 ~]# systemctl start waagent4. Purge the OMSagent
download the script to automate the removal of the omsagent,
NB: if you don’t have wget, install it first by using the command,
# yum install wget[root@lab02 ~]# wget https://raw.githubusercontent.com/Microsoft/OMS-Agent-for-Linux/master/installer/scripts/onboard_agent.sh
--2020-02-14 09:25:17-- https://raw.githubusercontent.com/Microsoft/OMS-Agent-for-Linux/master/installer/scripts/onboard_agent.sh
Resolving raw.githubusercontent.com (raw.githubusercontent.com)... 151.101.36.133
Connecting to raw.githubusercontent.com (raw.githubusercontent.com)|151.101.36.133|:443... connected.
HTTP request sent, awaiting response... 200 OK
Length: 3006 (2.9K) [text/plain]
Saving to: ‘onboard_agent.sh’
onboard_agent.sh 100%[====================>] 2.94K --.-KB/s in 0s
2020-02-14 09:25:18 (46.4 MB/s) - ‘onboard_agent.sh’ saved [3006/3006]
purge using the script.
[root@lab02 ~]# sudo sh onboard_agent.sh - - purge

--2020-02-14 09:31:19--  https://github.com/microsoft/OMS-Agent-for-Linux/releases    /download/OMSAgent_v1.12.15-0/omsagent-1.12.15-0.universal.x64.sh
Resolving github.com (github.com)... 140.82.118.3
Connecting to github.com (github.com)|140.82.118.3|:443... connected.
HTTP request sent, awaiting response... 302 Found
Location: https://github-production-release-asset-2e65be.s3.amazonaws.com/43709699    /a2f92f00-06dd-11ea-8cfc-de877d104657?X-Amz-Algorithm=AWS4-HMAC-SHA256&X-Amz-Crede    ntial=AKIAIWNJYAX4CSVEH53A%2F20200214%2Fus-east-1%2Fs3%2Faws4_request&X-Amz-Date=2    0200214T093120Z&X-Amz-Expires=300&X-Amz-Signature=be5fb8a724752169c97bb7de6efeb73b    b696ef25dba3599caea81d6305776c0f&X-Amz-SignedHeaders=host&actor_id=0&response-cont    ent-disposition=attachment%3B%20filename%3Domsagent-1.12.15-0.universal.x64.sh&res    ponse-content-type=application%2Foctet-stream [following]
--2020-02-14 09:31:20--  https://github-production-release-asset-2e65be.s3.amazona    ws.com/43709699/a2f92f00-06dd-11ea-8cfc-de877d104657?X-Amz-Algorithm=AWS4-HMAC-SHA    256&X-Amz-Credential=AKIAIWNJYAX4CSVEH53A%2F20200214%2Fus-east-1%2Fs3%2Faws4_reque    st&X-Amz-Date=20200214T093120Z&X-Amz-Expires=300&X-Amz-Signature=be5fb8a724752169c    97bb7de6efeb73bb696ef25dba3599caea81d6305776c0f&X-Amz-SignedHeaders=host&actor_id=    0&response-content-disposition=attachment%3B%20filename%3Domsagent-1.12.15-0.unive    rsal.x64.sh&response-content-type=application%2Foctet-stream
Resolving github-production-release-asset-2e65be.s3.amazonaws.com (github-producti    on-release-asset-2e65be.s3.amazonaws.com)... 52.216.101.131
Connecting to github-production-release-asset-2e65be.s3.amazonaws.com (github-prod    uction-release-asset-2e65be.s3.amazonaws.com)|52.216.101.131|:443... connected.
HTTP request sent, awaiting response... 200 OK
Length: 140668566 (134M) [application/octet-stream]
Saving to: ‘omsagent-1.12.15-0.universal.x64.sh’

omsagent-1.12.15-0.un 100%[=======================>] 134.15M  8.84MB/s    in 29s
NOTE: As of when this article is being written, if the system is not connected to the internet, the OMSAgent will not be purged with the script, even if you download the script locally and push it to the system via filezilla or scp or whatsoever method. However, I will share the script and the OMSAgent download link below.
Below is the onboard_agent.sh script
#!/bin/sh

#
# Easy download/install/onboard script for the OMSAgent for Linux
#

# Values to be updated upon each new release
GITHUB_RELEASE_X86=”https://github.com/Microsoft/OMS-Agent-for-Linux/releases/download/OMSAgent_v1.12.15-0/”
GITHUB_RELEASE_X64=”https://github.com/microsoft/OMS-Agent-for-Linux/releases/download/OMSAgent_v1.12.15-0/”

BUNDLE_X64=”omsagent-1.12.15-0.universal.x64.sh”
BUNDLE_X86=”omsagent-1.12.15-0.universal.x86.sh”

usage()
{
echo “usage: $1 [OPTIONS]”
echo “Options:”
echo ” -w id, –id id Use workspace ID for automatic onboarding.”
echo ” -s key, –shared key Use as the shared key for automatic onboarding.”
echo ” -d dmn, –domain dmn Use as the OMS domain for onboarding. Optional.”
echo ” default: opinsights.azure.com”
echo ” ex: opinsights.azure.us (for FairFax)”
echo ” -p conf, –proxy conf Use as the proxy configuration.”
echo ” ex: -p [protocol://][user:password@]proxyhost[:port]”
echo ” –purge Uninstall the package and remove all related data.”
echo ” -? | -h | –help shows this usage text.”
}

# Extract parameters
while [ $# -ne 0 ]
do
case “$1” in
-d|–domain)
topLevelDomain=$2
shift 2
;;

-s|–shared)
onboardKey=$2
shift 2
;;

-w|–id)
onboardID=$2
shift 2
;;

–purge)
purgeAgent=”true”
break;
;;

-p|–proxy)
proxyConf=$2
shift 2
;;

-\? | -h | –help)
usage `basename $0` >&2
exit 0
;;

*)
echo “Unknown argument: ‘$1′” >&2
echo “Use -h or –help for usage” >&2
exit 1
;;
esac
done

# Assemble parameters
bundleParameters=”–upgrade”
if [ -n “$onboardID” ]; then
bundleParameters=”${bundleParameters} -w $onboardID”
fi
if [ -n “$onboardKey” ]; then
bundleParameters=”${bundleParameters} -s $onboardKey”
fi
if [ -n “$topLevelDomain” ]; then
bundleParameters=”${bundleParameters} -d $topLevelDomain”
fi
if [ -n “$purgeAgent” ]; then
bundleParameters=”–purge”
fi
if [ -n “$proxyConf” ]; then
bundleParameters=”${bundleParameters} -p $proxyConf”
fi

# We need to use sudo for commands in the following block, if not running as root
SUDO=”
if [ “$EUID” != 0 ]; then
SUDO=’sudo’
fi

# Download, install, and onboard OMSAgent for Linux, depending on architecture of machine
if [ $(uname -m) = ‘x86_64’ ]; then
# x64 architecture
$SUDO sh ./${BUNDLE_X64} ${bundleParameters}
else
# x86 architecture
$SUDO sh ./${BUNDLE_X86} ${bundleParameters}
fi
you can download the OMSAgent from,
5. Ensure that all packages are removed.
[root@lab02 ~]# yum remove -y scx omi omsagent omsconfig auoms

Updating Subscription Management repositories.
No match for argument: scx
No match for argument: omi
No match for argument: omsagent
No match for argument: omsconfig
No match for argument: auoms
No packages marked for removal.
Dependencies resolved.
Nothing to do.
Complete!
[root@lab02 ~]#
Ensure that the following directories does not exist anymore
/etc/opt/microsoft/
/var/opt/microsoft/
/etc/opt/omi
/var/opt/omi
To be sure, you can use the commands below,
[root@lab02 ~]# [ -d /etc/opt/microsoft ] && mv /etc/opt/microsoft /etc/opt/microsoft.old
[root@lab02 ~]# [ -d /var/opt/microsoft ] && mv /var/opt/microsoft /var/opt/microsoft.old
[root@lab02 ~]# [ -d /etc/opt/omi ] && mv /etc/opt/omi /etc/opt/omi.old
[root@lab02 ~]# [ -d /var/opt/omi ] && mv /var/opt/omi /var/opt/omi.old
N:B: you can run the script below to save time.
[root@lab02 ~]# yum remove -y scx omi omsagent omsconfig auoms ; [ -d /etc/opt/microsoft ] && mv /etc/opt/microsoft /etc/opt/microsoft.old ; [ -d /var/opt/microsoft ] && mv /var/opt/microsoft /var/opt/microsoft.old ; [ -d /etc/opt/omi ] && mv /etc/opt/omi /etc/opt/omi.old ; [ -d /var/opt/omi ] && mv /var/opt/omi /var/opt/omi.old6. Ensure that the following users and groups are deleted.
omsagent
omi
nxautomation
omiusers
[root@lab02 ~]# id -u omsagent && userdel -r omsagent[root@lab02 ~]# id -u omi && userdel -r omi[root@lab02 ~]# id -u nxautomation && userdel -r nxautomation[root@lab02 ~]# id -g omiusers && groupdel omiusers[root@lab02 ~]# id -g omsagent && groupdel omsagent[root@lab02 ~]# id -g nxautomation && groupdel nxautomation[root@lab02 ~]# id -g omi && groupdel omiNB: you can run the script below to save time.
[root@lab02 ~]# id -u omi && userdel -r omi ; id -u nxautomation && userdel -r nxautomation ; id -g omiusers && groupdel omiusers ; id -g omsagent && groupdel omsagent ; id -g nxautomation && groupdel nxautomation ; id -g omi && groupdel omi7. verify if there are still any of these processes running.
omi
oms
nxautom
To verify and kill the processes at once, use the command,
[root@lab02 ~]# ps -ef | grep -i "omi\|oms\|nxautom" | grep -v grep | awk '{print $2}' | sed 's/^/kill -9 /g' >> /root/msoms/kill-oms-processes-script.sh
8. Remove the old OMS configuration.
save the old configuration of OMS work space first
[root@lab02 ~]# opt/microsoft/omsagent/bin/omsadmin.sh -l > /root/oms-script/old-oms-workspace.txtRemove the old OMS configuration.
[root@lab02 ~]# /opt/microsoft/omsagent/bin/omsadmin.sh -l[root@lab02 ~]# /opt/microsoft/omsagent/bin/omsadmin.sh -Xcreate a directory and backup the old the old configuration
[root@lab02 ~]# mkdir /var/lib/waagent/old-oms ; mv /var/lib/waagent/Microsoft.EnterpriseCloud.Monitoring* /var/lib/waagent/old-oms/
[root@lab02 ~]# yum update -y WALinuxAgent[root@lab02 ~]# systemctl restart waagent9. Repeat the purge process again.
[root@lab02 ~]# cd /root[root@lab02 ~]# sudo sh onboard_agent.sh - - purge
--2020-02-14 09:31:19-- https://github.com/microsoft/OMS-Agent-for-Linux/releases /download/OMSAgent_v1.12.15-0/omsagent-1.12.15-0.universal.x64.sh
Resolving github.com (github.com)... 140.82.118.3
Connecting to github.com -
omsagent-1.12.15-0.un 100%[=======================>] 134.15M 8.84MB/s in 29s10. Install using the command line.
go to the Azure portal > log analytics workspaces >choose the workspace > advanced settings > Linux servers > download and onboard agent for linux
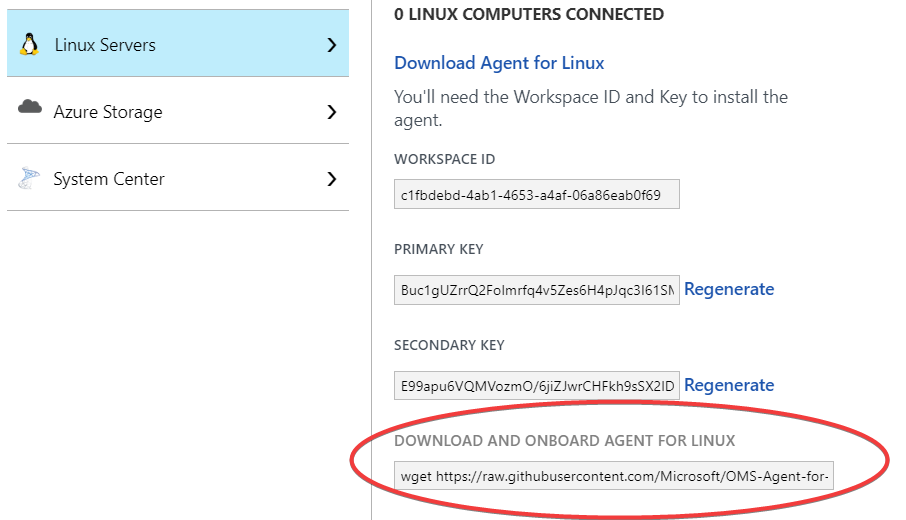
copy and paste the wget command in a notepad, then copy the highlighted command.

Before pasting it on the Linux terminal, you may create another directory for the new script.
[root@lab02 ~]# [ -d /root/latest-oms ] || mkdir /root/latest-oms[root@lab02 ~]# cd /root/latest-oms/[root@lab02 ~]# wget https://raw.githubusercontent.com/Microsoft/OMS-Agent-for-Linux/master/installer/scripts/onboard_agent.sh11. reconnect the machine from the portal
Just as it was disconnected in step 2, connect the VM again
go to log analytics workspaces >choose the workspace > virtual machines > click on the VM > click on connect.
Once it’s connected,
12. Enable and restart all related services.
[root@lab02 ~]# sudo /opt/microsoft/omsagent/bin/service_control enable ; sudo /opt/microsoft/omsagent/bin/service_control start ; sudo scxadmin -start allYour feedback is welcomed. If you love others, you will share with others
Thank you! You helped me a lot!
You are welcome Bruno
For some wierd reason i cant find the bin folder
bin]$ cd /opt/microsoft/omsagent/
xxx@xxxx omsagent]$ ll
total 12
drwxrwxr-t. 3 root omiusers 8192 Jul 15 18:59 plugin