
Last updated: August 2022
In this lesson, you will learn the step by step guide of how to install Kubernetes cluster
Understanding The Subject Matter
Like I mentioned in our previous lesson, for high availability, you should have at least two master nodes and two worker nodes. So, to install Kubernetes cluster, we can have an architecture like this or in the diagram as shown below.
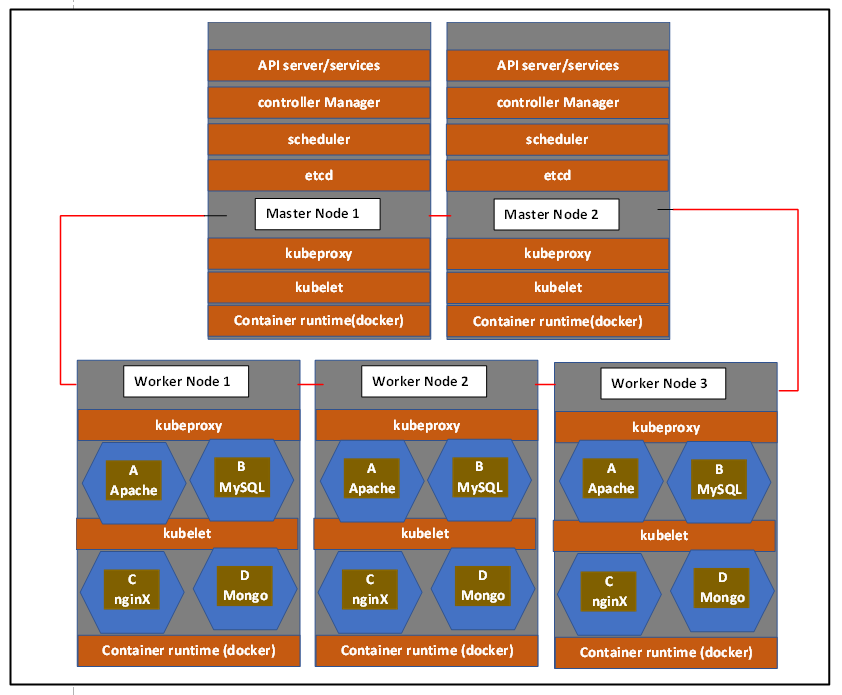
To build a Kubernetes cluster such as this, we need at least five VMs or five physical servers. We will also use the kubeadm tool to install Kubernetes cluster as shown in the diagram above. If you so wish, you can leverage the cloud infrastructure as a service platform or the Kubernetes managed services on the cloud.
However, because I don’t have all these resources in my lab (my lab is very full). There are lots of servers and lots of VMs running on my lab. So I don’t have the resources to create five virtual machines and I don’t even have five physical servers either. Hence, we are going to make use of minikube to install kubernetes cluster.
What is Minikube
Minikube enables you to run your Kubernetes cluster, including both the master and worker nodes, on a single node or server. A single-node Kubernetes cluster is another name for this. Minikube is very good for learning or testing environments.
If you have limited resources like I do, Minikube will be good for you. Whatever installation you have in minikube, whatever commands you run in a minikube cluster are also the same commands you are going to be running in a production-like installation environment. So, having or using a minikube to learn or test is equivalent to running those commands in a production-like environment.
At the end of this course, I am going to show you how to install a minikube cluster in a production-like environment where we are going to have at least two master nodes and at least three worker nodes. But for the time being, we’ll make do with the minikube.
Minikube can be installed on several platforms. Minikube can be installed on Windows, Mac, or Linux operating systems. However, there are a few things you should know about Minikube, one of which is that you must install Minikube on a platform that supports virtualization. Minikube Kubernetes clusters can only run on hypervisors, which means that if you intend to use Minikube on your system, you must first install either KVM or VirtualBox, or any hypervisor of your choice.
The bottom line is that minikube only works on a hypervisor. So in this class, we are going to be installing a minikube on Red Hat Enterprise Linux 9 (RHEL 9). I will also show you how to install Minikube on Ubuntu at the end of this course. But because I am very familiar with Red Hat and because I’m a Red Hat guy, I’m going to use Kubernetes on Red Hat Enterprise Linux. And by the way, this installation process can be done on both Red Hat 8 and Red Hat 7 systems as well.
What we are going to do first is to make sure that we have the KVM hypervisor installed on our Red Hat system. Following that, we install Minikube. The good thing about Minikube is that it comes with the Docker container runtime so that you do not need to install Docker on your system.
And like I mentioned in the previous lesson, to interact with Kubernetes you will have to go through the API server, and you need to use some tools to be able to interact with the API server, such as kubectl, the GUI and some other tools. So for this installation, we are going to be installing kubectl.
Kubectl will enable us to interact with the Kubernetes cluster. Let’s see the step-by-step guide to installing a minikube Kubernetes cluster on a Red Hat Enterprise Linux System.
ACTION TIME
Step By Step Guide Of How To Install Minikube Kubernetes Cluster On RHEL 9/8/7
1. verify that the system supports virtualization extension.
[root@snk ~]# lscpu | grep Virtualization

Virtualization:      VT-x
Virtualization type: full
OR
[root@snk ~]# cat /proc/cpuinfo | egrep "vmx|svm"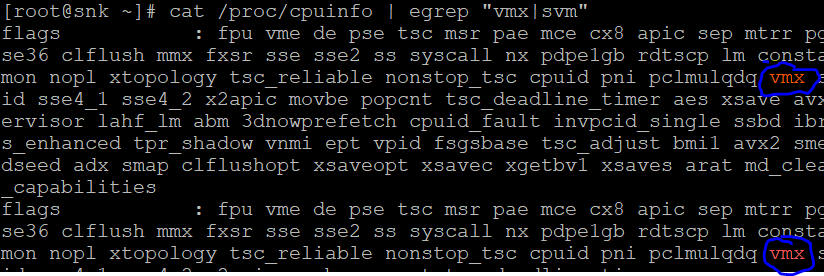
2. verify that the kernel modules are loaded
[root@snk ~]# lsmod | grep kvm

kvm_intel             290816  4
kvm                   753664  1 kvm_intel
irqbypass              16384  6 kvm
3. Verify that KVM is running
[root@snk ~]# systemctl status libvirtd

libvirtd.service - Virtualization daemon
   Loaded: loaded (/usr/lib/systemd/system/libvirtd.service; enabled; vendor preset:>
   Active: active (running)
NB: do not bother at this stage of KVM is running or not, By default, it should run if you installed the full version of the RHEL 8 system.
install other KVM virtualization packages/tools on your system.
[root@snk ~]# dnf install @virt -y

Updating Subscription Management repositories.
Last metadata expiration check: 1:36:45 ago on Mon 20 Jun 2022 06:24:15 PM WAT.
Dependencies resolved.
4. restart libvirtd
[root@snk ~]# systemctl restart libvirtdFor RHEL 9, you need to install and start libvirtd.
[root@snk ~]# dnf install qemu-kvm libvirt virt-install virt-viewer -y
Updating Subscription Management repositories.
Last metadata expiration check: 0:11:52 ago on Fri 15 Jul 2022 13:59:28.
Dependencies resolved.
================================================================================
.....................
*start libvirtd
[root@snk ~]# systemctl start libvirtd

[root@snk ~]# systemctl status libvirtd
● libvirtd.service - Virtualization daemon
     Loaded: loaded (/usr/lib/systemd/system/libvirtd.service; disabled; vendor>
     Active: active (running) since Fri 2022-07-15 14:13:00 WAT; 2s ago
TriggeredBy: ● libvirtd-ro.socket
..................................
*Because we don’t want the system to automatically choose podman to start minikube with, we need to install the kvm2 driver for docker.
5. download and install the kvm2 driver
[root@snk ~]# curl -LO https://storage.googleapis.com/minikube/releases/latest/docker-machine-driver-kvm2

  % Total    % Received % Xferd  Average Speed   Time    Time     Time  Current
                                 Dload  Upload   Total   Spent    Left  Speed
.........................
*verify that its downloaded
[root@snk ~]# ls -l docker-machine-driver-kvm2

-rw-r--r--. 1 root root 12187680 Jun 20 16:39 docker-machine-driver-kvm2
*make the file executable
[root@snk ~]# chmod +x docker-machine-driver-kvm2
[root@snk ~]# ls -l docker-machine-driver-kvm2

-rwxr-xr-x. 1 root root 12187680 Jun 20 16:39 docker-machine-driver-kvm2
*install the driver
N:B: we can easily put it in the /usr/local/bin directory to install since its a binary file and it can be moved in your $PATH
root@snk ~]# mv docker-machine-driver-kvm2 /usr/local/bin/
You can copy the binary file if you don’t wish to move it.
*verify the version of the driver
[root@snk ~]# docker-machine-driver-kvm2 version

version: v1.25.2
commit: 362d5fdc0a3dbee389b3d3f1034e8023e72bd3a7
6. Download and install kubectl
[root@snk ~]# curl -LO https://storage.googleapis.com/kubernetes-release/release/`curl -s https://storage.googleapis.com/kubernetes-release/release/stable.txt`/bin/linux/amd64/kubectl

  % Total    % Received % Xferd  Average Speed   Time    Time     Time  Current
                                 Dload  Upload   Total   Spent    Left  Speed
100   213  100   213    0     0      7      0  0:00:30  0:00:26  0:00:04    46
*make the file executable
[root@snk ~]# chmod +x kubectl
*install kubectl; we can easily put it in your $PATH since the kubectl is a binary file.
[root@snk ~]# mv kubectl /usr/local/bin/*verify kubectl version
[root@snk ~]# kubectl version -o yaml

clientVersion:
  buildDate: "2022-06-15T14:22:29Z"
  compiler: gc
  gitCommit: f66044f4361b9f1f96f0053dd46cb7dce5e990a8
  gitTreeState: clean
  gitVersion: v1.24.2
  goVersion: go1.18.3
  major: "1"
  minor: "24"
  platform: linux/amd64
kustomizeVersion: v4.5.4
7. Download and install minikube.
NOTE: minikube always come with the docker container runtime. So, if you wish, you can install docker on your system and if you don’t wish, there is no need to install container on your system.
[root@snk ~]# wget https://storage.googleapis.com/minikube/releases/latest/minikube-linux-amd64

--2022-06-20 17:17:19--  https://storage.googleapis.com/minikube/releases/latest/minikube-linux-amd64
Resolving storage.googleapis.com (storage.googleapis.com)... 216.58.223.240
..........
*make the downloaded binary file executable
[root@snk ~]# chmod +x minikube-linux-amd64
*install minikube; you can easily put it in your $PATH
[root@snk ~]# mv minikube-linux-amd64 /usr/local/bin/
*verify the minikube version
[root@snk ~]# minikube version

minikube version: v1.25.2
commit: 362d5fdc0a3dbee389b3d3f1034e8023e72bd3a7
NOTE: The KVM driver in this setup can’t be used as the root user, hence, we need another user to run minikube.
In this case I have the cont user. Hence, we need to add the cont user to the libvirt group as well.
To make it easier, I will also make the cont user a sudo user.
8. Add cont user to the libvirt and wheel group
[root@snk ~]# usermod -aG libvirt cont
[root@snk ~]# usermod -aG wheel cont
*verify
[root@snk ~]# id cont

uid=1000(cont) gid=1000(cont) groups=1000(cont),10(wheel),981(libvirt)
*if you wish, you can set KVM as the default driver
[root@snk ~]# minikube config set vm-driver kvm2

! These changes will take effect upon a minikube delete and then a minikube start
9. logout and login as the user, cont or ssh into the server as the user, cont on the same terminal.
NB: its best not to switch user in this case (su – victor)
[root@snk ~]# ssh cont@localhost

The authenticity of host 'localhost (::1)' can't be established.
ECDSA key fingerprint is SHA256:1b+fFpvcXKQU4MQUnvcqKbUKfgpKUj4CmG/1FeNOlks.
Are you sure you want to continue connecting (yes/no/[fingerprint])? yes
Warning: Permanently added 'localhost' (ECDSA) to the list of known hosts.
cont@localhost's password:

[cont@snk ~]$
10. Start minikube
starting minikube will automatically download the VM image and configures the single node kubernetes cluster
[cont@snk ~]$ minikube start
* minikube v1.26.0 on Redhat 9.0
* Automatically selected the kvm2 driver
* Downloading VM boot image ...
    > minikube-v1.26.0-amd64.iso....: 65 B / 65 B [----------] 100.00% ? p/s 0s
    > minikube-v1.26.0-amd64.iso: 268.86 MiB / 268.86 MiB  100.00% 700.70 KiB p
* Starting control plane node minikube in cluster minikube
* Downloading Kubernetes v1.24.1 preload ...
..............................................
NB: if you did not set the kvm2 as the default driver, you need to start minikube with the kvm2 driver.
[cont@snk ~]$ minikube start --driver=kvm211. Verify that minikube and the kubernetes cluster is running.
[cont@snk ~]$ minikube status

minikube
type: Control Plane
host: Running
kubelet: Running
apiserver: Running
kubeconfig: Configured
[cont@snk ~]$ kubectl cluster-info

Kubernetes control plane is running at https://192.168.39.238:8443
CoreDNS is running at https://192.168.39.238:8443/api/v1/namespaces/kube-system/services/kube-dns:dproxy

To further debug and diagnose cluster problems, use 'kubectl cluster-info dump'.
[cont@snk ~]$ kubectl version -o yaml
clientVersion:
buildDate: "2022-07-13T14:30:46Z"
compiler: gc
gitCommit: aef86a93758dc3cb2c658dd9657ab4ad4afc21cb
gitTreeState: clean
gitVersion: v1.24.3
goVersion: go1.18.3
major: "1"
minor: "24"
platform: linux/amd64
kustomizeVersion: v4.5.4
serverVersion:
buildDate: "2022-05-24T12:18:48Z"
compiler: gc
gitCommit: 3ddd0f45aa91e2f30c70734b175631bec5b5825a
gitTreeState: clean
gitVersion: v1.24.1
goVersion: go1.18.2
major: "1"
minor: "24"
platform: linux/amd64
[cont@snk ~]$ kubectl get nodes

NAME       STATUS   ROLES           AGE   VERSION
minikube   Ready    control-plane   32m   v1.24.1
Watch Video On How To Install Kubernetes Cluster Using Minikube On RHEL 9
Install Kubernetes cluster
Your feedback is welcomed. If you love others, you will share with others.
Hello,
I emailed you at info@tekneed.com from regarding training for RHCSA and would appreciate your feedback on that.
Thought I had replied you. I’ll do that.
Thank you for your patience.
I followed the instructions here to the T but cannot get any of these to work: minikube version,minikube status etc both command returned error “command not found” Command kubectl version -o yaml also gives error “The connection to the server localhost:8080 was refused – did you specify the right host or port?”
Try following the video & let me know if you have any error. https://www.youtube.com/watch?v=P0VSBKysh7g&list=PLPmshpW0EvYBxCNj5GBv-QhKaP93nJ3AT&index=2
I am running Redhat 8 on Virtualbox.
Red Hat 8 or 9 works with these steps. https://www.youtube.com/watch?v=P0VSBKysh7g&list=PLPmshpW0EvYBxCNj5GBv-QhKaP93nJ3AT&index=2