
Last updated: August 2024
Hello everyone, Victor here again! In today’s lesson, we will delve deeply into the topic of how to install a software on Linux systems. The process of how to install a software on Linux differs significantly from that on Windows, and understanding these differences is crucial for anyone transitioning to Linux. This comprehensive guide will cover everything from the early challenges of software installation on Linux to modern package management systems, providing you with a thorough understanding of how to effectively install software on various Linux distributions.
The Early Challenges of Linux Software Installation
When the Linux operating system first emerged, many users who migrated to it quickly returned to their previous operating systems. This was primarily due to the complexities involved in installing software. When users downloaded software from the internet and attempted to install it, they often encountered a series of dependency errors. A dependency is a piece of software required by another software to function properly. Users frequently found themselves in a frustrating loop of installing one dependency after another, sometimes dealing with dozens of dependencies just to install a single software package. This dependency hell drove many users back to more familiar operating systems.
Dependency Hell: An Example
Imagine you have downloaded a software package called example-software. You excitedly try to install it, only to receive an error message stating that example-software requires libexample1. You proceed to download and attempt to install libexample1, but now you encounter another error: libexample1 requires libexample2. This cycle can continue indefinitely, creating a frustrating experience for users trying to figure out how to install a software on Linux for the first time.
The Solution: Package Management Systems
To address these issues, Linux developers introduced package management systems. A package manager simplifies the installation, update, and removal of software by handling dependencies automatically. Each Linux distribution typically has its own package manager. For Red Hat-based systems, the progression has been from RPM to YUM, and now to DNF. On the other hand, Debian-based systems like Ubuntu have evolved from using apt-get to aptitude, and now apt. I previously explained the different package managers in the different Linux distributions. Here is a link to that documentation.
Package Managers in Detail
Red Hat and Its Derivatives
For Red Hat systems and their derivatives, the package manager has evolved as follows:
- RPM (Red Hat Package Manager): Initially, RPM was used, but it did not resolve dependencies, leading to the aforementioned frustrations.
- YUM (Yellowdog Updater, Modified): YUM was introduced to address the dependency issue by automating the process of installing required dependencies.
- DNF (Dandified YUM): The latest package manager for Red Hat systems, DNF, improves upon YUM with better performance and enhanced dependency resolution.
Installing Software with RPM
The RPM tool is used to install packages with the .rpm extension. However, RPM does not handle dependencies automatically.
rpm -i package-name.rpm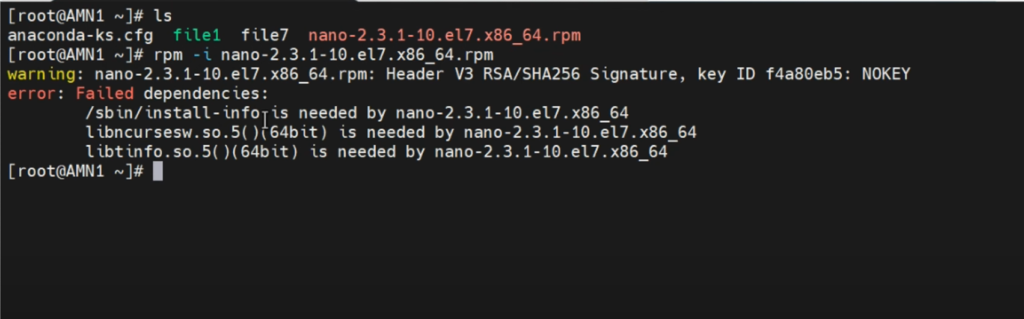
If dependencies are missing, you will see an error message listing the required dependencies. This necessitates manual resolution of each dependency, which can be cumbersome.
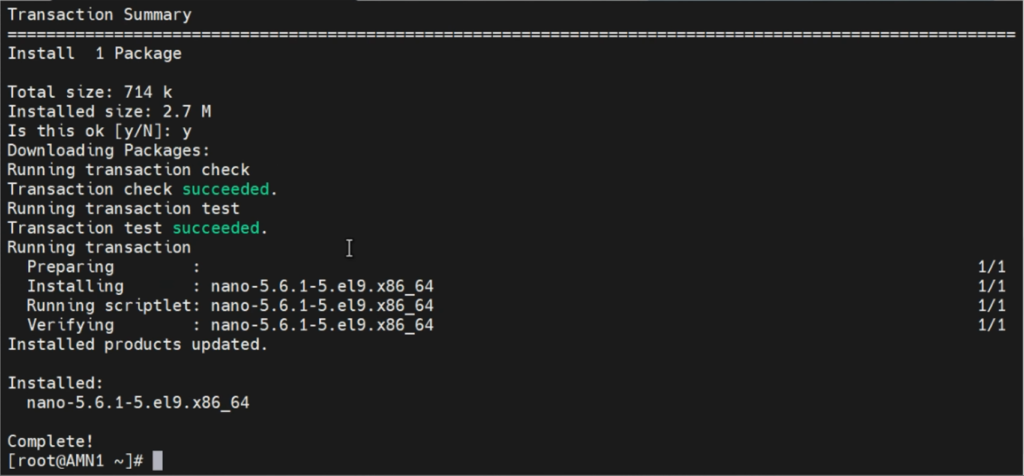
Installing Software with DNF
DNF, the modern package manager for Red Hat systems, resolves dependencies automatically.
dnf install package-nameFor example, to install the nano text editor:
dnf install nano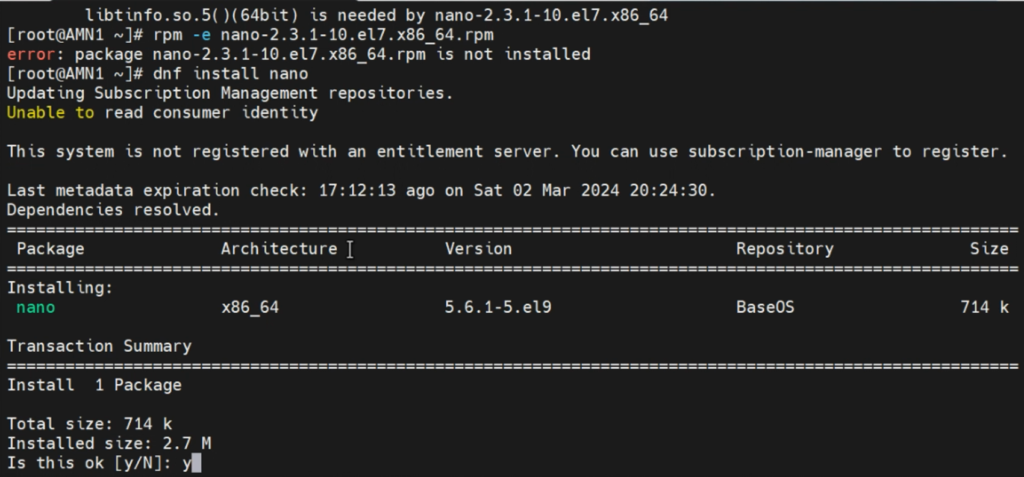
DNF automatically handles dependencies, making the installation process much smoother.
Ubuntu and Its Derivatives
For Debian systems and their derivatives like Ubuntu, the evolution of package managers has been:
- apt-get: The original command-line tool for handling packages.
- aptitude: An interface for apt-get with additional features.
- apt: The latest tool that combines the functionalities of apt-get and aptitude, offering a more streamlined experience.
Installing Software with dpkg
The dpkg tool is used to install .deb packages. However, like RPM, it does not resolve dependencies.
sudo dpkg -i package-name.deb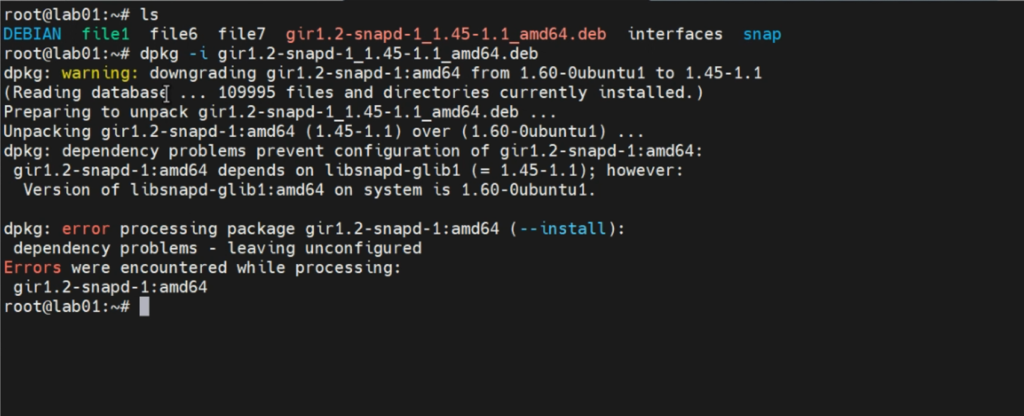
If there are dependency issues, dpkg will inform you of the missing dependencies, which need to be installed manually.
Installing Software with apt
The apt tool, similar to DNF on Red Hat systems, resolves dependencies automatically.
sudo apt install package-nameFor example, to install the snapd package:
sudo apt install snapd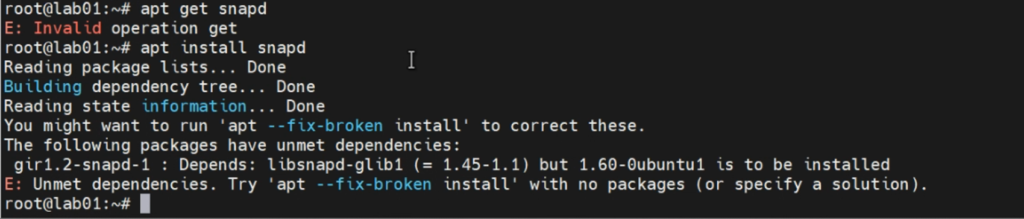
It seems like there is something that needs fixing here, so
sudo apt --fix-broken install
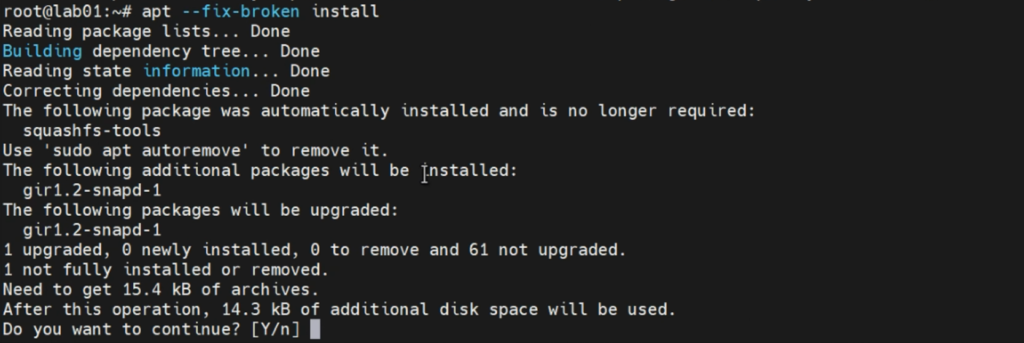
Apt fetches and installs all required dependencies, simplifying the process significantly.
Installing Software from Source Code
In the early days of Linux, software was often installed from the source code, typically packaged in tarballs (files with a .tgz extension). While this method is less common today, it remains an important skill for Linux administrators. Installing from source usually involves three steps: extracting the tarball, compiling the source code, and installing the software.
Steps to Install Software from Source Code
- Extract: Unpack the tarball using a command like
tar -xzvf filename.tgz. - Compile: Navigate to the extracted directory and run the
./configurescript followed by themakecommand to compile the source code. - Install: Use the
make installcommand to install the software. Or you can copy to the directory /usr/local/bin directory.
You should also know that installing or compiling programs from source code has its own drawbacks. One of those drawbacks is that you wouldn’t be able to update the program, unlike when a package manager is used to install a software. This might be an issue for you as an administrator, especially when the risk and compliance unit is on your neck to update the software so as to address the security concerns in your network or environment.
Example: Installing Software from Source Code
Let’s take a closer look at an example of installing software from source code. Suppose we want to install example-software packaged in a tarball named example-software-1.0.0.tgz.
Step 1: Extract the Tarball
First, we need to extract the tarball:
tar -xzvf example-software-1.0.0.tgzThis command extracts the contents of the tarball into a directory named example-software-1.0.0.
Step 2: Compile the Source Code
Next, navigate to the extracted directory and run the ./configure script to prepare the source code for compilation:
cd example-software-1.0.0
./configure
Once the configuration is complete, compile the source code using the make command:
makeThis command compiles the source code into an executable program.
Step 3: Install the Software
Finally, install the software using the make install command:
sudo make installThis command copies the compiled program and its associated files to the appropriate directories on your system.
Drawbacks of Installing from Source
While installing software from source provides greater control over the installation process, it has its drawbacks. One major issue is the lack of easy updates. Unlike package managers that can automatically update installed software, manually compiled software requires manual updates. This can be a significant disadvantage, especially for administrators who need to ensure that software is always up-to-date to address security vulnerabilities. This is why it is ultimately important to fully understand the nitty gritties on how to install a software on Linux systems.
Updating and Upgrading Software
One of the advantages of using package managers is the ability to keep software up to date. Keeping your software updated is crucial for maintaining security and functionality.
Updating Software on Red Hat Systems
To update all packages on a Red Hat system, use the following command:
dnf updateThis command updates the package list and upgrades all installed packages to the latest versions available in the repositories.
Updating Software on Ubuntu Systems
On Ubuntu systems, updating and upgrading is a two-step process:
- Update the package list:
sudo apt update- Upgrade installed packages:
sudo apt upgradeThis two-step process ensures that the system’s package list is refreshed before attempting to upgrade installed software.
Keeping Systems Up to Date: An Example
Let’s look at an example of keeping an Ubuntu system up to date. First, we update the package list:
sudo apt updateThis command downloads the latest repository information to ensure that we have the most current list of available software. Next, we upgrade all installed packages:
sudo apt upgradeThis command installs the latest versions of all packages currently installed on the system. The system may prompt you to confirm the installation of new packages and the removal of obsolete packages.
Best Practices for Managing Software on Linux
To ensure a smooth experience when installing and managing software on Linux, consider the following best practices:
- Use Package Managers Whenever Possible: Package managers handle dependencies automatically, making the installation process much simpler and reducing the risk of errors.
- Keep Your System Updated: Regularly updating your system ensures that you have the latest security patches and software features.
- Understand the Package Formats: Different Linux distributions use different package formats. Familiarize yourself with the package formats used by your distribution (.rpm for Red Hat-based systems and .deb for Debian-based systems).
- Use Repositories: Repositories are collections of software packages maintained by the distribution. Using official repositories ensures that you are installing trusted and tested software.
- Learn Basic Command-Line Skills: While graphical package managers are available, having basic command-line skills is essential for managing software on Linux effectively.
Conclusion
Learning how to install a software on Linux can seem daunting at first, especially for those accustomed to the simplicity of software installation on Windows. However, with the advent of package management systems, the process has become significantly more manageable. Understanding how to use tools like DNF, apt, and even how to compile software from source code, equips you with the skills needed to handle software installation on various Linux distributions.
Thank you for reading this comprehensive guide on “How to Install a Software on Linux”. Stay tuned for our next lesson on managing repositories in Linux systems. If you found this article helpful, please subscribe, like, share, and comment. Your support encourages us to create more educational content. See you in the next lesson!
By understanding the history, evolution, and current practices of software installation on Linux, you are better prepared to navigate the complexities of trying to learn how to install a software on Linux systems. Whether you’re a novice user or an experienced administrator, mastering these skills is essential for leveraging the full power of Linux. From handling dependencies to using modern package managers and compiling software from source, this guide has covered the essential aspects of software installation on Linux. Happy installing!
Leave a Reply