
Last updated: January 2022
It is a sure thing that one will have to do some form of testing or troubleshooting one way or the other when executing Ansible operations or tasks, in this lesson, we will learn a few methods of troubleshooting and debugging Ansible operations that result in error.
One of the very sure problems one will have to troubleshoot and correct is a typo error or error due to bad indentation.
The exam practice questions have really done justice to this topic. We kept on correcting the errors we encountered while solving various questions. These errors are bound to happen and your job as the operator is to troubleshoot and solve them.
Let’s look at some ways to troubleshoot and debug Ansible operations.
One of the ways to better troubleshoot Ansible operations is
1. Creating Ansible log file
Ansible log file can be created to store Ansible output that is displayed.
By default, Ansible does not create its log files or send its logs to any file but provides a way by which one can do that by using the keyword, “log_path” in the Ansible configuration file.
To see the Ansible log path, use the command,
[lisa@drdev1 ~]$  ansible-config dump |grep -i log

DEFAULT_LOG_FILTER(default) = []
DEFAULT_LOG_PATH(default) = None
DEFAULT_NO_LOG(default) = False
DEFAULT_NO_TARGET_SYSLOG(default) = False
DEFAULT_SYSLOG_FACILITY(default) = LOG_USER
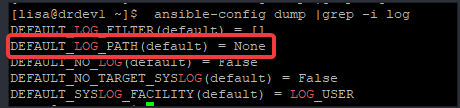
You can see that the log path is set to none.
To set a log path for Ansible logs, use the log_path=<log-path> keyword in the Ansible configuration file as seen below.
[lisa@drdev1 ~]$ mkdir logs[lisa@drdev1 ~]$ touch logs/ansible-logs[lisa@drdev1 ~]$ vim .ansible.cfg[defaults]
inventory=static-ini-inventory
remote_user=root
ask_pass=false
log_path=logs/ansible-logs
[privilege_escalation]
become=True
become_user=root
become_method=sudo
beocme_ask_pass=false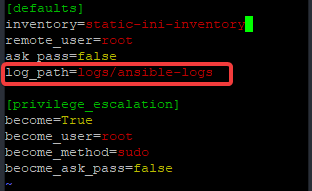
Whichever path one configures for Ansible logs, including /var/log, one should take into cognizance that the path will be filled up with logs at a point in time, hence, one may need to configure log rotation to take care of that, especially when there are multiple playbooks writing to the file.
Having configured the Ansible log path in the Ansible configuration file as seen above, let’s use the ansible-config dump command to verify, again, the set path.
[lisa@drdev1 ~]$  ansible-config dump |grep -i log

DEFAULT_LOG_FILTER(default) = []
DEFAULT_LOG_PATH(/home/lisa/.ansible.cfg) = /home/lisa/logs/ansible-logs
DEFAULT_NO_LOG(default) = False
DEFAULT_NO_TARGET_SYSLOG(default) = False
DEFAULT_SYSLOG_FACILITY(default) = LOG_USER
You can see that the log path has now been configured, let’s run a playbook and verify if Ansible will send its logs to the path configured.
[lisa@drdev1 ~]$ ansible-playbook playbook20.yml[lisa@drdev1 ~]$ cat logs/ansible-logs
2021-05-11 23:45:24,306 p=88128 u=lisa | PLAY [Time synchronization with rhel-system-roles.timesync] *******************************************
...........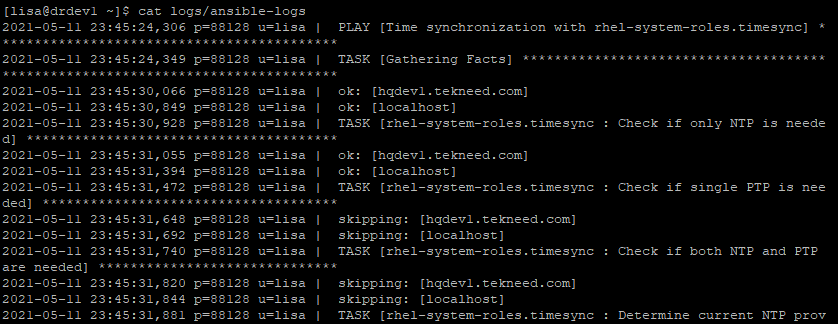
You can see that the messages displayed in standard out (stdout) are also written to the log file.
All the tasks in the playbook are successful in this case, if the playbook fails with an error, you will also see the errors logged to the file, and of course, tasks are executed in their order in the playbook, hence, you may need to use the grep, tail, more or less utility to find errors depending on how large the tasks are in a playbook.
2. Using the Ansible verbosity option.
The verbosity (-v) option is another good method of troubleshooting Ansible operations.
It can be used when running a playbook on the command line interface or in the playbook file itself either at a play level or task level.
The verbosity option in Ansible has four levels which means an extra v can be added up to four times and the more extra v added, the more information or debug output will be provided.
To use one level of verbosity, a playbook can be run in the format as shown below.
[lisa@drdev1 ~]$ ansible-playbook playbook3.yml -v

Using /home/lisa/.ansible.cfg as config file

PLAY [Use the file module to remove a file] ***********************************************************
........
To increase the verbosity, an extra, two or three level of verbosity can be added as shown below.
[lisa@drdev1 ~]$ ansible-playbook playbook3.yml -vvvv

ansible-playbook 2.8.18
  config file = /home/lisa/.ansible.cfg
  configured module search path = ['/home/lisa/.ansible/plugins/modules', '/usr/share/ansible/plugins/modules']
..............
The more the level of verbosity, the more debug output.
3. Using the debug module
The debug module can be used to show the values of your variables. The debug module gives an understanding of what is happening in a play. To know more about the debug module, use the command, “ansible-doc debug”.
An example of using the debug module is using the msg argument to display the message/value of a variable at run time, and at the same time, using the var argument to display the value of the displayed variable.
The verbosity directive (with the degree value) can also be used in a playbook, either at a task or play level. You can increase the verbosity of a task just as done in playbook23.yml below
Let’s see the example below.
[lisa@drdev1 ~]$ vim playbook23.yml- name: displaying system information
hosts: all
tasks:
- name: show kernel version
debug:
msg: "The system kernel version is {{ ansible_facts['kernel'] }}"
- name: Display the "output" variable
debug:
var: output
verbosity: 3[lisa@drdev1 ~]$ ansible-playbook playbook23.yml
PLAY [displaying system information] ******************************************************************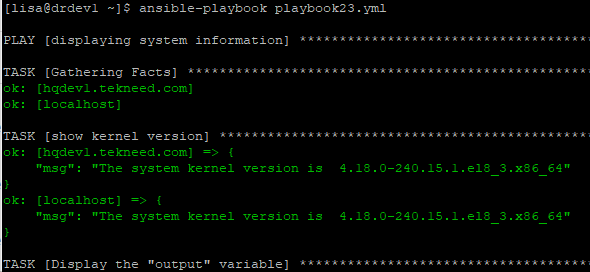
4. Using – -step option and starting a playbook at a specified task
The – -step option prompts you to enter the yes or no command option to allow Ansible to perform a particular task or not.
For example, playbook21.yml can be run with the – -step option as shown below.
[lisa@drdev1 ~]$ ansible-playbook playbook21.yml --step

PLAY [Install Apache web server] **********************************************************************
Perform task: TASK: Gathering Facts (N)o/(y)es/(c)ontinue:
5. Running a playbook form a particular task
More so, one can start to run a playbook from a particular task. To do this, the command below can be used
# ansible-playbook playbook21.yml --start-at-task=<task-name>For example, to start a task from the task name, install httpd, the command to run is as shown below.
[lisa@drdev1 ~]$ ansible-playbook playbook21.yml --start-at-task="install httpd"Troubleshooting can go a long way and involves a lot of thinking and verification sometimes. As mentioned in one of our previous lessons, one can view the different tasks that is in a play from the command line interface.
For example, to see the different tasks that make up a playbook with the name, playbook21.yml, use the command below
[lisa@drdev1 ~]$ ansible-playbook playbook21.yml --list-tasks

playbook: playbook21.yml

  play #1 (group1): Install Apache web server   TAGS: []
    tasks:
      tekneed.apache : Install apache httpd     TAGS: []
      tekneed.apache : start and enable apache  TAGS: []
      tekneed.apache : create a test webfile    TAGS: []
      tekneed.mysql : Install mysql database server     TAGS: []
6. Using – -check option
Using – -check option in Ansible can be used to do a smoke test. When this option is used, Ansible operations/tasks will run but changes will not take effect. A mere test will be done to see if the plays and tasks in a playbook will run.
One should take into cognizance that checks may fail when conditionals are used in a playbook.
To use the – -check option against playbook20.yml for example, use the command,
[lisa@drdev1 ~]$ ansible-playbook --check playbook20.yml

PLAY [Time synchronization with rhel-system-roles.timesync] *******************************************
.................
The – -check option can also be used in the playbook at a task level. One can decide to parse the – -check option or not. To use this option in a playbook, the playbook can be written as shown below.
- name: Use the file module to remove a file
  hosts: all
  tasks:
    - name: Remove a file from managed hosts
      file:
        path: /myfiles/file2
        state: absent
      check_mode: yes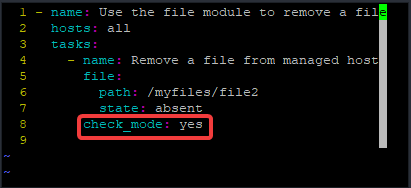
7. Using – -diff option
The – -diff option shows the changes that are made on the managed hosts when one runs a playbook.
To use the – -diff option on playbook21.yml for example, run the command below.
[lisa@drdev1 ~]$ ansible-playbook --diff playbook21.yml

PLAY [Install Apache web server] ***********************************************************
.........
The – -diff can also be used with the check option, in this case, the changes that will be made will be displayed but the changes won’t take effect.
To use the – -diff option with – -check option on playbook21.yml for example, use the command below.
[lisa@drdev1 ~]$ ansible-playbook --check --diff playbook21.yml

PLAY [Install Apache web server] ***********************************************************
................
More so, it is possible that a managed host has more than one IP address, the “ansible_hosts” variable can be specified in the inventory file to point to a specific IP address when a connection is made between the controller and managed host
8. Storing the python scripts on the managed hosts.
One can instruct the managed hosts to store the python scripts generated by the controller. These python scripts stored on the managed hosts can further be investigated provided one understands how to interpret python scripts.
To instruct the managed hosts to store the python scripts, you need to do that by creating a variable on the control node as shown below
[lisa@drsdev1 ansible]$ export ANSIBLE_KEEP_REMOTES_FILES=1When this variable is created, on the managed hosts in the (.ansible/tmp) directory, you will find the sub-directories created for every single task. In the sub-directories are the files named with the module names.
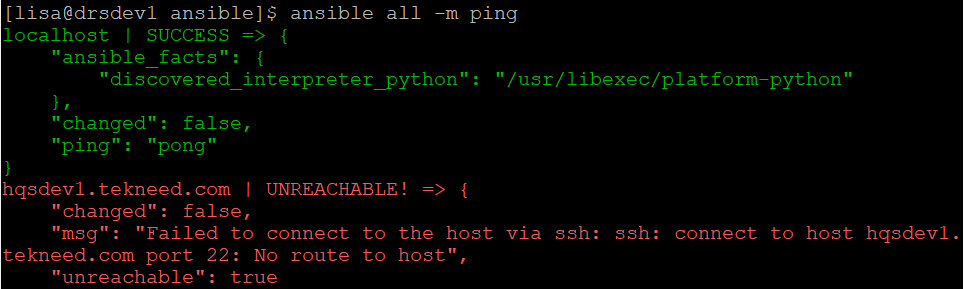
One can also verify if one can connect to the managed hosts using the ping module. This also helps in troubleshooting the connection between the Ansible control node and managed hosts.
To verify if you can connect to all the managed hosts in the inventory file, use the command,
[lisa@drsdev1 ansible]$ ansible all -m ping

localhost | SUCCESS => {
    "ansible_facts": {
        "discovered_interpreter_python": "/usr/libexec/platform-python"
    },
    "changed": false,
    "ping": "pong"
}
hqsdev1.tekneed.com | UNREACHABLE! => {
    "changed": false,
    "msg": "Failed to connect to the host via ssh: ssh: connect to host hqsdev1.tekneed.com port 22: No route to host",
    "unreachable": true
To verify if one can connect to a specific managed host in an inventory file, for example, hqsdev1.tekneed.com, use the command,
[lisa@drsdev1 ansible]$ ansible hqsdev1.tekneed.com -m ping

hqsdev1.tekneed.com | UNREACHABLE! => {
    "changed": false,
    "msg": "Failed to connect to the host via ssh: ssh: connect to host hqsdev1.tekneed.com port 22: No route to host",
    "unreachable": true
Watch Video On Various Ways To Troubleshoot and Debug Ansible
Click Here To Watch Video On Ansible for Begineers
Your feedback is welcomed. If you love others, you will share with others
Leave a Reply