
Last updated: January 2023
In this lesson, you will learn the basics of containers in Linux, how to start, stop & delete a container and how to manage containers.
Contents
UNDERSTANDING THE SUBJECT MATTER
What Is a Container / Linux Container?
Containers are set of one or more running instances isolated from the system. The container technology is quite similar to virtualization except that container is isolated.
Container uses namespaces(process, user, network, mount, etc) and control groups (cgroups) for isolation.
Compared to virtualization, containers are portable, reusable, and can be used for quick deployment.
From the diagram above, for virtualization, you can see that the applications are not isolated because they use the binaries and libraries of the guest OS, and modifications made on the guest OS libraries may likely affect the applications.
Unlike containerization, if modifications are made to the guest OS libraries, it will not most times affect the containerized application because they are isolated from the guest OS libraries.
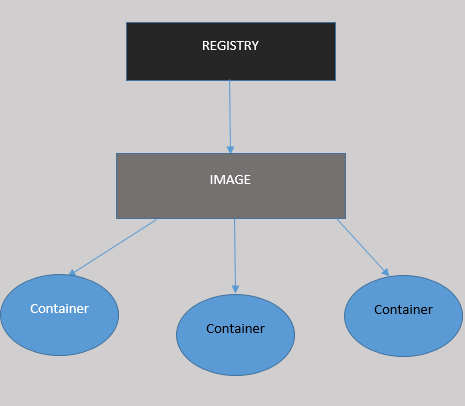
What Is a Container Image
Before you can create a container, you need an image, and images can be gotten from registries, just as you will need to get packages from repositories.
There are a lot of Image registries out there, the paid and the unpaid ones. Be sure to know and trust the registries before using them.
Red Hat distributes container images from two locations. One is (registry.redhat.io) and the other is (registry.access.redhat). The former requires authentication before you can use it while the latter does not require authentication.
If you are an existing customer of Red Hat with subscription(s), you can use your existing credentials to authenticate, otherwise, you will need to signup for the Red Hat Developer Program or 30-day trial subscriptions.
You can also get more information about these registries and their content here.
A container image is usually in this type of format [registry.redhat.io/rhel8/httpd-24:1-122]
where,
“registry.redhat.io” is the image registry
“rhel8” is the image username(s).
“httpd-24” is the image name and
“1-22” is the image tag.
If a tag is not specified, the latest tag of the image will be used by default.
So for example, if I build a container image and I decide to call the image name “webapp” and the image username “victor” because I built the image. If I also decide to put the image in a registry called “registry.tekneed.me”, the image can be referenced as [registry.tekneed.me/victor/webapp].
Then from my image, I and other users can begin to create a container.
What are The Tools Used To Create & Manage Containers In Linux
The utility used to create a container is podman. If you wish to build a container image, you can also do that with a utility called buildah while the skopeo utility can be used to inspect and do other container management activities.
The podman utility can be used to do a lot of container management processes. As we go on in this lesson, you will see how far we can use the podman utility
How Does A Basic Linux Container Work
Container leverage on the kernel and the key components of the operating system such as SELinux, namespace, cgroup, seccomp, etc. Hence, with just an operating system and some of its core component, one can run a container.
However, a container will run in an isolated environment or a different namespace from the operating system.
Namespaces make the isolation of resources/containers possible. It isolates the containers from each other and from the container hosts.
cgroups (control groups) on the other hand manages the system resources and regulates containers from using up the resources on the hosts.
While SELinux is used to protect container processes from each other and from the host machine.
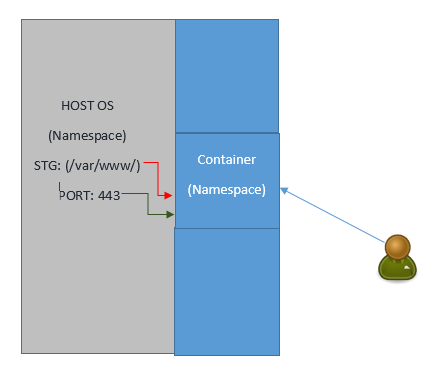
From the diagram above, you can see that the operating system is running on its namespace and with its libraries while the container image is running on a namespace and its libraries different from the operating system.
Hence, the running services or processes on the operating system will be different from that of the container.
One of the ways to verify this is by using the “ps -ef” command on the container and on the host which we will verify as we go on.
A container image, of course, may need a storage device, depending on how the image was built and the functions it will be used for. As regards storage, a storage device can be attached to the container from the container host. We will see how to do this in the “ACTION TIME” section below
More so, a port on the container host can also be forwarded to a container so that users will be able to connect to the services running on the container. We will also see how to do this in the “ACTION TIME” section below.
In summary, creating containers requires logging into the registry, downloading the container image, and running the container.
More so, before we can create a container, we need to install the module that contains the container utilities.
Let’ see how we can do all of these.
How To Install container tools module in Linux
To install container tools module, use the command,
[root@DRDEV1 ~]# yum module install container-tools -y

Updating Subscription Management repositories.
Last metadata expiration check: 0:00:30 ago on Mon 30 Nov 2020 05:15:34 PM GMT.
Dependencies resolved.
How To Login To an Image Registry In Linux
To login to an image registry in Linux, use the command,
[root@DRDEV1 ~]# podman login registry.redhat.io

Username: my_username
Password:
Login Succeeded!
How To Download a Container Image In Linux
To download a container image in Linux, use the command
# podman pull <registry-name>/<registry-username>/<image-name>:<tag>For example,
# podman pull registry.redhat.io/rhel8/httpd-24:1-122N:B: The latest tag will be used if you don’t specify a tag.
verify the downloaded image
# podman images <registry-username>/<image-name>:<tag># podman images registry.redhat.io/rhel8/httpd-24:1-122How To Run/Start a Container In Linux
*To run or start a container in Linux with an interactive shell, use the command,
podman run --name <container-name> -it <registry-username>/<image-name>:<tag> /bin/bashFor example,
podman run --name site1 registry.redhat.io/rhel8/httpd-24:1-122 /bin/bashNB 1: the option (it) means you are calling for an interactive shell.
NB 2: /bin/bash will start the container with an interactive bash shell
NB 3: If you don’t specify a name when running or starting a container, a random name will be given to the container.
NB 4: you can also run or start a container this way without downloading the images first. However, the image will be downloaded before it can be started thereby taking time before the container is started.
NB 4: if you exit out of the interactive bash shell, the container will stop because you started the container with an interactive shell. You can prevent this by starting the container in the background.
*To start or run a container without an interactive shell in Linux, use the command,
podman run -d --name site1 registry.redhat.io/rhel8/httpd-24:1-122NB: The (-d) option means detach the image, that is, the container should run in the background.
To use the interactive shell if the container is running in the background, use the command,
podman exec -it <container-name-OR-id> bashFor example,
podman exec -it site1 bashNB: If you exit of the container, the container will not stop because you didn’t start the container with an interactive shell.
How To View Container Logs In Linux
To view logs, use the command,
podman logs <container-name-OR-ID>How To Start, Stop and Restart a Container In Linux
*To start a container, use the command,
# podman start <container-name-OR-ID>*To stop a container, use the command,
# podman stop <container-name-OR-ID>*To restart a container, use the command,
# podman restart <container-name-OR-ID>How To Search For a Container Image In Linux
To search for the httpd images in the “registry.redhat.io” registry for example, use the command,
[student@DRDEV1 ~]$ podman search registry.redhat.io/httpd

INDEX       NAME                                                                  DESCRIPTION                                       STARS   OFFICIAL   AUTOMATED
redhat.io   registry.redhat.io/rhscl/httpd-24-rhel7                               Apache HTTP 2.4 Server                            0
redhat.io   registry.redhat.io/cloudforms46-beta/cfme-openshift-httpd             CloudForms is a management and automation pl...   0
redhat.io   registry.redhat.io/cloudforms46/cfme-openshift-httpd                  Web Server image for a multi-pod Red Hat® C...    0
..............
How To Search For Image tags In Linux
To search for image tags in Linux, use the command,
[student@DRDEV1 ~]$ skopeo inspect docker://registry.redhat.io/rhel8/httpd-24 |more

{
    "Name": "registry.redhat.io/rhel8/httpd-24",
    "Digest": "sha256:43b6a13d3e6674ec684ba2cdf433633cabe4963a24e00b59f32532b31bbf1ce5",
    "RepoTags": [
        "1-112",
        "1-118",
        "1-118-source",
        "1-70",
............
How To View Locally Stored Images In Linux
[student@DRDEV1 ~]$ podman images

REPOSITORY                         TAG               IMAGE ID      CREATED       SIZE
registry.redhat.io/rhel8/httpd-24  1-112.1599745027  737cae068fa5  2 months ago  432 MB
registry.redhat.io/rhel8/httpd-24  1-112             e00cffb90b64  3 months ago  430 MB
registry.redhat.io/rhel8/httpd-24  1-105             7e93f25a9468  4 months ago  430 MB
registry.redhat.io/rhel8/httpd-24  1-89              e57f2e65a71b  8 months ago  401 MB
*To remove or delete a locally stored image, use the command,
podman rmi registry.redhat.io/rhel8/httpd-24How To Verify a Running Container & Delete a Container In Linux
* To verify a running container, use the command,
# podman ps*To verify an archived container, use the command,
# podman ps -a*To delete a running container, use the command,
# podman rm container-id-OR-nameHow To Attach Storage To a Container In Linux With podman
By nature, containers are ephemeral, and when they crash or are restarted, all the data in them vanishes as well. Hence, the need to attach an external storage outside of a container so that data can be persistent. By doing this, even if your container crashes, the data still remains, and when the container is recreated, the storage or volume can be attached to the container again.
One can also use the storage host of where the container resides for a very small environment by creating a path/directory for the container storage.
For example, if you want to use a directory on the container host or any external storage that will be mapped to a container host, one can take the following steps.
1. Create a directory.
sudo mkdir /var/pv2. The user that is running the processes in the container must be able to write files to the directory/volume. We can do this by defining the numeric user ID from the container. For example, if the numeric user ID of the container application is 45, we can change the ownership of the directory by using the command below.
sudo chown -R 45:45 /var/pv3. We need to apply the “container_file_t” type context to the volume (directory and all sub-directories). We can do this by using the command below
semanage fcontext -a -t container_file_t '/var/pv(/.*)?'4. use the restorecon command by writing the appropriate context in the filesystem
restorecon -Rv /var/pv5. Mount the volume to the container by using the -v flag as shown below.
podman run -v /var/pv:/var/lib/mysql mysql*where (/var/lib/mysql) is where the volume will be attached to on the container, and
*(mysql) is the container name
NOTE: if the volume, /var/lib/mysql already exists inside the container, the volume, /var/pv mount overlays but will not delete the contents in the container. The original content will be accessible again if the mount is removed.
**Another direct method***
To attach storage to a container, use the volume option (-v) and use the Z option to set the directory type context to the right SELinux type context (container-file-t).
For example, to attach the path, (/tekneed/mnt/web_file) on the host to a container as /var/www/html, use the option,
-v /tekneed:/var/www/html:ZWe will see how to use this in the “ACTION TIME” section below.
How To Forward a Port To a Container In Linux With podman
By default, internal IPs are given to every container when it is created, and containers can only talk to each other when they are on the same hosts. Containers in a host are isolated from containers in other hosts, even if the hosts are on the same network.
For example, if you have container 1 and container 2 on host A, and you also have container 3 and container 4 on host B, container 1 and container 2 can only talk to each other by default, while container 2 and container 3 can only talk to each other by default.
Container 1 and container 2 on host A cannot communicate with container 3 and container 4 on host B.
To allow containers to communicate outside of their hosts, we must use port forwarding, which means that any request that comes into the host at the port you specified for the host will be forwarded to the container application port. If you do not specify a port for the host, a random port will be assigned to the host for the container.
The -p flag is used to specify port forwarding.
For examples,
*To forward port 8081 on the container host with the IP of 192.168.0.33 to a container application on port 80, use the command below.
sudo podman run -d --name httpd -p 192.168.0.33:8081:80 registry.redhat.io/rhel8/httpd-24:latest*If you do not want to specify a port on the host and want podman to use a random port, use the command below.
sudo podman run -d --name httpd -p 192.168.0.33::80 registry.redhat.io/rhel8/httpd-24:latest*To see the random port podman assigns to the host, use the command,
[victor@DRDEV1 ~]$ sudo podman port httpd

80/tcp -> 127.0.0.1:34237

[victor@DRDEV1 ~]$ curl 127.0.0.1:34237

<html><body><h1>It works!</h1></body></html>
Where
*httpd is the container name
In summary, and in conclusion,
For example, to forward port 8080 on the container host to port 8821 on the container, use the option,
-p 8080:8821We will see how to use this in the “ACTION TIME” section below.
How To add Environment Variable To a Container In Linux
To add an environment variable to a container, use the -e option. For example, to add the environment variable, WEB_NAME and the value apache, use the option,
-e WEB_NAME=apacheHow To Make a Container Persistent In Linux
To make a container persistent, configure the container as a systemd service by taking the following steps.
*create a systemd directory where a user’s unit files will be defined and generate the file
# mkdir -p ~/.config/systemd/user# cd ~/.config/systemd/user# podman generate --name <container-name> --files --newwith the (–files) option, the files will be generated inside the current directory
with the (–new) option, the container will be created whenever the service starts and be deleted whenever the service stops.
* enable the linger feature to make the systemd service persistent
# loginctl enable-linger*start and enable the container as a service
# systemctl --user daemon-reloadsystemctl --user enable --now container-<container-name>ACTION TIME
Having understood what a container is, let’s see the step by step guide of how to create a container in Linux.
Step By Step Guide Of How To Create a Basic Container In Linux
create an apache webserver container with the latest tag from registry.redhat.io/rhel8/httpd-24 named tekhour and should be accessible on port 8080.
The service running on the container should be persistent. On the host, create a file (/tekneed/html/index.html) and attach it to the container as /var/www
1. Install the module that contains the container utilities
[victor@DRDEV1 ~]# sudo yum module install container-tools

Updating Subscription Management repositories.
Red Hat Enterprise Linux 8 for x86_64 - AppStream (RPMs)                                                       2.6 kB/s | 4.5 kB     00:01
Red Hat CodeReady Linux Builder for RHEL 8 x86_64 (RPMs)                                                       7.5 kB/s | 4.5 kB     00:00
Red Hat Enterprise Linux 8 for x86_64 - BaseOS (RPMs)                                                          6.6 kB/s | 4.1 kB     00:00
............
2. login to the registry
[victor@DRDEV1 ~]# podman login registry.redhat.io

Username: tekneed
Password:
Login Succeeded!
3. inspect the httpd-24 image
[victor@DRDEV1 ~]# skopeo inspect docker://registry.redhat.io/rhel8/httpd-24 |more
{
    "Name": "registry.redhat.io/rhel8/httpd-24",
    "Digest": "sha256:43b6a13d3e6674ec684ba2cdf433633cabe4963a24e00b59f32532b31bbf1ce5",
..........
4. download the image
[victor@DRDEV1 ~]# podman pull registry.redhat.io/rhel8/httpd-24:latest

Trying to pull registry.redhat.io/rhel8/httpd-24:latest...
Getting image source signatures
Copying blob c375cdde5b27 skipped: already exists
Copying blob 1b8dabac56ed skipped: already exists
Copying blob 6500ac87b29f skipped: already exists
Copying blob 0c7bc3c1e1a3 [--------------------------------------] 0.0b / 0.0b
Copying config 9efdfdd093 done
Writing manifest to image destination
Storing signatures
9efdfdd093de32e1a6035e885342fd03e09bf3aec68057996f191181755dd04c
4. create the file, /tekneed/html/index.html
[victor@DRDEV1 ~]# mkdir -p ~/tekneed/html[victor@DRDEV1 ~]# echo "This is a test" > ~/tekneed/html/index.html5. Make sure others have read permission on the file.
[victor@DRDEV1 ~]$ ls -ld ~/tekneed/

drwxrwxr-x. 3 victor victor 18 Dec  9 18:03 /home/victor/tekneed/
[victor@DRDEV1 ~]$ ls -l ~/tekneed/html/index.html

-rw-rw-r--. 1 victor victor 15 Dec  9 18:04 /home/victor/tekneed/html/index.html
6. create the container
[victor@DRDEV1 ~]$  podman run -d --name tekhour -p 8080:8080 -v ~/tekneed:/var/www:Z registry.redhat.io/rhel8/httpd-24:latest

f4e4606f78b0751fb23d8af186a578fa6bc515129a5db58912bbacd4c5c573c7
7. verify that the container has been created.
[victor@DRDEV1 ~]$ podman ps

CONTAINER ID  IMAGE                                     COMMAND               CREATED        STATUS            PORTS                   NAMES
f4e4606f78b0  registry.redhat.io/rhel8/httpd-24:latest  /usr/bin/run-http...  7 seconds ago  Up 7 seconds ago  0.0.0.0:8080->8080/tcp  tekhour
8. verify that you can access the storage attached to the container over port 8080
[victor@DRDEV1 ~]# curl http://localhost:8080

This is a test
If you reboot your system, the container will not start across reboot. We need to follow the steps below to make it persistent.
9. create the systemd directory where the user’s unit files will be defined.
[victor@DRDEV1 ~]$ mkdir -p ~/.config/systemd/user10. Generate the user’s unit file in the created directory
[victor@DRDEV1 ~]$ cd ~/.config/systemd/user[victor@DRDEV1 user]$ podman generate systemd --name tekhour --files --new
/home/victor/.config/systemd/user/container-tekhour.service[victor@DRDEV1 user]$ ls
container-tekhour.service
11. enable linger and verify it’s been enabled.
[victor@DRDEV1 user]$ loginctl enable-linger[victor@DRDEV1 user]$ loginctl show-user victor
UID=1005
GID=1005
Name=victor
Timestamp=Mon 2020-12-07 09:19:31 GMT
........12. stop and remove the container.
[victor@DRDEV1 user]$ podman stop tekhour

f4e4606f78b0751fb23d8af186a578fa6bc515129a5db58912bbacd4c5c573c7
[victor@DRDEV1 user]$ podman rm tekhour

f4e4606f78b0751fb23d8af186a578fa6bc515129a5db58912bbacd4c5c573c7
13. start and enable the container as a service.
[victor@DRDEV1 ~]$ systemctl --user daemon-reload[victor@DRDEV1 ~]$ systemctl --user enable --now container-site1
Created symlink /home/victor/.config/systemd/user/multi-user.target.wants/container-site1.service → 14. verify if the container is up and can access the storage.
[victor@DRDEV1 ~]$ podman ps[victor@DRDEV1 ~]$ curl http://localhost:8080
This is a testTutorial Video On Managing Basic Containers In Linux
RHCSA 8 Exam Practice Question On Understanding & Managing Basic Containers In Linux
Your feedback is welcomed. If you love others, you will share with others
Hi Victor,
Can you answer this question for me please?
1. Create a container logserver from an image rsyslog in note 1 from registry.lab.example.com
configure the container with systemd services by an exiting user wallah service name should be container-logserver and configure it automatic configure
2) Configure your host journal to store all journal across reboot
copy all jornal form /var/log/journal and all subdirectories to /home/wallah/container-logserver
configure automount /var/log/journal from logserver container to /home/wallah/container_server when container start
Hi Ramu,
The question is pretty straight forward. what you need to do is to
create a container with the name, “logserver” form ryslog image from
“registry.lab.example.com” registry.
After which you need to configure the container to be persistent.
It’s similar to what I did in the RHCSA 8 exam practice question 9
(https://www.youtube.com/watch?v=bJlmFOadb3c&list=PLPmshpW0EvYD7kVZVCL6pa01FTkx6NMPV&index=10)
The other question is about logging. Journal entries are not persistent
by default. Configure journal to be persistent
(https://tekneed.com/how-to-make-journal-logs-persistent-in-linux/) and
then attach the directory, “/home/wallah/container” as a storage to your
container.
You can learn about how basic containers work:
(https://www.youtube.com/watch?v=pSUmrgqbins&list=PLPmshpW0EvYBFSx0RRRov9C5juxs2_k_Y&index=102)
Cheers!
Though question, I met it encounter it on my RHCSA exam recently….
Hers is the full answer : https://tekneed.com/rhcsa-8-exam-practice-question-20-configure-containers/
Thank You man!
sir please give full solution of these question i refer all the videos but didnt understand
okay, i will create time and do that
Here is the solution:https://tekneed.com/rhcsa-8-exam-practice-question-20-configure-containers/
I can’t access the content of the exam
hi, when i use this command
$ systemctl –user daemon-reload
i have and error message which is [Failed to connect to bus: no such file or directory]
can you help me?
The /lib/system/systemd –user process for the specific user you are logged in as does not exist. Make sure linger is enabled for that specifc user and make sure you did not use the “su” command to switch user to that specific user. Do a fresh login to that user via SSH or console. Don’t use “su”. Read the comment section below in this link:(https://www.youtube.com/watch?v=1ZLThVl1aTw&list=PLPmshpW0EvYBFSx0RRRov9C5juxs2_k_Y&index=104) Your problem is similar to this.
You are a genius, dude! Thanks
export XDG_RUNTIME_DIR=/run/user/$( id – u) or userid to get rid of those error.
Hello Victor, do you have a school?
Hello Hannah,
We don’t have a physical school but we do online trainings. To make more enquires, please send an email to info@tekneed.com
it’s saying page password protected
The protected ones are premium. https://tekneed.com/premium-rhcsa-8-exam-practice-questions-answers/
Hello Tekneed,
Can you please allow me to have a look on configuration Rsyslog log-server Container?
Please Pleasee.
Hi Viktor, with regards to question 20: When you run “logger “hello”” in the container do you actually see any logging in the mounted directory in /home/wallah?
I followed the exercise but I see no logging happening.
hi victor,
i am able to make persistent storage.but not able to figure out how and where all the log messages are stored. How and where we able to see logger’s messages on those storage. can you show a example. exam rhel8 is asking to log a message to store on both container and persistent storage .
How can I get the password so that I can view the contents.