")
Last updated: September 2024
Introduction to Linux Storage Management
Hi everyone, Victor here again! In today’s lesson, we’re diving into the crucial topic of storage configuration and management in Linux. Understanding how to manage storage in Linux is essential for any Linux system administrator, whether you’re preparing for an RHCSA exam or simply looking to enhance your Linux skills. If you need RHCSA exam practice questions, kindly click this link.
In Linux, there are primarily two methods for partitioning a disk: the standard partitioning method and the Logical Volume Manager (LVM) method. We will explore both methods in detail, illustrating the steps with practical examples using Red Hat and Ubuntu systems.
Overview of Disk Partitioning
Before we jump into the action of how to manage storage in Linux, let’s briefly review what partitioning is. Disk partitioning involves dividing a disk into separate sections, allowing you to manage file systems, mount points, and storage space more effectively. Each partition can serve different purposes, such as system files, user data, or swap space.
Key Concepts:
- Mount Points: Directories where partitions are attached to the filesystem.
- fstab File: Configuration file that contains information about disk partitions and their mount points.
If you’re new to Linux or need a refresher on these concepts, I highly recommend checking out Series One of the Linux System Administration course.
Introduction to Storage Management in Linux
Linux offers various methods for managing storage, primarily through partitioning disks. The two most common partitioning techniques are standard partitioning and Logical Volume Management (LVM). Each method has its advantages and use cases, which we will explore in detail.
Why is Storage Configuration Important?
Storage configuration is not just about creating partitions; it’s about optimizing your system’s performance, ensuring data integrity, and making the system easy to manage. Properly configured storage can lead to improved speed and efficiency, allowing you to handle applications and data more effectively.
Understanding Disk Partitioning Methods
1. Standard Partitioning
Standard partitioning is the traditional method of dividing a disk into separate sections, each acting as an independent volume. This method is straightforward but has limitations, such as the inability to resize partitions easily once they are created.
2. Logical Volume Management (LVM)
LVM, or Logical Volume Manager, provides a more flexible approach to disk management. It allows you to create, resize, and delete partitions (known as logical volumes) without the constraints of standard partitioning. This flexibility is particularly beneficial for systems that require dynamic storage management.
Key Components of LVM
- Physical Volumes (PV): These are the actual physical disks or partitions that LVM manages.
- Volume Groups (VG): A collection of PVs that form a pool of storage.
- Logical Volumes (LV): These are the partitions created from the available space in the VG.
Getting Started: Tools You Need
Before we dive into practical examples, let’s familiarize ourselves with some essential Linux commands and tools we need to be familiar with, if we want to properly understand how to manage storage in Linux:
- lsblk: Lists all block devices and their partitions.
- fdisk: A command-line utility to manage disk partitions.
- vgcreate, lvcreate: Commands to create volume groups and logical volumes in LVM.
- mkfs: Used to create a filesystem on a partition.
- mount: This command mounts filesystems to specified directories.
Step-by-Step Guide: Standard Partitioning Method
Let’s walk through the process of partitioning a disk using the standard method. For this example, we’ll work with the disk /dev/sdb.
Step 1: Identify Available Disks
First, let’s check which disks are available on your system:
lsblkThis command will display the disks and their respective partitions.
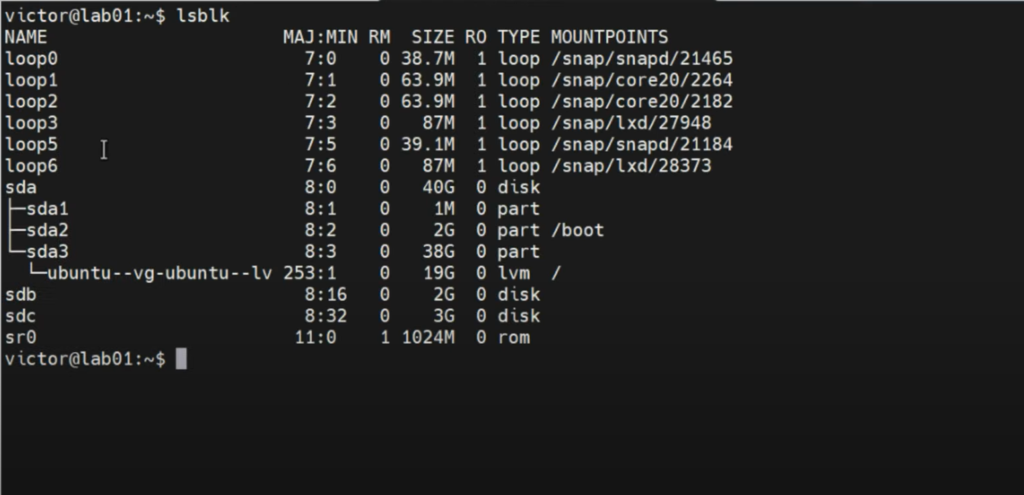
sda1 – 1MB
sda2 – 2GB
sda3 – 38GB
Open the FDisk Utility: To start, log in as a root user or use sudo and open the fdisk utility. Look for /dev/sdb as the target disk.
Step 2: Partition the Disk
To start partitioning, enter fdisk using sudo:
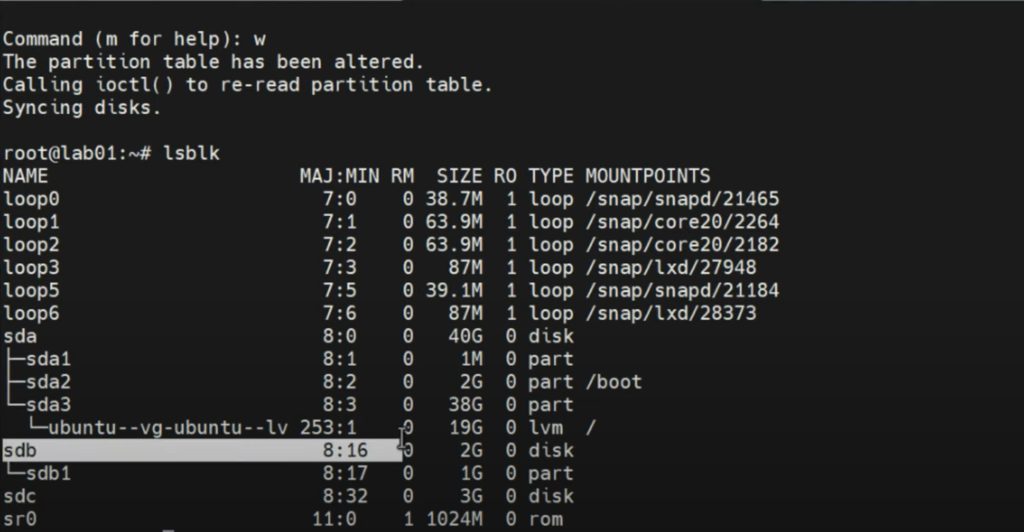
Within fdisk, you can view the help menu by typing m. To create a new partition, press n, and then choose whether you want to create a primary (p) or extended (e) partition. For this example, let’s create a primary partition
sudo fdisk /dev/sdb- Command (m for help): m
- Create a New Partition: Press
nto create a new partition. - Choose Partition Type: Select
pfor primary. - Select Partition Number: Choose a number (1-4).
- Specify Size: Enter the size (e.g.,
+1Gfor 1 GB). - Print Partition Table: Press p to inspect partition
- Write Changes: Press
wto save changes and exit. - Enter
lsblkto display and check configured partition
Step 3: Create a Filesystem
Once the partition is created, format it with a filesystem, such as ext4:
sudo mkfs.ext4 /dev/sdb1Step 4: Create a Mount Point
Now, create a directory where you’ll mount the new partition:
sudo mkdir /mnt/tekneed2Step 5: Mount the Partition
Finally, mount the partition:
sudo mount /dev/sdb1 /mnt/tekneed2Step 6: Make the Mount Persistent
To ensure the partition mounts automatically on reboot, add it to /etc/fstab:
sudo vi /etc/fstabAdd the following line:
/dev/sdb1 /mnt/tekneed ext4 defaults 0 0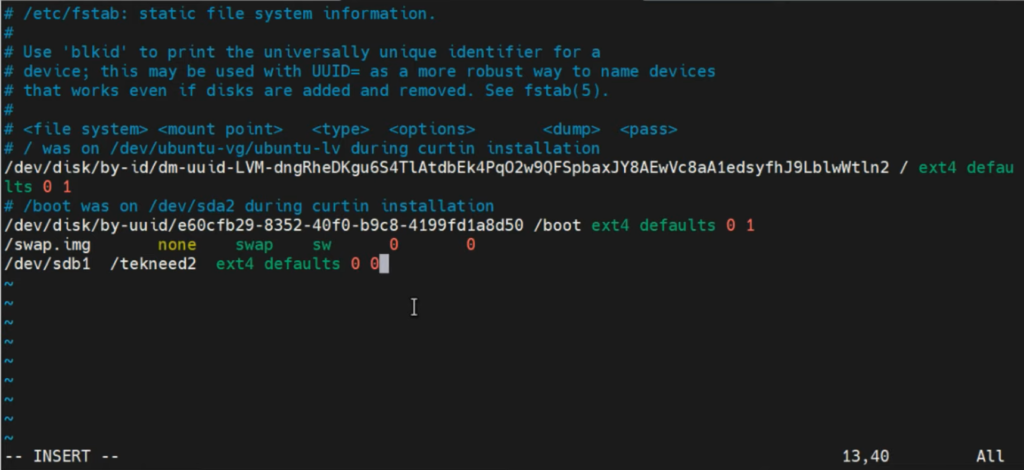
Step 7: Verifying the Setup
You can verify the mount using:
df -hThis will show the newly mounted filesystem.
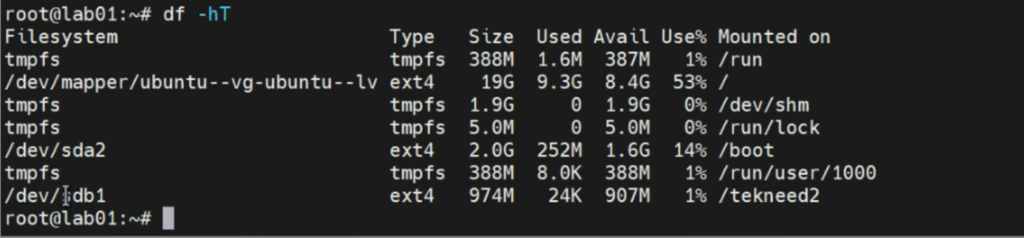
Save and exit. You can test it with sudo mount -a
If there is no error message, then that means it has been properly mounted.
Managing Partitions
As a system administrator who is an expert on how to manage storage in Linux, you may need to delete or resize partitions. Use the fdisk utility again, but ensure the partition is unmounted first:
sudo umount /mnt/tekneed2
sudo fdisk /dev/sdb
Select the partition you wish to delete with the d command and follow the prompts to confirm.
Step-by-Step Guide: Logical Volume Management (LVM)
Now let’s explore the LVM method for managing storage, which offers more flexibility.
Step 1: Install LVM (if not already installed)
For many distributions, LVM comes pre-installed. If not, you can install it using:
sudo apt install lvm2   (For Debian-based systems)
sudo yum install lvm2   (For Red Hat-based systems)
Step 2: Create Physical Volumes
Identify the disk you want to use (e.g., /dev/sdc). Then create a physical volume:
sudo pvcreate /dev/sdcStep 3: Create a Volume Group
For newer versions of Linux, creating a volume group automatically creates a physical volume. So it is still very safe if you skip step 2 above.
Next, create a volume group:
sudo vgcreate tekneed_vg /dev/sdc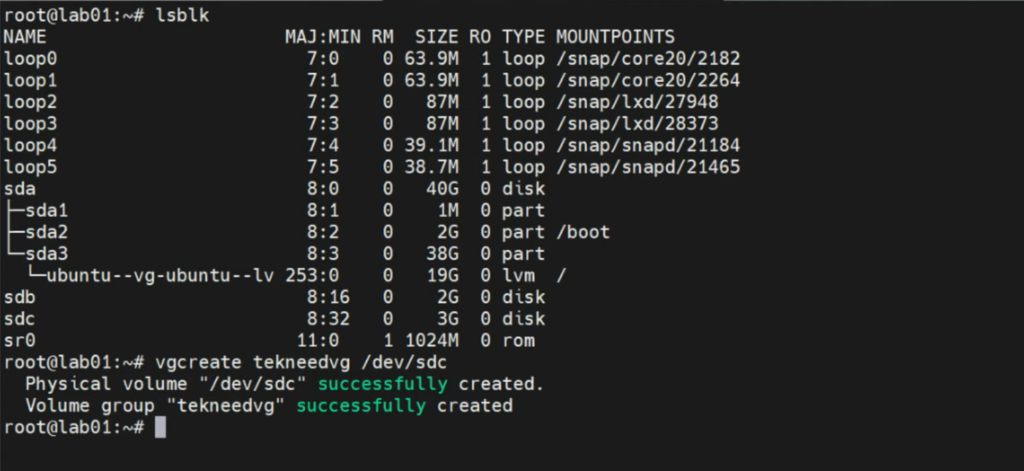
Step 4: Create a Logical Volume
Now, let’s create a logical volume from the volume group:
sudo lvcreate -L 1G -n tekneed_lv tekneed_vgto display logical volumes:
lvdisplay
Step 5: Format the Logical Volume
Format the logical volume with a filesystem:
sudo mkfs.ext4 /dev/tekneed_vg/tekneed_lvStep 6: Create a Mount Point
Create a mount point for the logical volume:
sudo mkdir /mnt/tekneed3Step 7: Mount the Logical Volume
Mount the logical volume:
sudo mount /dev/tekneed_vg/tekneed_lv /mnt/tekneed3Step 8: Update /etc/fstab
Add the logical volume to /etc/fstab for automatic mounting:
sudo vi /etc/fstabAdd the following line:
/dev/tekneed_vg/tekneed_lv /mnt/tekneed3 ext4 defaults 0 0Verifying the Setup
Verify and Configure Persistent Mount: Use df -h to verify the mount, then edit /etc/fstab to make it persistent:
/dev/tekneed_vg/tekneed_lv /mnt/tekneed3 ext4 defaults 0 0Advanced LVM Features
One of the standout features of LVM is the ability to resize logical volumes dynamically.
For kilobytes – K.
For megabytes – M.
For gigabytes – G.
For terabytes – T.
And petabytes – P.
Extending a Logical Volume
If you need to increase the size of your logical volume, use:
sudo lvextend -L +1G /dev/tekneed_vg/tekneed_lvAfter extending, resize the filesystem:
sudo resize2fs /dev/tekneed_vg/tekneed_lvReducing a Logical Volume
Reducing a logical volume is more risky and should only be done if you are sure there is no critical data. To reduce a logical volume:
- Shrink the Filesystem First:
sudo resize2fs /dev/tekneed_vg/tekneed_lv 500M- Then Reduce the Logical Volume:
sudo lvreduce -L 500M /dev/tekneed_vg/tekneed_lvManaging Swap Space
In Linux, swap space serves as an overflow for your system’s RAM. If your system runs out of physical memory, it uses swap space to handle additional data. This section covers how to manage swap in Linux.
Checking Current Swap Usage
To check your current swap usage, use:
free -hThis command will display the total, used, and free swap space.
Creating Swap Space
You can create swap space either as a file or as a logical volume. Here’s how to create a swap logical volume:
- Create a Logical Volume for Swap:
sudo lvcreate -L 1G -n swap_lv tekneed_vg- Format the Logical Volume as Swap:
sudo mkswap /dev/tekneed_vg/swap_lv- Activate the Swap:
sudo swapon /dev/tekneed_vg/swap_lvMaking Swap Permanent
To ensure the swap space remains active after a reboot, add it to /etc/fstab:
sudo vi /etc/fstabAdd the following line:
/dev/tekneed_vg/swap_lv swap swap defaults 0 0Checking Available Disks
To see the available disks on your system, use the lsblk command, which lists all block devices. This command provides a clear view of your disks and their partitions:
lsblkYou might see output like this:
NAME   MAJ:MIN RM   SIZE RO TYPE MOUNTPOINT
sda      8:0    0  40G   0 disk
├─sda1   8:1    0  1G    0 part /boot
├─sda2   8:2    0  38G   0 part /
sdb      8:16   0  2G    0 disk
sdc      8:32   0  3G    0 disk
Conclusion
In this lesson, we’ve covered the essentials of storage configuration and management in Linux, exploring both standard partitioning and LVM methods. You should now have a solid understanding of how to manage storage in Linux, partition disks, create mount points, and manage logical volumes, including extending and reducing them.
Managing storage in Linux through partitioning, whether standard or via LVM, is essential for efficient system administration. Understanding these methods of how to manage storage in Linux, allows you to tailor your storage needs dynamically, optimizing performance and ensuring data integrity.
This knowledge is invaluable for anyone learning how to manage storage in Linux systems, especially in professional environments. As always, practice is key. Experiment with these commands in a safe environment to build your confidence and proficiency.
Thank you for joining me today! Don’t forget to subscribe, like, share, and comment below. Your support encourages us to produce more educational content. Until next time, happy learning!
Leave a Reply