Last updated: November 2026
Introduction
AWS CloudOps/DevOps Infrastructure Portal Project:
This project is designed as a practical, real-world AWS infrastructure implementation and assessment for individuals currently learning AWS Cloud, CloudOps, and DevOps.
It provides an opportunity to apply theoretical knowledge, develop practical skills, and gain hands-on experience working with real AWS services and DevOps tools.
The primary objective is to test learners’ understanding and practical ability to work with core AWS services by giving them a realistic business scenario that requires them to design, provision, configure, and deploy an application on AWS infrastructure.
Rather than simply learning what individual AWS services do, learners are expected to demonstrate how these services work together to deliver a functional, secure, highly available, and reliable infrastructure solution.
Throughout the project, learners will work with essential AWS services and concepts, including:
- Amazon EC2: Provisioning and configuring virtual servers to host applications.
- AWS IAM: Creating users, roles, policies, and permissions to implement secure access management.
- Amazon S3: Creating and managing storage buckets for application files and backups.
- Amazon VPC: Designing and implementing a custom virtual network.
- Subnets: Creating public and private subnets across multiple Availability Zones.
- Route Tables: Configuring network traffic routing between subnets and external networks.
- Internet Gateway: Enabling internet connectivity for resources in public subnets.
- NAT Gateway: Providing outbound internet access to resources in private subnets where required.
- Application Load Balancer: Distributing incoming application traffic across multiple EC2 instances.
- High Availability (HA): Implementing an architecture that distributes application resources across multiple Availability Zones to improve availability and resilience.
By the end of this project, learners should be able to demonstrate their ability to combine these AWS services into a working infrastructure that reflects how applications are hosted and managed in real business environments.
The project will also introduce additional CloudOps and DevOps tools in subsequent stages, including Terraform, Ansible, Docker, and GitHub Actions, to extend the solution through infrastructure automation, configuration management, containerization, and CI/CD.
The Business Scenario
Tekneed Technologies has recently employed two Cloud/DevOps Engineers, Victor and Onoh.
One of the company’s developers has completed a new web application known as the CloudOps Infrastructure Portal. The application is ready for deployment, and the company has assigned Victor and Onoh the responsibility of designing, implementing, deploying, and managing the infrastructure required to host it on AWS.
As newly employed engineers, Victor and Onoh are expected to work together, apply their technical knowledge, follow appropriate engineering practices, and deliver a reliable and scalable infrastructure solution for Tekneed Technologies.
The Video Demonstration
The video component of this project follows Victor and Onoh as they work together at Tekneed Technologies to successfully implement the project.
Rather than presenting isolated tutorials on individual AWS services and DevOps tools, the videos tell the story of how the two engineers approach assigned tasks, make technical decisions, troubleshoot challenges, collaborate, and progressively deliver the company’s infrastructure project.
By following their journey, learners gain an understanding of not just how to use the tools, but also why, when, and where those tools are used in a real working environment.
Understanding The Subject Matter
Architecture
We will start by running the website/portal locally itself before creating any AWS resources. Since we want to keep costs low, we will run the website locally first, using only the four files (application source code) provided by Ben, the developer responsibe for building the application.
At this stage, we will not incur any AWS costs because we won’t be using any AWS resources.
Once we have confirmed that the website works correctly locally, we will proceed to deploy it on AWS. The final architecture will consist of two EC2 instances running in separate private subnets across different Availability Zones, with an internet-facing Application Load Balancer distributing incoming requests between them.
We will also configure the website to display the identity of the EC2 instance handling each request. This means that whenever we refresh the website, we can see which server responded.
This will provide a practical demonstration of how an Application Load Balancer distributes traffic across multiple servers and how a highly available architecture can continue serving requests when one of the application instances becomes unavailable.
Architecture Diagram
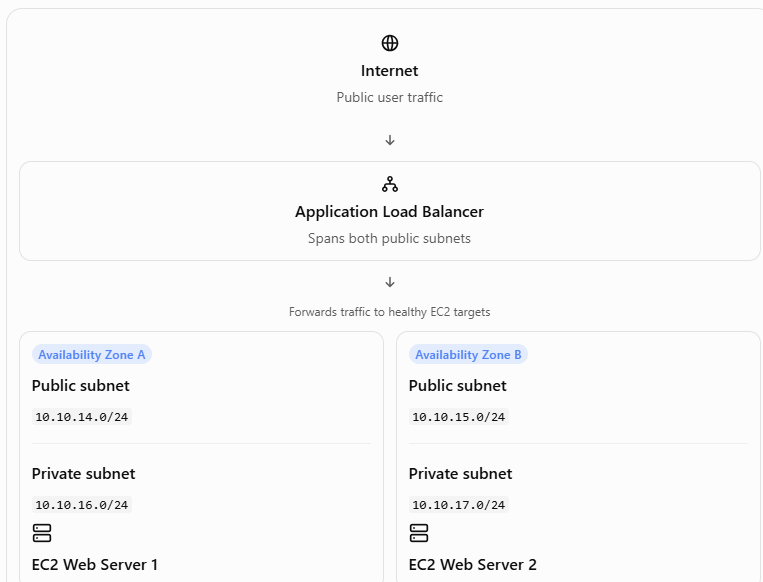
This project will be splitted into seven (7) phases for better understanding.
Phase 1- Run the website/portal locally
The files provided by Ben, the developer (The HTML, CSS, and JavaScript files) for a professional infrastructure portal displays application status and server identity.
See below the portal interface.
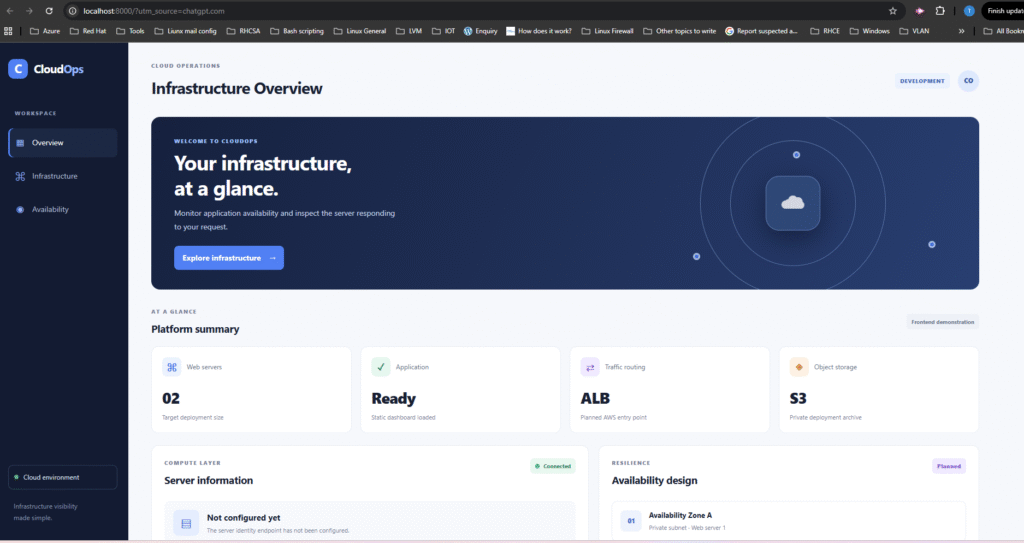
The CloudOps Infrastructure website/Portal will include:
- A professional cloud operations dashboard.
- Application and infrastructure status indicators.
- Server identity, populated by the web server.
- A simple availability and health-check page.
- Responsive styling for desktop and mobile.
We will use HTML, CSS, and JavaScript, with Nginx serving the website later on AWS.
Ben has committed the application’s source code to the company’s GitHub repository. (For learning and accessibility purposes, the repository will remain public) so that other learners can easily access and download the source code.
You can obtain the source code directly from this article or by visiting the company’s public GitHub repository here: [GitHub Repository Link].
Phase 2 – Configure the AWS network
Create a VPC across two Availability Zones, with public subnets for the load balancer and private subnets for the web servers.
We will create a network that supports two web servers in separate Availability Zones, with public traffic entering through an Application Load Balancer rather than exposing the EC2 instances directly.
Why this design is better for HA
- Two public subnets: the load balancer can operate across two Availability Zones.
- Two private subnets: each EC2 instance runs in a different Availability Zone.
- Separate IP ranges: network addressing and routing are easier to manage.
- Health checks: the load balancer can stop sending requests to an unhealthy instance.
- Private application servers: EC2 instances won’t need public IP addresses for incoming web traffic.
One distinction to remember: two subnets alone don’t guarantee high availability. We also need the instances deployed across separate Availability Zones, healthy targets configured, and sufficient capacity to serve traffic if one instance fails.
Phase 3 – Set up IAM and S3
Create a private Amazon S3 bucket to store the website’s source files and deployment archive. Configure IAM roles and policies to grant the EC2 instances secure, controlled access to the S3 bucket without embedding AWS access keys or credentials in the application or server configuration.
Why this is important
- Centralised storage: S3 provides a central location for storing the website files and deployment archives.
- Secure access: IAM roles allow EC2 instances to access S3 without hardcoding access credentials.
- Least privilege: Each EC2 instance receives only the permissions required to retrieve the application files from the designated S3 bucket.
- Private storage: The S3 bucket remains private and is not directly accessible to the public.
- Practical IAM experience: Learners gain hands-on experience creating IAM roles, policies, and permissions for AWS services.
Expected outcome: Both private EC2 instances will be able to securely retrieve the website files from the S3 bucket using their assigned IAM role.
Phase 4 – Deploy the web servers
Launch two private EC2 instances, install Nginx, and deploy the website on both servers.
Launch two Amazon EC2 instances in the private subnets, ensuring that each instance is deployed in a different Availability Zone. Configure both instances with Linux and Nginx.
Configure the web servers to display their individual server identities on the website so that we can identify which EC2 instance handles each request.
Why this design is important
- Private deployment: The EC2 instances will not have public IP addresses or direct inbound internet access.
- High availability: Two web servers will run in separate Availability Zones.
- Consistent application deployment: Both instances will host the same version of the website.
- Server identification: Each web server will display its hostname or identity on the portal.
- Secure AWS access: The EC2 instances will use their assigned IAM role to retrieve application files from S3.
Expected outcome: Two functional Nginx web servers running the CloudOps Infrastructure Portal in separate private subnets.
Phase 5 – Configure the Application Load Balancer
Create an internet-facing Application Load Balancer (ALB) in the two public subnets and configure it to distribute incoming HTTP traffic across the two private EC2 web servers.
Register both EC2 instances as targets in a target group and configure health checks to monitor their availability. The ALB will forward incoming requests only to healthy web servers.
Why this design is important
- Public application access: Users can access the website through the ALB’s public DNS name without exposing the EC2 instances directly.
- Traffic distribution: The ALB distributes incoming requests across the two EC2 instances.
- Health monitoring: Health checks continuously assess whether the web servers are responding correctly.
- Automatic traffic management: If one web server becomes unhealthy, the ALB stops forwarding requests to it and uses the remaining healthy instance.
- High availability: The application can continue serving requests when one web server becomes unavailable, provided the other instance remains healthy.
Expected outcome: A publicly accessible CloudOps Infrastructure Portal with traffic distributed across two private EC2 instances, demonstrating load balancing and application high availability.
Phase 6 – Store backups of your CloudOps Infrastructure Portal application
Implement a backup strategy for the CloudOps Infrastructure Portal application by storing copies of the website source files and deployment archives in a dedicated Amazon S3 bucket.
Organise the backups to make it easier to identify and retrieve previous application versions when needed. Where appropriate, configure S3 versioning to preserve previous versions of uploaded files and protect against accidental overwrites or deletions.
Why this is important
- Data protection: Maintain backup copies of the application files in Amazon S3.
- Version recovery: S3 Versioning allows previous versions of objects to be retrieved when files are accidentally overwritten or deleted.
- Centralised backups: Keep application backups separate from the files currently deployed on the EC2 instances.
- Disaster recovery: Provide a way to restore the application files if the deployed copies are lost or corrupted.
- Practical AWS experience: Gain hands-on experience with S3 bucket management, versioning, backup organisation, and recovery.
Expected outcome: A backup arrangement in Amazon S3 that allows the CloudOps Infrastructure Portal application files to be preserved and previous versions recovered when required.
Having understood our assignment, let’s get to the action time.
ACTION TIME
Phase 1 Step By Step Guide (Build the website)
1 – Create the project folder
On your computer, clone the project’s repository or create a folder named cloudOpsInfra.
Inside it, create these four files:
- index.html: The main dashboard and its content
- style.css: The design, layout, colors, and responsiveness
- app.js: Dashboard behavior and server identification
- health.html: A lightweight endpoint for load-balancer health checks
You can use Visual Studio Code, Notepad++, or another text editor. Make sure the files are saved with the correct extensions, not as .txt files.
Source file 1 – index.html
This is the main dashboard. It contains the navigation, overview cards, server status, architecture summary, and footer.
Copy the following code into index.html.
<!DOCTYPE html>
<html lang="en">
<head>
  <meta charset="UTF-8">
  <meta name="viewport" content="width=device-width, initial-scale=1.0">
  <meta name="description" content="CloudOps Infrastructure Portal - Cloud infrastructure operations dashboard.">
  <title>CloudOps | Infrastructure Portal</title>
  <link rel="stylesheet" href="style.css">
  <script src="app.js" defer></script>
</head>
<body>
  <aside class="sidebar">
    <a class="brand" href="#" aria-label="CloudOps home">
      <span class="brand-icon">C</span>
      <span>Cloud<span class="brand-light">Ops</span></span>
    </a>

    <p class="nav-label">WORKSPACE</p>
    <nav aria-label="Main navigation">
      <a class="nav-link active" href="#overview">
        <span class="nav-icon">▦</span> Overview
      </a>
      <a class="nav-link" href="#infrastructure">
        <span class="nav-icon">⌘</span> Infrastructure
      </a>
      <a class="nav-link" href="#availability">
        <span class="nav-icon">◉</span> Availability
      </a>
    </nav>

    <div class="sidebar-bottom">
      <div class="environment-tag">
        <span class="status-dot"></span>
        <span>Cloud environment</span>
      </div>
      <p class="sidebar-caption">Infrastructure visibility<br>made simple.</p>
    </div>
  </aside>

  <main class="main-content" id="overview">
    <header class="topbar">
      <div>
        <p class="eyebrow">CLOUD OPERATIONS</p>
        <h1>Infrastructure Overview</h1>
      </div>
      <div class="topbar-right">
        <span class="environment-badge">DEVELOPMENT</span>
        <div class="avatar" aria-label="CloudOps administrator">CO</div>
      </div>
    </header>

    <section class="welcome">
      <div>
        <p class="eyebrow welcome-eyebrow">WELCOME TO CLOUDOPS</p>
        <h2>Your infrastructure,<br>at a glance.</h2>
        <p class="welcome-copy">
          Monitor application availability and inspect the server
          responding to your request.
        </p>
        <a class="primary-button" href="#infrastructure">
          Explore infrastructure <span aria-hidden="true">→</span>
        </a>
      </div>
      <div class="welcome-art" aria-hidden="true">
        <div class="orbit orbit-one"></div>
        <div class="orbit orbit-two"></div>
        <div class="cloud-symbol">☁</div>
        <div class="orbit-node node-one"></div>
        <div class="orbit-node node-two"></div>
        <div class="orbit-node node-three"></div>
      </div>
    </section>

    <section class="section-block" aria-labelledby="summary-title">
      <div class="section-heading">
        <div>
          <p class="eyebrow">AT A GLANCE</p>
          <h2 id="summary-title">Platform summary</h2>
        </div>
        <span class="updated-label">Frontend demonstration</span>
      </div>

      <div class="metrics-grid">
        <article class="metric-card">
          <div class="metric-top">
            <span class="metric-icon blue-icon">⌘</span>
            <span class="metric-label">Web servers</span>
          </div>
          <p class="metric-value">02</p>
          <p class="metric-note">Target deployment size</p>
        </article>

        <article class="metric-card">
          <div class="metric-top">
            <span class="metric-icon green-icon">✓</span>
            <span class="metric-label">Application</span>
          </div>
          <p class="metric-value">Ready</p>
          <p class="metric-note">Static dashboard loaded</p>
        </article>

        <article class="metric-card">
          <div class="metric-top">
            <span class="metric-icon purple-icon">⇄</span>
            <span class="metric-label">Traffic routing</span>
          </div>
          <p class="metric-value">ALB</p>
          <p class="metric-note">Planned AWS entry point</p>
        </article>

        <article class="metric-card">
          <div class="metric-top">
            <span class="metric-icon orange-icon">◈</span>
            <span class="metric-label">Object storage</span>
          </div>
          <p class="metric-value">S3</p>
          <p class="metric-note">Private deployment archive</p>
        </article>
      </div>
    </section>

    <section class="content-grid" id="infrastructure">
      <article class="panel server-panel">
        <div class="panel-heading">
          <div>
            <p class="eyebrow">COMPUTE LAYER</p>
            <h2>Server information</h2>
          </div>
          <span class="status-pill">
            <span class="status-dot"></span> Connected
          </span>
        </div>

        <div class="server-visual">
          <div class="server-icon">▤</div>
          <div>
            <p class="server-name" id="server-name">Detecting server...</p>
            <p class="server-description" id="server-description">
              Waiting for web server identification.
            </p>
          </div>
        </div>

        <div class="detail-row">
          <span>Server identity</span>
          <strong id="server-id">Checking...</strong>
        </div>
        <div class="detail-row">
          <span>Web server</span>
          <strong>Nginx (planned)</strong>
        </div>
        <div class="detail-row">
          <span>Deployment platform</span>
          <strong>AWS EC2 (planned)</strong>
        </div>

        <p class="panel-footnote" id="server-footnote">
          Server identity will be supplied by Nginx after deployment.
        </p>
      </article>

      <article class="panel availability-panel" id="availability">
        <div class="panel-heading">
          <div>
            <p class="eyebrow">RESILIENCE</p>
            <h2>Availability design</h2>
          </div>
          <span class="design-label">Planned</span>
        </div>

        <div class="availability-item">
          <span class="availability-icon">01</span>
          <div>
            <h3>Availability Zone A</h3>
            <p>Private subnet · Web server 1</p>
          </div>
        </div>

        <div class="availability-item">
          <span class="availability-icon">02</span>
          <div>
            <h3>Availability Zone B</h3>
            <p>Private subnet · Web server 2</p>
          </div>
        </div>

        <div class="routing-note">
          <span aria-hidden="true">↗</span>
          <p>The Application Load Balancer will route requests to healthy targets.</p>
        </div>
      </article>
    </section>

    <section class="notice-panel">
      <div class="notice-icon">i</div>
      <div>
        <h2>Project status</h2>
        <p>
          This is the initial frontend. AWS resources, live metrics,
          and actual health status will be configured and validated
          in the following project phases.
        </p>
      </div>
    </section>

    <footer class="footer">
      <span>CloudOps Infrastructure Portal</span>
      <span>Built for cloud infrastructure learning</span>
    </footer>
  </main>
</body>
</html>
Source file 2 – style.css
This file gives the dashboard its dark navy sidebar, blue highlights, status cards, and responsive layout.
Copy this into style.css.
:root {
  --navy: #101b33;
  --navy-light: #182844;
  --blue: #3b82f6;
  --blue-light: #eaf2ff;
  --text: #172033;
  --muted: #778198;
  --border: #e8edf4;
  --background: #f6f8fc;
  --white: #ffffff;
  --green: #16845b;
}

* {
  box-sizing: border-box;
}

html {
  scroll-behavior: smooth;
}

body {
  margin: 0;
  background: var(--background);
  color: var(--text);
  font-family: Inter, -apple-system, BlinkMacSystemFont, "Segoe UI",
    Roboto, Arial, sans-serif;
  font-size: 14px;
  line-height: 1.6;
}

a {
  color: inherit;
  text-decoration: none;
}

.sidebar {
  position: fixed;
  inset: 0 auto 0 0;
  z-index: 10;
  display: flex;
  flex-direction: column;
  width: 240px;
  padding: 30px 20px;
  background: var(--navy);
  color: #d7e0f0;
}

.brand {
  display: flex;
  align-items: center;
  gap: 11px;
  margin-bottom: 55px;
  color: #fff;
  font-size: 21px;
  font-weight: 750;
  letter-spacing: -0.7px;
}

.brand-icon {
  display: grid;
  width: 36px;
  height: 36px;
  place-items: center;
  border-radius: 11px;
  background: var(--blue);
  color: white;
  font-size: 22px;
}

.brand-light {
  color: #8db7ff;
}

.nav-label,
.eyebrow {
  margin: 0 0 8px;
  color: var(--muted);
  font-size: 10px;
  font-weight: 800;
  letter-spacing: 1.5px;
}

.nav-label {
  padding-left: 12px;
  color: #8494b0;
}

.sidebar nav {
  display: grid;
  gap: 8px;
  margin-top: 12px;
}

.nav-link {
  display: flex;
  align-items: center;
  gap: 12px;
  padding: 12px;
  border-radius: 9px;
  color: #aebbd1;
  transition: background 0.2s ease, color 0.2s ease;
}

.nav-link:hover,
.nav-link.active {
  background: var(--navy-light);
  color: #fff;
}

.nav-link.active {
  box-shadow: inset 3px 0 var(--blue);
}

.nav-icon {
  width: 20px;
  color: #8eb6ff;
  font-size: 18px;
  text-align: center;
}

.sidebar-bottom {
  margin-top: auto;
}

.environment-tag {
  display: flex;
  align-items: center;
  gap: 9px;
  padding: 12px 10px;
  border: 1px solid #30415d;
  border-radius: 9px;
  font-size: 12px;
}

.status-dot {
  display: inline-block;
  flex: 0 0 auto;
  width: 8px;
  height: 8px;
  border-radius: 50%;
  background: #24bf83;
}

.sidebar-caption {
  margin: 20px 10px 0;
  color: #8190a9;
  font-size: 12px;
  line-height: 1.8;
}

.main-content {
  max-width: 1600px;
  min-height: 100vh;
  margin-left: 240px;
  padding: 34px 42px 22px;
}

.topbar,
.topbar-right,
.section-heading,
.metric-top,
.panel-heading,
.server-visual,
.detail-row,
.footer {
  display: flex;
  align-items: center;
  justify-content: space-between;
}

.topbar {
  gap: 20px;
  margin-bottom: 30px;
}

.topbar h1 {
  margin: 0;
  font-size: clamp(22px, 2.3vw, 30px);
  font-weight: 750;
  letter-spacing: -1px;
}

.topbar-right {
  gap: 15px;
}

.environment-badge,
.design-label,
.updated-label {
  display: inline-block;
  border-radius: 6px;
  padding: 6px 9px;
  background: #eaf2ff;
  color: #3266b4;
  font-size: 10px;
  font-weight: 800;
  letter-spacing: 0.6px;
}

.avatar {
  display: grid;
  width: 39px;
  height: 39px;
  place-items: center;
  border-radius: 50%;
  background: #dce8ff;
  color: #2859a5;
  font-size: 12px;
  font-weight: 800;
}

.welcome {
  position: relative;
  display: flex;
  min-height: 270px;
  align-items: center;
  justify-content: space-between;
  overflow: hidden;
  padding: 36px 42px;
  border-radius: 16px;
  background: linear-gradient(115deg, #12213e, #203f72);
  color: white;
}

.welcome > div:first-child {
  position: relative;
  z-index: 2;
  max-width: 480px;
}

.welcome-eyebrow {
  color: #9fc3ff;
}

.welcome h2 {
  margin: 8px 0 12px;
  font-size: clamp(27px, 3vw, 38px);
  line-height: 1.2;
  letter-spacing: -1.1px;
}

.welcome-copy {
  max-width: 410px;
  margin: 0 0 22px;
  color: #c6d5ed;
  line-height: 1.8;
}

.primary-button {
  display: inline-flex;
  align-items: center;
  gap: 15px;
  padding: 11px 15px;
  border-radius: 8px;
  background: var(--blue);
  color: white;
  font-weight: 650;
  transition: background 0.2s ease;
}

.primary-button:hover {
  background: #2563eb;
}

.welcome-art {
  position: absolute;
  top: 0;
  right: 1%;
  width: 43%;
  height: 100%;
  opacity: 0.8;
}

.orbit {
  position: absolute;
  top: 50%;
  left: 50%;
  border: 1px solid #6586b8;
  border-radius: 50%;
  transform: translate(-50%, -50%);
}

.orbit-one {
  width: 230px;
  height: 230px;
}

.orbit-two {
  width: 340px;
  height: 340px;
}

.cloud-symbol {
  position: absolute;
  top: 50%;
  left: 50%;
  display: grid;
  width: 100px;
  height: 100px;
  place-items: center;
  border: 1px solid #6d95d0;
  border-radius: 25px;
  background: #294c7c;
  color: white;
  font-size: 48px;
  transform: translate(-50%, -50%);
  box-shadow: 0 15px 50px #0c1936;
}

.orbit-node {
  position: absolute;
  width: 13px;
  height: 13px;
  border: 3px solid #c3dcff;
  border-radius: 50%;
  background: #3b82f6;
}

.node-one {
  top: 20%;
  left: 50%;
}

.node-two {
  right: 10%;
  bottom: 24%;
}

.node-three {
  bottom: 17%;
  left: 22%;
}

.section-block {
  margin-top: 32px;
}

.section-heading {
  gap: 20px;
  margin-bottom: 18px;
}

.section-heading h2,
.panel-heading h2 {
  margin: 0;
  font-size: 19px;
  font-weight: 750;
  letter-spacing: -0.4px;
}

.updated-label {
  background: #eef1f7;
  color: #64718a;
  font-weight: 650;
  letter-spacing: 0;
}

.metrics-grid {
  display: grid;
  grid-template-columns: repeat(4, minmax(0, 1fr));
  gap: 16px;
}

.metric-card,
.panel,
.notice-panel {
  border: 1px solid var(--border);
  border-radius: 13px;
  background: var(--white);
}

.metric-card {
  min-width: 0;
  padding: 19px;
}

.metric-top {
  justify-content: flex-start;
  gap: 10px;
}

.metric-icon {
  display: grid;
  width: 35px;
  height: 35px;
  flex: 0 0 auto;
  place-items: center;
  border-radius: 9px;
  font-size: 17px;
  font-weight: 750;
}

.blue-icon {
  background: #eaf2ff;
  color: #3678e6;
}

.green-icon {
  background: #e4f7ef;
  color: #13885b;
}

.purple-icon {
  background: #f0eaff;
  color: #7950cf;
}

.orange-icon {
  background: #fff1e3;
  color: #d17a23;
}

.metric-label {
  color: #64718a;
  font-size: 12px;
}

.metric-value {
  margin: 17px 0 0;
  font-size: 28px;
  font-weight: 800;
  letter-spacing: -0.8px;
}

.metric-note {
  margin: 4px 0 0;
  color: var(--muted);
  font-size: 11px;
}

.content-grid {
  display: grid;
  grid-template-columns: 1.15fr 1fr;
  gap: 18px;
  margin-top: 22px;
}

.panel {
  min-width: 0;
  padding: 23px;
}

.panel-heading {
  align-items: flex-start;
  gap: 12px;
  margin-bottom: 24px;
}

.status-pill {
  display: inline-flex;
  align-items: center;
  gap: 7px;
  padding: 6px 9px;
  border-radius: 7px;
  background: #e8f8f0;
  color: #167b56;
  font-size: 10px;
  font-weight: 750;
  white-space: nowrap;
}

.design-label {
  background: #f0eaff;
  color: #7950cf;
}

.server-visual {
  justify-content: flex-start;
  gap: 14px;
  margin-bottom: 22px;
  padding: 16px;
  border-radius: 10px;
  background: #f7f9fd;
}

.server-icon {
  display: grid;
  width: 48px;
  height: 48px;
  flex: 0 0 auto;
  place-items: center;
  border-radius: 10px;
  background: #e4edff;
  color: #326bd0;
  font-size: 24px;
}

.server-name {
  margin: 0;
  font-size: 15px;
  font-weight: 750;
}

.server-description {
  margin: 3px 0 0;
  color: var(--muted);
  font-size: 11px;
}

.detail-row {
  gap: 12px;
  padding: 12px 0;
  border-bottom: 1px solid #edf0f5;
  font-size: 12px;
}

.detail-row:last-of-type {
  border-bottom: 0;
}

.detail-row span {
  color: var(--muted);
}

.detail-row strong {
  overflow-wrap: anywhere;
  text-align: right;
  font-size: 12px;
}

.panel-footnote {
  margin: 16px 0 0;
  color: #8b95a8;
  font-size: 11px;
}

.availability-item {
  display: flex;
  align-items: center;
  gap: 13px;
  margin-bottom: 13px;
  padding: 15px;
  border: 1px solid var(--border);
  border-radius: 10px;
}

.availability-icon {
  display: grid;
  width: 39px;
  height: 39px;
  flex: 0 0 auto;
  place-items: center;
  border-radius: 9px;
  background: #edf3ff;
  color: #3b70ca;
  font-size: 12px;
  font-weight: 800;
}

.availability-item h3 {
  margin: 0;
  font-size: 13px;
}

.availability-item p {
  margin: 3px 0 0;
  color: var(--muted);
  font-size: 11px;
}

.routing-note {
  display: flex;
  align-items: flex-start;
  gap: 12px;
  margin-top: 19px;
  padding: 15px;
  border-radius: 9px;
  background: #eff6ff;
  color: #315c9b;
}

.routing-note > span {
  font-size: 21px;
}

.routing-note p {
  margin: 0;
  font-size: 12px;
  line-height: 1.8;
}

.notice-panel {
  display: flex;
  align-items: flex-start;
  gap: 13px;
  margin-top: 20px;
  padding: 19px;
}

.notice-icon {
  display: grid;
  width: 28px;
  height: 28px;
  flex: 0 0 auto;
  place-items: center;
  border-radius: 50%;
  background: #eaf2ff;
  color: #3678e6;
  font-weight: 800;
}

.notice-panel h2 {
  margin: 0 0 4px;
  font-size: 13px;
}

.notice-panel p {
  margin: 0;
  color: #69758c;
  font-size: 12px;
  line-height: 1.8;
}

.footer {
  gap: 15px;
  margin-top: 27px;
  padding-top: 17px;
  border-top: 1px solid #e7ebf2;
  color: #8993a6;
  font-size: 11px;
}

@media (max-width: 1150px) {
  .sidebar {
    width: 205px;
  }

  .main-content {
    margin-left: 205px;
    padding: 28px 24px;
  }

  .metrics-grid {
    grid-template-columns: repeat(2, minmax(0, 1fr));
  }

  .welcome-art {
    right: -9%;
    opacity: 0.5;
  }
}

@media (max-width: 760px) {
  .sidebar {
    position: static;
    width: 100%;
    padding: 15px 20px;
  }

  .brand {
    margin-bottom: 18px;
  }

  .nav-label,
  .sidebar-bottom {
    display: none;
  }

  .sidebar nav {
    display: flex;
    flex-wrap: wrap;
    gap: 5px;
    margin-top: 0;
  }

  .nav-link {
    padding: 9px 10px;
    font-size: 12px;
  }

  .main-content {
    margin-left: 0;
    padding: 24px 16px;
  }

  .topbar {
    align-items: flex-start;
  }

  .topbar-right {
    gap: 8px;
  }

  .environment-badge {
    display: none;
  }

  .welcome {
    min-height: 280px;
    padding: 28px 23px;
  }

  .welcome-art {
    right: -40%;
    width: 85%;
    opacity: 0.25;
  }

  .metrics-grid,
  .content-grid {
    grid-template-columns: 1fr;
  }

  .section-heading {
    align-items: flex-start;
  }

  .updated-label {
    max-width: 125px;
    text-align: center;
  }

  .panel {
    padding: 18px;
  }

  .footer {
    align-items: flex-start;
    flex-direction: column;
    gap: 5px;
  }
}

@media (prefers-reduced-motion: reduce) {
  *,
  *::before,
  *::after {
    scroll-behavior: auto !important;
    transition: none !important;
  }
}
Source file 3 – app.js
This JavaScript checks whether the web server exposes a /server-info endpoint. Later, we will configure Nginx to return the actual hostname of the EC2 instance that handled the request.
For now, if you open the site locally, the dashboard will explain that server identification is not yet configured.
Copy this into app.js.
"use strict";

document.addEventListener("DOMContentLoaded", () => {
  const serverName = document.getElementById("server-name");
  const serverId = document.getElementById("server-id");
  const serverDescription = document.getElementById("server-description");
  const serverFootnote = document.getElementById("server-footnote");

  async function identifyServer() {
    try {
      const response = await fetch("/server-info", {
        cache: "no-store",
        headers: {
          Accept: "application/json"
        }
      });

      if (!response.ok) {
        throw new Error("Server identification endpoint is unavailable.");
      }

      const data = await response.json();

      if (!data.hostname) {
        throw new Error("No hostname was returned.");
      }

      serverName.textContent = data.hostname;
      serverId.textContent = data.hostname;
      serverDescription.textContent =
        "This server responded to your request.";

      serverFootnote.textContent =
        "Identity supplied by the web server.";
    } catch (error) {
      serverName.textContent = "Not configured yet";
      serverId.textContent = "Unavailable";
      serverDescription.textContent =
        "The server identity endpoint has not been configured.";
      serverFootnote.textContent =
        "This is expected during local development. " +
        "We will configure /server-info when setting up Nginx.";
    }
  }

  identifyServer();
});
Why this matters: when we eventually deploy two EC2 instances, the endpoint will return a different hostname depending on which server responds. We can use that to demonstrate that the load balancer is distributing requests across the instances.
Source file 4 – health.html
The Application Load Balancer will need a URL to check to determine whether each web server is healthy. This simple file will be our health-check endpoint.
Copy this into health.html.
<!DOCTYPE html>
<html lang="en">
<head>
  <meta charset="UTF-8">
  <meta name="viewport" content="width=device-width, initial-scale=1.0">
  <title>CloudOps Health Check</title>
</head>
<body>
  <h1>CloudOps Health Check</h1>
  <p>The health-check page is reachable.</p>
</body>
</html>
Later, we will configure the Application Load Balancer to request /health.html over HTTP on port 80. A successful HTTP response will allow the target to pass this basic health check.
Note that a static page checks whether the web server can serve the endpoint; it does not, by itself, prove that every part of the application is functioning correctly.
2. Run the website locally
Now let’s confirm that the four files work before moving to AWS.
Step 1 – Check your folder
Your folder should look like this:
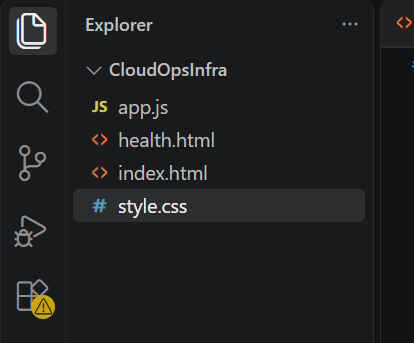
cloudOpsInfra/
index.html
style.css
app.js
health.html
Step 2 – Open the website
Option A: The simplest way
Double-click index.html to open it in your browser. The layout and styling should appear, but the server identity will show as unavailable. That is expected because we haven’t configured Nginx yet.
Option B: Run a local web server
If you have Python installed (or you can install python), open a terminal in the cloudops-portal folder and run:
python -m http.server 8000If that command does not work on Windows, try:
py -m http.server 8000Then open this address in your browser:http://localhost:8000
Press Ctrl+C in the terminal when you want to stop the local server.
The server identity will still be unavailable because Python’s simple web server does not implement our future Nginx /server-info endpoint. That is normal.

Step 3 – Validate the result
Check these items:
Local testing checklist
0 of 6The dashboard displays without a blank page.The dark sidebar and blue welcome section appear.The four summary cards are visible.The server information and availability sections appear.The layout adjusts when I narrow the browser window.The browser console has no unexpected errors other than the missing /server-info endpoint during local testing.
One important clarification: the dashboard currently contains illustrative project labels, not live AWS monitoring data. We will only describe real infrastructure status as verified after the AWS resources are deployed and tested.
Phase 2 Step By Step Guide – Configure the AWS network
Once the website works locally, we will move to Phase 2: AWS networking.
We will create the VPC, two public subnets for the load balancer, two private subnets for EC2, and the required routing and security groups. Because we want to minimise costs, we will carefully evaluate the management-access approach before adding NAT gateways or interface endpoints, which can introduce ongoing charges.
1 – Now recreate the VPC
search for VPC → Create VPC → VPC and more, use these settings:
| Setting | Value |
|---|---|
| Name | cloudops-vpc |
| VPC IPv4 CIDR | 10.10.0.0/16 |
| Availability Zones | 2 |
| Public subnets | 2 |
| Private subnets | 2 |
| NAT gateways | None initially, to minimize cost |
| VPC endpoints | None initially |
Once the new VPC is created, we will now create the four subnets manually so we control the IP ranges and Availability Zones for our CloudOps Infrastructure Portal.
2 – Create the four subnets
In the AWS Console, go to VPC → Subnets → Create subnet.
Select your new cloudops-vpc VPC, then create the following subnets. You can add multiple subnets in the same creation form.
| Subnet name | Availability Zone | IPv4 CIDR |
|---|---|---|
cloudops-public-a | Availability Zone A | 10.10.14.0/24 |
cloudops-public-b | Availability Zone B | 10.10.15.0/24 |
cloudops-private-a | Same AZ as public A | 10.10.16.0/24 |
cloudops-private-b | Same AZ as public B | 10.10.17.0/24 |
Use two different Availability Zones in the same AWS Region. For example, if your Region offers eu-central-1a and eu-central-1b, you could use those, but choose the actual AZs available in your account.
These CIDRs must fall within your VPC CIDR (10.10.0.0/16) and must not overlap any existing subnet.
3 – Check these details as you create them
- Public subnets:
10.10.14.0/24and10.10.15.0/24. - Private subnets:
10.10.16.0/24and10.10.17.0/24. - Each subnet must be assigned to the correct Availability Zone.
- Do not launch EC2 instances yet.
One important point: creating a subnet does not automatically make it public or private. We will configure that through route tables in the next step. Also, leave automatic public IPv4 assignment disabled for the private subnets.
Verify the four subnets
| Subnet | CIDR block | Availability Zone | Intended use |
|---|---|---|---|
cloudops-pub-sub-a | 10.10.14.0/24 | eu-north-1a | Public – ALB |
cloudops-pub-sub-b | 10.10.15.0/24 | eu-north-1b | Public – ALB |
cloudops-pri-sub-a | 10.10.16.0/24 | eu-north-1a | Private – EC2 web server 1 |
cloudops-pri-sub-b | 10.10.17.0/24 | eu-north-1b | Private – EC2 web server 2 |
4 – create and attach an Internet Gateway
An Internet Gateway (IGW) provides a path between your VPC and the internet. We will use it for the public subnets, where the Application Load Balancer will live.
In the AWS Console:
- Open VPC → Internet gateways.
- Click Create internet gateway.
- Enter the name
cloudops-igw. - Click Create internet gateway.
- Select
cloudops-igw. - Choose Actions → Attach to a VPC.
- Select
cloudops-vpc(vpc-0801cf72ba42bb456) and attach it.
After attaching it, the gateway should show Attached.
5 – configure the route tables
Our subnets currently show the same route table ID, rtb-069652e39f234d51f. That is not necessarily wrong at this stage, but we need to separate the routing so the public and private subnets behave correctly.
Our target setup is:
- Public route table: associated with both public subnets, with a default route
0.0.0.0/0pointing tocloudops-igw. - Private route table: associated with both private subnets, with no direct internet route through the Internet Gateway.
We should not launch the EC2 instances yet. We also need to decide how private instances will install Nginx and access AWS Systems Manager without adding unnecessary ongoing costs, such as a NAT Gateway.
a: Create the public route table
In the AWS Console:
- Go to VPC → Route tables.
- Click Create route table.
- Enter these details:
- Name:
cloudops-public-rt - VPC:
cloudops-vpc(vpc-0801cf72ba42bb456)
4. Click Create route table.
b: Add the internet route
- Select
cloudops-public-rt. - Open the Routes tab.
- Click Edit routes → Add route.
- Configure the new route:
| Field | Value |
|---|---|
| Destination | 0.0.0.0/0 |
| Target | Internet Gateway → cloudops-igw |
5. Click Save changes.
The route table should now contain a route similar to this:
| Destination | Target |
|---|---|
10.10.0.0/16 | local |
0.0.0.0/0 | igw-... (cloudops-igw) |
The local route allows communication within the VPC. The 0.0.0.0/0 route directs other IPv4 traffic toward the Internet Gateway.
c: Associate both public subnets
While cloudops-public-rt is selected:
- Open Subnet associations.
- Click Edit subnet associations.
- Select only these two subnets:
cloudops-pub-sub-a—10.10.14.0/24cloudops-pub-sub-b—10.10.15.0/24
- Save the associations.
Leave both private subnets unselected.
Important distinction
Creating an internet route does not automatically make every resource publicly reachable. Public access also depends on subnet settings, public IP addressing where required, and security group rules. Our EC2 web servers will remain private; the internet-facing Application Load Balancer will be placed in the public subnets.
d: Create the private route table
In the AWS Console:
- Go to VPC → Route tables → Create route table.
- Enter:
- Name:
cloudops-private-rt - VPC:
cloudops-vpc
3. Click Create route table.
e: Associate the two private subnets
Select cloudops-private-rt, then:
- Open Subnet associations.
- Click Edit subnet associations.
- Select these two subnets only:
cloudops-pri-sub-a–10.10.16.0/24cloudops-pri-sub-b–10.10.17.0/24
4. Save the associations.
f: Verify the private route table
Open its Routes tab. For now, it should contain only the local route:
| Destination | Target |
|---|---|
10.10.0.0/16 | local |
Do not add 0.0.0.0/0 to the private route table yet. That route would require a suitable egress target, and we are deliberately avoiding unnecessary NAT Gateway costs for now while we plan how to install Nginx and manage the private EC2 instances.
g: Verify the routing architecture
Public route table: cloudops-public-rt
Associated subnets:
cloudops-pub-sub-a—10.10.14.0/24cloudops-pub-sub-b—10.10.15.0/24Routes:10.10.0.0/16→local0.0.0.0/0→cloudops-igw
Private route table: cloudops-pri-rt
Associated subnets:
cloudops-pri-sub-a—10.10.16.0/24cloudops-pri-sub-b—10.10.17.0/24Route:10.10.0.0/16→local
The public route table should have the two routes shown above. Your private route table already has the correct local route. This is the intended design, provided the public route and subnet associations are configured as shown.
6 – Create the security groups
Security groups act as virtual firewalls for AWS resources. We will create three:
| Security group | Attached to | Purpose |
|---|---|---|
cloudops-alb-sg | Application Load Balancer | Allow public HTTP traffic |
cloudops-web-sg | Both EC2 instances | Accept HTTP only from the ALB |
cloudops-admin-sg | Optional, only if needed | Administrative access, if we choose a suitable method |
For the first security group: cloudops-alb-sg
- Go to VPC → Security groups → Create security group.
- Set:
- Security group name:
cloudops-alb-sg - Description:
Allow HTTP access to the CloudOps Infrastructure Portal - VPC:
cloudops-vpc
- Security group name:
- Under Inbound rules, add:
| Type | Protocol | Port | Source |
|---|---|---|---|
| HTTP | TCP | 80 | 0.0.0.0/0 |
- Leave the outbound rule at its default setting for now.
- Click Create security group.
This allows visitors to reach the load balancer over HTTP. We will restrict the EC2 instances so they accept HTTP only from the load balancer’s security group.
Cost note: We have not created any EC2 instances, load balancers, or NAT Gateways yet. Some of those resources incur ongoing charges, so we will keep the remaining steps cost-conscious.
For the second security group (cloudops-web-sg)
In the AWS Console:
- Go to VPC → Security groups → Create security group.
- Enter the following details:
- Security group name:
cloudops-web-sg - Description:
Allow HTTP traffic from the CloudOps Application Load Balancer - VPC:
cloudops-vpc
3. Under Inbound rules, add this rule:
| Type | Protocol | Port | Source |
|---|---|---|---|
| HTTP | TCP | 80 | cloudops-alb-sg security group |
For the source, choose the security group option and select cloudops-alb-sg (or enter its security group ID). Do not use 0.0.0.0/0 here.
- Leave the default outbound rule in place for now.
- Click Create security group.
Why are we doing this?
The load balancer accepts public HTTP requests. The EC2 instances accept HTTP requests only from resources associated with cloudops-alb-sg. This keeps the web servers from being directly exposed to the internet.
Important: We are not creating cloudops-admin-sg yet. We will first choose a low-cost way to administer the private EC2 instances without opening SSH to the internet or accidentally creating costly infrastructure.
Next, we need to prepare the EC2 instances and their access to AWS services. Before launching anything, let’s make one important cost decision.
Before we launch EC2, choose how to configure the private servers
Private EC2 instances cannot download Nginx from public package repositories without an outbound network path. We also need a way to administer them for our resilience test.
There are two practical approaches:
Option A – Temporary NAT Gateway
Simpler setup, extra cost
Create a NAT Gateway temporarily so the private servers can download Nginx and updates. We would delete it after setup if it is no longer needed.
Trade-off: NAT Gateways incur hourly and data-processing charges. Removing one also removes that route for future internet access; it does not automatically provide ongoing administration.
Option B – Build a reusable server image
Avoid a NAT Gateway
Prepare an EC2 image with Nginx and your website already installed, then launch both private servers from that image. We can use a private administration method for the resilience test.
Trade-off: More setup steps, but avoids running a NAT Gateway.
In this project, we will proceed with option A
7 – Create a NAT Gateway
We will use the NAT Gateway to give the private EC2 instances outbound internet access for installing Nginx and any required packages, then review whether it can be removed.
a: In the AWS Console, go to VPC → NAT gateways → Create NAT gateway.
Use these settings:
| Setting | Value |
|---|---|
| Availability mode | Zonal |
| Name | cloudops-nat-gw |
| VPC | cloudops-vpc |
| Subnet | cloudops-pub-sub-a (eu-north-1a) |
| Connectivity type | Public |
| Elastic IP | Allocate a new Elastic IP |
Then click Create NAT gateway.
Why place it in a public subnet? A public NAT Gateway needs a route to the Internet Gateway to send outbound traffic from the private subnets.
Cost reminder: The NAT Gateway can begin incurring charges while it exists, even when traffic is low. The allocated Elastic IP can also have charges associated with it. We’ll delete the NAT Gateway and release its Elastic IP when we are finished, provided nothing else is using it.
b: Wait for it to become available
After creating it, find cloudops-nat-gw in the NAT gateways list.
Wait until its state changes to Available. Don’t change the private route table yet.
c: connect the private subnets to the NAT gateway
This is needed so that the ec2 instances can download Nginx and other required packages without being directly exposed to the internet
Go to VPC → NAT gateways and check cloudops-nat-gw.
- If its state is Pending, wait.
- Continue only when its state is Available.
c2: Update the private route table
Open VPC → Route tables and select:
cloudops-pri-rt: rtb-096a91c12c1845eb9
- Open the Routes tab.
- Click Edit routes.
- Click Add route.
- Enter the following:
| Field | Value |
|---|---|
| Destination | 0.0.0.0/0 |
| Target | NAT Gateway |
| NAT Gateway | cloudops-nat-gw (nat-...) |
d. Click Save changes.
Your private route table should now look like this:
| Destination | Target | Purpose |
|---|---|---|
10.10.0.0/16 | local | Communication within the VPC |
0.0.0.0/0 | cloudops-nat-gw | Outbound internet access |
This allows private instances to initiate outbound connections while preventing unsolicited internet connections directly to them. Their security groups still control permitted traffic.
Important: Both private subnets should be associated with cloudops-pri-rt, and the NAT Gateway’s public subnet must have a route to the Internet Gateway.
Our private route table now has a route through the NAT Gateway, so the private subnets have an outbound internet path.
Before launching the EC2 instances, let’s create an IAM role. This will let us administer the private instances through AWS Systems Manager and later grant the ec2 instances controlled access to our S3 bucket – without storing AWS access keys on the servers.
What is AWS IAM Role? IAM role is a temporary security identity with specific permissions that you can create in your AWS account. Unlike an IAM user, a role does not have long-term credentials like a password or secret access keys. Instead, trusted entities such as AWS services (like Amazon EC2 or AWS Lambda), applications, or users – assume the role to receive temporary security credentials that expire automatically
Phase 3 – Set up IAM and S3
1 – Create an IAM role for EC2
In the AWS Console:
- Open IAM → Roles.
- Click Create role.
- Under Trusted entity type, choose AWS service.
- Under Use case, choose EC2.
- Click Next.
2: Attach the Systems Manager policy
Search for and select this AWS-managed policy:
AmazonSSMManagedInstanceCore
This allows the EC2 instances to communicate with Systems Manager for session access and management.
Click Next.
3: Name and create the role
Use these details:
| Setting | Value |
|---|---|
| Role name | cloudops-ec2-role |
| Trusted entity | EC2 |
| Permissions policy | AmazonSSMManagedInstanceCore |
Create the role.
Do not attach AdministratorAccess, and don’t create or store long-term AWS access keys on the instances.
Why this matters
Secure administration:
We can use Systems Manager Session Manager to access the private EC2 instances without opening SSH port 22 to the internet.
Least-privilege access:
The role will give the instances only the permissions they need. Later, we will scope S3 access to the CloudOps project bucket.
More so, you absolutely can create a jump box (bastion host) instead.
The important distinction is that an IAM role and a jump box solve different problems:
- IAM role: Gives an EC2 instance permission to use AWS services, such as Systems Manager or S3, without storing permanent access keys on the instance.
- Jump box: Gives an administrator a controlled network path to connect to private EC2 instances, typically using SSH.
A jump box does not replace the IAM role if your application or ec2 instances needs permission to access S3 or you want to use Systems Manager.
Compare the options
| Consideration | Systems Manager | Jump box |
|---|---|---|
| SSH port 22 open to internet | No | No, if configured properly |
| Requires an IAM instance role | Yes | Not necessarily for SSH, but AWS permissions may still be needed |
| Requires a separate EC2 instance | No | Yes |
| Ongoing infrastructure cost | No additional jump-box instance; other access components may incur charges | Extra EC2 instance and potentially public IPv4 charges |
| Administration | Browser or CLI session | SSH client |
| Learning value | Modern AWS operations and IAM | Traditional bastion and SSH networking |
The recommendation for our CloudOps project
We will use Systems Manager (SSM) with the IAM role for this project.
We already have a NAT Gateway, so the private EC2 instances can reach the Systems Manager service over outbound HTTPS. With the AmazonSSMManagedInstanceCore policy attached to their instance role, and the SSM Agent running, we can administer them without launching another EC2 instance.
That means we will avoid paying for a separate jump box and avoid exposing SSH to the internet.
One additional benefit: we will eventually need an IAM role for controlled S3 access anyway. We can use the same EC2 role for SSM and add only the specific S3 permissions the application needs.
4 – Create the s3 bucket
In the AWS Console:
- Open S3 → General purpose buckets.
- Click Create bucket.
- Configure the following:
| Setting | Value |
|---|---|
| AWS Region | Europe (Stockholm) – eu-north-1 (dependent on your region) |
| Bucket type | General purpose |
| Bucket name | cloudops-portal-533267195508-eun1 |
| Object Ownership | ACLs disabled (recommended) |
| Block Public Access | Keep all four settings enabled |
| Bucket Versioning | Disable for now to keep the project simple |
| Default encryption | Keep the default encryption enabled |
S3 bucket names must be globally unique. If AWS says this name is already taken, add a few extra digits to the end and try again.
4. Click Create bucket.
Why keep the bucket private?
Our users will access the website through the Application Load Balancer, not directly through S3. Keeping the bucket private avoids accidentally exposing archived files and follows the least-privilege approach.
We will use S3 as a private archive/backup for the website files, rather than hosting the public website directly from S3.
5 – Add S3 permissions to the EC2 role
We should grant the role access only to our project bucket, not to every S3 bucket in our AWS account.
In the AWS Console:
- Open IAM → Roles.
- Select
cloudops-ec2-role. - Open Permissions → Add permissions → Create inline policy.
- Select the JSON tab.
- Replace the editor contents with the policy below, substituting your exact bucket name if it differs.
{
  "Version": "2012-10-17",
  "Statement": [
    {
      "Sid": "ListCloudOpsPortalBucket",
      "Effect": "Allow",
      "Action": "s3:ListBucket",
      "Resource": "arn:aws:s3:::cloudops-portal-533267195508-eun1"
    },
    {
      "Sid": "ReadAndUploadCloudOpsPortalObjects",
      "Effect": "Allow",
      "Action": [
        "s3:GetObject",
        "s3:PutObject"
      ],
      "Resource": "arn:aws:s3:::cloudops-portal-533267195508-eun1/*"
    }
  ]
}- Click Next.
- Name the policy
cloudops-portal-s3-access. - Create the policy.
This allows the instances to list the bucket and read or upload objects. It does not grant permission to delete objects or change bucket settings.
Before saving: make sure the bucket name in the policy matches your actual bucket name exactly.
Now we are ready to prepare the web servers.
Phase 4 – Deploy the web servers
1: Prepare the EC2 launch settings
Open the AWS Console and go to EC2 → Instances → Launch instances.
Use these settings for both Ubuntu instances
| Setting | Server 1 | Server 2 |
|---|---|---|
| Name | cloudops-web-01 | cloudops-web-02 |
| AMI | Ubuntu Server LTS | Ubuntu Server LTS |
| Instance type | t3.micro | t3.micro |
| VPC | cloudops-vpc | cloudops-vpc |
| Subnet | cloudops-pri-sub-a | cloudops-pri-sub-b |
| Private IP range | 10.10.16.x | 10.10.17.x |
| Auto-assign public IP | Disabled | Disabled |
| Security group | cloudops-web-sg | cloudops-web-sg |
| IAM instance profile | cloudops-ec2-role | cloudops-ec2-role |
Choose an Ubuntu LTS image, preferably the current Ubuntu Server image if available in your Region.
Important checks:
- Key pair: If you plan to use SSH through a jump box, create or select a key pair and keep the private key safe. If using Systems Manager, a key pair isn’t required, provided the SSM Agent and network connectivity are working.
- Outbound traffic: The web-server security group must allow outbound traffic for package downloads and Systems Manager communication.
- NAT Gateway: Your private route table should have
0.0.0.0/0pointing to the NAT Gateway. This lets Ubuntu reach package repositories without assigning public IP addresses. - Cost: Two running EC2 instances, their storage, the NAT Gateway, and the Application Load Balancer will incur charges. We can delete the NAT Gateway after installation if you no longer need outbound access, but that may also affect Systems Manager access.
2: Use AWS Systems Manager to access the ec2 Instances
- Go to EC2 → Instances.
- Select your Ubuntu instance.
- Click Connect.
- Open the Session Manager tab.
- Click Connect.
If it works, you’ll get a browser-based shell.
3: Install Nginx on both servers
Once the instances are running and you have a way to access their terminals, run this on each:
sudo apt update
sudo apt install -y nginx
sudo systemctl enable –now nginx
sudo systemctl status nginx
Test Nginx:
curl http://localhost
4: prepare the web servers
Inside the Session Manager terminal, run:
hostname
hostname -I
sudo systemctl is-active nginx
These commands show the hostname, private IP address, and Nginx service status.
Then we can deploy your website files to:
/var/www/html/Nginx normally serves its default website from /var/www/html on Ubuntu. We will replace the default page with our project files.
After that, we will configure the second instance in cloudops-pri-sub-b, deploy the same website there, and create the Application Load Balancer target group, and then the Load Balancer.
5 – Prepare your website files
Since both EC2 instances are in private subnets, and we currently have a NAT Gateway providing outbound internet access, they can reach GitHub and clone your repository.
a: Create your GitHub repository
Go to your GitHub and create a new repository or you can clone the repo from TekNeed’s public repository [Link]
Connect to cloudops-web-01 and cloudops-web-02
Open AWS Console:
- Go to EC2 → Instances.
- Select
cloudops-web-01andcloudops-web-02 - Click Connect → Session Manager → Connect.
b: Check whether Git is installed
Run:
git --versionIf Git is not installed, install it:
sudo apt update
sudo apt install git -y
Then verify:
git --versionc: Clone your GitHub repository
We will keep the application source code separate from Nginx’s document root.
Run:
cd /opt
sudo git clone https://github.com/tekneed/cloudops.git
Change ownership so your normal Ubuntu user can work with the files:
sudo chown -R ubuntu:ubuntu /opt/cloudopsInspect the repository:
ls -la /opt/cloudopsWe’ll configure Nginx to serve the correct directory, test the first instance, and then repeat on the second.
d: Deploy the application to Nginx
Currently, your files are in /opt/cloudops, but Nginx serves content from /var/www/html by default.
We will copy the application files into Nginx’s document root.
Run on cloudops-web-01 and cloudops-web-02 :
sudo cp -r /opt/cloudops/. /var/www/html/Set appropriate ownership and permissions:
sudo chown -R www-data:www-data /var/www/html
sudo find /var/www/html -type d -exec chmod 755 {} \;
sudo find /var/www/html -type f -exec chmod 644 {} \;
This allows Nginx to read and serve the application files.
e: Test the main application:
curl -I http://localhostYou should see an HTTP response similar to:
HTTP/1.1 200 OK
Server: nginx
Content-Type: text/html
Also test the health-check page:
curl -I http://localhost/health.htmlYou should see the HTML content of your health page.
The -I option tells curl to send an HTTP HEAD request. It retrieves the response headers without displaying the page content.
Without -I, curl sends a normal GET request and displays the actual HTML content of the page.
Both results demonstrate that the health-check page is accessible.
Both EC2 instances ready
We now have:
cloudops-web-01: Application deployed and responding.cloudops-web-02: Application deployed and responding.- Nginx running on both instances.
- Health-check page available on both instances.
Phase 5 – Configure the Application Load Balancer
Before creating the actual load balancer, we need a target group.
Think of the target group as the collection of backend servers to which the load balancer forwards incoming requests.
Our target group will contain:
cloudops-web-01cloudops-web-02
Both will receive HTTP traffic on port 80.
- Target Group: Keeps a list of your EC2 instances and checks whether they are healthy.
- Application Load Balancer (ALB): Receives public HTTP requests and forwards them to healthy instances in the target group.
1 – Create the target group
- In the AWS Console:
- Confirm you are still in Europe (Stockholm) –
eu-north-1. – Depending on the region you started with - Search for EC2.
- In the left navigation pane, scroll to Load Balancing.
- Select Target Groups.
- Click Create target group.
Choose the following settings:
Basic configuration
| Setting | Value |
|---|---|
| Target type | Instances |
| Target group name | cloudops-web-tg |
| Protocol | HTTP |
| Port | 80 |
| IP address type | IPv4 |
| VPC | cloudops-vpc |
Health checks
| Setting | Value |
|---|---|
| Protocol | HTTP |
| Path | /health.html |
| Port | Traffic port |
| Healthy threshold | 2 |
| Unhealthy threshold | 2 |
| Timeout | 5 seconds |
| Interval | 30 seconds |
| Success codes | 200 |
The health-check path is important. AWS will periodically request /health.html on each EC2 instance. If an instance responds successfully, it can receive application traffic.
Click Next.
1b – Register your EC2 instances
Under Available instances, locate:
cloudops-web-01cloudops-web-02
Select both instances.
For each instance, confirm the port is 80, then click Include as pending below.
You should see both instances listed under Review targets.
Click Create target group.
1c – Verify the target group
After creation:
- Open
cloudops-web-tg. - Select the Targets tab.
- Confirm both EC2 instances are registered.
You may initially see Unused or another status because the target group is not yet associated with a load balancer. That is not necessarily an error. Health checks will become meaningful once we attach it to the ALB.
One important check before moving on: your cloudops-alb-sg must allow inbound HTTP on port 80 from the internet, and cloudops-web-sg must allow inbound port 80 from cloudops-alb-sg. This is what allows public traffic to reach the ALB and the ALB to reach your private instances.
1d – Check the target group
In AWS Console:
- Go to EC2 → Target Groups.
- Select
cloudops-web-tg. - Open the Targets tab.
You should see both instances:
cloudops-web-01cloudops-web-02
1e: Understand the target status
You may see one of these statuses:
| Status | Meaning |
|---|---|
healthy | Instance passed its health checks and can receive traffic. |
initial | Health checks are still running. |
unused | Target group is not currently associated with a load balancer, or the target isn’t being used. |
unhealthy | Health checks failed. |
draining | Instance is being removed from service and existing connections are being handled. |
Important: Since we haven’t created the Application Load Balancer yet, seeing unused is expected. The target group has no load balancer to perform health checks through.
1f: Confirm these details
Check that:
- Both EC2 instances are registered.
- Both use port
80. - The health-check protocol is
HTTP. - The health-check path is
/health.html.
Why are both instances showing Unused At this point?
Look at the health status details:
Target group is not configured to receive traffic from the load balancer.
This is expected because we haven’t created the Application Load Balancer yet.
AWS has registered both instances, but no load balancer is associated with the target group. Therefore, health checks haven’t started.
Once we create the ALB and associate cloudops-web-tg with it, AWS will begin checking:
http://<EC2-private-IP>:80/health.htmlBoth instances should eventually transition to healthy.
2 – Create the Application Load Balancer
Open the load balancer creation page
- Go to EC2 → Load Balancers.
- Click Create load balancer.
- Under Application Load Balancer, click Create.
We will create an internet-facing ALB with the following configuration:
CloudOps Application Load Balancer
| Setting | Value |
|---|---|
| Name | cloudops-public-alb |
| Scheme | Internet-facing |
| IP address type | IPv4 |
| VPC | cloudops-vpc |
| Availability Zones | eu-north-1a and eu-north-1b |
| Subnets | Both public subnets |
| Security group | cloudops-alb-sg |
| Listener | HTTP : 80 |
| Default action | Forward to cloudops-web-tg |
After creation, AWS will provision the ALB. Its initial state may be Provisioning, then Active.
Don’t worry if the targets initially show unhealthy. We will investigate once the ALB becomes active.
Next, we need to verify that the ALB can communicate with both instances and that their health checks are passing.
3 – Check target health
In AWS Console:
- Go to EC2 → Target Groups.
- Select
cloudops-web-tg. - Open the Targets tab.
- Refresh the page.
You should eventually see:
| Instance | Expected status |
|---|---|
cloudops-web-01 | healthy |
cloudops-web-02 | healthy |
Allow a minute or two for the health checks to run.
4 – Check the ALB DNS name
Go to EC2 → Load Balancers → cloudops-public-alb → Details.
Find the DNS name. It will look something like:
cloudops-public-alb-123456.eu-north-1.elb.amazonaws.com5 – Access your application
Open this address in your Windows browser: cloudops-public-alb-123456.eu-north-1.elb.amazonaws.com. This is dependent on your environment.
Copy it, and paste it on your browser. If it doesn’t work, add (http://cloudops-public-alb-123456.eu-north-1.elb.amazonaws.com)
You should see your CloudOps Infrastructure Portal.
The load balancer will distribute requests between the ec2 instances and checks their health.
6 – Test high availability
This is where we demonstrate why we deployed two EC2 instances.
We will simulate an application failure on cloudops-web-01 while leaving the EC2 instance itself running.
- Connect to
cloudops-web-01using Session Manager. - Run:
sudo systemctl stop nginx- Wait for the target group health check to mark
cloudops-web-01unhealthy. - Open your ALB DNS name again in your browser.
Your website should remain accessible because the ALB will route requests to cloudops-web-02.
Expected failover behaviour
cloudops-web-01: Unhealthy
cloudops-web-02: Healthy
Public website: Still accessible
Phase 6 – Store backups of your CloudOps Infrastructure Portal application
Let’s use S3 for a practical purpose to store backups of your CloudOps Infrastructure Portal application.
Step 1: Confirm the S3 bucket
First, open AWS Console:
- Search for S3.
- Click Buckets.
- Locate the bucket you created for this project.
- Copy its exact bucket name.
We need the exact name because S3 bucket names are globally unique.
Step 2: Verify the EC2 IAM role
Go to:
IAM → Roles → cloudops-ec2-role
Confirm that the role has:
AmazonSSMManagedInstanceCore- Your inline policy:
cloudops-portal-s3-access
The S3 policy should grant:
s3:ListBucketon your bucket.s3:PutObjectands3:GetObjecton objects inside your bucket.
Do not add public access or AWS access keys.
Step 3: Check AWS CLI on web-01
Connect to cloudops-web-01 through Session Manager and run:
aws --versionIf installed, run:
aws sts get-caller-identityThis checks which AWS identity the EC2 instance is using. Ideally, it should show an assumed-role identity associated with cloudops-ec2-role.
If aws is not installed, we need to install it
Because we are connected through AWS Systems Manager Session Manager, our current Linux user will be ssm-user rather than ubuntu.
and our home directory will be
/home/ssm-userWe can download the installer here:
Take the following steps:
1. Download AWS CLI
curl "https://awscli.amazonaws.com/awscli-exe-linux-x86_64.zip" -o awscliv2.zip2. Extract
unzip awscliv2.zip3. Install
sudo ./aws/install4. Verify
aws --versionThen run:
aws sts get-caller-identityOne thing to watch: ssm-user is just the Session Manager operating-system user. The AWS identity returned by the last command should be the EC2 instance’s IAM role, not ssm-user.
Look at this part of our output:
Arn: arn:aws:sts::533xxxxxx:assumed-role/cloudops-ec2-role/i-05efxxxxxxThis confirms:
- AWS account:
533xxxxxx - IAM role:
cloudops-ec2-role - EC2 instance:
i-05efxxxxxx(cloudops-web-01)
We have successfully demonstrated IAM role-based authentication. No AWS access keys were configured on the server.
Now let’s connect this instance to S3.
Step 4 – connect this instance to S3.
confirm that the EC2 instance can access the bucket using its IAM role from cloudops-web-01
Run:
aws s3 ls s3://cloudops-portal-533267195508-eun1/This tests whether the cloudops-ec2-role has permission to list the bucket. You should get an empty response if the bucket is empty, or a list of objects if it contains files.
Step 5 – Backup the website files from Nginx by uploading them to s3
a: Create a compressed website backup
On cloudops-web-01, run:
sudo tar -czvf /tmp/cloudops-portal-backup.tar.gz -C /var/www/html .What this does:
tarcreates an archive.-ccreates a new archive.-zcompresses it using gzip.-vdisplays the files being archived.-fspecifies the archive filename.-C /var/www/htmltells tar to back up the website directory.
b: Confirm the backup exists
ls -lh /tmp/cloudops-portal-backup.tar.gzYou should see the archive and its file size.
c: Upload the backup to S3
Run:
aws s3 cp /tmp/cloudops-portal-backup.tar.gz \
s3://cloudops-portal-533267195508-eun1/cloudops-backups/releases/cloudops-portal-backup.tar.gz
This uploads the archive into the cloudops-backups/releases/ folder in your private S3 bucket. S3 creates these folder-like prefixes automatically.
d: Verify the upload
After the upload completes, run:
aws s3 ls s3://cloudops-portal-533267195508-eun1/cloudops-backups/releases/You should see cloudops-portal-backup.tar.gz listed with its size and upload date.
e: Test downloading the backup
Let’s demonstrate that the backup can be retrieved from S3.
First, create a temporary directory:
mkdir -p ~/s3-restore-testNow download the backup:
aws s3 cp \
s3://cloudops-portal-533267195508-eun1/cloudops-backups/releases/cloudops-portal-backup.tar.gz \
~/s3-restore-test/cloudops-portal-backup.tar.gz
Confirm that the downloaded file exists:
ls -lh ~/s3-restore-test/
Leave a Reply