Last updated: August 2026
In this lesson, you will learn the step-by-step guide of how to create User Account on Tanzu Kubernetes Grid Integrated
Understanding The Subject Matter
Creating individual user accounts on VMware Tanzu Kubernetes Grid Integrated (TKGI) is an important part of managing access to Kubernetes environments securely.
Instead of giving everyone access through the default administrator account, you can create separate user accounts, authenticate them through the TKGI User Account and Authentication (UAA) service, and then control what those users can do inside a Kubernetes cluster using Kubernetes RBAC.
In this guide, I will show you how to create user account on Tanzu Kubernetes Grid Integrated (TKGI) platform, log in to the TKGI environment, obtain Kubernetes cluster credentials, assign the user the cluster-admin role, and finally test the account by accessing the Kubernetes cluster.
Important: The passwords, client secrets and other credentials shown in command examples below are placeholders. They are not the originals. TekNeed will not publish real passwords, UAA client secrets or other credentials on a public website.
Before creating the user, it is important to understand how authentication and authorization work in a TKGI environment.
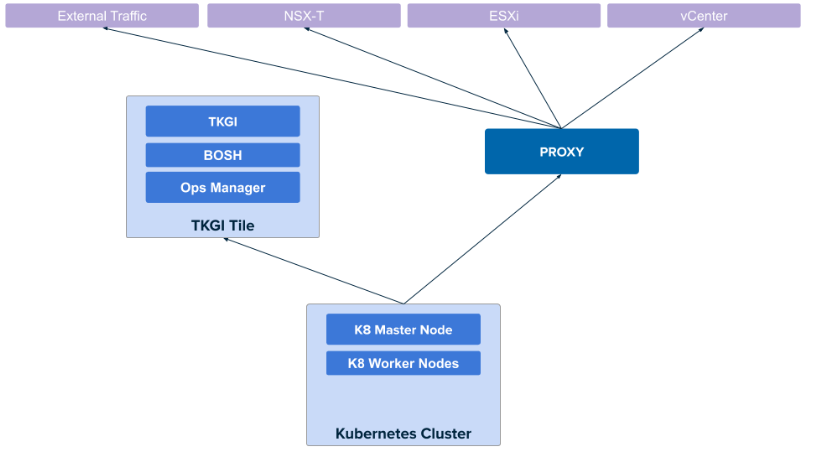
There are several components involved in this process of User Account on Tanzu Kubernetes Grid Integrated:
- Ops Manager – Used to manage the TKGI foundation and its deployed components.
- BOSH – Used to interact with and manage the underlying Tanzu components.
- UAA – The User Account and Authentication service used by TKGI for user authentication.
- PKS CLI – The command-line interface used to authenticate to TKGI and manage Kubernetes clusters.
- Kubernetes RBAC – Controls what an authenticated user is allowed to do inside a Kubernetes cluster.
- ClusterRole – Defines a set of Kubernetes permissions.
- ClusterRoleBinding – Connects a user to a ClusterRole.
The important thing to understand is that creating a user in UAA does not automatically give that user administrative access to Kubernetes.
There are actually two separate steps:
- Create and authenticate the user through UAA/TKGI.
- Authorize that user inside Kubernetes using RBAC.
For example, you can create a user called:
victorin UAA.
That user can exist successfully in UAA but still have no permission to run commands such as:
kubectl get nodesuntil the appropriate Kubernetes RBAC permissions are assigned.
This separation between authentication and authorization is very important.
Authentication vs Authorization
Think of it this way:
Authentication asks:
Who are you?
UAA answers this by validating the user’s credentials.
Authorization asks:
What are you allowed to do?
Kubernetes RBAC answers this by checking the user’s roles and bindings.
Therefore, creating the account is only part of the job.
ACTION TIME
Now let’s create a user account on Tanzu Kubernetes Grid Integrated (TKGI)
Step 1 – Log in to the Ops Manager VM
First, SSH into the Ops Manager VM belonging to the TKGI foundation where the user needs to be created.
[tekneed_Victor@vmwarepkscli01 ~]$ ssh ubuntu@reg1tkgiqamgr.tekneed.com

Welcome to Ubuntu 22.04.5 LTS (GNU/Linux 5.15.0-136-generic x86_64)

 * Documentation:  https://help.ubuntu.com
 * Management:     https://landscape.canonical.com
 * Support:        https://ubuntu.com/pro
Last login: Mon Aug 10 13:37:19 UTC 2026 from 10.10.10.47 on pts/0
Last login: Wed Aug 12 14:53:24 2026 from 10.10.10.47
The hostname will obviously be different in your own environment.
Step 2 – Load the BOSH Environment
After logging into the Ops Manager VM, load the BOSH environment.
[tekneed_Victor@vmwarepkscli01 ~]$ . ./bosh
[tekneed_Victor@vmwarepkscli01 ~]$
This loads the BOSH-related environment variables and configuration into your current shell.
You can think of it as preparing the shell so that the BOSH/TKGI management commands can communicate with the appropriate environment.
Step 3 – Configure the UAA Target
The next step is to configure uaac to communicate with the UAA endpoint.
[tekneed_Victor@vmwarepkscli01 ~]$ uaac target https://reg1tkgiqamgr.tekneed.com:8443 --ca-cert /var/tempest/workspaces/default/root_ca_certificate


Target: https://reg1tkgiqamgr.tekneed.com:8443
Context: admin, from client admin
What does uaac target do?
The uaac target command tells the UAA client which UAA server it should communicate with.
The --ca-cert option specifies the CA certificate that should be used to establish trust with the UAA endpoint.
This is preferable to simply disabling certificate verification.
Step 4 – Authenticate to UAA
Before you can create a user, you need to authenticate to UAA with an account that has sufficient privileges.
A common approach is to obtain a token using the UAA admin client:
[tekneed_Victor@vmwarepkscli01 ~]$ uaac token client get admin -s edgwkehewdhh34lsdjslah7sss3wde-_b
WARNING: Decoding token without verifying it was signed by its authoring UAA

Successfully fetched token via client credentials grant.
Target: https://reg1tkgiqamgr.tekneed.com:8443
Context: admin, from client admin
Step 5 – Create the User Account
Now that you are authenticated to UAA, you can create the user account on Tanzu Kubernetes Grid Integrated .
[tekneed_Victor@vmwarepkscli01 ~]$ uaac user add victor --emails victor.t@tekneed.com -p CrazyW0RLD221#

user account successfully added
Step 6 – Verify That the User Exists
[tekneed_Victor@vmwarepkscli01 ~]$  uaac users |grep  vic

    username: victor
Step 7 – Log In to the TKGI Environment
Next, authenticate to the TKGI API using the PKS CLI.
[tekneed_Victor@vmwarepkscli01 ~]$ pks login  -a reg1tkgiqamgr.tekneed.com -u tekneed_victor -p CraZYFooDww332 -k

API Endpoint: reg1tkgiqamgr.tekneed.com
User: tekneed_victor
Login successful.
What does -k do?
The -k option tells the PKS CLI to skip TLS certificate verification.
This can be useful in environments where the CLI cannot validate the certificate chain, but it should be used carefully.
Where possible, it is better to configure proper CA trust rather than routinely bypass certificate verification.
Step 8 – List the Available TKGI Clusters in the foundation if you wish
[tekneed_Victor@vmwarepkscli01 ~]$ pks clusters


PKS Version     Name             k8s Version  Plan Name   UUID                                  Status     Action
1.22.1-build.4  cluster1  1.31.5       plan1  ewwe-fwe32-cwe244-323fs-fsseeffs33dfds  succeeded  UPDATE
1.22.1-build.4  cluster2   1.31.5       plan2       ewwe-fwe32-cwe244-323fs-fsseeffs33dfds  succeeded  UPGRADE
1.22.1-build.4  cluster3        1.31.5       plan3      wawwe-fwe32-cwe244-323fs-fsseeffs33dfds  succeeded  ROTATE_NSX_CERTIFICATES
Step 9 – Get Credentials for the Kubernetes Cluster
Suppose we want to work with cluster1, use the command,
[tekneed_Victor@vmwarepkscli01 ~]$ pks get-credentials cluster1


Fetching credentials for cluster cluster1.
Password: ********************
Context set for cluster cluster1.

You can now switch between clusters by using:
$kubectl config use-context <cluster-name>
Step 10 – Create a Kubernetes ClusterRoleBinding
This is the part that connects the UAA user to Kubernetes permissions.
[tekneed_Victor@vmwarepkscli01 ~]$  k config current-context

cluster1
[tekneed_Victor@vmwarepkscli01 ~]$ vi victor-crb.yamlapiVersion: rbac.authorization.k8s.io/v1
kind: ClusterRoleBinding
metadata:
name: victor-admin-binding
subjects:
- kind: User
  name: oidc:victor
  apiGroup: rbac.authorization.k8s.io
roleRef:
  kind: ClusterRole
  name: cluster-admin
  apiGroup: rbac.authorization.k8s.io
save the file
Understanding the ClusterRoleBinding
Let’s break this configuration down.
kind: ClusterRoleBinding
kind: ClusterRoleBindingA ClusterRoleBinding grants permissions defined by a ClusterRole to a user, group or service account.
Because this is a ClusterRoleBinding, the permissions apply at the cluster level.
The subject
The following section identifies the user:
subjects:
- kind: User
name: oidc:victor
apiGroup: rbac.authorization.k8s.ioThe important part here is:
name: oidc:victorThe oidc: prefix is significant in this TKGI authentication setup because the Kubernetes API server is receiving the authenticated identity through the OIDC/UAA integration.
In other words, although the UAA account is:
victorthe identity presented to Kubernetes is:
oidc:victorThis is why the ClusterRoleBinding must reference the identity that Kubernetes actually sees.
The role reference
The following section defines what permissions the user receives:
roleRef:
kind: ClusterRole
name: cluster-admin
apiGroup: rbac.authorization.k8s.ioHere we are binding the user to:
cluster-adminThe Kubernetes built-in cluster-admin ClusterRole provides extremely broad administrative privileges across the cluster.
Therefore, you should not automatically give every TKGI user cluster-admin.
For normal users, it is usually better to create or assign a role containing only the permissions they require.
Step 11 – Apply the ClusterRoleBinding
[tekneed_Victor@vmwarepkscli01 ~]$  k apply -f victor-crb.yaml

clusterrolebinding.rbac.authorization.k8s.io/victor-admin-binding created
Step 12 – Verify the ClusterRoleBinding if you wish
You can confirm that the binding exists with:
[tekneed_Victor@vmwarepkscli01 ~]$  k get clusterrolebinding |grep victor

victor-admin-binding                                         ClusterRole/cluster-admin                                                   2m53s
Step 13 – Test the User Account
The final step is to actually test the new User Account on Tanzu Kubernetes Grid Integrated that was created.
Rather than assuming that the account works because the UAA user was created successfully, test authentication and Kubernetes authorization.
[tekneed_Victor@vmwarepkscli01 ~]$ pks get-kubeconfig cluster1 -u victor -p CraZYFooDww332 -a reg1tkgiqamgr.tekneed.com -k

Fetching kubeconfig for cluster cluster1 and user victor.
You can now use the kubeconfig for user victor:
$kubectl config use-context cluster1
[tekneed_Victor@vmwarepkscli01 ~]$ kubectl get nodes

NAME                                   STATUS   ROLES    AGE    VERSION
dskkje-fwaf-ehkasb6-2ejjdddasawwssca   Ready    <none>   245d   v1.31.5+vmware.1
dskkje-fwaf-ehkasb6-2ejjdddasawwssca   Ready    <none>   291d   v1.31.5+vmware.1
dskkje-fwaf-ehkasb6-2ejjdddasawwssca   Ready    <none>   291d   v1.31.5+vmware.1
dskkje-fwaf-ehkasb6-2ejjdddasawwssca   Ready    <none>   292d   v1.31.5+vmware.1
dskkje-fwaf-ehkasb6-2ejjdddasawwssca   Ready    <none>   292d   v1.31.5+vmware.1
A Note About Usernames
One thing that can easily cause confusion is the username used at different stages.
For example, you may create the UAA user as:
victorbut your TKGI login could use another username format depending on how your environment is configured.
More importantly, the Kubernetes RBAC identity may appear as:
oidc:victorTherefore, if a user can authenticate successfully but receives:
Error from server (Forbidden)do not immediately assume that authentication is broken.
Authentication and authorization are separate.
Check the Kubernetes identity and RBAC configuration.
For example:
kubectl get clusterrolebindingand:
kubectl describe clusterrolebinding victor-admin-bindingHow to Troubleshoot Permission Problems
Suppose the user can authenticate but receives:
Error from server (Forbidden)This normally indicates that authentication has succeeded but the user does not have sufficient authorization for the requested operation.
You can check the user’s permissions using:
kubectl auth can-i get nodesYou can also test:
kubectl auth can-i get pods -AFor a cluster administrator:
kubectl auth can-i '*' '*' --all-namespacesA successful response should be:
yesIf the response is:
nothen the user does not have the required RBAC permission.
You should then inspect the relevant Role, ClusterRole, RoleBinding or ClusterRoleBinding.
ClusterRole vs Role
It is also important to understand the difference between Role and ClusterRole.
A Role normally grants permissions within a particular namespace.
For example:
namespace: developmentA ClusterRole can define permissions at the cluster level and can also be used in namespace-scoped bindings.
When you use:
kind: ClusterRoleBindingthe permissions are bound at the cluster level.
This is why assigning:
cluster-adminthrough a ClusterRoleBinding gives the user extremely broad access.
ClusterRoleBinding vs RoleBinding
The distinction is straightforward:
RoleBinding
A RoleBinding grants permissions within a namespace.
For example:
victor
   |
   +---- RoleBinding
            |
            +---- Role
                   |
                   +---- read pods in development
ClusterRoleBinding
A ClusterRoleBinding grants the referenced ClusterRole at the cluster level.
For example:
victor
   |
   +---- ClusterRoleBinding
            |
            +---- cluster-admin
The second configuration is considerably more powerful.
Therefore, in a production environment, avoid using cluster-admin unless the user genuinely needs full cluster administration.
A Better Approach for Normal Users
The example in this article uses:
cluster-adminbecause the objective is to demonstrate how to create an administrative user and verify that the authentication and RBAC integration work.
However, this is not necessarily the best design for everyday users.
For example, if a developer only needs to view pods and deployments in the development namespace, giving that developer:
cluster-adminwould provide far more access than required.
A better design would be:
User
 |
 +-- RoleBinding
       |
       +-- Role
             |
             +-- get pods
             +-- get deployments
             +-- get services
This follows the principle of least privilege.
Important Security Considerations
When managing TKGI users, there are several things worth keeping in mind.
Never publish real passwords
Do not publish commands containing real credentials:
-p MyRealPasswordUse placeholders:
-p '<USER_PASSWORD>'The same applies to UAA client secrets.
Avoid sharing administrator credentials
Do not use the default TKGI/UAA administrator account as the normal account for every administrator.
Create individual accounts instead.
This provides better accountability because activities can be associated with individual users.
Use strong passwords
TKGI/UAA accounts should use strong passwords that comply with your organization’s password policy.
Avoid passwords that are easy to guess or reused across multiple systems.
Do not unnecessarily use cluster-admin
The cluster-admin role is extremely powerful.
Use it only when required.
For application teams, developers and read-only users, create appropriate namespace-level or cluster-level roles instead.
Be careful with -k
Commands such as:
pks login ... -kand:
pks get-kubeconfig ... -kdisable normal TLS certificate verification.
Although this can be useful for troubleshooting or environments where certificate validation has not been configured correctly, proper CA trust is preferable for production environments.
Common Problems
User was created but cannot access Kubernetes
Creating the user with:
uaac user adddoes not automatically grant Kubernetes permissions.
Check that the appropriate RBAC binding exists:
kubectl get clusterrolebinding | grep victorUser receives Forbidden
Check the user’s RBAC permissions:
kubectl auth can-i get nodesThen inspect the binding:
kubectl describe clusterrolebinding victor-admin-bindingPay particular attention to the username.
For an OIDC-authenticated user, it may need to be:
oidc:victorrather than simply:
victorUser can authenticate but cannot see clusters
Authentication to UAA and permissions to perform TKGI operations are not necessarily the same thing.
If:
pks loginsucceeds but the user cannot perform the expected TKGI operations, investigate the TKGI/UAA authorization configuration in addition to Kubernetes RBAC.
Useful Commands
Here is a quick reference for the commands used in this procedure.
SSH to the Ops Manager VM
ssh ubuntu@<OPS_MANAGER_HOSTNAME>Load BOSH environment
. ./boshConfigure UAA
uaac target https://<TKGI_API>:8443 \
  --ca-cert /var/tempest/workspaces/default/root_ca_certificate
Authenticate to UAA
uaac token client get admin -s <UAA_ADMIN_CLIENT_SECRET>Create a user
uaac user add <USERNAME> \
  --emails <EMAIL_ADDRESS> \
  -p '<PASSWORD>'
Verify the user
uaac users | grep <USERNAME>Log in to TKGI
pks login \
  -a <TKGI_API_ENDPOINT> \
  -u <USERNAME> \
  -p '<PASSWORD>' \
  -k
List TKGI clusters
pks clustersGet cluster credentials
pks get-credentials <CLUSTER_NAME>Check Kubernetes context
kubectl config current-contextApply RBAC configuration
kubectl apply -f <RBAC_FILE>.yamlVerify ClusterRoleBinding
kubectl get clusterrolebinding | grep <USERNAME>Check permissions
kubectl auth can-i get nodesGet Kubernetes nodes
kubectl get nodesGet all pods
kubectl get pods -AConclusion
Creating a user account on VMware TKGI involves more than simply adding a username and password.
The process can be summarized into three major stages:
- Create the user in UAA
- Authenticate the user through TKGI
- Authorize the user in Kubernetes using RBAC
In this example, we created a UAA user, authenticated to the TKGI foundation using the PKS CLI, obtained credentials for a Kubernetes cluster, created a ClusterRoleBinding, and assigned the user the Kubernetes cluster-admin role.
We then tested the account by retrieving the user’s kubeconfig and running:
kubectl get nodesThe most important concept to remember is this:
UAA determines who the user is, while Kubernetes RBAC determines what that user can do inside the Kubernetes cluster.
Once this distinction is clear, managing users on a TKGI platform becomes much easier to understand and troubleshoot.
For production environments, however, avoid giving users cluster-admin unless absolutely necessary. Define roles around the user’s actual responsibilities and follow the principle of least privilege.
Leave a Reply