
Last updated: March 2022
In this lesson, you will learn with examples how to use Ansible template module to parse a jinja2 template file.
Contents
In the previous lesson, we learned the different ways of how some various file-related modules can be used to manage and manipulate files. Using these modules to manage files may not be easy sometimes, especially when it comes to managing large files, and managing files dynamically.
For example, the blockinfile and lineinfile modules can only be used to add a few lines to a file. What if one needs to add a larger number of lines, especially dynamically?
Therefore, in this lesson, we will look at how to manage and manipulate files but this time around by using the template module and a jinja2 template file which can make file manipulation and management easy.
The question now would be;
1. What is jinja2 template file?
2. What is a template module?
Jinja2 is a modern-day templating language for python developers. It is an extensible templating engine, and it can be used in Ansible for templating files.
The idea here is that a template file will be created by using the jinja2 template system, and the Ansible template module will be used inside of a playbook to reference or render the jinja2 template file that has been created.
Jinja2 is very effective in managing network devices such as switches, routers, firewalls, etc. The jinja2 template file will have the extension, (.j2)
Enough of the theory about the Ansible template module and Ansible Jinja2 templating, let’s see how this is practically applicable.
You can click here to read more about jinja2.
Ansible Template Module With Examples
In the example below, we are going to create a custom message of the day file(MOD). The file will display the OS distribution and version, the FQDN, and the Administrator.
The following steps may be taken.
1. Create a jinja2 template file with the name (temp.j2) for the message of the day (MOD)
[lisa@drsdev1 ansible]$ vim temp.j2This server is a {{ ansible_facts['distribution'] }} version
{{ ansible_facts['distribution_version'] }} system.
The fully qualified domain name is {{ ansible_facts['fqdn'] }}.
The Administrator is {{ administrator }}. Contact the Administrator for Administrative privileges.-The facts/variable, {{ ansible_facts[‘distribution’] }} will display the OS distribution
-The facts/variable, {{ ansible_facts[‘distribution_version’] }} will display the OS version
-The facts/variable, {{ ansible_facts[‘fqdn’] }} will display the fully qualified domain name of the system
-The variable, {{ administrator }} will display the variable value which can be specified in the playbook or a separate file.
Now that the jinja2 template file has been created, we need to create a playbook, and in the playbook use the template module that will be used to render the jinja2 template file.
2. Create a playbook file that will be used with the template, of course, using the template module to initiate/activate/process/parse/render the jinja2 template.
[lisa@drsdev1 ansible]$ vim playbook11.yml- name: display Message of the day (MOD)
hosts: all
vars:
- administrator: seun@tekneed.com
tasks:
- name: configure MOD
template:
src: temp.j2
dest: /etc/MOD
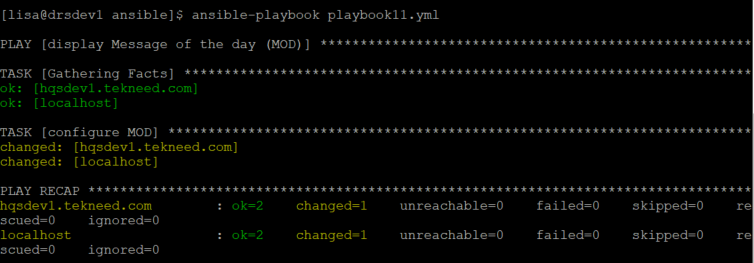
3. Run the playbook
[lisa@drsdev1 ansible]$ ansible-playbook playbook11.yml --syntax-check[lisa@drsdev1 ansible]$ ansible-playbook playbook11.yml
PLAY [display Message of the day (MOD)] ******************************************************
...........................
4. On one of the hosts, you can verify that the file to display the message of the day has been created.
[lisa@drsdev1 ansible]$ ansible hqsdev1.tekneed.com -a "cat /etc/MOD"

hqsdev1.tekneed.com | CHANGED | rc=0 >>
This server is a RedHat version
 8.1 system.
The fully qualified domain name is hqsdev1.tekneed.com.
The Administrator is seun@tekneed.com. Contact the Administrator for Administrative privileges.

Having gone through the example below, you can see how flexible, dynamic and easy it is to use the jinja2 template to manage large files.
The jinja2 template module can also be very useful to populate configuration files, for example, the (/etc/httpd/conf.d/hqsdev1.conf) can be populated using the jinja2 template file below.
# {{ ansible_managed }}
<VirtualHost {{ ansible_default_ipv4.address }}:{{ custom.port }}>
serverAdmin root@{{ ansible_domain }}
ServerName {{ ansible_fqdn }}
ServerAlias {{ ansible_hostname }}
DocumentRoot /vhosts/{{ ansible_fqdn }}/html
ErrorLog logs/{{ ansible_hostname}}-error.log
CustomLog logs/{{ ansible_hostname }}-access.log common
</VirtualHost>

<Directory "/vhosts/{{ ansible_fqdn }}/html">
AllowOverride none
Options Indexes
Require all granted
</Directory>
The task below can also be used to render the template file.
- name: configure jina2 template
  template:
     src: template.j2
     dest: /etc/httpd/conf.d/{{ ansible_hostname }}.conf

- name: configure a sample
  copy:
    content: "This is {{ ansible_fgdn }}\n"
    dest: /vhosts/{{ ansible_fqdn }}/html/index.html
Using Ansible jinja2 Template File With Loops and Conditions
The jinja2 template file can also be used with conditional statements and loops.
jinja2 uses the “for” statement to provide looping functionality. In the example below, the variable called user will be created based on another already defined variable called users
{% for user in users %}
 {{ user }}
{% endfor %}
The example below is a practical example of using jinja2 with loop (creating and ending a loop using jinja2)
This template can be used to populate the /etc/hosts file.
#vim network.j2{% for host in network_properties %}
{{ host.ipv4 | ipaddr('address') }} {{ host.ename }} {{ host.bname }}
{% endfor %}What this means is that the item on the list will be iterated over, and the item on the list, in this case, is the network_properties which is inside of a variable file called network-var.yml.
host, in this case, refers to the various items inside of a dictionary called network_properties. Each dash represents one host.
The jinja2 template means host.ipv4 which simply refers to item.host will extract only the IP address, and the bname as well as the ename.
#vim network-var.ymlnetwork_properties:
- bname: hqsdev1
ename: hqsdev1.tekneed.com
ipv4: 192.168.1.20/24
gw4: 192.168.1.1
mtu: 1500
dns: 192.168.1.2
- bname: hqsprd1
ename: hqsprd1.tekneed.com
ipv4: 192.168.1.21/24
gw4: 192.168.1.1
mtu: 1500
dns: 192.168.1.2
- bname: hqaqas1
ename: hqsqa1.tekneed.com
ipv4: 192.168.1.22/24
gw4: 192.168.1.1
mtu: 1500
dns: 192.168.1.2
The playbook below, of course with the template module can be used to render the jinja2 template file.
- name: configure networking
  hosts: hqsdev1.tekneed.com
  vars_files
    - network-var.yml
  tasks:
    - name: populate /etc/hosts
      template:
        dest: /etc/hosts
        src: network.j2
Jinja2 uses the “if” statement to provide conditional control. This allows you to put a line in a deployed file if certain conditions are met.
In the example below, the value of the result variable is placed in the deployed file only if the value of the finished variable is True.
{% if finished %}
{{ result }}
{% endif %}
Other Examples Of Using Ansible Template Module With Jinja 2 Template File
-using Ansible jinja2 template called ppt.j2, create a custom file with the name, /etc/custom. The custom file must contain the total memory and the processor count for the system, hqsdev1.tekneed.com
-The file must be owned by root and the group owner must be root. The file must have 644 permission.
-Verify that the file has been created using the stat module and must be registered as verify_custom file. It will be nice to display the status of the file while running the playbook.
-copy the file, /etc/custom2 on the controller to /tmp/custom. /tmp/custom must be owned by root. group owner must be root and have the 644 permission. Also, make /tmp/custom a symbolic link to /etc/custom
Answer
1. you can use the setup module to get the facts and also do a search for both memtotal and processor using the grep utility. This makes it easier.
[lisa@drsdev1 ansible]$ ansible hqsdev1.tekneed.com -m setup |grep -E 'processor|memtotal'

        "ansible_memtotal_mb": 1805,
        "ansible_processor": [
        "ansible_processor_cores": 1,
        "ansible_processor_count": 1,
        "ansible_processor_threads_per_core": 1,
        "ansible_processor_vcpus": 1,
2. create the jinja2 template file with the name, ppt.j2
[lisa@drsdev1 ansible]$ vim ppt.j2System total memory: {{ ansible_facts['memtotal_mb'] }} MiB.
System processor count: {{ ansible_facts['processor_count'] }}3. create the playbook to render the jinja2 template and do other configuration.
[lisa@drsdev1 ansible]$ vim cust.yml- name: configure a custom file
hosts: hqsdev1.tekneed.com
tasks:
- name: configure a custom file
template:
src: cust.j2
dest: /etc/custom
mode: 0644
owner: root
group: root
- name: verify if file exists
stat:
path: /etc/custom
register: verify_custom
- name: display stat result
debug:
var: verify_custom
- name: copy the custom file
copy:
src: /etc/custom2
dest: /tmp/custom
mode: 0644
owner: root
group: root
- name: make /tmp/custom a symlink to /etc/custom
file:
src: /etc/custom
dest: /tmp/custom
state: link
mode: 0644
owner: root
group: root
force: yes
4. Run the playbook
[lisa@drsdev1 ansible]$ ansible-playbook cust.yml --syntax-check

playbook: cust.yml
[lisa@drsdev1 ansible]$ ansible-playbook cust.yml
PLAY [configure a custom file] ************************************************************************************
5. Verify
[lisa@drsdev1 ansible]$ ansible hqsdev1.tekneed.com -a "cat /etc/custom"

hqsdev1.tekneed.com | CHANGED | rc=0 >>
System total memory: 1806 MiB.
System processor count: 1

Watch Video On Using Ansible Template Module
RHCE Exam Practice Question and Answer On Using Ansible Template Module
Your feedback is welcomed. If you love others, you will share with others
Leave a Reply