
Last updated: August 2024
Hello, everyone! Victor here again, and in this lesson, we’re diving deep into the topic of “how to configure network settings in Linux”. Proper network configuration is essential for system administrators and users alike, as without it, you’ll find yourself stuck and unable to effectively communicate with other systems. Today, I’ll be sharing some personal stories from the field and providing a detailed step-by-step guide to configuring networks on both Red Hat and Ubuntu systems. If you’re preparing for an exam or simply want to test your knowledge, click the link for exam practice questions and answers or contact us at info@tekneed.com.
Introduction to Network Configuration in Linux
Linux offers a variety of services and tools to manage network configurations. Understanding these tools is essential for system administrators and anyone looking to effectively know how to configure network settings in Linux systems. The primary services and tools used to manage networks in Linux are:
networkd(Network Service)- Network Manager Service
- Netplan Utility
Historical Overview
In earlier versions of Linux distributions, such as Red Hat 5, Red Hat 6, Ubuntu 16, and other early versions, the networkd service was responsible for network management. Various Linux distributions have spread network service configuration files across different locations on the system. For example, in earlier versions of Red Hat, the network configuration file for networkd was located in /etc/sysconfig/network-scripts/ifcfg-*, while in Ubuntu, it was found in /etc/network/interfaces.
As newer Linux distributions emerged, such as RHEL 7 and Ubuntu 18, the networkd service was deprecated, and the Network Manager service was adopted. Red Hat continued to maintain the network configuration file for the Network Manager service in the /etc/sysconfig/network-scripts directory. Interestingly, RHEL 7 allowed the concurrent use of both networkd and Network Manager services concurrently to manage the network.
Ubuntu, on the other hand, adopted a new location for managing networks with the Network Manager service, which is found in /etc/NetworkManager/system-connections.
Modern Network Management
As even newer Linux distributions appeared, such as RHEL 8, the use of networkd was entirely deprecated in favor of the Network Manager service. The network configuration file for this service remained in the same location, /etc/sysconfig/network-scripts. However, Ubuntu continued to maintain its network manager configuration file in /etc/NetworkManager/system-connections, and also introduced the Netplan utility for network management.
With the release of RHEL 9 and beyond, Red Hat decided to move the Network Manager service network configuration file to the same location as Ubuntu’s, i.e., /etc/NetworkManager/system-connections. This move reflects a trend where more distributions adopt a common location for network configuration, promoting uniformity.
For RHEL 9, while you can still use the former location (/etc/sysconfig/network-scripts), it is not recommended. By default, the system checks the /etc/NetworkManager/system-connections file first for network connections before the /etc/sysconfig/network-scripts location.
Summary of Services
For Red Hat distributions and their derivatives:
- Older versions:
networkdservice - Newer versions: Network Manager service
For Ubuntu and its derivatives:
- Older versions:
networkdservice - Newer versions: Network Manager service and Netplan utility
How to Configure Network Settings in Linux
Checking Network Service Status
To understand how network services operate in Red Hat, let’s start with checking the status of the network service. Open your terminal and execute the following command:
systemctl status networkYou might find that the networkd service is no longer available because it has been deprecated. Instead, check the Network Manager service:
systemctl status NetworkManager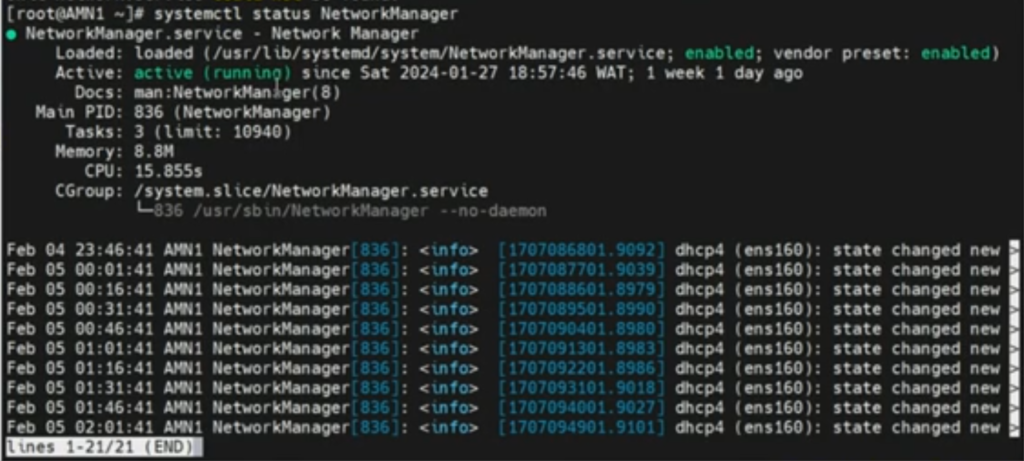
If the service is running, it confirms that Network Manager is the active service managing the network.
Let’s do a little confirmation;
cd /etc/sysconfig/network-scripts/
ls

We can see that the network configuration profile is no longer in this location.
Rather, it has been moved to /etc/NetworkManager/system-connections/
So, enter;
cd /etc/NetworkManager/system-connections/
ls
Now let’s check out this file.
cat ens160.nmconnection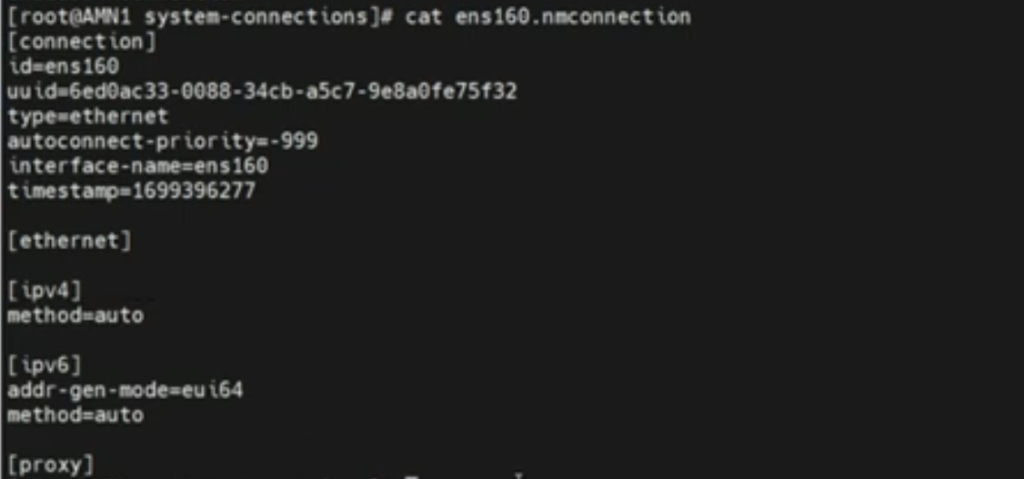
Viewing Current Network Configuration
To view the current network interfaces and their configuration:
ip aIdentify the network interface you want to configure. In this example, we’ll use ens160.
Configuring a Static IP Address Using Network Manager
Network configurations are now managed through files in the /etc/NetworkManager/system-connections directory. Let’s navigate there and view the configuration files:
cd /etc/NetworkManager/system-connections
ls
You should see files representing the network interfaces. Open a file to inspect its content:
cat <your-network-profile-file>The configuration is typically in an INI format. For example, you saw something like this in the image above:
[connection]
id=ens160
uuid=6ed0ac33-0088-34cb-a5c7-9e8a0fe75f32
type ethernet
autoconnect-priority=-999
interface-name=ens160
timestamp=1699396277
[ethernet]
[ipv4]
method auto
[ipv6]
addr-gen-mode=eui64
method=auto
[proxy]
This configuration uses DHCP (Dynamic Host Configuration Protocol). To change it to a static IP, use the nmcli tool, which stands for Network Manager Command Line Interface.
Using nmcli to Set a Static IP Address
To set a static IP address, follow these steps:
- Modify the connection to use a static IP:
nmcli connection modify ens160 ipv4.addresses 192.168.72.146/24- Set the gateway:
nmcli connection modify ens160 ipv4.gateway 192.168.72.2- Configure the DNS server:
nmcli connection modify ens160 ipv4.dns "192.168.72.2 8.8.8.8"- Change the method from DHCP to manual:
nmcli connection modify ens160 ipv4.method manual- Restart the Network Manager service to apply changes:
systemctl restart NetworkManagerSometimes, a simple restart might not show the changes immediately. If this happens, deactivate and then activate the connection:
nmcli connection down ens160
nmcli connection up ens160
Using the Text User Interface (nmtui)
Alternatively, you can use the nmtui tool, which stands for Network Manager Text User Interface. This tool provides a simple text-based interface to configure network settings:
nmtuiFrom here, you can edit the connection, add new connections, or delete existing ones. This interface is straightforward and guides you through the process with menus and prompts.
Configuring Network in Ubuntu Linux
Checking Network Service Status
Ubuntu has adopted Netplan as its default network configuration utility. To verify the status of the network manager, you can use:
systemctl status networkdIf the service is not found, it indicates that Netplan is the active utility. Verify this by checking the Netplan configuration files:
cd /etc/netplan
ls
You should see YAML files here. Open one to inspect its content:
cat 00-installer-config.yamlConfiguring a Static IP Address Using Netplan
Netplan uses YAML for configuration, which requires proper indentation. Here’s an example configuration to set a static IP address:
network:
  version: 2
  ethernets:
    ens33:
      dhcp4: no
      addresses:
        - 192.168.72.143/24
      gateway4: 192.168.72.2
      nameservers:
        addresses:
          - 192.168.72.2
          - 8.8.8.8
Save and apply the configuration:
sudo netplan applyUsing Network Manager in Ubuntu
If you prefer the Network Manager, you can install it:
sudo apt install network-managerAfter installation, you can use nmcli and nmtui as described earlier for Red Hat.
Example of Using nmcli in Ubuntu
Here’s an example of setting a static IP using nmcli in Ubuntu:
- Install Network Manager:
sudo apt install network-manager- Use
nmclito set the static IP:
nmcli connection modify ens33 ipv4.addresses 192.168.72.143/24
nmcli connection modify ens33 ipv4.gateway 192.168.72.2
nmcli connection modify ens33 ipv4.dns "192.168.72.2 8.8.8.8"
nmcli connection modify ens33 ipv4.method manual- Restart the Network Manager service:
sudo systemctl restart NetworkManager- Deactivate and activate the connection if needed:
nmcli connection down ens33
nmcli connection up ens33
Conclusion
Proper network configuration and management are crucial for the smooth operation of Linux systems. Whether you’re using Red Hat or Ubuntu, understanding how to configure network settings in Linux using various tools like nmcli, nmtui, and Netplan is essential.
For more detailed steps and explanations, refer to the documentation linked in the description. If you have any questions or need further assistance, feel free to contact us at info@tekneed.com. For practice exam questions, click this link.
Thank you for reading, and don’t forget to subscribe, like, share, and comment to encourage us to create more content like this. In the next lesson, we’ll dive deeper into the part 2 of how to configure network settings in Linux. We will also look into network management, focusing on DNS configuration and the /etc/hosts file in Linux.
Stay tuned and see you in the next lesson!
Leave a Reply