
Last updated: January 2026
Docker network or Docker Networking is one of those topics that feels mysterious until you actually see what Docker is doing under the hood. In this article, we will break Docker networking down step by step using real commands and outputs, starting from the default docker0 bridge network and moving all the way to user-defined bridges and IPvlan networks.
There are six types of Docker Network. They are the
- Bridge (Default & User-defined)
- Host
- None
- Overlay
- Macvlan
- IPvlan.
This is a hands-on, Linux-level explanation. You will see interfaces, bridges, veth pairs, and how containers really communicate.
Let’s start with the Bridge network.
1. Bridge Docker Network – Default Docker Bridge
When you install Docker on a Linux host/server, listing network interfaces shows something like this:
user1@LinuxSrv:~$ ip a

1: lo: <LOOPBACK,UP,LOWER_UP> mtu 65536 qdisc noqueue state UNKNOWN group default qlen 1000
    link/loopback 00:00:00:00:00:00 brd 00:00:00:00:00:00
    inet 127.0.0.1/8 scope host lo
       valid_lft forever preferred_lft forever
2: ens33: <BROADCAST,MULTICAST,UP,LOWER_UP> mtu 1500 qdisc mq state UP group default qlen 1000
    link/ether 00:50:56:bf:71:fe brd ff:ff:ff:ff:ff:ff
    altname enp2s1
    inet 10.10.23.152/24 brd 10.10.23.255 scope global ens33
       valid_lft forever preferred_lft forever
3: docker0: <NO-CARRIER,BROADCAST,MULTICAST,UP> mtu 1500 qdisc noqueue state DOWN group default
    link/ether a2:01:f1:dd:04:da brd ff:ff:ff:ff:ff:ff
    inet 172.17.0.1/16 brd 172.17.255.255 scope global docker0
       valid_lft forever preferred_lft forever
You will typically see:
lo– loopback interfaceens33– the physical network interface (mostly host IP)docker0– Docker’s default virtual bridge
What is docker0?
When Docker is installed, it automatically creates a Linux bridge called docker0. Think of this bridge as a virtual switch that Docker uses to connect containers together.
By default:
- Subnet:
172.17.0.0/16 - Gateway:
172.17.0.1 - Driver:
bridge
This is Docker’s default network.
To list the Docker’s network on the system, you can use the command,
user1@LinuxSrv:~$ docker network ls

NETWORK ID     NAME      DRIVER    SCOPE
60668e5246ba   bridge    bridge    local
7fcc6d0c93c8   host      host      local
e84dc339ed70   none      null      local
You will always see the docker network above out of the box:
| Network Name | Driver (Network Type) | Purpose |
|---|---|---|
| bridge | bridge | Default container network |
| host | host | Containers share host network |
| none | null | No networking |
The driver defines the network type.
Having understood the default Docker Network bridge, let’s run some containers using the default bridge Docker network.
Running a Container on the Default Bridge Network
We will deploy two containers without specifying any network.
user1@LinuxSrv:~$ docker run -d --name web1 nginx

Unable to find image 'nginx:latest' locally
latest: Pulling from library/nginx
Digest: sha256:553f64aecdc31b5bf944521731cd70e35da4faed96b2b7548a3d8e2598c52a42
Status: Downloaded newer image for nginx:latest
8ee524d1856f27f920c8479b3d4aef6f0b76ff5ac98a9cb78b8289d54f81e513
................
user1@LinuxSrv:~$ docker run -d --name web2 nginx

abaa9829e7428944317c0e0ed551bbd746694b676669779e533c27e0d4007cfd
..............
user1@LinuxSrv:~$ docker ps

CONTAINER ID   IMAGE     COMMAND                  CREATED         STATUS         PORTS     NAMES
abaa9829e742   nginx     "/docker-entrypoint.…"   3 minutes ago   Up 3 minutes   80/tcp    web2
8ee524d1856f   nginx     "/docker-entrypoint.…"   3 minutes ago   Up 3 minutes   80/tcp    web1
Now, let’s check the interfaces again.
user1@LinuxSrv:~$ ip a

1: lo: <LOOPBACK,UP,LOWER_UP> mtu 65536 qdisc noqueue state UNKNOWN group default qlen 1000
    link/loopback 00:00:00:00:00:00 brd 00:00:00:00:00:00
    inet 127.0.0.1/8 scope host lo
       valid_lft forever preferred_lft forever
2: ens33: <BROADCAST,MULTICAST,UP,LOWER_UP> mtu 1500 qdisc mq state UP group default qlen 1000
    link/ether 00:50:56:bf:71:fe brd ff:ff:ff:ff:ff:ff
    altname enp2s1
    inet 10.10.23.152/24 brd 10.10.23.255 scope global ens33
       valid_lft forever preferred_lft forever
3: docker0: <BROADCAST,MULTICAST,UP,LOWER_UP> mtu 1500 qdisc noqueue state UP group default
    link/ether a2:01:f1:dd:04:da brd ff:ff:ff:ff:ff:ff
    inet 172.17.0.1/16 brd 172.17.255.255 scope global docker0
       valid_lft forever preferred_lft forever
114: veth87145d1@if2: <BROADCAST,MULTICAST,UP,LOWER_UP> mtu 1500 qdisc noqueue master docker0 state UP group default
    link/ether fa:49:33:f7:c1:5f brd ff:ff:ff:ff:ff:ff link-netnsid 0
115: veth69f2c53@if2: <BROADCAST,MULTICAST,UP,LOWER_UP> mtu 1500 qdisc noqueue master docker0 state UP group default
    link/ether ea:ff:45:0c:1a:43 brd ff:ff:ff:ff:ff:ff link-netnsid 1

so when we deployed those containers, you see that we didn’t have to do anything with networking because docker took care of it by default.
You now see interfaces like:
vethXXXX@if2 -> attached to docker0
Each container gets one end of a veth pair, while the other end plugs into docker0.
what docker did was to create two virtual network interfaces and linked/connected/mapped them to the docker0 switch just as shown in the visual image below.
[ web1 ]──veth──┐
                ├── docker0 (bridge) ── NAT ── ens33
[ web2 ]──veth──┘
if you also run the command below (Linux bridge utility), you will see both veth interfaces in forwarding state and attached to docker0. This confirms Docker is using standard Linux bridging, not magic.
user1@LinuxSrv:~$ bridge link

114: veth87145d1@ens33: <BROADCAST,MULTICAST,UP,LOWER_UP> mtu 1500 master docker0 state forwarding priority 32 cost 2
115: veth69f2c53@ens33: <BROADCAST,MULTICAST,UP,LOWER_UP> mtu 1500 master docker0 state forwarding priority 32 cost 2
You can also inspect the default bridge network (You can inspect any Docker Object)
user1@LinuxSrv:~$ docker inspect bridge

[
    {
        "Name": "bridge",
        "Id": "60668e5246babd34e243678f83b2cce2d47f11e4c5e7c14c2c9bb8ea938ef54d",
        "Created": "2025-11-19T18:00:30.470081401Z",
        "Scope": "local",
        "Driver": "bridge",
        "EnableIPv4": true,
        "EnableIPv6": false,
        "IPAM": {
            "Driver": "default",
            "Options": null,
            "Config": [
                {
                    "Subnet": "172.17.0.0/16",
                    "IPRange": "",
                    "Gateway": "172.17.0.1"
                }
            ]
        },
        "Internal": false,
        "Attachable": false,
        "Ingress": false,
        "ConfigFrom": {
            "Network": ""
        },
        "ConfigOnly": false,
        "Options": {
            "com.docker.network.bridge.default_bridge": "true",
            "com.docker.network.bridge.enable_icc": "true",
            "com.docker.network.bridge.enable_ip_masquerade": "true",
            "com.docker.network.bridge.host_binding_ipv4": "0.0.0.0",
            "com.docker.network.bridge.name": "docker0",
            "com.docker.network.driver.mtu": "1500"
        },
        "Labels": {},
        "Containers": {
            "8ee524d1856f27f920c8479b3d4aef6f0b76ff5ac98a9cb78b8289d54f81e513": {
                "Name": "web1",
                "EndpointID": "7e8b744b4d29819982c1bc32197678a98a39bade2d5c86f27c5fcb21612593b5",
                "MacAddress": "4e:bc:c7:a0:b2:8d",
                "IPv4Address": "172.17.0.2/16",
                "IPv6Address": ""
            },
            "abaa9829e7428944317c0e0ed551bbd746694b676669779e533c27e0d4007cfd": {
                "Name": "web2",
                "EndpointID": "91deb262ad27c81a02853e2d4d107e87edebed4c0406b1fdce7c5d616c71a88f",
                "MacAddress": "8a:a7:3c:5e:73:ae",
                "IPv4Address": "172.17.0.3/16",
                "IPv6Address": ""
            }
        },
        "Status": {
            "IPAM": {
                "Subnets": {
                    "172.17.0.0/16": {
                        "IPsInUse": 5,
                        "DynamicIPsAvailable": 65531
                    }
                }
            }
        }
    }
]
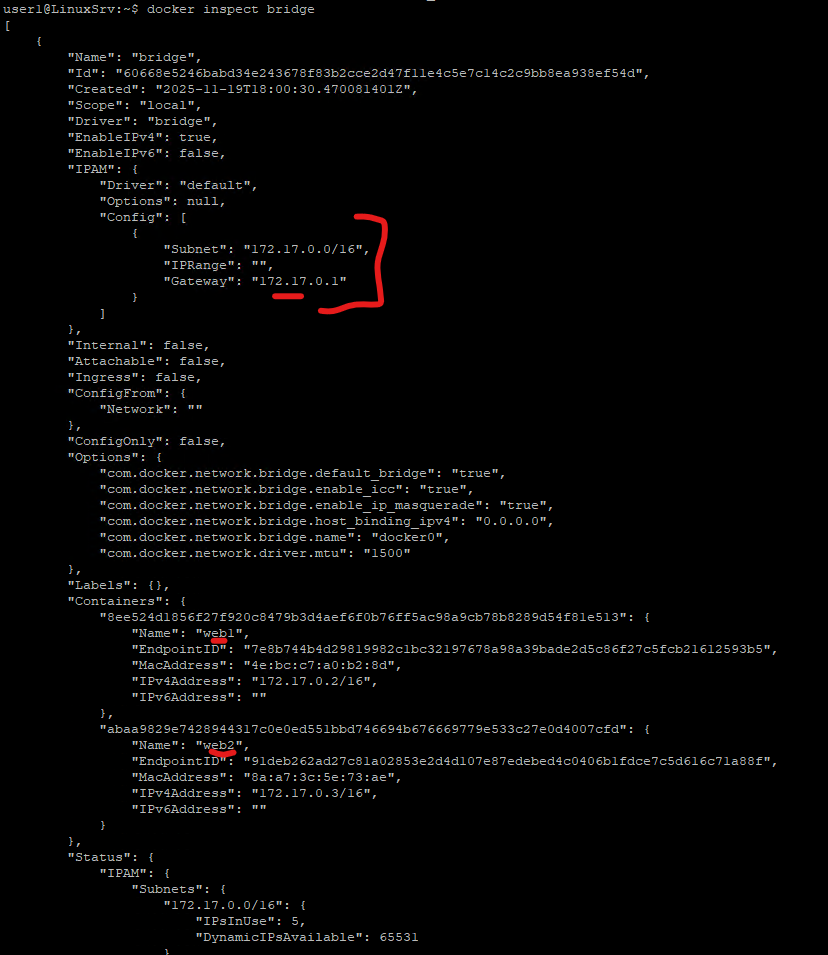
Important things to note:
- Subnet:
172.17.0.0/16 - Gateway:
172.17.0.1 - Containers receive IPs like:
web1 → 172.17.0.2web2 → 172.17.0.3
Docker also provides:
- Internal DHCP-like IP assignment
- Built-in DNS (127.0.0.11)
- NAT for outbound internet access
Container-to-Container Communication
Because the docker0 acts as a switch and both containers are on the same network, they can talk to each other. Let’s do some testing.
From the host, let’s exec into the web1 container and try and ping the web2 container.
user1@LinuxSrv:~$ docker exec -it web1 bash
root@8ee524d1856f:/#
root@8ee524d1856f:/# ping 172.17.0.3
bash: ping: command not found
root@8ee524d1856f:/# apt update -y

Get:1 http://deb.debian.org/debian trixie InRelease [140 kB]
Get:2 http://deb.debian.org/debian trixie-updates InRelease [47.3 kB]
Get:3 http://deb.debian.org/debian-security trixie-security InRelease [43.4 kB]
...................
root@8ee524d1856f:/# apt install -y iputils-ping
Installing:
iputils-ping
Installing dependencies:
linux-sysctl-defaults
..................root@8ee524d1856f:/# ping 172.17.0.3
PING 172.17.0.3 (172.17.0.3) 56(84) bytes of data.
64 bytes from 172.17.0.3: icmp_seq=1 ttl=64 time=0.150 ms
64 bytes from 172.17.0.3: icmp_seq=2 ttl=64 time=0.086 ms
64 bytes from 172.17.0.3: icmp_seq=3 ttl=64 time=0.065 ms
Once ICMP tools are installed, the ping succeeds. Hence, containers on the same bridge can communicate freely.
You can also test if your containers can reach the internet. In my case, it can get to the internet because I was able to download the ping utilities.
We can do more testing by downloading the dns utilities and do nslookup as well,
root@8ee524d1856f:/# apt install -y dnsutils

Note, selecting 'bind9-dnsutils' instead of 'dnsutils'
Installing:
  bind9-dnsutils

Installing dependencies:
............................
root@8ee524d1856f:/# nslookup google.com 8.8.8.8

Server:         8.8.8.8
Address:        8.8.8.8#53

Non-authoritative answer:
Name:   google.com
Address: 142.251.142.14
Name:   google.com
Address: 2a00:1450:4007:80a::200e
And also, of course, you will be able to reach the Nginx webserver container from the host but not from outside the word/external endpoints except you do a Port Mapping(expose the port with your host port), and this is one of the disadvantages of the Docker bridge network.
For the sake of better understanding of Docker Networking, let’s address this issue by exposing the port.
Solution: Port Mapping
Recreate the container with port publishing:
user1@LinuxSrv:~$ docker stop web1
web1
user1@LinuxSrv:~$ docker rm web1
web1
user1@LinuxSrv:~$ docker run -d -p 80:80 --name web1 nginx

3757e629c566887b0bf2b8e49e5c811a61bc9e5106dd59e8b79ec46255b570fd
Now lets test from an external machine
user5@LinuxSrv2:~$ curl http://172.17.0.2/
<!DOCTYPE html>
<html>
<head>
<title>Welcome to nginx!</title>
<style>
html { color-scheme: light dark; }
body { width: 35em; margin: 0 auto;
font-family: Tahoma, Verdana, Arial, sans-serif; }
Now traffic flows:
Client → Host:80 → Container:80
Having understood the default Docker birdge network, let’s look at the User-Defined Bridge.
1b. User-Defined Bridge Docker Network
The user defined bridged is similar to the default bridge. It behaves like the default bridge but add better isolation and DNS features.
To create one, we do.
user1@LinuxSrv:~$ docker network create tekneed-bridged

e1e508eb9dfc83aaec5744c351922054885d404b068842dc5a1d8a015429f610
“tekneed-bridged” is the name of the network
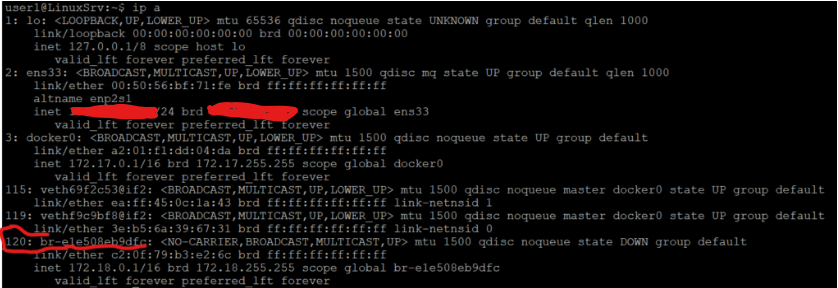
Now let’s check the interfaces again like we did when we were learning the default bridge.
user1@LinuxSrv:~$ ip a

1: lo: <LOOPBACK,UP,LOWER_UP> mtu 65536 qdisc noqueue state UNKNOWN group default qlen 1000
    link/loopback 00:00:00:00:00:00 brd 00:00:00:00:00:00
    inet 127.0.0.1/8 scope host lo
       valid_lft forever preferred_lft forever
2: ens33: <BROADCAST,MULTICAST,UP,LOWER_UP> mtu 1500 qdisc mq state UP group default qlen 1000
    link/ether 00:50:56:bf:71:fe brd ff:ff:ff:ff:ff:ff
    altname enp2s1
    inet 10.10.23.152/24 brd 10.10.23.255 scope global ens33
       valid_lft forever preferred_lft forever
3: docker0: <BROADCAST,MULTICAST,UP,LOWER_UP> mtu 1500 qdisc noqueue state UP group default
    link/ether a2:01:f1:dd:04:da brd ff:ff:ff:ff:ff:ff
    inet 172.17.0.1/16 brd 172.17.255.255 scope global docker0
       valid_lft forever preferred_lft forever
115: veth69f2c53@if2: <BROADCAST,MULTICAST,UP,LOWER_UP> mtu 1500 qdisc noqueue master docker0 state UP group default
    link/ether ea:ff:45:0c:1a:43 brd ff:ff:ff:ff:ff:ff link-netnsid 1
119: vethf9c9bf8@if2: <BROADCAST,MULTICAST,UP,LOWER_UP> mtu 1500 qdisc noqueue master docker0 state UP group default
    link/ether 3e:b5:6a:39:67:31 brd ff:ff:ff:ff:ff:ff link-netnsid 0
120: br-e1e508eb9dfc: <NO-CARRIER,BROADCAST,MULTICAST,UP> mtu 1500 qdisc noqueue state DOWN group default
    link/ether c2:0f:79:b3:e2:6c brd ff:ff:ff:ff:ff:ff
    inet 172.18.0.1/16 brd 172.18.255.255 scope global br-e1e508eb9dfc
       valid_lft forever preferred_lft forever
user1@LinuxSrv:~$ docker network ls

NETWORK ID     NAME              DRIVER    SCOPE
60668e5246ba   bridge            bridge    local
7fcc6d0c93c8   host              host      local
e84dc339ed70   none              null      local
e1e508eb9dfc   tekneed-bridged   bridge    local
Now, let’s run a container on the “tekneed-bridged” network
user1@LinuxSrv:~$ docker run -d --network tekneed-bridged --name web3 nginx

17f7beea92a94b80aab2ac8ec6075f2e499e5278dda1a3d6c3d737284c395647
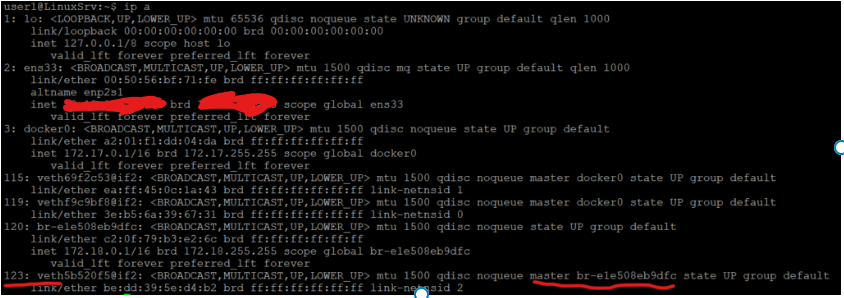
Let’s check the interfaces again.
user1@LinuxSrv:~$ ip a

1: lo: <LOOPBACK,UP,LOWER_UP> mtu 65536 qdisc noqueue state UNKNOWN group default qlen 1000
    link/loopback 00:00:00:00:00:00 brd 00:00:00:00:00:00
    inet 127.0.0.1/8 scope host lo
       valid_lft forever preferred_lft forever
2: ens33: <BROADCAST,MULTICAST,UP,LOWER_UP> mtu 1500 qdisc mq state UP group default qlen 1000
    link/ether 00:50:56:bf:71:fe brd ff:ff:ff:ff:ff:ff
    altname enp2s1
    inet 10.10.23.152/24 brd 10.10.23.255 scope global ens33
       valid_lft forever preferred_lft forever
3: docker0: <BROADCAST,MULTICAST,UP,LOWER_UP> mtu 1500 qdisc noqueue state UP group default
    link/ether a2:01:f1:dd:04:da brd ff:ff:ff:ff:ff:ff
    inet 172.17.0.1/16 brd 172.17.255.255 scope global docker0
       valid_lft forever preferred_lft forever
115: veth69f2c53@if2: <BROADCAST,MULTICAST,UP,LOWER_UP> mtu 1500 qdisc noqueue master docker0 state UP group default
    link/ether ea:ff:45:0c:1a:43 brd ff:ff:ff:ff:ff:ff link-netnsid 1
119: vethf9c9bf8@if2: <BROADCAST,MULTICAST,UP,LOWER_UP> mtu 1500 qdisc noqueue master docker0 state UP group default
    link/ether 3e:b5:6a:39:67:31 brd ff:ff:ff:ff:ff:ff link-netnsid 0
120: br-e1e508eb9dfc: <BROADCAST,MULTICAST,UP,LOWER_UP> mtu 1500 qdisc noqueue state UP group default
    link/ether c2:0f:79:b3:e2:6c brd ff:ff:ff:ff:ff:ff
    inet 172.18.0.1/16 brd 172.18.255.255 scope global br-e1e508eb9dfc
       valid_lft forever preferred_lft forever
123: veth5b520f5@if2: <BROADCAST,MULTICAST,UP,LOWER_UP> mtu 1500 qdisc noqueue master br-e1e508eb9dfc state UP group default
    link/ether be:dd:39:5e:d4:b2 brd ff:ff:ff:ff:ff:ff link-netnsid 2
We can also inspect the user-defined bridge Docker network
user1@LinuxSrv:~$ docker network inspect tekneed-bridged
[
    {
        "Name": "tekneed-bridged",
        "Id": "e1e508eb9dfc83aaec5744c351922054885d404b068842dc5a1d8a015429f610",
        "Created": "2025-12-04T15:48:25.707808055Z",
        "Scope": "local",
        "Driver": "bridge",
        "EnableIPv4": true,
        "EnableIPv6": false,
        "IPAM": {
            "Driver": "default",
            "Options": {},
            "Config": [
                {
                    "Subnet": "172.18.0.0/16",
                    "IPRange": "",
                    "Gateway": "172.18.0.1"
                }
            ]
        },
        "Internal": false,
        "Attachable": false,
        "Ingress": false,
        "ConfigFrom": {
            "Network": ""
        },
        "ConfigOnly": false,
        "Options": {},
        "Labels": {},
        "Containers": {
            "17f7beea92a94b80aab2ac8ec6075f2e499e5278dda1a3d6c3d737284c395647": {
                "Name": "web3",
                "EndpointID": "fc299f7bb4ca92cdc601e68b8c8b678cd7919d005f35c7d3fd293f6b2122655d",
                "MacAddress": "96:6f:85:a0:11:2c",
                "IPv4Address": "172.18.0.2/16",
                "IPv6Address": ""
            }
        },
        "Status": {
            "IPAM": {
                "Subnets": {
                    "172.18.0.0/16": {
                        "IPsInUse": 4,
                        "DynamicIPsAvailable": 65532
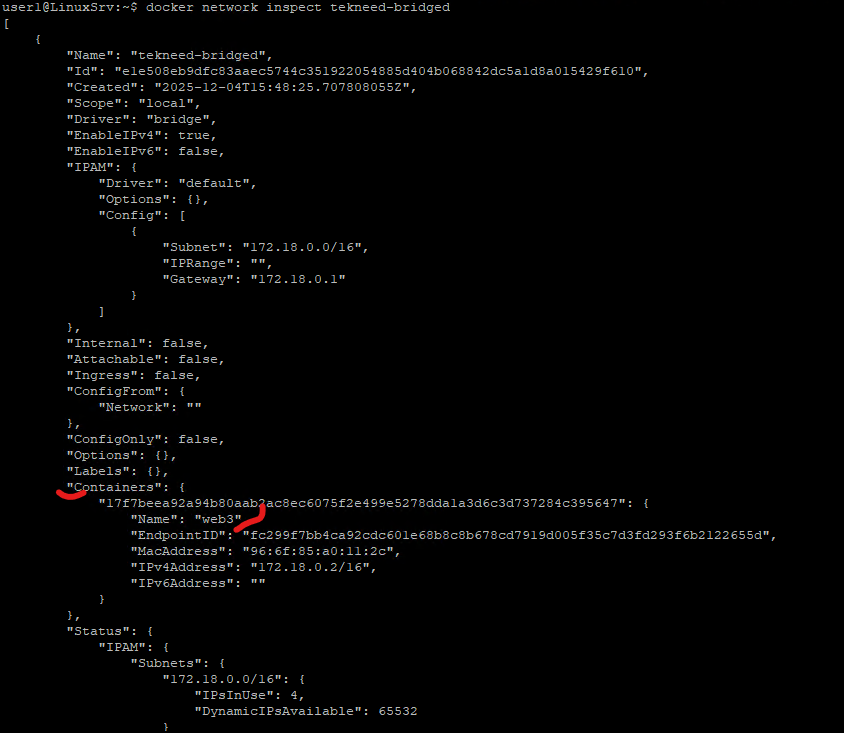
Key Advantages
- Isolation from
docker0 - Automatic DNS resolution by container name
- Cleaner microservice-style networking
Containers on tekneed-bridged cannot talk to containers on docker0 unless explicitly connected.
Another type of Docker network we are going to learn is the Host Network.
2. Host Docker Network
The host network is one of Docker’s default networks and is available out of the box. As seen earlier when we ran the “docker network ls” command, it comes preconfigured.
When a container uses the host network, it shares the host’s network stack directly. This means there is no need to expose or map ports, because the container uses the same IP address as the host. The container does not get its own separate IP.
The major drawback of the host network is the lack of network isolation. Since the container is effectively running on the host’s network, it sits directly alongside host processes, which can pose security and port-conflict risks.
In summary, this is what the host network does.
Characteristics:
- No container IP
- Uses host IP directly
- No port mapping needed
Downsides:
- No isolation
- Port conflicts
- Reduced security
Useful mainly for performance-critical workloads.
3. IPvlan Docker Network
Traditional Docker networking (like bridge) hides containers behind NAT. While this works, it introduces:
- Additional network hops
- Complex firewall rules
- Difficulty integrating containers into existing enterprise networks
IPvlan removes this friction by allowing containers to appear as first-class citizens on the network, without each one needing its own physical NIC or MAC address.
IPvlan is a Linux kernel network driver that allows multiple container interfaces to share one parent network interface, while assigning unique IP addresses to each container.
Unlike Macvlan:
- IPvlan does not create multiple MAC addresses
- All traffic uses the parent interface’s MAC
- Switching infrastructure sees only one MAC, reducing network complexity
This makes IPvlan ideal for environments with strict network policies or MAC address limitations.
What Is IPvlan?
IPvlan is a Linux kernel network driver that allows multiple container interfaces to share one parent network interface, while assigning unique IP addresses to each container.
IPvlan Modes Explained
1. IPvlan L2 Mode
- Containers are on the same subnet as the host
- Traffic flows directly between containers and the external network
- Requires the upstream network to accept container IPs
Use case:
When containers must behave like normal servers on the LAN.
2. IPvlan L3 Mode
- Containers are placed on a different subnet
- The host performs routing between networks
- No dependency on external switches for container IP routing
Use case:
Enterprise or cloud environments where routing control must stay on the host.
Why Use IPvlan in Production?
IPvlan shines when you need:
- High performance (no NAT, minimal overhead)
- Clean IP visibility for monitoring and logging
- Simplified firewall rules
- Compliance with network policies
- Large-scale container deployments
It’s commonly used in:
- Financial services
- Telecom environments
- On-prem Kubernetes clusters
- Legacy application integration
Example: Creating an IPvlan Network
First, create an IPvlan network bound to the host’s physical interface (ens33):
user1@LinuxSrv:~$ docker network create -d ipvlan \
--subnet 10.10.19.0/24 \
--gateway 10.10.19.1 \
-o parent=ens33 \
tekneed-ipvlan

11f7e5b5ca0ce030c2df10c5c7cc6db8c47fc84cb81569903a271c8a4ea585f2
Verify the network:
user1@LinuxSrv:~$ docker network ls

NETWORK ID     NAME              DRIVER    SCOPE
60668e5246ba   bridge            bridge    local
7fcc6d0c93c8   host              host      local
e84dc339ed70   none              null      local
e1e508eb9dfc   tekneed-bridged   bridge    local
11f7e5b5ca0c   tekneed-ipvlan    ipvlan    local
Running a Container on the IPvlan Network
Next, start a container and assign it a static IP address from the IPvlan subnet:
user1@LinuxSrv:~$ docker run -d --network tekneed-ipvlan \
  --ip 10.10.19.33 \
  --name web4 nginx

98822113a38a9af978ee43e76d7613b648acf66fa92b600585ea930a028e77e2
You may optionally specify custom DNS servers using --dns if required.
Inspecting the IPvlan Network
Docker allows you to inspect any object it manages, including networks:
user1@LinuxSrv:~$ docker inspect tekneed-ipvlan
[
    {
        "Name": "tekneed-ipvlan",
        "Id": "cb7aa994b8281d16e0f42bf461468e74f08b24bb117d5ffd17a699c86a705619",
        "Created": "2025-12-04T19:31:09.52199825Z",
        "Scope": "local",
        "Driver": "ipvlan",
        "EnableIPv4": true,
        "EnableIPv6": false,
        "IPAM": {
            "Driver": "default",
            "Options": {},
            "Config": [
                {
                    "Subnet": "10.10.19.0/24",
                    "IPRange": "",
                    "Gateway": "10.10.19.2"
                }
            ]
        },
        "Internal": false,
        "Attachable": false,
        "Ingress": false,
        "ConfigFrom": {
            "Network": ""
        },
        "ConfigOnly": false,
        "Options": {
            "parent": "ens33"
        },
        "Labels": {},
        "Containers": {
            "3f7ea92a1442f3772b801dca7eb641cba7a0bdf776da8372e44b4ab82da5c0ff": {
                "Name": "web4",
                "EndpointID": "894585bfe35d1b377ae5db77abf315e95658b5b763901c4834bcbdd1bdb47c43",
                "MacAddress": "",
                "IPv4Address": "10.10.19.33/24",
                "IPv6Address": ""
            }
        },
        "Status": {
            "IPAM": {
                "Subnets": {
                    "10.10.19.0/24": {
                        "IPsInUse": 4,
                        "DynamicIPsAvailable": 252
This confirms that the container has been assigned an IP directly from the physical network.
Testing Connectivity from Another Host
From a different machine on the same network, you can ping the container directly:
C:\Users\odunuga.victor>ping 10.10.19.33
Pinging 10.10.14.33 with 32 bytes of data:
Reply from 10.10.14.33: bytes=32 time=5ms TTL=58
Reply from 10.10.14.33: bytes=32 time=6ms TTL=58
Reply from 10.10.14.33: bytes=32 time=5ms TTL=58
This demonstrates that the container is reachable like a regular host on the network
Note: As of today, By design, containers on an IPvlan network cannot ping the Docker host unless additional routing is configured.
Inspecting Networking Inside the Container
Access the container shell:
user1@LinuxSrv:~$ docker exec -it web4 bash
root@97d6113bbe1d:/#
Install Network tools:
root@97d6113bbe1d:/# apt update -y

Get:1 http://deb.debian.org/debian trixie InRelease [140 kB]
Get:2 http://deb.debian.org/debian trixie-updates InRelease [47.3 kB]
.....................
root@97d6113bbe1d:/# apt install -y iputils-ping

Installing:
  iputils-ping

Installing dependencies:
  linux-sysctl-defaults
root@97d6113bbe1d:/# ping 10.10.19.138

PING 10.10.14.138 (10.10.14.138) 56(84) bytes of data.
64 bytes from 10.10.14.138: icmp_seq=1 ttl=128 time=1.43 ms
64 bytes from 10.10.14.138: icmp_seq=2 ttl=128 time=0.908 ms
64 bytes from 10.10.14.138: icmp_seq=3 ttl=128 time=0.857 ms
Check the container’s IP configuration:
root@97d6113bbe1d:/# cat /etc/resolv.conf

# Generated by Docker Engine.
# This file can be edited; Docker Engine will not make further changes once it
# has been modified.

nameserver 127.0.0.11
search .
options edns0 trust-ad ndots:0

# Based on host file: '/etc/resolv.conf' (internal resolver)
# ExtServers: [8.8.8.8 1.1.1.1]
# Overrides: [nameservers]
# Option ndots from: internal
root@97d6113bbe1d:/# apt install -y iproute2

Installing:
  iproute2

Installing dependencies:
  libbpf1  libcap2-bin  libelf1t64  libmnl0  libpam-cap  libtirpc-common  libtirpc3t64  libxtables12
......................
root@97d6113bbe1d:/# ip a

1: lo: <LOOPBACK,UP,LOWER_UP> mtu 65536 qdisc noqueue state UNKNOWN group default qlen 1000
    link/loopback 00:00:00:00:00:00 brd 00:00:00:00:00:00
    inet 127.0.0.1/8 scope host lo
       valid_lft forever preferred_lft forever
    inet6 ::1/128 scope host proto kernel_lo
       valid_lft forever preferred_lft forever
127: eth0@if2: <BROADCAST,MULTICAST,UP,LOWER_UP> mtu 1500 qdisc noqueue state UNKNOWN group default
    link/ether 00:50:56:bf:71:fe brd ff:ff:ff:ff:ff:ff link-netnsid 0
    inet 10.10.19.33/24 brd 10.10.14.255 scope global eth0
       valid_lft forever preferred_lft forever
root@97d6113bbe1d:/# ip route

default via 10.10.19.2 dev eth0
10.10.19.0/24 dev eth0 proto kernel scope link src 10.10.19.33
4. Macvlan Docker Network
Macvlan is similar to IPvlan, but they are not the same.
Both:
- Allow containers to get real IP addresses on the physical network
- Avoid Docker bridge and NAT
- Make containers reachable directly from the LAN
Key difference:
- Macvlan gives each container its own MAC address
- IPvlan shares the host’s MAC address and only assigns unique IPs
One-line summary
Macvlan = real IP + real MAC per container
IPvlan = real IP, shared MAC
When to choose which
- Use Macvlan if applications or network policies depend on MAC addresses
- Use IPvlan if you want better scalability and fewer switch constraints
Docker Network Type Summary Table
| Network Type | Isolation | Multi-Host | Uses NAT | Typical Use |
|---|---|---|---|---|
| Bridge | Yes | No | Yes | Development |
| Host | No | No | No | High performance |
| None | Full | No | No | No networking |
| Overlay | Yes | Yes | Yes | Swarm clusters |
| Macvlan | Medium | No | No | Legacy systems |
| IPvlan | Medium | No | No | Enterprise networking |
Leave a Reply