
Last updated: May 2025
Understanding The Subject Matter
Hey everyone, Victor here again!
In today’s lesson, we’re deploying our first mini project on OpenShift. Initially, I planned to introduce this topic later, but I realized we need to understand a few key Kubernetes/OpenShift concepts early on—and this project is a perfect way to explore them.
We’ll be working with a two-tier application consisting of:
- MySQL Database Server
- phpMyAdmin
These two applications were my go-to tools back in the day when I used to build websites with WordPress for a living. I’d always access phpMyAdmin through cPanel to manage MySQL databases—it was a survival hustle and a lot of fun. So, I thought: why not bring that nostalgia into our OpenShift learning journey?
What You’ll Learn
In this tutorial, you’ll learn how to:
- Deploy a multi-container application (MySQL + phpMyAdmin)
- Create and use Secrets to store sensitive data
- Create ConfigMaps for configuration values
- Set up internal and external services for OpenShift applications
Let’s go!
Project Overview
We’ll be acting as the Scrum Master, Product Owner, and DevOps engineer all at once…(kidding)..
The Plan:
- Deploy MySQL database server
- Create an internal service so it’s not exposed to the internet.
- Deploy phpMyAdmin
- Create an external service so it’s accessible from the browser.
- Connect phpMyAdmin to MySQL
- Use the internal MySQL service to connect both.
- Use phpMyAdmin to create a test database
While doing all this, we’ll cover how Secrets and ConfigMaps work and how to implement them in real-world scenarios. Please note that the plan may not follow a step-by-step guide.
Understanding OpenShift Secrets and ConfigMap
What is a Secret in OpenShift?
As the name suggests, a Secret stores sensitive data—things you don’t want everyone in the cluster to see. Think:
- Usernames & passwords
- SSH keys
- API tokens
- Config files with sensitive data
You can create a secret using the command line or a YAML manifest. Once created, you can reference it in your deployments either as:
- Environment variables, or
- Mounted volumes
Pro Tip: Always create the secret before referencing it in any deployment.
What is a ConfigMap in OpenShift?
A ConfigMap is used to store non-sensitive configuration data in key-value pairs. These are things your app needs to run but are not secrets. Think of them like environment-specific settings or application preferences. The major or only difference between secret and config map is that secret stores sensitive information while config map stores non-sensitive information. Sometimes, sensitive information is also determined by organization.
Common Uses of ConfigMaps:
- App configuration files (
.ini,.properties,.yaml) - URLs, ports, feature flags
- Command-line arguments
- Environment variables (non-sensitive)
Key Differences: Secret vs ConfigMap
| Feature | Secret | ConfigMap |
|---|---|---|
| Purpose | Store sensitive data | Store non-sensitive config |
| Data storage | Base64-encoded | Plain text |
| Access in pods | Env variables or volumes | Env variables or volumes |
| Encryption | Can be encrypted at rest | No encryption by default |
| Examples | Passwords, API tokens, SSH keys | App settings, DB hostnames, feature flags |
Like I mentioned above, sensitivity is also determined by an organization. Some organization may decide to store App settings in secret instead of the config-map.
Having understood what secrets and config map is, let’s get to the step by step demo of this project
Action Time
1. First, lets deploy MySQL using adhoc (oc create)
[victor@sno ~]$ oc create deployment mysql --image mysql

Warning: would violate PodSecurity "restricted:latest": allowPrivilegeEscalation != false (container "mysql" must set securityContext.allowPrivilegeEscalation=false), unrestricted capabilities (container "mysql" must set securityContext.capabilities.drop=["ALL"]), runAsNonRoot != true (pod or container "mysql" must set securityContext.runAsNonRoot=true), seccompProfile (pod or container "mysql" must set securityContext.seccompProfile.type to "RuntimeDefault" or "Localhost")

deployment.apps/mysql created
2. Let’s confirm that the pod is running
[victor@sno ~]$ oc get pods

NAME                     READY   STATUS              RESTARTS   AGE
mysql-68f7776797-nq952   0/1     ContainerCreating   0          11s
[victor@sno ~]$ oc get pods
NAME READY STATUS RESTARTS AGE
mysql-68f7776797-nq952 0/1 Error 0 18s[victor@sno ~]$ oc get pods
NAME READY STATUS RESTARTS AGE
mysql-68f7776797-nq952 0/1 CrashLoopBackOff 4 (87s ago) 3m52sMySQL Deployment: The Problem
We tried deploying MySQL container using “oc create deployment mysql --image=mysql“, it kept crashing. We saw errors like:
mysql-68f7776797-nq952 0/1 CrashLoopBackOffAnd why is that? It’s simply because MySQL requires mandatory environment variables to run—particularly:
MYSQL_ROOT_PASSWORD
Without this environment variable, the container refuses to start. And it does make sense. One needs to set the root password of MySQL server at the point of installation or how will one login when the password is not set?
One can find more about MySQL environmental variables on the docker hub page, MySQL Docker Hub page. Scroll to the Environment Variables section, and you’ll see:
MYSQL_ROOT_PASSWORD(Required) – Sets the root password.MYSQL_DATABASE(Optional) – Creates a database on startup.MYSQL_USER&MYSQL_PASSWORD(Optional) – Creates an additional user and sets a password.
Meaning we need to include at least the mandatory, MYSQL_ROOT_PASSWORD variable to get the container running.
You can also watch the video to this lesson here to flow along better
Deploying MySQL with YAML
Now that we have established that we need to deploy MySQL with at least one environment variable, let’s now do this using the YAML manifest file
3. Let’s create a manifest file called mysql-deploy.yaml.
[victor@sno ~]$ vi mysql-deploy.yml

apiVersion: apps/v1
kind: Deployment
metadata:
  name: mysql
spec:
  selector:
    matchLabels:
      app: mysql
  template:
    metadata:
      labels:
        app: mysql
    spec:
      containers:
      - image: mysql
        name: mysql
        env:
        - name: MYSQL_ROOT_PASSWORD
          value: Pa55word
        - name: MYSQL_DATABASE
          value: db1
        - name: MYSQL_USER
          value: dbuser
        - name: MYSQL_PASSWORD
          value: Pa55word
        ports:
        - containerPort: 3306
4. Apply the file.
[victor@sno ~]$ oc create -f mysql-deploy.yml

Warning: would violate PodSecurity "restricted:latest": allowPrivilegeEscalation != false (container "mysql" must set securityContext.allowPrivilegeEscalation=false), unrestricted capabilities (container "mysql" must set securityContext.capabilities.drop=["ALL"]), runAsNonRoot != true (pod or container "mysql" must set securityContext.runAsNonRoot=true), seccompProfile (pod or container "mysql" must set securityContext.seccompProfile.type to "RuntimeDefault" or "Localhost")

deployment.apps/mysql created
5. Verify that the pod is running
[victor@sno ~]$ oc get pods

NAME                    READY   STATUS    RESTARTS   AGE
mysql-565ff78f4-t7fvs   1/1     Running   0          14s
In the Yaml manifest file, you can see that the password is exposed. We need to be cautious with how we handle these environment variables. Rather than hard-coding the username and password in the deployment manifest, we should use secret instead. This makes our deployment more secure and aligns with best practices.
Deploying MySQL with YAML – Using Secret to Handle Environment Variable
6. Create a secret
NOTE: When creating the secret, the values must be encoded. Base 64 encryption works fine.
[victor@sno ~]$ echo -n 'pa55word' |base64
cGE1NXdvcmQ=
[victor@sno ~]$ echo -n 'Pa55word' |base64
UGE1NXdvcmQ=[victor@sno ~]$ echo -n 'dbuser1' |base64
ZGJ1c2VyMQ==6b. create the secret YAML manifest file
[victor@sno ~]$ vi mysql-secret.yml

apiVersion: v1
kind: Secret
metadata:
  name: mysql-secret
type: Opaque
data:
  mysql-root-p: UGE1NXdvcmQ=
  mysql-username: ZGJ1c2VyMQ==
  mysql-password: UGE1NXdvcmQ=
7. Apply the manifest file
[victor@sno ~]$ oc create -f mysql-secret.yml

secret/mysql-secret created
8. Verify that the secret has been created.
[victor@sno ~]$ oc get secret

NAME                       TYPE                                  DATA   AGE
builder-dockercfg-nhj27    kubernetes.io/dockercfg               1      167d
builder-token-2mxrk        kubernetes.io/service-account-token   4      167d
default-dockercfg-bzvk9    kubernetes.io/dockercfg               1      167d
default-token-bm2gm        kubernetes.io/service-account-token   4      167d
deployer-dockercfg-2cldz   kubernetes.io/dockercfg               1      167d
deployer-token-5slrt       kubernetes.io/service-account-token   4      167d
mysql-secret               Opaque                                3      8s
9. Create the deployment manifest file called mysql-deploy-secret.yaml
[victor@sno ~]$ vi mysql-deploy-secret.yml

apiVersion: apps/v1
kind: Deployment
metadata:
  name: mysql
spec:
  selector:
    matchLabels:
      app: mysql
  template:
    metadata:
      labels:
        app: mysql
    spec:
      containers:
      - image: mysql
        name: mysql
        env:
        - name: MYSQL_ROOT_PASSWORD
          valueFrom:
            secretKeyRef:
              name: mysql-secret
              key: mysql-root-p
        - name: MYSQL_USER
          valueFrom:
            secretKeyRef:
              name: mysql-secret
              key: mysql-username
        - name: MYSQL_PASSWORD
          valueFrom:
            secretKeyRef:
              name: mysql-secret
              key: mysql-password
        ports:
        - containerPort: 3306
Explaining secretKeyRef
In the deployment manifest (mysql-deploy-secret.yml), the secretKeyRef field is used to securely reference values stored in the mysql-secret Secret object. Instead of hardcoding sensitive values (like passwords or usernames) directly into the deployment file, secretKeyRef tells Kubernetes to fetch the values from the corresponding keys in the Secret.
10. Apply the manifest file
[victor@sno ~]$ oc create -f mysql-deploy-secret.yml

Warning: would violate PodSecurity "restricted:latest": allowPrivilegeEscalation != false (container "mysql" must set securityContext.allowPrivilegeEscalation=false), unrestricted capabilities (container "mysql" must set securityContext.capabilities.drop=["ALL"]), runAsNonRoot != true (pod or container "mysql" must set securityContext.runAsNonRoot=true), seccompProfile (pod or container "mysql" must set securityContext.seccompProfile.type to "RuntimeDefault" or "Localhost")
deployment.apps/mysql created
11. Verify that the pod is running
[victor@sno ~]$ oc get pods

NAME                    READY   STATUS    RESTARTS   AGE
mysql-565ff78f4-t7fvs   1/1     Running   0          14s
[victor@sno ~]$ oc get pods
NAME READY STATUS RESTARTS AGE
mysql-565ff78f4-t7fvs 1/1 Running 0 34sOnce the container transitions to Running, it means the application has successfully started.
Creating Internal Service
Having deployed MySQL, let create the internal service
1. Create the YAML manifest file for MySQL service
[victor@sno ~]$ vi mysql-service.yml

apiVersion: v1
kind: Service
metadata:
  name: mysql
spec:
  selector:
    app: mysql
  ports:
  - port: 3306
    targetPort: 3306
    protocol: TCP
2. Apply the file
[victor@sno ~]$ oc create -f mysql-service.yml

service/mysql created
3. Verify
[victor@sno ~]$ oc get svc

NAME         TYPE           CLUSTER-IP     EXTERNAL-IP                            PORT(S)    AGE
kubernetes   ClusterIP      10.217.4.1     <none>                                 443/TCP    167d
mysql        ClusterIP      10.217.4.122   <none>                                 3306/TCP   8s
openshift    ExternalName   <none>         kubernetes.default.svc.cluster.local
Deploying PHPMyAdmin with YAML
PHPMyAdmin like MySQL will also be deployed with variables.
Some of the most important ones include:
PMA_HOST: This is the hostname or IP address of the MySQL server PHPMyAdmin should connect to. In our case, since we’ve already created an internal Kubernetes service for MySQL, we’ll use the name of that service here.MYSQL_ROOT_PASSWORD: This variable holds the root user’s password for the MySQL instance. Since it contains sensitive information, it must be handled securely, which the variable has been created with a secret during the MySQL deployment.
Now, similar to what we did with the MySQL deployment, we need to be cautious with how we handle these environment variables. Rather than hard-coding the username and password in the deployment manifest, we should reference the existing secret that we’ve already created. This makes our deployment more secure and aligns with best practices.
Additionally, we will be creating the config-map resource
Creating Config-map & Using it to Handle Environment Variable
We begin by moving sensitive data (like the root password) into a Kubernetes Secret which has been done, and non-sensitive configuration (like the MySQL hostname) into a ConfigMap. This helps centralize configuration management and enhances security.
1. create config map for the PHPMyAdmin variables
[victor@sno ~]$ vi mysql-configmap.yml
apiVersion: v1
kind: ConfigMap
metadata:
  name: mysql-configmap
data:
  mysql_host: mysql
2. Apply the file
[victor@sno ~]$ oc create -f mysql-configmap.yml

configmap/mysql-configmap created
3. Verify
[victor@sno ~]$ oc get cm

NAME                       DATA   AGE
kube-root-ca.crt           1      167d
mysql-configmap            1      5s
4. Create the YAML manifest file.
In the phpMyAdmin deployment file, we reference both the Secret and ConfigMap instead of providing raw values:
[victor@sno ~]$ vi phpmyadmin-deploy-secret.yml
apiVersion: apps/v1
kind: Deployment
metadata:
  name: phpmyadmin
spec:
  selector:
    matchLabels:
      app: phpmyadmin
  template:
    metadata:
      labels:
        app: phpmyadmin
    spec:
      containers:
      - image: phpmyadmin
        name: phpmyadmin
        env:
        - name: MYSQL_ROOT_PASSWORD
          valueFrom:
            secretKeyRef:
              name: mysql-secret
              key: mysql-root-p
        - name: PMA_HOST
          valueFrom:
            configMapKeyRef:
              name: mysql-configmap
              key: mysql_host
        ports:
        - containerPort: 80
5. Apply the file
[victor@sno ~]$ oc apply -f phpmyadmin-deploy-secret.yml 6. Verify that the pod is running
[victor@sno ~]$ oc get pods

NAME                          READY   STATUS    RESTARTS   AGE
mysql-849c4b7b98-dlfrv        1/1     Running   0          43m
phpmyadmin-5557797b89-k5m26   1/1     Running   0          11m
Once the container transitions to Running, it means phpMyAdmin has successfully started and connected to MySQL using the variables we configured.
Creating External Service
After deploying PHPMyAdmin, we also need to expose this PHPMyAdmin application so we can access it from our browser. We can do that by creating a Kubernetes service of type NodePort or LoadBalancer, or using a Route if you’re on OpenShift.
1. Create the YAML Manifest file.
[victor@sno ~]$ vi phpmyadmin-service.yml

apiVersion: v1
kind: Service
metadata:
  name: phpmyadmin
spec:
  selector:
    app: phpmyadmin
  ports:
  - port: 80
    targetPort: 80
    protocol: TCP
  type: NodePort
2. Apply the file
[victor@sno ~]$ oc create -f phpmyadmin-service.yml

service/phpmyadmin created
3. Verify that the service has been created.
[victor@sno ~]$ oc get svc

NAME         TYPE           CLUSTER-IP     EXTERNAL-IP                            PORT(S)        AGE
kubernetes   ClusterIP      10.217.4.1     <none>                                 443/TCP        167d
mysql        ClusterIP      10.217.4.122   <none>                                 3306/TCP       24m
openshift    ExternalName   <none>         kubernetes.default.svc.cluster.local   <none>         167d
phpmyadmin   NodePort       10.217.5.86    <none>                                 80:32651/TCP   3s
Logging into phpMyAdmin
on the browser, run the URL.
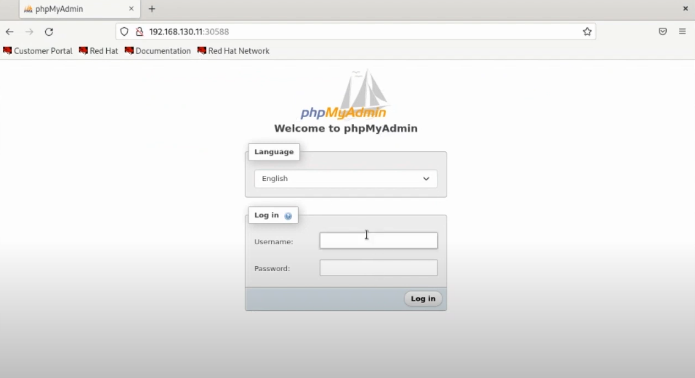
Once the web interface loads, log in using:
- Username:
root - Password:
p@55w0rd(or whatever you configured in your secret)
You should be able to view:
- The default MySQL database
- Any additional users created (e.g.,
dbuser1)
If you are confused, you can click to watch the video here.
And that’s it! We’ve:
- Deployed MySQL securely using Secrets
- Created an internal service for MySQL
- Deployed PHPMyAdmin securely referencing the same Secrets
- Exposed PHPMyAdmin for external access via a Route
With phpMyAdmin now accessible both via NodePort and OpenShift Route, and environment variables securely handled, your Kubernetes-based deployment is complete.
Watch Video On How
Thank you Victor. It worked so well in my Lab
You are welcome Davies. I am glad it worked