
Last updated: August 2025
Deploying Ingress Controller In Kubernetes and MetalLB
When deploying applications on Kubernetes, making them accessible from the outside world is a common requirement. While Kubernetes provides several ways to expose services, Ingress and Ingress Controllers offer a more efficient, scalable, and production-friendly approach.
Why You Need Ingress and Ingress Controllers in Kubernetes
When deploying applications on Kubernetes, one of the key challenges is how to expose them to the outside world. Kubernetes offers multiple ways to do this which is using NodePort, LoadBalancer, and Ingress. But not all approaches are created equal.
Let’s break this down with real-world clarity.
NodePort and LoadBalancer Services: Why They Fall Short
NodePort
The NodePort service type opens a static port on each node to expose your application. But it comes with limitations which are :
- You can’t control which external IP is used.
- Port ranges are restricted.
- Not DNS-friendly.
- Doesn’t scale well for many services.
LoadBalancer
The LoadBalancer type asks your cloud provider (e.g., AWS, Azure, GCP, OCI) to provision a cloud load balancer for your service.
For example:
- In AWS, this could be an Application Load Balancer (ALB) created within public and private subnets.
- In Azure (AKS), the Kubernetes cloud controller manager integrates with Azure Load Balancer automatically.
- The load balancer service type gets a public IP or DNS and routes traffic to your service inside the cluster.
But here’s the catch:
- Cloud Dependency: This only works if your Kubernetes cluster is running on a supported cloud provider with a working Cloud Controller Manager. On bare metal or unsupported environments, it won’t work
- Cost: If you have 20 apps and expose each using
LoadBalancer, you’ll create 20 load balancers which is both costly and inefficient, except you have one to three apps. - Limited Control: You can’t easily swap out ALB for Nginx, F5, or Cisco. You’re stuck with what the cloud gives you.
This is where Ingress comes into the picture.
What Is Ingress?
Ingress is a networking term that simply refers to “in”, “inside” “incoming traffic”, traffic that flows into a system. Ingress can also be a gateway. “In basically”
In Kubernetes, Ingress is a powerful concept that manages inbound HTTP and HTTPS traffic to services running inside the cluster. It allows you to:
- Route requests based on hostnames or paths.
- Terminate SSL/TLS (HTTPS).
- Handle multiple services under a single IP or domain name.
So instead of spinning up a load balancer for every application, you can use one Ingress and intelligently route traffic.
What Is an Ingress Controller?
An Ingress Controller is the component/application/appliance/engine that makes Ingress work. It watches for Ingress resource and uses their rules to configure a reverse proxy/load balancing features
Important: The Ingress Controller is not a load balancer itself. it’s a component/engine that uses load balancer logic to route traffic based on Ingress resource rules.
Real-world Analogy (VM World)
Think of your application running on a virtual machine behind:
- A load balancer,
- A WAF (Web Application Firewall),
- And a firewall or reverse proxy.
You don’t expose each VM directly to the internet. Instead, you route everything through the load balancer, which applies traffic rules, security checks, and forwards requests appropriately. The Ingress pattern in Kubernetes works the same way.
Popular Ingress Controllers
There are several Ingress Controllers to choose from, including:
- NGINX (Community & NGINX Inc. type)
- Traefik
- Kong
- HAProxy
- F5 BIG-IP
- AWS ALB Ingress Controller
Each has unique features. So your choice depends on the kind of load balancing, routing, and security capabilities your application requires.
Tip: Always collaborate with your security team, network team, solutions architect, and application owners when selecting the right Ingress controller.
Also, you can deploy multiple Ingress controllers in a single Kubernetes cluster. To direct traffic to the correct one, simply specify the desired controller using the ingressClassName field in your Ingress resource YAML manifest.
NGINX Ingress Controller (Our Focus)
There are two types of the NGINX Ingress Controller:
- Community Version: Maintained by the Kubernetes community.
- NGINX Inc. Version: Developed by NGINX the company (now part of F5).
Both are capable, but in this lesson, we will go with the community version for simplicity and broad support.
Now that you understand the theory, the next step is practical.

Step by Step Guide of How To Deploy Nginx Ingress Controller on Kubernetes Cluster
The Nginx Ingress Controller can be deployed in various ways but we will be looking at deploying it via direct apply from the github , and via helm chart.
The quick installation guide of the community version for Nginx controller deployment is below
https://kubernetes.github.io/ingress-nginx/deploy/#quick-startTo deploy via direct apply, use the command
#kubectl apply -f https://raw.githubusercontent.com/kubernetes/ingress-nginx/controller-v1.13.0/deploy/static/provider/cloud/deploy.yaml
To deploy via helm, use the following steps below.
1. Add the Ingress-NGINX Helm Repository
ansu@mastern-01:~$ helm repo add ingress-nginx https://kubernetes.github.io/ingress-nginx

"ingress-nginx" has been added to your repositories
2. Verify that the repo is added
ansu@mastern-01:~$ helm repo list

NAME            URL
argo            https://argoproj.github.io/argo-helm
ingress-nginx   https://kubernetes.github.io/ingress-nginx
2. Update the Repository
ansu@mastern-01:~$ helm repo update

Hang tight while we grab the latest from your chart repositories...
...Successfully got an update from the "ingress-nginx" chart repository
...Successfully got an update from the "argo" chart repository
Update Complete. ⎈Happy Helming!⎈
3. Check Available ingress nginx Versions
helm search repo ingress-nginx --versions: lists all available versions of the ingress-nginx chart.
| head -5: limits output to the first 5 results.
ansu@mastern-01:~$ helm search repo ingress-nginx --versions | head -5

NAME                            CHART VERSION   APP VERSION     DESCRIPTION
ingress-nginx/ingress-nginx     4.13.0          1.13.0          Ingress controller for Kubernetes using NGINX a...
ingress-nginx/ingress-nginx     4.12.4          1.12.4          Ingress controller for Kubernetes using NGINX a...
ingress-nginx/ingress-nginx     4.12.3          1.12.3          Ingress controller for Kubernetes using NGINX a...
ingress-nginx/ingress-nginx     4.12.2          1.12.2          Ingress controller for Kubernetes using NGINX a...
4. Install Nginx controller using helm
If you need the debug option to control the installation process which is a good idea, you can add it as below else you can ignore the option.
ansu@mastern-01:~$ helm upgrade --install ingress-nginx ingress-nginx \
  --repo https://kubernetes.github.io/ingress-nginx \
  --namespace ingress-nginx --create-namespace \
  --version 4.10.0

Release "ingress-nginx" does not exist. Installing it now.
NAME: ingress-nginx
LAST DEPLOYED: Mon Jul 14 20:16:40 2025
NAMESPACE: ingress-nginx
STATUS: deployed
REVISION: 1
TEST SUITE: None
NOTES:
The ingress-nginx controller has been installed.
It may take a few minutes for the load balancer IP to be available.
You can watch the status by running 'kubectl get service --namespace ingress-nginx ingress-nginx-controller --output wide --watch'

An example Ingress that makes use of the controller:
  apiVersion: networking.k8s.io/v1
  kind: Ingress
  metadata:
    name: example
    namespace: foo
  spec:
    ingressClassName: nginx
    rules:
      - host: www.example.com
        http:
          paths:
            - pathType: Prefix
              backend:
                service:
                  name: exampleService
                  port:
                    number: 80
              path: /
    # This section is only required if TLS is to be enabled for the Ingress
    tls:
      - hosts:
        - www.example.com
        secretName: example-tls

If TLS is enabled for the Ingress, a Secret containing the certificate and key must also be provided:

  apiVersion: v1
  kind: Secret
  metadata:
    name: example-tls
    namespace: foo
  data:
    tls.crt: <base64 encoded cert>
    tls.key: <base64 encoded key>
  type: kubernetes.io/tls
OR
helm upgrade --debug --install ingress-nginx ingress-nginx \
  --repo https://kubernetes.github.io/ingress-nginx \
  --namespace ingress-nginx --create-namespace \
  --version 4.10.0
5. Verify that the Nginx controller pod is running
ansu@mastern-01:~$ kubectl get pods -n ingress-nginx

NAME                                        READY   STATUS    RESTARTS   AGE
ingress-nginx-controller-55474d95c5-j5dgb   1/1     Running   0          3h59m
6. Verify that the controller services (LoadBalancer & Cluster IP) have also been created.
ansu@mastern-01:~$ kubectl get svc -n ingress-nginx

NAME                                 TYPE           CLUSTER-IP      EXTERNAL-IP   PORT(S)                      AGE
ingress-nginx-controller             LoadBalancer   10.102.111.91   <pending>     80:31581/TCP,443:31603/TCP   105s
ingress-nginx-controller-admission   ClusterIP      10.109.45.115   <none>        443/TCP                      105s

If you were using a cloud-managed Kubernetes cluster, running commands like “kubectl get ingress” or “kubectl get svc” would typically show an external IP address. This happens because the Cloud Controller Manager is present and responsible for provisioning external load balancers.
The Cloud Controller Manager monitors for services of type LoadBalancer. However, in an on-premises Kubernetes environment, there is no Cloud Controller Manager available. As a result, an alternative solution like MetalLB (Metal LoadBalancer) is used to provide external IPs and load balancer functionality.
What Is MetalLB?
MetalLB is a load-balancer implementation designed specifically for bare-metal Kubernetes clusters. In simple words:
MetalLB gives your Kubernetes services an external IP address, making them accessible from outside the cluster, even if you’re not using a cloud provider.
Without MetalLB, kubectl get svc will show a <pending> state for services of type LoadBalancer because there’s no external IP assigned. With MetalLB, you get that IP, just like you would in the cloud.
How Does MetalLB Work?
MetalLB supports two operating modes:
- Layer 2 Mode
In this mode, MetalLB uses ARP (Address Resolution Protocol) to advertise the service IP directly from the node that’s hosting the pod. It makes the node act like the owner of the external IP. This is ideal for simple network setups. - BGP Mode
MetalLB uses Border Gateway Protocol to advertise IPs to upstream routers. This is more advanced and suited for environments with existing network infrastructure that supports BGP.
In this lesson, we’ll focus only on Layer 2 mode, since it’s easier to configure and great for home labs or small clusters.
How Does Layer 2 Mode Work?
In Layer 2 mode:
- You define a pool of IP addresses in your network that MetalLB can assign to services.
- MetalLB watches for
LoadBalancerservices. - When a service is created, MetalLB picks one IP from the pool and announces it to the local network using ARP.
- Any traffic sent to that IP is forwarded to the correct pod inside your cluster.
Benefits of MetalLB
- Makes LoadBalancer services work on bare-metal
- Easy to configure (especially in Layer 2 mode)
- Lightweight and native to Kubernetes
- Integrates well with ingress controllers and other traffic tools
Things to Keep in Mind
- You must reserve IPs in your network that are not used by DHCP or any other device.
- MetalLB doesn’t do actual load balancing like NGINX. It simply advertises external IPs and lets Kubernetes route the traffic.
- In Layer 2 mode, only one node advertises the IP at a time, meaning traffic will hit that node first.
Having understood what MetalLB is, let’s now deploy MetalLB
Step By Step Guide of How to Install & Configure MetalLB on Self-Managed Premise Kubernetes Cluster
The URL below is the official URL that I used for this step by step guide
https://metallb.universe.tf/installation/MetalLB can be installed Uusing Helm or kubectl apply directly, a d we eill look at both methods in this guide
1. Enable strictARP (for IPVS mode)
If your cluster uses kube-proxy in IPVS mode, you must enable strictARP. This ensures MetalLB can properly respond to ARP requests when claiming IPs. If your cluster doesn’t, then there is no need to enable strictARP
a . Check if IPVS mode is enabled in kube-proxy
if it returns (mode: “”), Then your cluster doesn’t use IPVS mode. but if it returns (mode: “ipvs”), proceed to enable strictARP.
ansu@mastern-01:~$ kubectl get configmap kube-proxy -n kube-system -o yaml | grep mode

    mode: ""
In my case, the output confirms that my cluster doesn’t use “IPVS” but I will still enable strictARP. It doesn’t matter. I can enable or decide not to. Even though my cluster is running in iptables mode, enabling strictARP in the kube-proxy config doesn’t break anything. It simply:
- Is safely ignored when using
iptables - Becomes active only if
kube-proxyis inIPVSmode.
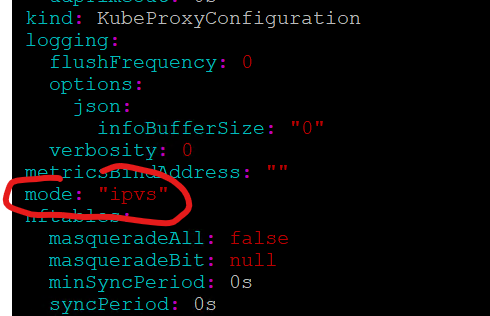
Also, If it does use IPVS, and you run, “kubectl edit configmap -n kube-system kube-proxy”, you will see as below in the picture
b. Enable strictARP.
edit the configmap of kube-proxy and set “strictARP: true”
NB: You can also add this configuration snippet to your kubeadm-config, just append it with -- after the main configuration.
NB: Skip this step if you’re using iptables mode or kube-router.
ansu@mastern-01:~$ kubectl edit configmap -n kube-system kube-proxyapiVersion: kubeproxy.config.k8s.io/v1alpha1
kind: KubeProxyConfiguration
mode: "ipvs"
ipvs:
strictARP: true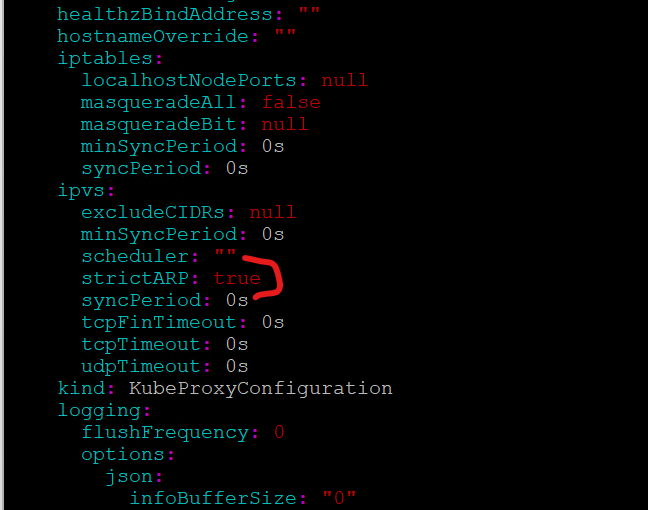
c. (optional) Restart kube-proxy pods to apply the change (Optional)
kubectl delete pod -n kube-system -l k8s-app=kube-proxy
YOU CAN ALSO AUTOMATE STEP 1 WITH THE FOLLOWING COMMAND BELOW WHICH IS WHAT I DID IN THIS LESSON
# see what changes would be made, returns nonzero returncode if different
kubectl get configmap kube-proxy -n kube-system -o yaml | \
sed -e "s/strictARP: false/strictARP: true/" | \
kubectl diff -f - -n kube-system

# actually apply the changes, returns nonzero returncode on errors only
kubectl get configmap kube-proxy -n kube-system -o yaml | \
sed -e "s/strictARP: false/strictARP: true/" | \
kubectl apply -f - -n kube-system
Run the script as shown below
ansu@mastern-01:~$ # see what changes would be made, returns nonzero returncode if different
kubectl get configmap kube-proxy -n kube-system -o yaml | \
sed -e "s/strictARP: false/strictARP: true/" | \
kubectl diff -f - -n kube-system

# actually apply the changes, returns nonzero returncode on errors only
kubectl get configmap kube-proxy -n kube-system -o yaml | \
sed -e "s/strictARP: false/strictARP: true/" | \
kubectl apply -f - -n kube-system

----------------------
diff -u -N /tmp/LIVE-4147414460/v1.ConfigMap.kube-system.kube-proxy /tmp/MERGED-81640592/v1.ConfigMap.kube-system.kube-proxy
--- /tmp/LIVE-4147414460/v1.ConfigMap.kube-system.kube-proxy    2025-07-15 00:28:33.389064281 +0000
+++ /tmp/MERGED-81640592/v1.ConfigMap.kube-system.kube-proxy    2025-07-15 00:28:33.390064294 +0000
@@ -37,7 +37,7 @@
       excludeCIDRs: null
       minSyncPeriod: 0s
       scheduler: ""
-      strictARP: false
+      strictARP: true
       syncPeriod: 0s
       tcpFinTimeout: 0s
       tcpTimeout: 0s
Warning: resource configmaps/kube-proxy is missing the kubectl.kubernetes.io/last-applied-configuration annotation which is required by kubectl apply. kubectl apply should only be used on resources created declaratively by either kubectl create --save-config or kubectl apply. The missing annotation will be patched automatically.
configmap/kube-proxy configured
ansu@mastern-01:~$
2. Install MetalLB using Manifest. To Install MetalLB using Helm which is what I did in this lesson, go to the section “using helm to install MetalLB below.
a. Create the metallb-system namespace
kubectl create namespace metallb-systemb. Deploy MetalLB using the official manifests
kubectl apply -f https://raw.githubusercontent.com/metallb/metallb/v0.15.2/config/manifests/metallb-native.yamlc. Verify is MetalLB pod is up
kubectl get pods -n metallb-system3. Configure the IP Address Pool (Layer 2 Mode)
a. Create the IP address pool and the advertisement config file
---
apiVersion: metallb.io/v1beta1
kind: IPAddressPool
metadata:
  name: metallb-pool
  namespace: metallb-system
spec:
  addresses:
    - 10.10.14.170-10.10.14.173 #Adjust to your network

---
apiVersion: metallb.io/v1beta1
kind: L2Advertisement
metadata:
  name: metallb-advert
  namespace: metallb-system
spec:
  ipAddressPools:
    - metallb-pool
b. Apply the manifest
kubectl apply -f metallb-config.yamlc. Verify that the resources are created
kubectl get crd ipaddresspools.metallb.iokubectl get crd l2advertisements.metallb.iokubectl get crd | grep metallbUsing Helm To Install MetalLB
1. After step 1 above, continue with step 2 to use helm
2. Add MetalLB helm repository
ansu@mastern-01:~$ helm repo add metallb https://metallb.github.io/metallb

"metallb" has been added to your repositories
Verify that the repo is added
ansu@mastern-01:~$ helm repo list

NAME            URL
argo            https://argoproj.github.io/argo-helm
ingress-nginx   https://kubernetes.github.io/ingress-nginx
metallb         https://metallb.github.io/metallb
3. Update the helm repository
ansu@mastern-01:~$ helm repo update

Hang tight while we grab the latest from your chart repositories...
...Successfully got an update from the "metallb" chart repository
...Successfully got an update from the "argo" chart repository
...Successfully got an update from the "ingress-nginx" chart repository
Update Complete. ⎈Happy Helming!⎈
4. Create a custom values YAML File (metallb-values.yaml) because we want to change some default settings of MetalLB
ansu@mastern-01:~$ vi metallb-values.yamlconfig:
address-pools:
- name: metallb-pool
protocol: layer2
addresses:
- 10.10.14.170-10.10.14.173 # Replace with your own IP range
l2-advertisements:
- {} # This empty object instructs MetalLB to enable L2 advertisement for all configured pools 5. Install MetalLB with Helm
ansu@mastern-01:~$ helm install metallb metallb/metallb \
  --namespace metallb-system \
  --create-namespace \
  -f metallb-values.yaml

..............
NAME: metallb
LAST DEPLOYED: Tue Jul 15 11:45:27 2025
NAMESPACE: metallb-system
STATUS: deployed
REVISION: 1
TEST SUITE: None
NOTES:
MetalLB is now running in the cluster.

Now you can configure it via its CRs. Please refer to the metallb official docs
on how to use the CRs.
6. Verify the installation
ansu@mastern-01:~$ kubectl get pods -n metallb-system

NAME                                 READY   STATUS    RESTARTS   AGE
metallb-controller-568f4dc5c-lqxbx   1/1     Running   0          23m
metallb-speaker-kl9t9                4/4     Running   0          23m
metallb-speaker-m5f49                4/4     Running   0          23m
metallb-speaker-mczjp                4/4     Running   0          23m
metallb-speaker-mprzf                4/4     Running   0          23m
ansu@mastern-01:~$ kubectl get crd ipaddresspools.metallb.io

NAME                        CREATED AT
ipaddresspools.metallb.io   2025-07-15T11:45:28Z
ansu@mastern-01:~$ kubectl get crd l2advertisements.metallb.io

NAME                          CREATED AT
l2advertisements.metallb.io   2025-07-15T11:45:28Z
ansu@mastern-01:~$ kubectl get crd | grep metallb
bfdprofiles.metallb.io 2025-07-15T11:45:28Z
bgpadvertisements.metallb.io 2025-07-15T11:45:28Z
bgppeers.metallb.io 2025-07-15T11:45:28Z
communities.metallb.io 2025-07-15T11:45:28Z
ipaddresspools.metallb.io 2025-07-15T11:45:28Z
l2advertisements.metallb.io 2025-07-15T11:45:28Z
servicebgpstatuses.metallb.io 2025-07-15T11:45:28Z
servicel2statuses.metallb.io 2025-07-15T11:45:28Z
ansu@mastern-01:~$ kubectl get svc -n metallb-system

NAME                      TYPE        CLUSTER-IP      EXTERNAL-IP   PORT(S)   AGE
metallb-webhook-service   ClusterIP   10.108.69.230   <none>        443/TCP   26m
ansu@mastern-01:~$ kubectl get all -n metallb-system

NAME                                     READY   STATUS    RESTARTS   AGE
pod/metallb-controller-568f4dc5c-lqxbx   1/1     Running   0          53m
pod/metallb-speaker-kl9t9                4/4     Running   0          53m
pod/metallb-speaker-m5f49                4/4     Running   0          53m
pod/metallb-speaker-mczjp                4/4     Running   0          53m
pod/metallb-speaker-mprzf                4/4     Running   0          53m

NAME                              TYPE        CLUSTER-IP      EXTERNAL-IP   PORT(S)   AGE
service/metallb-webhook-service   ClusterIP   10.108.69.230   <none>        443/TCP   53m

NAME                             DESIRED   CURRENT   READY   UP-TO-DATE   AVAILABLE   NODE SELECTOR            AGE
daemonset.apps/metallb-speaker   4         4         4       4            4           kubernetes.io/os=linux   53m

NAME                                 READY   UP-TO-DATE   AVAILABLE   AGE
deployment.apps/metallb-controller   1/1     1            1           53m

NAME                                           DESIRED   CURRENT   READY   AGE
replicaset.apps/metallb-controller-568f4dc5c   1         1         1       53m
7. Create the IPAddressPool and L2Advertisement Manually
Even though you passed your metallb-values.yaml file during Helm install, it’s important to know:
The Helm chart does not automatically create the
IPAddressPoolandL2AdvertisementCRDs from theconfig:values.
That config : block in values.yaml is only used by the old manifest-based installation, not Helm and thats because does not automatically create instances of these CRDs from values files. It only installs the CRDs themselves, not custom resources using them. This separation is by design, to avoid unexpected overwrites or data loss when upgrading.
ansu@mastern-01:~$ vi addl2.yaml
---
apiVersion: metallb.io/v1beta1
kind: IPAddressPool
metadata:
  name: metallb-pool
  namespace: metallb-system
spec:
  addresses:
    - 10.10.14.170-10.10.14.173


---
apiVersion: metallb.io/v1beta1
kind: L2Advertisement
metadata:
  name: l2
  namespace: metallb-system
Apply the manifest file
ansu@mastern-01:~$ kubectl apply -f addl2.yaml

ipaddresspool.metallb.io/metallb-pool created
l2advertisement.metallb.io/l2 created
8. Verify all IPAddressPool Resources
ansu@mastern-01:~$ kubectl get ipaddresspool -n metallb-system

NAME           AUTO ASSIGN   AVOID BUGGY IPS   ADDRESSES
metallb-pool   true          false             ["10.10.14.170-10.10.14.173"]
To See Which IPs Are in Use:
Check for services of type LoadBalancer using MetalLB:
ansu@mastern-01:~$ kubectl get svc -A -o wide | grep LoadBalancer

ingress-nginx      ingress-nginx-controller             LoadBalancer   10.102.111.91    10.10.14.170   80:31581/TCP,443:31603/TCP                   16h     app.kubernetes.io/component=controller,app.kubernetes.io/instance=ingress-nginx,app.kubernetes.io/name=ingress-nginx
istio-ingress      istio-ingressgateway                 LoadBalancer   10.111.54.179    10.10.14.171   15021:31763/TCP,80:32533/TCP,443:31572/TCP   4d19h   app=istio-ingressgateway,istio=ingressgateway
With MetalLB installed in Layer 2 mode, your bare-metal Kubernetes cluster now supports LoadBalancer services, just like in cloud environments.
Ingress Controller Deployment (Contd)
Now that we have our MetalLB configured, let’s verify if an IP is now assigned to the ingress controller service
ansu@mastern-01:~$ kubectl get svc -n ingress-nginx

NAME                                 TYPE           CLUSTER-IP      EXTERNAL-IP    PORT(S)                      AGE
ingress-nginx-controller             LoadBalancer   10.102.111.91   10.10.14.170   80:31581/TCP,443:31603/TCP   17h
ingress-nginx-controller-admission   ClusterIP      10.109.45.115   <none>         443/TCP                      17h
Noe you can see that the External-IP now has an IP address for the LoadBalancer service
Ingress Controller Behavior
Once deployed, an Ingress Controller doesn’t do anything until you create an Ingress resource. It constantly watches the Kubernetes API for Ingress objects, and configures itself accordingly.
Step By Step Guide of How To Expose Application Externally Using Ingress
We will be using a simple go application in this demo
1. Create the YAML manifest for the go application
ansu@mastern-01:~$ vi go-app.yaml---
apiVersion: v1
kind: Namespace
metadata:
name: qa
---
apiVersion: apps/v1
kind: Deployment
metadata:
name: go-app
namespace: qa
spec:
replicas: 1
selector:
matchLabels:
app: go-app
template:
metadata:
labels:
app: go-app
spec:
containers:
- image: tekneed/tekneedcr:go-app-210
imagePullPolicy: Always
name: go-app
env:
- name: SERVICE
value: go-app
- name: VERSION
value: v1
ports:
- name: http
containerPort: 8080
---
apiVersion: v1
kind: Service
metadata:
name: go-app
namespace: qa
spec:
ports:
- name: http
port: 8080
selector:
app: go-app2. Apply the YAML manifest.
ansu@mastern-01:~$ kubectl apply -f go-app.yaml

Warning: resource namespaces/qa is missing the kubectl.kubernetes.io/last-applied-configuration annotation which is required by kubectl apply. kubectl apply should only be used on resources created declaratively by either kubectl create --save-config or kubectl apply. The missing annotation will be patched automatically.
namespace/qa configured
deployment.apps/go-app created
service/go-app created
3. Verify that the pod has been created and running
ansu@mastern-01:~$ kubectl get pods -n qa

NAME                      READY   STATUS    RESTARTS   AGE
go-app-5946c444f7-zn2kj   1/1     Running   0          4m46s
ansu@mastern-01:~$ kubectl get svc

NAME         TYPE        CLUSTER-IP   EXTERNAL-IP   PORT(S)   AGE
kubernetes   ClusterIP   10.96.0.1    <none>        443/TCP   30d
4. Create an ingress YAML Manifest to expose the application
ansu@mastern-01:~$ vi goapp-ingress.yamlapiVersion: networking.k8s.io/v1
kind: Ingress
metadata:
namespace: qa
name: go-app
annotations:
nginx.ingress.kubernetes.io/ssl-redirect: "false" #enforces HTTP to redirect to HTTPS
spec:
ingressClassName: nginx
tls:
- hosts:
- "goapp.tekneed.com"
- "*.tekneed.com"
secretName: "wildcard-tls"
rules:
- host: "goapp.tekneed.com"
http:
paths:
- path: "/"
pathType: Prefix
backend:
service:
name: "go-app"
port:
number: 8080
5. Apply the YAML manifest
ansu@mastern-01:~$ kubectl apply -f goapp-ingress.yaml

ingress.networking.k8s.io/go-app created
6. Verify that the ingress resource has been created
ansu@mastern-01:~$ kubectl get ing -n qa

NAME     CLASS   HOSTS                 ADDRESS        PORTS     AGE
go-app   nginx   goapp.tekneed.com   10.10.14.170   80, 443   3m54s
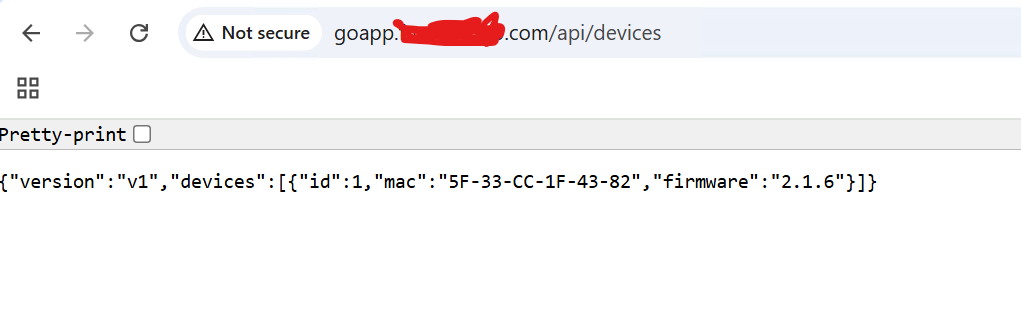
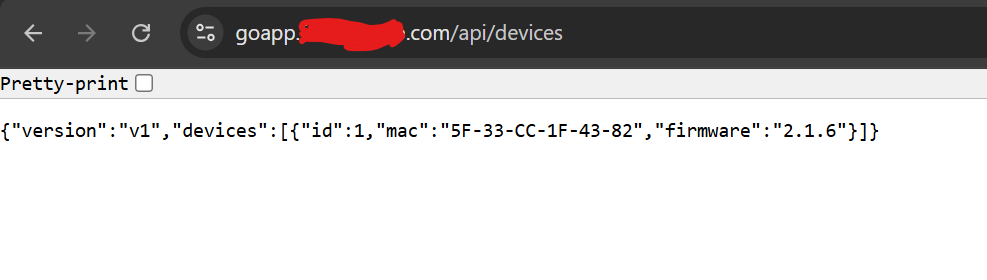
7. Verify that the app is reachable
ansu@mastern-01:~$ curl goapp.tekneed.com/api/devices

{"version":"v1","devices":[{"id":1,"mac":"5F-33-CC-1F-43-82","firmware":"2.1.6"}]}ansu@mastern-01:~$
ansu@mastern-01:~$ curl -H "Host: goapp.tekneed.com" http://10.10.14.170/api/devices
{"version":"v1","devices":[{"id":1,"mac":"5F-33-CC-1F-43-82","firmware":"2.1.6"}]}ansu@mastern-01:~$
How to Configure TLS/SSL (HTTPS) for Applications Exposed via Ingress In Kubernetes
Now that the application is accessible over HTTP, it’s essential to enable HTTPS in a production environment to ensure secure communication.
The steps below outline how to enable HTTPS for your application.
1. Obtain an SSL Certificate
In this setup, we are using a wildcard SSL certificate purchased from GoDaddy. A wildcard certificate allows you to secure multiple subdomains under a single domain.
ansu@mastern-01:~/wildcard-tls$ ls

 4dgwhwhwbejwhqqe.crt   ajewlejwhehja.pem  'tekneed.com 1.key'   tekneed.pfx   gk-g9_iis_intermediates.p7b
2. Create a secret with the SSL certificate
ansu@mastern-01:~/wildcard-tls$ kubectl create -n qa secret tls wildcard-tls  --cert="4dgwhwhwbejwhqqe.crt"   --key="tekneed.com 1.key"

secret/wildcard-tls created
3. Verify that the secret has been created
ansu@mastern-01:~$ kubectl get secret -n qa

NAME           TYPE                DATA   AGE
wildcard-tls   kubernetes.io/tls   2      5m32s
4. Re-apply the Ingress YAML manifest
ansu@mastern-01:~$ kubectl apply -f goapp-ingress.yaml

ingress.networking.k8s.io/go-app unchanged
5. Test that you can access the application via https
Leave a Reply