
Last updated: August 2025
Install and Configure Istio on Kubernetes Cluster
NB: For CKA or other Exam Practice/Preparation Questions / Mock (RHCSA, RHCE, etc. send an email to info@tekneed.com)
What is Istio?
Istio is a service mesh.
And your next question might be; what is a service mesh?
But before that, let’s even talk about the word mesh itself.
so what is a Mesh?
A mesh simply means that everything is connected to everything.
So, in different contexts:
A network mesh means every network device is connected to each other, in quote “meshed with each other”, can communicate with each other, “enter each other”, “everything each other”.
Similarly, a storage mesh means every storage devices are connected with each other.
And now in our case, a service mesh means every service (of course micro service) can communicate with every other service, and again of course in a reliable, secure, and controlled way. so service mesh manages communication amongst microservices.
It’s like giving every service a walkie-talkie and a shared rulebook to talk to each other. No guesswork, final!
Again,
Why Do We Need a Service Mesh?
Well in Kubernetes? Why do we need a service mesh in Kubernetes?
In a microservices architecture, you usually have dozens, sometimes hundreds of small services talking to one another.
Now here’s the problem:
Each service has to:
- Handle retries
- Add timeouts
- Encrypt traffic
- Collect metrics
- Authenticate requests
- Handle failures
- etc.
And trust me, that’s a lot of responsibility! I am not a developer oh but I know that’s a lot.
Imagine every developer writing all these logics we have stated over and over again in every service. Omoh! It’s inefficient and risky but with a service mesh like Istio and any other service mesh like Linkerd, Consul, Kuma, AWS App Mesh, Open source Mesh, and others, all those extra logics and of course which I personally call complexities is taken away from the developers, hence the developers can now focus on writing only the services that has to do with business logics.
Instead of micros services doing the communication work, with Istio mesh, we deploy sidecars which are small proxies (envoy proxies), right next to each service. These sidecars then handle:
- Communication between or amongst the services
- Security (TLS encryption) amongst the services, especially when it has to do with financial services or information that shouldn’t be leaked.
- Traffic routing
- Load balancing
- Observability
- Access policies and every other important logic.
- etc
So now, instead of services talking directly to each other, they talk through the sidecars (envoy proxy).
Interesting, right? Now let me reverse my Bugatti to what Istio is again.
Again, What is Istio?
I am sure you now understand what Istio is but let me save you from telling me because you are too brilliant
- Istio, Mr Istio is one of the most popular service mesh implementations out there. It provides:
- Advanced traffic control (like A/B testing, canary deployments)
- Security (mutual TLS, fine-grained policies)
- Observability (metrics, tracing, logging)
- Resilience (failovers, retries, circuit breakers)
And do you know the most interesting thing? all of these happens without changing your application code & that’s the beauty of Istio.
One thing I love about Istio for me is that it simplifies canary deployment in microservices.
You can route 10% or any % of users to a new version of your application just to be sure everything works fine before routing all your users to the new version. This is known as canary or traffic shifting.
Also With Istio, You can enforce that all traffic is encrypted.
With Istio, You can trace how a request flows through all services.
And you can also apply policies to limit what can talk to what.
Having understand what Istio is and what service mesh is, let’s look at the Istio Architecture.
Architecture of Istio
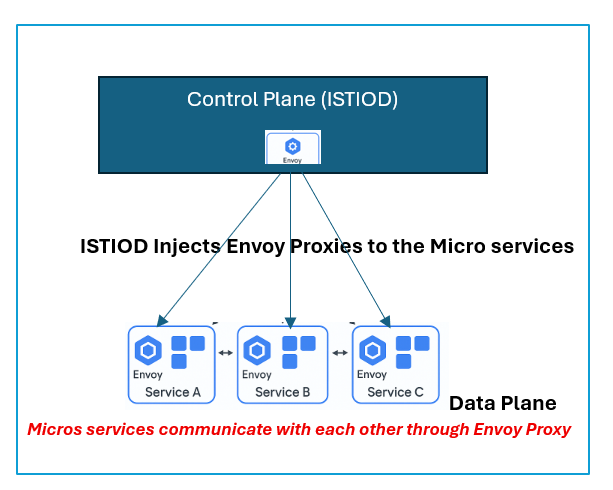
Istio consists of a control plane called istiod.
The control plane(istiod) is the brain of Istio. it injects the proxies into the data plane, that is, into the microservices, and then the microservices communicates with each other with the aid of the proxies.
The istiod consists of different components such as
- Pilot: Configures Envoy proxies with routing rules.
- Citadel: Manages certificates and mTLS (mutual TLS) for secure service-to-service communication.
- Galley: Handles configuration validation (deprecated in later versions).
- Telemetry: Collects metrics, logs, and traces (via Envoy).
These components are all bundled in istiod. They used to be a separate components in older versions of istio.
Imagine a simple application running in Kubernetes with three microservices:
- frontend (service A)
- backend (Service B)
- database (Service C)
Now, when you install Istio, it injects a small component called Envoy proxy. This is the sidecar next to every service.
So now, your architecture looks like this:
[frontend] <-> [Envoy]
[backend]  <-> [Envoy]
[database] <-> [Envoy]
All communication between services now goes through these Envoy proxies.
So instead of frontend → backend directly, it’s:
frontend → Envoy → Envoy → backend
Istio Gateway (Istio Ingress Gateway)
Istio has another component called Istio gateway, basically an entry point to Kubernetes cluster. You can think of it as an alternative to Nginx ingress controller. There is also Istio egress but we will not discuss that in this lesson.
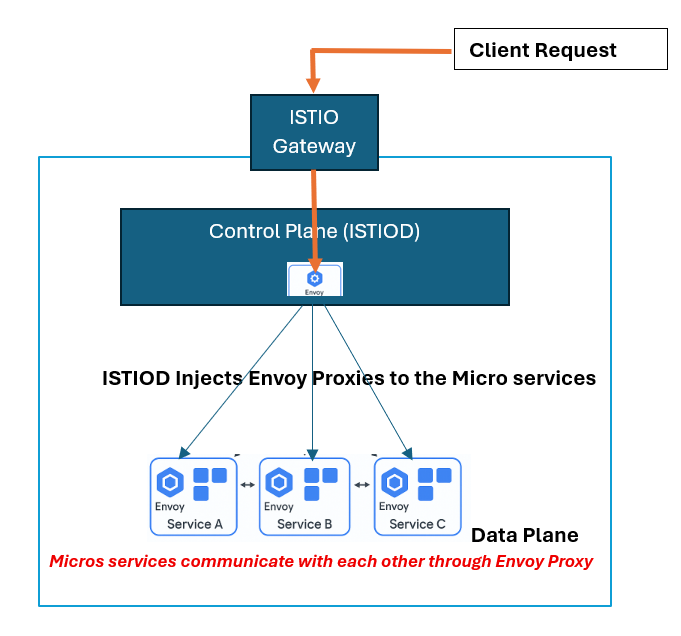
When deploying applications inside a Kubernetes cluster, there’s always the need to expose those applications to the outside world for users, external systems, or other integrations. In traditional Kubernetes setups, this is often done using an Ingress Controller, like NGINX.
However, when you’re using Istio as a service mesh, there’s a better alternative: The Istio Gateway.
The Istio Gateway is a Kubernetes custom resource (CRD) that configures a load balancer (typically an Envoy proxy) at the edge of your mesh to handle incoming and outgoing HTTP/TCP traffic.
It acts as a gatekeeper to your cluster letting only defined traffic into the mesh, and routing it as configured.
Think of it as the “Ingress Controller of Istio”, but much more powerful, secure, and flexible.
Istio Gateway vs Kubernetes Ingress
| Feature | Kubernetes Ingress (NGINX etc.) | Istio Gateway |
|---|---|---|
| Controller | Typically NGINX or HAProxy | Envoy Proxy (via Istio) |
| Resource Type | Ingress | Gateway + VirtualService |
| Protocol Support | HTTP/HTTPS | HTTP, HTTPS, TLS, TCP, gRPC |
| Mesh-Aware | ❌ No | ✅ Yes |
| mTLS Support | ❌ No | ✅ Yes |
| Canary/Routing Logic | Basic | Advanced (weight-based, headers, etc.) |
Gateway CRD
In Istio, you don’t use the standard Ingress resource. Instead, you define two resources:
Gateway: defines how traffic enters the mesh (port, protocol, TLS, etc.)VirtualService: defines how traffic is routed within the mesh.
Example: Gateway YAML
apiVersion: networking.istio.io/v1beta1
kind: Gateway
metadata:
  name: my-ingress-gateway
  namespace: default
spec:
  selector:
    istio: ingressgateway # matches the Istio ingress service
  servers:
  - port:
      number: 80
      name: http
      protocol: HTTP
    hosts:
    - "*"
This defines a gateway that listens on port 80 and accepts traffic for any host.
Example: VirtualService YAML
apiVersion: networking.istio.io/v1beta1
kind: VirtualService
metadata:
  name: my-app
spec:
  hosts:
  - "*"
  gateways:
  - my-ingress-gateway
  http:
  - match:
    - uri:
        prefix: /app
    route:
    - destination:
        host: my-app-service
        port:
          number: 8080
This routes requests that start with /app to the Kubernetes service my-app-service.
Istio’s Gateway is decoupled from routing logic. This separation of concerns (Gateway handles traffic entry; VirtualService handles routing) gives you modularity and reusability across environments.
The Istio Ingress Gateway is much more than a replacement for traditional ingress controllers . It’s a core component of Istio’s secure, observable, and programmable service mesh architecture. Whether you are doing simple ingress or advanced routing and security, the Istio Gateway is your edge gateway to the mesh world.
High Level Architecture
  [Client]
     |
     v
[Istio Gateway (Ingress)]
     |
     v
[Envoy] <-> [Service A]     <-- Mesh side
     |
[Envoy] <-> [Service B]
     |
[Envoy] <-> [Service C]
     |
[Egress Gateway]
     |
 [External API]
How To Inject Istio Sidecars to Pods
Just as I have explained, the sidecar, typically an Envoy proxy, acts as a gateway for each pod, allowing Istio to manage service-to-service communication. Below are the primary ways to inject sidecars into pods:
1. Namespace-Based Automatic Injection (Recommended)
The most common method is to label the namespace with istio-injection=enabled where your pods are deployed:
You can either use ad hoc or a Manifest file to label the namespace.
To use ad hoc , use the command below
kubectl label namespace <your-namespace> istio-injection=enabled
To use Manifest, below can be used
apiVersion: v1
kind: Namespace
metadata:
  name: prod
  labels:
    istio-injection: enabled
This tells Istio to automatically inject the Envoy proxy sidecar into any new pods created in that namespace. For this to work:
- Istio must be properly installed and running.
- The namespace must be labeled before deploying your workloads.
Its also advisable that each deployment or pod should have clear labels (e.g., version, app) to help visualize traffic in tools like Kiali.
2. Pod-Level Injection Label
Istio also supports enabling injection at the pod level, using the following annotation:
metadata:
  annotations:
    sidecar.istio.io/inject: "true"
This is useful when you want fine-grained control. For example, injecting a sidecar into only one or two specific pods within a namespace that does not have namespace-level injection enabled.
Although sidecar.istio.io/inject: "true" placed under labels might sometimes work, Istio officially expects it as an annotation. Relying on namespace-level injection or misusing labels may lead to inconsistent behavior across environments or future Istio versions.
3. Manual Sidecar Injection (For Testing Only)
In some edge cases, such as troubleshooting or experimentation, you might want to inject the sidecar manually:
istioctl kube-inject -f your-app.yaml | kubectl apply -f -
While this works, it’s not recommended for production as it bypasses the automatic injection logic and makes your YAML files harder to maintain.
NB: If sidecar injection is disabled in the namespace, “istio-injection: disabled” , none of the injection methods will apply, not even manual.
Step By Step Guide of How To Deploy Istio on Kubernetes Cluster
Istio can be installed using Helm Chart or kubectl apply directly. We will look at both methods in this guide
Using helm chart
In earlier versions (as recent as January 2025), many users, myself included installed Istio using Helm directly from: “https://istio-release.storage.googleapis.com/charts“
This worked because the storage bucket temporarily hosted an index.yaml, which made it behave like a valid Helm repository. However, as of mid-2025, this URL is no longer accessible as a Helm repo. It throws: “Error: looks like “…/charts” is not a valid chart repository or cannot be reached”
Istio now recommends downloading the release manually and installing the charts from the local directory.
Here’s the updated, working method:
1. Download istio release bundle locally
ansu@mastern-01:~$ curl -LO https://github.com/istio/istio/releases/download/1.24.3/istio-1.24.3-linux-amd64.tar.gz
2. Extract
ansu@mastern-01:~$ tar -xzf istio-1.24.3-linux-amd64.tar.gz
3. Change directory
ansu@mastern-01:~$ cd istio-1.24.3
After running cd istio-1.24.3, you’ll find:
manifests/charts/→ This is where all Helm charts (base,istiod,gateway, etc.) are.bin/istioctl→ Istio CLI tool.samples/→ Sample apps likebookinfo.
4. Verify files in directory
ansu@mastern-01:~/istio-1.24.3$ ls -l

total 40
drwxr-x---  2 ansu ansu  4096 Feb  6 01:30 bin
-rw-r--r--  1 ansu ansu 11357 Feb  6 01:30 LICENSE
drwxr-xr-x  4 ansu ansu  4096 Feb  6 01:30 manifests
-rw-r-----  1 ansu ansu   983 Feb  6 01:30 manifest.yaml
-rw-r--r--  1 ansu ansu  6927 Feb  6 01:30 README.md
drwxr-xr-x 27 ansu ansu  4096 Feb  6 01:30 samples
drwxr-xr-x  3 ansu ansu  4096 Feb  6 01:30 tools
5. Install the istio-base helm chart
The istio-base helm contains the necessary CRDs the istio controller (istiod) needs for its installation
ansu@mastern-01:~/istio-1.24.3$ helm install istio-base manifests/charts/base \
  --namespace istio-system --create-namespace \
  --set global.istioNamespace=istio-system

NAME: istio-base
LAST DEPLOYED: Thu Jul 10 17:21:39 2025
NAMESPACE: istio-system
STATUS: deployed
REVISION: 1
TEST SUITE: None
NOTES:
Istio base successfully installed!

To learn more about the release, try:
  $ helm status istio-base -n istio-system
  $ helm get all istio-base -n istio-system
6. You can verify that the necessary CRDs have been installed with istio-base
ansu@mastern-01:~/istio-1.24.3$ kubectl get crd -n istio-system

NAME                                                  CREATED AT
apiservers.operator.tigera.io                         2025-06-20T23:26:59Z
applications.argoproj.io                              2025-06-26T22:07:11Z
applicationsets.argoproj.io                           2025-06-26T22:07:11Z
appprojects.argoproj.io                               2025-06-26T22:07:11Z
authorizationpolicies.security.istio.io               2025-07-10T17:21:40Z
bgpconfigurations.crd.projectcalico.org               2025-06-20T23:26:58Z
bgpfilters.crd.projectcalico.org                      2025-06-20T23:26:58Z
bgppeers.crd.projectcalico.org                        2025-06-20T23:26:58Z
blockaffinities.crd.projectcalico.org                 2025-06-20T23:26:58Z
caliconodestatuses.crd.projectcalico.org              2025-06-20T23:26:58Z
clusterinformations.crd.projectcalico.org             2025-06-20T23:26:58Z
............................
7. Install the istiod helm chart
istiod is the istio controller/engine itself.
ansu@mastern-01:~/istio-1.24.3$ helm install istiod manifests/charts/istio-control/istio-discovery \
  --namespace istio-system \
  --set telemetry.enabled=true \
  --set global.istioNamespace=istio-system \
  --set meshConfig.ingressService=istio-gateway \
  --set meshConfig.ingressSelector=gateway

NAME: istiod
LAST DEPLOYED: Thu Jul 10 17:50:36 2025
NAMESPACE: istio-system
STATUS: deployed
REVISION: 1
TEST SUITE: None
NOTES:
"istiod" successfully installed!

To learn more about the release, try:
  $ helm status istiod -n istio-system
  $ helm get all istiod -n istio-system

Next steps:
  * Deploy a Gateway: https://istio.io/latest/docs/setup/additional-setup/gateway/
  * Try out our tasks to get started on common configurations:
    * https://istio.io/latest/docs/tasks/traffic-management
    * https://istio.io/latest/docs/tasks/security/
    * https://istio.io/latest/docs/tasks/policy-enforcement/
  * Review the list of actively supported releases, CVE publications and our hardening guide:
    * https://istio.io/latest/docs/releases/supported-releases/
    * https://istio.io/latest/news/security/
    * https://istio.io/latest/docs/ops/best-practices/security/

For further documentation see https://istio.io website
8. Verify that the istiod pod has been deployed.
ansu@mastern-01:~/istio-1.24.3$ kubectl get pods -n istio-system

NAME                      READY   STATUS    RESTARTS   AGE
istiod-68f5d46b8d-tv7zs   1/1     Running   0          2m8s
We are now ready to start managing traffic using the istio control plane
9. Install the istio ingress gateway (optional)
ansu@mastern-01:~/istio-1.24.3$ helm install istio-ingress manifests/charts/gateways/istio-ingress \
  --namespace istio-ingress --create-namespace \
  --set global.istioNamespace=istio-system

NAME: istio-ingress
LAST DEPLOYED: Thu Jul 10 17:59:13 2025
NAMESPACE: istio-ingress
STATUS: deployed
REVISION: 1
TEST SUITE: None
10. Verify that the istio ingress gateway pod has been deployed.
ansu@mastern-01:~/istio-1.24.3$ kubectl get pods -n istio-ingress

NAME                                    READY   STATUS    RESTARTS   AGE
istio-ingressgateway-549b5b8795-rzp4r   1/1     Running   0          14m
11. Verify that the istio ingress gateway service has also been created
ansu@mastern-01:~$ kubectl get svc -n istio-ingress

NAME                   TYPE           CLUSTER-IP      EXTERNAL-IP   PORT(S)                                      AGE
istio-ingressgateway   LoadBalancer   10.111.54.179   <pending>     15021:31763/TCP,80:32533/TCP,443:31572/TCP   2d

You can see that the external IP is pending.
If you were using a cloud-managed Kubernetes cluster, running commands like “kubectl get svc -n istio-ingress” would typically show an external IP address. This happens because the Cloud Controller Manager is present and responsible for provisioning external load balancers.
The Cloud Controller Manager monitors for services of type LoadBalancer. However, in an on-premises Kubernetes environment, there is no Cloud Controller Manager available. As a result, an alternative solution like MetalLB (Metal LoadBalancer) is used to provide external IPs and load balancer functionality.
Click Here to Understand What MetalLB is and How to Configure MetalLB
When you configure MetalLB, the status of the “EXTERNAL-IP” changes from pending to having an IP address as shown below.
ansu@mastern-01:~$ kubectl get svc -n istio-ingress

NAME                   TYPE           CLUSTER-IP      EXTERNAL-IP    PORT(S)                                      AGE
istio-ingressgateway   LoadBalancer   10.111.54.179   10.10.14.171   15021:31763/TCP,80:32533/TCP,443:31572/TCP   4d19h

Step By Step Guide of How To Configure a Microservice Application to Use Istio (Canary Deployment)
You don’t need to modify your Kubernetes Deployment or Service YAML files. Istio’s configuration is completely decoupled from your application configuration, allowing you to manage traffic and policies independently.
I’ll divide this guide into four (4) parts to understand this concept better.
PART A
In this part, we will deploy the following
- The namespace where istio will be injected. which is “prod” namespace
- The GO application – Version 1 (tekneed/tekneedcr:go-app-210)
- Internal service for the GO application
- The test Pod called client – This is not part of the application. We only need this for test. This pod runs a container built from the curl image and runs with an infinite loop to prevent it from exiting.
YAML Manifest file to create a namespace with the name “prod”
---
apiVersion: v1
kind: Namespace
metadata:
  name: prod
  labels:
    monitoring: prometheus
    istio-injection: enabled  #Istio injection
YAML Manifest file to create the deployment resource for the GO application
---
apiVersion: apps/v1
kind: Deployment
metadata:
  name: go-app-v1
  namespace: prod
spec:
  replicas: 1
  selector:
    matchLabels:
      app: go-app
      version: v1
  template:
    metadata:
      labels:
        app: go-app
        version: v1   #will be used as subset for DestinationRule CR
        istio: monitor
    spec:
      containers:
        - image: tekneed/tekneedcr:go-app-210
          imagePullPolicy: Always
          name: go-app
          env:
            - name: SERVICE
              value: go-app
            - name: VERSION
              value: v1
          ports:
            - name: http
              containerPort: 8080
YAML Manifest file to create the service resource for the GO application
---
apiVersion: v1
kind: Service
metadata:
  name: go-app
  namespace: prod
spec:
  ports:
    - name: http
      port: 8080
  selector:
    app: go-app
YAML Manifest file for the test pod
---
apiVersion: v1
kind: Namespace
metadata:
  name: backend
  labels:
    istio-injection: enabled
---
apiVersion: v1
kind: Pod
metadata:
  name: client
  namespace: backend
spec:
  containers:
    - name: client
      image: curlimages/curl:latest
      command: ["/bin/sh", "-c", "--"]
      args: ["while true; do sleep 30; done;"]
1. Deploy the following resources above.
i. create the YAML manifest file for all the resources
ansu@mastern-01:~$ vi goapp-v1
---
apiVersion: v1
kind: Namespace
metadata:
  name: prod
  labels:
    monitoring: prometheus
    istio-injection: enabled  #Istio injection

---
apiVersion: apps/v1
kind: Deployment
metadata:
  name: go-app-v1
  namespace: prod
spec:
  replicas: 1
  selector:
    matchLabels:
      app: go-app
      version: v1
  template:
    metadata:
      labels:
        app: go-app
        version: v1  #will be used as subset for DestinationRule CR
        istio: monitor
    spec:
      containers:
        - image: tekneed/tekneedcr:go-app-210
          imagePullPolicy: Always
          name: go-app
          env:
            - name: SERVICE
              value: go-app
            - name: VERSION
              value: v1
          ports:
            - name: http
              containerPort: 8080

---
apiVersion: v1
kind: Service
metadata:
  name: go-app
  namespace: prod
spec:
  ports:
    - name: http
      port: 8080
  selector:
    app: go-app

---
apiVersion: v1
kind: Namespace
metadata:
  name: backend
  labels:
    istio-injection: enabled
---
apiVersion: v1
kind: Pod
metadata:
  name: client
  namespace: backend
spec:
  containers:
    - name: client
      image: curlimages/curl:latest
      command: ["/bin/sh", "-c", "--"]
      args: ["while true; do sleep 30; done;"]
ii. Deploy all the resources
ansu@mastern-01:~$ kubectl apply -f goapp-v1

Warning: resource namespaces/prod is missing the kubectl.kubernetes.io/last-applied-configuration annotation which is required by kubectl apply. kubectl apply should only be used on resources created declaratively by either kubectl create --save-config or kubectl apply. The missing annotation will be patched automatically.
namespace/prod configured
deployment.apps/go-app-v1 created
service/go-app created
namespace/backend created
pod/client created
iii. Verify that the application pod is running
ansu@mastern-01:~$ kubectl get pods -n prod

NAME                         READY   STATUS    RESTARTS   AGE
go-app-v1-77f9d9f544-5sr6s   2/2     Running   0          3m13s
ansu@mastern-01:~$ kubectl get pods -o wide -n prod

NAME                         READY   STATUS    RESTARTS   AGE   IP               NODE         NOMINATED NODE   READINESS GATES
go-app-v1-77f9d9f544-5sr6s   2/2     Running   0          14m   192.168.90.162   workern-02   <none>           <none>
ansu@mastern-01:~$ kubectl get endpoints -n prod

NAME     ENDPOINTS             AGE
go-app   192.168.90.162:8080   16m
The Ready status, 2/2 indicates that there are two containers running in one pod. One is the application container itself while the other is the sidecar (envoy proxy). If you run the command, “kubectl describe pod”, you will see the details of both conatiners
iv. Verify that the pod we will use for test is running
ansu@mastern-01:~$ kubectl get pods -n backend

NAME     READY   STATUS    RESTARTS   AGE
client   2/2     Running   0          7m35s
2. Using the test pod (client), verify to see where traffic is being routed
We will now use this curl pod to continuously send requests to the go-app service in the prod namespace.
NB: This step is not really needed in part A. Its needed in part B, C and D but we can do this here to understand the concept better when we get to part B, C, and D
i. connect/ssh to the client pod in the backend namespace
ansu@mastern-01:~$ kubectl exec -it client -n  backend -- sh
~ $
ii. Run the script below to continuously send requests to the go-app service in the prod namespace to test where traffic is being routed to
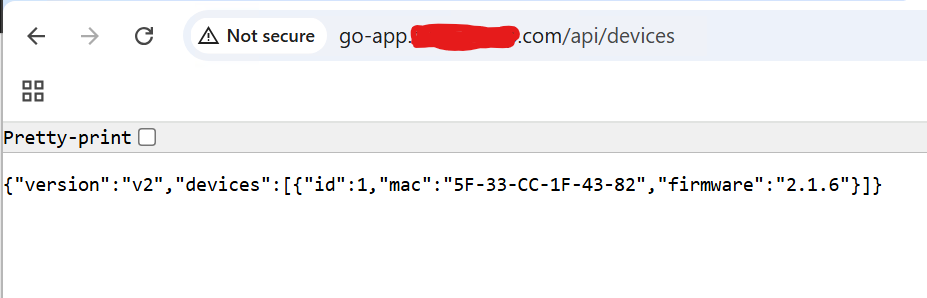
~ $ while true; do curl http://go-app.prod:8080/api/devices && echo "" && sleep 1; done

{"version":"v1","devices":[{"id":1,"mac":"5F-33-CC-1F-43-82","firmware":"2.1.6"}]}
{"version":"v1","devices":[{"id":1,"mac":"5F-33-CC-1F-43-82","firmware":"2.1.6"}]}
{"version":"v1","devices":[{"id":1,"mac":"5F-33-CC-1F-43-82","firmware":"2.1.6"}]}
{"version":"v1","devices":[{"id":1,"mac":"5F-33-CC-1F-43-82","firmware":"2.1.6"}]}
{"version":"v1","devices":[{"id":1,"mac":"5F-33-CC-1F-43-82","firmware":"2.1.6"}]}
{"version":"v1","devices":[{"id":1,"mac":"5F-33-CC-1F-43-82","firmware":"2.1.6"}]}
{"version":"v1","devices":[{"id":1,"mac":"5F-33-CC-1F-43-82","firmware":"2.1.6"}]}
{"version":"v1","devices":[{"id":1,"mac":"5F-33-CC-1F-43-82","firmware":"2.1.6"}]}
{"version":"v1","devices":[{"id":1,"mac":"5F-33-CC-1F-43-82","firmware":"2.1.6"}]}
{"version":"v1","devices":[{"id":1,"mac":"5F-33-CC-1F-43-82","firmware":"2.1.6"}]}
................
At this point from the output above, traffic is routed only to the v1 version of the application.
NB: one can also implement canary by having 2 services and direct accordingly but we will not be doing that in this lesson
PART B
Now that we’ve completed Part A, in Part B we’ll deploy the second version of the same Go application. Imagine a scenario where a new version is being rolled out, we want to release it without causing any downtime. In this section, we’ll leverage Istio’s traffic shifting capabilities, commonly referred to as a Canary deployment, to gradually introduce the new version.
In this part, we will deploy the following:
- The GO application – Version 2 (tekneed/tekneedcr:go-app-211)
- Destination Rule ( we will rout 20% of and 80% of
- Virtual Service (
To manage and shift traffic between different versions of a micro service, Istio uses two key custom resources: DestinationRule and VirtualService.
- DestinationRule: Tells Istio about the different versions (called subsets) of your app. For example, we can define a
v1and av2subset by matching the version labels on the pods. Each subset typically matches labels assigned to pods, such as “version: v1” or “version: v2“. We also include the name of the service (host) that handles the traffic/this rule applies to. - VirtualService: is where we define how to send traffic to those versions (subsets). It also uses the same service name (host) and lets us choose how much traffic goes to each version, for example, 90% to v1 and 10% to v2.
Together, these resources allow you to control traffic flow between service versions without downtime.
YAML Manifest file to create the deployment resource for the Version 2 GO application
---
apiVersion: apps/v1
kind: Deployment
metadata:
  name: go-app-v2
  namespace: prod
spec:
  replicas: 1
  selector:
    matchLabels:
      app: go-app
      version: v2
  template:
    metadata:
      labels:
        app: go-app
        version: v2  #will be used as subset for DestinationRule CR
        istio: monitor
    spec:
      containers:
        - image: tekneed/tekneedcr:go-app-211
          imagePullPolicy: Always
          name: go-app
          env:
            - name: SERVICE
              value: go-app
            - name: VERSION
              value: v2
          ports:
            - name: http
              containerPort: 8080
YAML Manifest file for DestinationRule
---
apiVersion: networking.istio.io/v1beta1
kind: DestinationRule
metadata:
  name: go-app
  namespace: prod
spec:
  host: go-app   #Target host is the service name
  subsets:
    - name: v1
      labels:
        app: go-app
        version: v1   #link between the pod and DR
    - name: v2
      labels:
        app: go-app
        version: v2   #link between the pod and DR
YAML Manifest file for VirtualService
---
apiVersion: networking.istio.io/v1beta1
kind: VirtualService
metadata:
  name: go-app
  namespace: prod
spec:
  hosts:
    - go-app   #Target host is the service name
  http:
    - route:
        - destination:
            host: go-app
            subset: v1
          weight: 80
        - destination:
            host: go-app
            subset: v2
          weight: 20
1. Deploy the following resources above.
i. Create the YAML Manifest file for all the resources.
ansu@mastern-01:~$ vi goapp-v2---
apiVersion: apps/v1
kind: Deployment
metadata:
name: go-app-v2
namespace: prod
spec:
replicas: 1
selector:
matchLabels:
app: go-app
version: v2
template:
metadata:
labels:
app: go-app
version: v2 #will be used as subset for DestinationRule CR
istio: monitor
spec:
containers:
- image: tekneed/tekneedcr:go-app-211
imagePullPolicy: Always
name: go-app
env:
- name: SERVICE
value: go-app
- name: VERSION
value: v2
ports:
- name: http
containerPort: 8080
---
apiVersion: networking.istio.io/v1beta1
kind: DestinationRule
metadata:
name: go-app
namespace: prod
spec:
host: go-app #Target host is the service name
subsets:
- name: v1
labels:
app: go-app
version: v1 #link between the pod and DR
- name: v2
labels:
app: go-app
version: v2 #link between the pod and DR
---
apiVersion: networking.istio.io/v1beta1
kind: VirtualService
metadata:
name: go-app
namespace: prod
spec:
hosts:
- go-app #Target host is the service name
http:
- route:
- destination:
host: go-app
subset: v1
weight: 80
- destination:
host: go-app
subset: v2
weight: 20ii. Deploy all the resources
ansu@mastern-01:~$ kubectl apply -f goapp-v2

deployment.apps/go-app-v2 created
destinationrule.networking.istio.io/go-app created
virtualservice.networking.istio.io/go-app created
iii. Verify that the application pod is running
ansu@mastern-01:~$ kubectl get pods -n prod

NAME                         READY   STATUS    RESTARTS   AGE
go-app-v1-77f9d9f544-5sr6s   2/2     Running   0          79m
go-app-v2-7657bbf949-q7wch   2/2     Running   0          107s
ansu@mastern-01:~$ kubectl get pods -n prod -o wide

NAME                         READY   STATUS    RESTARTS   AGE     IP               NODE         NOMINATED NODE   READINESS GATES
go-app-v1-77f9d9f544-5sr6s   2/2     Running   0          79m     192.168.90.162   workern-02   <none>           <none>
go-app-v2-7657bbf949-q7wch   2/2     Running   0          2m26s   192.168.90.164   workern-02   <none>           <none>
ansu@mastern-01:~$ kubectl get endpoints -n prod

NAME     ENDPOINTS                                 AGE
go-app   192.168.90.162:8080,192.168.90.164:8080   80m
2. Using the test pod (client), verify to see where traffic is being routed
We will now use this curl pod to continuously send requests to the go-app service in the prod namespace.
Without sidecars, accessing the service results in random traffic distribution between v1 and v2.
i. connect/ssh to the client pod in the backend namespace
ansu@mastern-01:~$ kubectl exec -it client -n  backend -- sh
~ $
ii. Run the script below to continuously send requests to the go-app service in the prod namespace to test where traffic is being routed to
~ $ while true; do curl http://go-app.prod:8080/api/devices && echo "" && sleep 1; done

{"version":"v1","devices":[{"id":1,"mac":"5F-33-CC-1F-43-82","firmware":"2.1.6"}]}
{"version":"v1","devices":[{"id":1,"mac":"5F-33-CC-1F-43-82","firmware":"2.1.6"}]}
{"version":"v1","devices":[{"id":1,"mac":"5F-33-CC-1F-43-82","firmware":"2.1.6"}]}
{"version":"v1","devices":[{"id":1,"mac":"5F-33-CC-1F-43-82","firmware":"2.1.6"}]}
{"version":"v1","devices":[{"id":1,"mac":"5F-33-CC-1F-43-82","firmware":"2.1.6"}]}
{"version":"v1","devices":[{"id":1,"mac":"5F-33-CC-1F-43-82","firmware":"2.1.6"}]}
{"version":"v2","devices":[{"id":1,"mac":"5F-33-CC-1F-43-82","firmware":"2.1.6"}]}
{"version":"v2","devices":[{"id":1,"mac":"5F-33-CC-1F-43-82","firmware":"2.1.6"}]}
{"version":"v1","devices":[{"id":1,"mac":"5F-33-CC-1F-43-82","firmware":"2.1.6"}]}
{"version":"v1","devices":[{"id":1,"mac":"5F-33-CC-1F-43-82","firmware":"2.1.6"}]}
...................
You’ll notice that most of the traffic is going to version v1 rather than v2. That’s because in our VirtualService configuration, we set 80% of the traffic to go to v1 and 20% to v2.
Now, let’s assume we’re gaining more confidence in v2. We’ll go ahead and update the configuration to split the traffic evenly—50% to v1 and 50% to v2.
PART C
Now that we have gained mor confidence in version v2, let’s split the traffic evenly.
i. Edit the YAML Manifest for goapp-v2 and change the weight parameter for v1 and v2 to 50
ansu@mastern-01:~$ vi goapp-v2---
apiVersion: networking.istio.io/v1beta1
kind: VirtualService
metadata:
name: go-app
namespace: prod
spec:
hosts:
- go-app
http:
- route:
- destination:
host: go-app
subset: v1
weight: 50
- destination:
host: go-app
subset: v2
weight: 50ii. Apply the file so that the new changes can take effect.
ansu@mastern-01:~$ kubectl apply -f goapp-v2

deployment.apps/go-app-v2 unchanged
destinationrule.networking.istio.io/go-app unchanged
virtualservice.networking.istio.io/go-app configured
iii. Using the test pod (client), verify to see where traffic is being routed
ansu@mastern-01:~$ kubectl exec -it client -n  backend -- sh
~ $
ansu@mastern-01:~$ kubectl exec -it client -n  backend -- sh
~ $ while true; do curl http://go-app.prod:8080/api/devices && echo "" && sleep 1; done

{"version":"v1","devices":[{"id":1,"mac":"5F-33-CC-1F-43-82","firmware":"2.1.6"}]}
{"version":"v1","devices":[{"id":1,"mac":"5F-33-CC-1F-43-82","firmware":"2.1.6"}]}
{"version":"v2","devices":[{"id":1,"mac":"5F-33-CC-1F-43-82","firmware":"2.1.6"}]}
{"version":"v2","devices":[{"id":1,"mac":"5F-33-CC-1F-43-82","firmware":"2.1.6"}]}
{"version":"v1","devices":[{"id":1,"mac":"5F-33-CC-1F-43-82","firmware":"2.1.6"}]}
{"version":"v2","devices":[{"id":1,"mac":"5F-33-CC-1F-43-82","firmware":"2.1.6"}]}
{"version":"v1","devices":[{"id":1,"mac":"5F-33-CC-1F-43-82","firmware":"2.1.6"}]}
{"version":"v2","devices":[{"id":1,"mac":"5F-33-CC-1F-43-82","firmware":"2.1.6"}]}
{"version":"v1","devices":[{"id":1,"mac":"5F-33-CC-1F-43-82","firmware":"2.1.6"}]}
{"version":"v1","devices":[{"id":1,"mac":"5F-33-CC-1F-43-82","firmware":"2.1.6"}]}
{"version":"v2","devices":[{"id":1,"mac":"5F-33-CC-1F-43-82","firmware":"2.1.6"}]}
{"version":"v2","devices":[{"id":1,"mac":"5F-33-CC-1F-43-82","firmware":"2.1.6"}]}
{"version":"v1","devices":[{"id":1,"mac":"5F-33-CC-1F-43-82","firmware":"2.1.6"}]}
{"version":"v2","devices":[{"id":1,"mac":"5F-33-CC-1F-43-82","firmware":"2.1.6"}]}
From the output above, you can clearly observe that traffic is now evenly split between version v1 and v2.
PART D
Let’s assume that you are now confident that version v2 is working correctly, you can go ahead and route 100% of the traffic to v2 and 0% to v1, effectively completing the rollout.
i. Edit the YAML Manifest for goapp-v2 and change the weight parameter for v1 to 0 and v2 to 100
ansu@mastern-01:~$ vi goapp-v2

---
apiVersion: networking.istio.io/v1beta1
kind: VirtualService
metadata:
  name: go-app
  namespace: prod
spec:
  hosts:
    - go-app
  http:
    - route:
        - destination:
            host: go-app
            subset: v1
          weight: 0
        - destination:
            host: go-app
            subset: v2
          weight: 100
ii. Apply the file so that the new changes can take effect.
ansu@mastern-01:~$ kubectl apply -f goapp-v2

deployment.apps/go-app-v2 unchanged
destinationrule.networking.istio.io/go-app unchanged
virtualservice.networking.istio.io/go-app configured
iii. Using the test pod (client), verify to see where traffic is being routed
ansu@mastern-01:~$ kubectl exec -it client -n  backend -- sh
~ $
ansu@mastern-01:~$ kubectl exec -it client -n backend -- sh
~ $ while true; do curl http://go-app.prod:8080/api/devices && echo "" && sleep 1; done
{"version":"v2","devices":[{"id":1,"mac":"5F-33-CC-1F-43-82","firmware":"2.1.6"}]}
{"version":"v2","devices":[{"id":1,"mac":"5F-33-CC-1F-43-82","firmware":"2.1.6"}]}
{"version":"v2","devices":[{"id":1,"mac":"5F-33-CC-1F-43-82","firmware":"2.1.6"}]}
{"version":"v2","devices":[{"id":1,"mac":"5F-33-CC-1F-43-82","firmware":"2.1.6"}]}
{"version":"v2","devices":[{"id":1,"mac":"5F-33-CC-1F-43-82","firmware":"2.1.6"}]}
{"version":"v2","devices":[{"id":1,"mac":"5F-33-CC-1F-43-82","firmware":"2.1.6"}]}
{"version":"v2","devices":[{"id":1,"mac":"5F-33-CC-1F-43-82","firmware":"2.1.6"}]}
{"version":"v2","devices":[{"id":1,"mac":"5F-33-CC-1F-43-82","firmware":"2.1.6"}]}
From the output above, you can now see that version v2 is now handling all the traffic.
How To Expose Kubernetes Application Externally Using Istio Ingress Gateway
We will be exposing our same (go-app) application externally by using Istio ingress gateway. To expose applications using Istio gateway, you need two CRs which are the Gateway resource and the VirtualService resource
Gateway: The Gateway resource configures the Istio ingress gateway (which is typically running as a LoadBalancer service) to listen on specific ports (HTTP/HTTPS) and for specific hostnames.
VirtualService: The VirtualService defines the actual routing rules, i.e., what to do with incoming requests that hit the gateway. It tells Istio how to route traffic to your internal service, which version to send it to, and how traffic is split (if needed).
Together, these two resources act similarly to what an Ingress rule would do in a traditional Kubernetes setup but with richer traffic management capabilities, such as retries, timeouts, and canary deployments.
1. We don’t need to create a deployment and service YAML manifest since those has already been deployed in the demo above, and since we will be using the same go-app application for this demo.
2. Create the YAML manifest for the Gateway Resource
NB: Confirm Istio Ingress Gateway Label, it must match with what is in your gateway resource hence, won’t work
ansu@mastern-01:~$ kubectl get svc -n istio-ingress istio-ingressgateway --show-labels
NAME                   TYPE           CLUSTER-IP      EXTERNAL-IP    PORT(S)                                      AGE   LABELS
istio-ingressgateway   LoadBalancer   10.111.54.179   10.10.14.171   15021:31763/TCP,80:32533/TCP,443:31572/TCP   8d    app.kubernetes.io/instance=istio-ingress,app.kubernetes.io/managed-by=Helm,app.kubernetes.io/name=istio-ingressgateway,app.kubernetes.io/part-of=istio,app.kubernetes.io/version=1.24.3,app=istio-ingressgateway,helm.sh/chart=istio-ingress-1.24.3,install.operator.istio.io/owning-resource=unknown,istio.io/rev=default,istio=ingressgateway,operator.istio.io/component=IngressGateways,release=istio-ingress

ansu@mastern-01:~$ vi gateway.yamlapiVersion: networking.istio.io/v1beta1
kind: Gateway
metadata:
name: goapp-istiogw
namespace: prod
spec:
selector:
istio: ingressgateway #This must match with the istio ingress gateway label
servers:
- port:
number: 80
name: http
protocol: HTTP
hosts:
#- "*"
- go-app.tekneed.com
- port:
number: 443
name: https
protocol: HTTPS
hosts:
- go-app.tekneed.com
tls:
credentialName: wildcard-tls
mode: SIMPLE You can use the same gateway to route multiple domains. Just list them under hosts.
3. Update the current VirtualService resource we created in the demo above
We only need to include the gateway paramater (i.e. the name of the gateway created above)
ansu@mastern-01:~$ vi goapp-v2apiVersion: networking.istio.io/v1beta1
kind: VirtualService
metadata:
name: go-app
namespace: prod
spec:
hosts:
- go-app
- go-app.tekneed.com
gateways: #updated parameter
- goapp-istiogw #updated parameter
http: #updated parameter
- match: #updated parameter
- uri: #updated parameter
prefix: / #updated parameter
route:
- destination:
host: go-app
subset: v1
weight: 0
- destination:
host:
- go-app
subset: v2
weight: 1004. Apply the manifest file for the Gateway resource
ansu@mastern-01:~$ kubectl apply -f gateway.yaml

gateway.networking.istio.io/goapp-istiogw created
5. Verify that the gateway has been created
ansu@mastern-01:~$ kubectl get gw -n prod

NAME            AGE
goapp-istiogw   101s
6. Apply the manifest for the updated VirtualService resource
ansu@mastern-01:~$ kubectl apply -f goapp-v2

deployment.apps/go-app-v2 unchanged
destinationrule.networking.istio.io/go-app unchanged
virtualservice.networking.istio.io/go-app configured
7. Verify that the resource has been created
ansu@mastern-01:~$ kubectl get vs -n prod

NAME     GATEWAYS            HOSTS                               AGE
go-app   ["goapp-istiogw"]   ["go-app","go-app.tekneed.com"]   6d8h
8. Allow ports 80, 8080, and 443 on all the Kubernetes nodes
In my case, I used Ansible. You can do yours manually or use Ansible if you have that as well.
9. Configure/create your DNS record. In my case, I created an A record with the information below.
go-app.tekneed.com 10.10.14.171(istio gateway's svc IP)10. Test to see if the application is reachable
ansu@mastern-01:~$ curl 10.10.14.171ansu@mastern-01:~$ curl go-app.tekneed.com
Cannot GET /ansu@mastern-01:~$“Cannot GET /” suggests our Istio Gateway is now reachable (since Cannot GET / is a response).
This message is not an error with connectivity. It’s an HTTP 404-style response directly from your application (the one running in the go-app pods). It means:
- You successfully reached the
go-appservice on port8080. - But the app does not handle requests to
/(root path), so it returnedCannot GET /. which is true. It handles requests to another path which is what we are going to test in the next step
11. Test to see if the application is reachable on the path configured for the app to handle requests to.
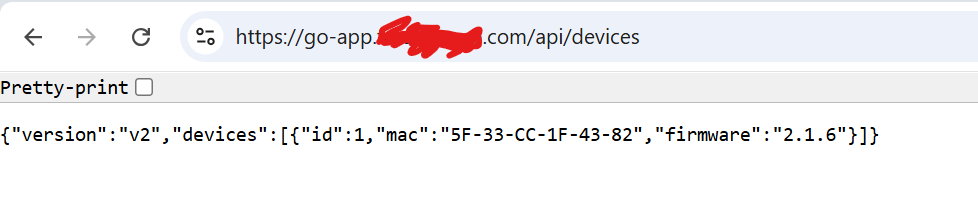
ansu@mastern-01:~$ curl go-app.tekneed.com/api/devices

{"version":"v2","devices":[{"id":1,"mac":"5F-33-CC-1F-43-82","firmware":"2.1.6"}]}ansu@mastern-01:~$
You can also test via the browser
How to Configure TLS/SSL (HTTPS) for Applications Exposed via Istio Ingress Gateway
Now that we are able to reach our application via HTTP, for a production environment, we will have to enable HTTPS for security reasons.
The following steps below will enable HTTPS.
1. Get the SSL certificate – In my case, I am using a wildcard certificate and its purchased from GoDaddy.
ansu@mastern-01:~/wildcard-tls$ ls

4hsjkslejehnsjklq5.crt  4rjskekwhenwkaaa.pem  tekneed.com.key  TEKNEED.pfx  fullchain.crt  gg-r4_iis_intermediates.p7b
2. Create a secret with the SSL certificate in the namespace the Istio gateway was deployed
ansu@mastern-01:~/wildcard-tls$ kubectl create secret tls wildcard-tls   --cert=4hsjkslejehnsjklq5.crt   --key=tekneed.com.key   -n istio-ingress

secret/wildcard-tls created
3. Verify that the secret has been created
ansu@mastern-01:~/wildcard-tls$ kubectl get secret -n istio-ingress

NAME                                  TYPE                 DATA   AGE
sh.helm.release.v1.istio-ingress.v1   helm.sh/release.v1   1      15d
wildcard-tls                          kubernetes.io/tls    2      3m24s
4. Re-apply the Istio gateway YAML manifest
ansu@mastern-01:~$ kubectl apply -f gateway.yaml

gateway.networking.istio.io/goapp-istiogw unchanged
5. Test that the application is reachable via HTTPS
In most cases in the production environment, you either completely disable HTTP or you enforce the redirection of HTTP to HTTPS..
To completely disable HTTP, you can simply remove all the HTTP parameters from the YAML manifest of the gateway resource.
To redirect, you can edit the virtual service YAML manifest.
How to Use Prometheus and Grafana to Monitor Service Performance
In the next lesson, we will explore how to use Prometheus and Grafana to monitor key performance metrics, including latency, traffic, and availability for both externally exposed services and internal applications running within your Kubernetes cluster.
To complement these metrics, we will also use Kiali to visualize the service mesh topology, giving us real-time insights into how services interact, their health status, and traffic flow within the Istio mesh.
EXTRA
How To Tag & Push Docker Images to Docker Hub (Private Registry)
1. Verify the container images available
ansu@mastrn-01:~$ sudo docker images

REPOSITORY               TAG                 IMAGE ID       CREATED        SIZE
tekneed/tekneedcr        test-push           97662d24417b   5 months ago   192MB
nginx                    latest              97662d24417b   5 months ago   192MB
tekhour/myapp-lesson155  latest              d62f3a42f937   2 years ago    30.6MB
tekhour/myapp-lesson155  v0.1.8              d62f3a42f937   2 years ago    30.6MB
tekneed/tekneedcr        fe-bookreview-160   d62f3a42f937   2 years ago    30.6MB
tekneed/tekneedqcr       fe-bookreview-161   d62f3a42f937   2 years ago    30.6MB
2. Create and tag the Image you want to push form an existing image.
The existing image is (tekhour/myapp-lesson155:latest). The new tagged image is tekneed/tekneedcr:go-app-210)
ansu@mastrn-01:~$ sudo docker tag tekhour/myapp-lesson155:latest tekneed/tekneedcr:go-app-2103. Verify that the image has been created and tagged
ansu@mastrn-01:~$ sudo docker images

REPOSITORY               TAG                 IMAGE ID       CREATED        SIZE
tekneed/tekneedcr        test-push           97662d24417b   5 months ago   192MB
nginx                    latest              97662d24417b   5 months ago   192MB
tekhour/myapp-lesson155  latest              d62f3a42f937   2 years ago    30.6MB
tekhour/myapp-lesson155  v0.1.8              d62f3a42f937   2 years ago    30.6MB
tekneed/tekneedcr        fe-bookreview-160   d62f3a42f937   2 years ago    30.6MB
tekneed/tekneedcr        fe-bookreview-161   d62f3a42f937   2 years ago    30.6MB
tekneed/tekneedcr        go-app-210          d62f3a42f937   2 years ago    30.6MB
4. Login to docker hub
create a PAT from the docker hub to login with
ansu@mastrn-01:~$ echo 'dckr_pat_hewkwjwhwkwjkwkwkwesdsdcssdswe' | sudo docker login -u tekneed --password-stdin

WARNING! Your credentials are stored unencrypted in '/root/.docker/config.json'.
Configure a credential helper to remove this warning. See
https://docs.docker.com/go/credential-store/

Login Succeeded
5. Push the docker image
ansu@mastrn-01:~$ sudo docker push tekneed/tekneedcr:go-app-210

The push refers to repository [docker.io/tekneed/tekneedcr]
4ba564dc419c: Mounted from tekhour/myapp-lesson155
5380d9872d05: Mounted from tekhour/myapp-lesson155
28e757e6e258: Mounted from tekhour/myapp-lesson155
go-app-210: digest: sha256:f6d5fa294243fb2b150154d3f5f9c4f399297b9b8e86753166f071e88f6f9559 size: 949
ansu@mastrn-01:~$
Leave a Reply