Introduction
In this lesson, you’ll learn how to set up a production-ready Kubernetes cluster from scratch. Whether you’re deploying it for learning purposes or real-world use, this guide provides a step-by-step walkthrough.
Lesson Overview
This lesson is divided into two parts:
- Part 1: Manual deployment of a Kubernetes cluster.
- Part 2: Automated deployment using Terraform and Ansible.
A video guide is also provided to support the process. You can click on the link at the end of this lesson
Deployment Topology
For this implementation, we’ll deploy:
- One load balancer
- Two master (control plane) nodes
- Two worker nodes
You’ll need a minimum of five virtual machines (VMs) or physical servers, depending on your environment. These same steps can be applied when deploying tens or hundreds of nodes.
The architecture is illustrated below.
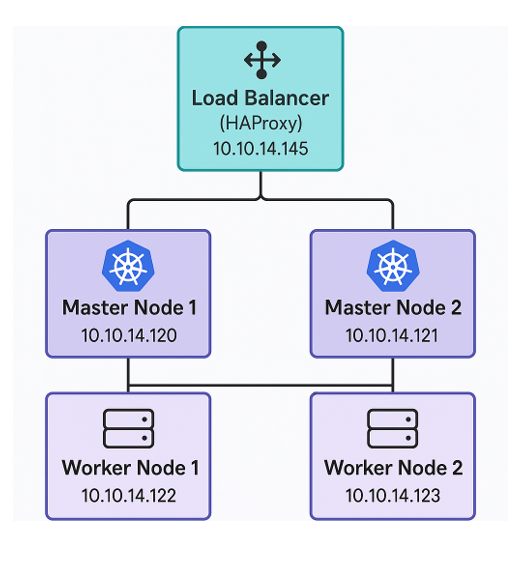
The load balancer will be placed in front of the master nodes. Ubuntu 24.04 LTS will be used for all the nodes.
Load Balancer (HAProxy) : 10.10.14.145
Master Node 1: 10.10.14.120
Master Node 2: 10.10.14.121
Worker Node 1: 10.10.14.122
Worker Node 2: 10.10.14.123
Before we begin to deploy, some necessary ports needs to be allowed on the firewall. Let’s look at those ports below.
| Component | Port(s) | What It’s Used For |
|---|---|---|
| Load Balancer | 6443 | Talks to the Kubernetes API — the brain/door of your cluster |
| 8404 (optional) | Used to monitor HAProxy (only if you enable this in the settings) | |
| All Kubernetes Nodes | 6443 | Allows nodes to communicate with the API server |
| 10250 | Lets Kubernetes control and get data from the worker node (via the Kubelet) | |
| 30000–32767 | Used when you expose apps using NodePort (external access to services) | |
| Master Nodes | 2379–2380 | etcd – stores all cluster data (like a database for Kubernetes) |
| 10257 | Controller Manager – makes decisions like scaling and rollout | |
| 10259 | Scheduler – decides where new apps (pods) should run |
Now that we have all the information we need, let’s begin by configuring the Load Balancer
Step By Step Guide of How To Configure HAProxy LoadBalancer for Kubernetes Cluster on Linux
I’ll be using the latest Ubuntu Linux server for this deployment
1. Install HAProxy
$ sudo apt install haproxy -y2. Edit the HAProxy configuration file
$ sudo vi /etc/haproxy/haproxy.cfg
At the end of the file, add the following.
######Kubernetes configuration#####
listen stats
    bind :8404
    stats enable
    stats uri /stats
    stats refresh 10s


frontend kubernetes
        bind 10.10.14.145:6443  #HAProxy server IP
        option tcplog
        mode tcp
        default_backend  kubernetes-master-nodes

backend kubernetes-master-nodes
        mode tcp
        balance roundrobin
        option  tcp-check
        server  mastern-01  10.10.14.120:6443 check fall 3 rise 2   #Master Node 1
        server  mastern-02  10.10.14.121:6443 check fall 3 rise 2   #Master Node 2
3. Restart HAProxy
$ sudo systemctl restart haproxy4. Optionally open port 8404 and intentionally open port 6443 for kubernetes API
$ sudo ufw allow 8404/tcp$ sudo ufw allow 6443/tcp5. Verify that you can reach HAProxy via GUI on your browser
http://10.10.14.145:8404/stats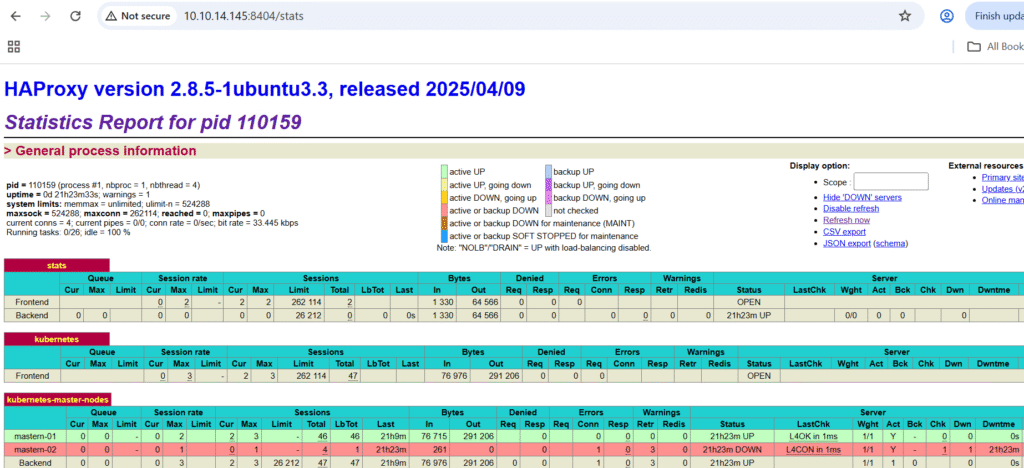
NB: mastern-01 is up and green because it’s listening on port 6443 at the time while mastern-02 is Red and down because it’s not listening on port 6443 at the time. For a first time configuration without configuring Kubernetes yet, both should be Red and Down until the Kubernetes API is up and listening on port 6443
Now that the Load Balance is deployed, let’s proceed with the deployment of kubernetes cluster
Step By Step Guide of How To Deploy a Self Managed Kubernetes Cluster With Multiple Master and Worker Nodes
Run the following commands on all the Kubernetes nodes. A better way is to run on one node(master node 1) and create a template from (master node 1 ) to install other nodes.
Please note that if you are creating a template, you must stop at step 8 before you continue with (master node 1)
On the master nodes, open up the following ports as mentioned above. For me, I’ll just open up all the ports for both master and worker, especially if I am using a template.
ansu@mastern-01:~$ sudo ufw allow 2379:2380/tcpansu@mastern-01:~$ sudo ufw allow 10257/tcpansu@mastern-01:~$ sudo ufw allow 10259/tcpansu@mastern-01:~$ sudo ufw allow 6443/tcpansu@mastern-01:~$ sudo ufw allow 10250/tcpansu@mastern-01:~$ sudo ufw allow 30000:32767/tcp1. (Step 1) Disable swap
This is essential not to cause inconsistent memory handling, unstable pods, and performance issues
a). disable swap
ansu@mastern-01:~$ sudo swapoff -a
b). comment swap line in the fstab file with the command below. You can also use the vi editor as an alternative (vi /etc/fstab)
ansu@mastern-01:~$ sudo sed -i '/swap/s/^\(.*\)$/#\1/g' /etc/fstab c). verify that swap is completely disabled
ansu@mastern-01:~$ free -h

               total        used        free      shared  buff/cache   available
Mem:            25Gi       659Mi        24Gi       1.1Mi       537Mi        25Gi
Swap:             0B          0B          0B
2. (Step 2) Ensure that the necessary kernel modules are loaded at boot time for Kubernetes
The modules to load are the “overlay” and the “br_netfilter” modules.
These modules are essential for networking, container runtime, and Kubernetes cluster operations.
*The overlay module is used for overlay filesystems, which are critical for container runtimes like Docker and containerd.
*The br_netfilter module is essential for packet filtering and network bridging in Kubernetes.
a). use the command below to write to the file, “/etc/modules-load.d/k8s.conf“. You can also use the vi editor as an alternative. (vi /etc/modules-load.d/k8s.conf)
ansu@mastern-01:~$ cat <<EOF | sudo tee /etc/modules-load.d/k8s.conf
overlay
br_netfilter
EOF
b). Verify that the content is present
ansu@mastern-01:~$ cat /etc/modules-load.d/k8s.conf

overlay
br_netfilter
c). Load the modules
ansu@mastern-01:~$ sudo modprobe overlayansu@mastern-01:~$ sudo modprobe br_netfilterd). Verify that the modules are loaded
ansu@mastern-01:~$ lsmod | grep overlay

overlay               212992  0
ansu@mastern-01:~$ lsmod | grep br_netfilter
br_netfilter 32768 0
bridge 421888 1 br_netfilter3. (Step 3) Ensure that IP forwarding is enabled at the kernel level
This is critical for pod communication and cluster routing – This configuration is essential for Kubernetes networking
It enables IP forwarding at the kernel level. It allows the Linux kernel to forward packets between network interfaces, which is critical for pod-pod and pod-external communication. Without IP forwarding, Kubernetes network won’t function properly.
a). use the command below to write to the file “/etc/sysctl.d/k8s.conf”. You can also use the vi editor as an alternative. (vi /etc/sysctl.d/k8s.conf)
ansu@mastern-01:~$ cat <<EOF | sudo tee /etc/sysctl.d/k8s.conf
net.bridge.bridge-nf-call-iptables  = 1
net.ipv4.ip_forward                 = 1
EOF
b). Apply the configuration immediately without reboot by reloading all sysctl config files in /etc/sysctl.d
ansu@mastern-01:~$ sudo sysctl --system

* Applying /usr/lib/sysctl.d/10-apparmor.conf ...
* Applying /etc/sysctl.d/10-console-messages.conf ...
* Applying /etc/sysctl.d/10-ipv6-privacy.conf ...
* Applying /etc/sysctl.d/10-kernel-hardening.conf ...
* Applying /etc/sysctl.d/10-magic-sysrq.conf ...
* Applying /etc/sysctl.d/10-map-count.conf ...
* Applying /etc/sysctl.d/10-network-security.conf ...
* Applying /etc/sysctl.d/10-ptrace.conf ...
* Applying /etc/sysctl.d/10-zeropage.conf ...
.........................
NB: If it returns “net.ipv4.ip_forward = 1”, the setting is active.
c). verify that IP forwarding is enabled
ansu@mastern-01:~$ sudo sysctl net.ipv4.ip_forward

net.ipv4.ip_forward = 1
If it returns net.ipv4.ip_forward = 1 as above, the setting is active.
4. (Step 4) Install prerequisites packages, especially for step 5 usage
ansu@mastern-01:~$ sudo apt install -y apt-transport-https ca-certificates curl gpg lsb-release gnupg

.......................
Reading package lists... Done
Building dependency tree... Done
Reading state information... Done
ca-certificates is already the newest version (20240203)
........................................
i. apt-transport-https: Allows apt to fetch packages over HTTPS (more secure than HTTP). Required to add external repos securely.
ii. ca-certificates: Ensures your system can verify SSL certificates from HTTPS endpoints. Vital for secure web access.
iii. curl: Command-line tool for transferring data. Used frequently in scripts to download binaries.
iv. gpg / gnupg: Tools for verifying signatures and managing GPG keys. Needed to verify authenticity of downloaded software.
v. lsb-release: Provides lsb_release command, useful for identifying the OS version in scripts or repo logic.
5. (Step 5) Install the container runtime (containerd)
You can either install docker which of course comes with containerd or you install just containerd but for this setup, I’ll be installing just containerd
a). download the binaries for containerd
curl -LO https://github.com/containerd/containerd/releases/download/v1.7.14/containerd-1.7.14-linux-amd64.tar.gz

  % Total    % Received % Xferd  Average Speed   Time    Time     Time  Current
                                 Dload  Upload   Total   Spent    Left  Speed
  0     0    0     0    0     0      0      0 --:--:-- --:--:-- --:--:--     0
 34 45.5M   34 15.7M    0     0  11980      0  1:06:23  0:22:57  0:43:26 22855
 .................................
b). extract the downloaded file to the /usr/local directory
ansu@mastern-01:~$ sudo tar Cxzvf /usr/local containerd-1.7.14-linux-amd64.tar.gz

bin/
bin/containerd-shim
bin/ctr
bin/containerd-shim-runc-v1
bin/containerd
bin/containerd-stress
bin/containerd-shim-runc-v2
c). run containerd as a systemctl service
(i) download the service file
ansu@mastern-01:~$ curl -LO https://raw.githubusercontent.com/containerd/containerd/main/containerd.service

  % Total    % Received % Xferd  Average Speed   Time    Time     Time  Current
                                 Dload  Upload   Total   Spent    Left  Speed
100  1248  100  1248    0     0    842      0  0:00:01  0:00:01 --:--:--   842
(ii) create a directory
ansu@mastern-01:~$ sudo mkdir -p /usr/local/lib/systemd/system/(iii) move the downloaded service file to the directory
ansu@mastern-01:~$ sudo mv containerd.service /usr/local/lib/systemd/system/(iv) create a second directory
ansu@mastern-01:~$ sudo mkdir -p /etc/containerd(v) Generate the default config for containerd and save it to “/etc/containerd/config.toml”
ansu@mastern-01:~$ containerd config default | sudo tee /etc/containerd/config.toml

disabled_plugins = []
imports = []
oom_score = 0
plugin_dir = ""
required_plugins = []
root = "/var/lib/containerd"
state = "/run/containerd"
temp = ""
version = 2
.......................
(vi) make some changes to update the systemcgroup parameter from false to true
You can use a vi editor (vi /etc/containerd/config.toml), then change the value, “SystemdCgroup” from false to true OR just use the command below.
ansu@mastern-01:~$ sudo sed -i 's/SystemdCgroup \= false/SystemdCgroup \= true/g' /etc/containerd/config.tomlNB: You’re changing SystemdCgroup = false to SystemdCgroup = true in the containerd config because Kubernetes expects to manage cgroups using systemd as the cgroup driver, especially on modern Linux systems that use systemd as their init system
(vii) reload the systemctl daemon
ansu@mastern-01:~$ sudo systemctl daemon-reload(viii) Enable and make the setting persistent
ansu@mastern-01:~$ sudo systemctl enable --now containerd

Created symlink /etc/systemd/system/multi-user.target.wants/containerd.service → /usr/local/lib/systemd/system/containerd.service.
(ix) verify that the containerd service is up and running
ansu@mastern-01:~$ systemctl status containerd

● containerd.service - containerd container runtime
     Loaded: loaded (/usr/local/lib/systemd/system/containerd.service; enabled; preset: enabled)
     ................................
6. (Step 6) install runc
runc also helps with the container runtime. It’s a low level container runtime.
a). download runc libraries
ansu@mastern-01:~$ curl -LO https://github.com/opencontainers/runc/releases/download/v1.1.12/runc.amd64

  % Total    % Received % Xferd  Average Speed   Time    Time     Time  Current
                                 Dload  Upload   Total   Spent    Left  Speed
  0     0    0     0    0     0      0      0 --:--:-- --:--:-- --:--:--     0
 44 10.2M   44 4650k    0     0  14606      0  0:12:13  0:05:25  0:06:48 25760
100 10.2M  100 10.2M    0     0  14469      0  0:12:20  0:12:20 --:--:-- 18363
b). Install runc
ansu@mastern-01:~$ sudo install -m 755 runc.amd64 /usr/local/sbin/runc7. (Step 7) Configure crictl to work with containerd
ansu@mastern-01:~$ sudo crictl config runtime-endpoint unix:///var/run/containerd/containerd.sockNB: Also at this point, of course no containers are running yet when you do “crictl ps -a”
If you run step 10, you will also get the error below and it is understandable from the error
[cp: cannot stat ‘/etc/kubernetes/admin.conf’: No such file or directory
chown: cannot access ‘/home/ansu/.kube/config’: No such file or directory]
8. (step 8) Install the Kubernetes packages/tools (kubeadm, kubelet, and kubectl)
a). Install the necessary packages
ansu@mastern-01:~$ curl -fsSL https://pkgs.k8s.io/core:/stable:/v1.29/deb/Release.key | sudo gpg --dearmor -o /etc/apt/keyrings/kubernetes-apt-keyring.gpgansu@mastern-01:~$ echo 'deb [signed-by=/etc/apt/keyrings/kubernetes-apt-keyring.gpg] https://pkgs.k8s.io/core:/stable:/v1.29/deb/ /' | sudo tee /etc/apt/sources.list.d/kubernetes.listansu@mastern-01:~$ sudo apt updateansu@mastern-01:~$ sudo apt install kubelet kubeadm kubectl -y
Reading package lists... Done
Building dependency tree... Done
Reading state information... Done
The following additional packages will be installed:
conntrack cri-tools kubernetes-cni
The following NEW packages will be installed
............................*** if you wish, you can install specific version of the tools [sudo apt install -y kubelet=1.29.6-1.1 kubeadm=1.29.6-1.1 kubectl=1.29.6-1.1 –allow-downgrades –allow-change-held-packages]***
b). Prevents automatic upgrades of these Kubernetes components
ansu@mastern-01:~$ sudo apt-mark hold kubectl kubeadm kubectl

kubectl set on hold.
kubeadm set on hold.
kubectl set on hold.
c). You can also verify the versions of these packages
ansu@mastern-01:~$ kubeadm version
kubectl version
kubectl version --client

kubeadm version: &version.Info{Major:"1", Minor:"29", GitVersion:"v1.29.15", GitCommit:"0d0f172cdf9fd42d6feee3467374b58d3e168df0", GitTreeState:"clean", BuildDate:"2025-03-11T17:46:36Z", GoVersion:"go1.23.6", Compiler:"gc", Platform:"linux/amd64"}
Client Version: v1.29.15
Kustomize Version: v5.0.4-0.20230601165947-6ce0bf390ce3
The connection to the server localhost:8080 was refused - did you specify the right host or port?
Client Version: v1.29.15
Kustomize Version: v5.0.4-0.20230601165947-6ce0bf390ce3
d). Verify that the kubelet service is running.
expected result is that, it shouldn’t run at this point.
ansu@mastern-01:~$ systemctl status kubelet

○ kubelet.service - kubelet: The Kubernetes Node Agent
     Loaded: loaded (/usr/lib/systemd/system/kubelet.service; enabled; preset: enabled)
    Drop-In: /usr/lib/systemd/system/kubelet.service.d
             └─10-kubeadm.conf
     Active: inactive (dead)
       Docs: https://kubernetes.io/docs/
NB: Kubernetes components must be upgraded carefully and in a controlled sequence — especially:
kubeadm must usually be upgraded first when upgrading a cluster.
kubelet and kubectl must be upgraded after the control plane is upgraded.
Letting apt upgrade them randomly may break cluster compatibility or stability, that was why we prevented automatic aupdates
You would also notice that when you run “systemctl status kubelet”, the kubelet service wouldn’t have started at this point. The kubelet requires configuration to function. Until you run “kubeadm init” to initialize, join a master node or a worker node, kubelet will not start, even if you manually start it, it will keep exiting/crashing.
*How kubelet works*
After installing, kubelet is registered as a systemd service and tries to start immediately.
However, it depends on a configuration file:
*/var/lib/kubelet/config.yaml
and also a kubelet kubeconfig at:
*/etc/kubernetes/kubelet.conf
These files do not exist yet until you run kubeadm init (on control-plane node) OR kubeadm join (on worker node). So if you try to start it without finding its config, can’t find it crashes. But as soon as kubeadm init becomes successful, /var/lib/kubelet/config.yaml, /etc/kubernetes/kubelet.conf, Certificates, etc are created, then kubelet is restarted automatically by systemd and starts running successfully, joining the cluster.
At this point, if you are going to use this as a template to create other Kubernetes nodes, shut down the server and create a template from it, then create other Kubernetes nodes from the template
Now on the first master node, continue with step 9 when it is powered on again.
9. (Step 9) initialize the control plane on master node 1
[If you are using a load balancer as I am, use the control-plane-endpoint command]
ansu@mastern-01:~$ sudo kubeadm init --pod-network-cidr=192.168.0.0/16 --control-plane-endpoint="10.10.14.145:6443" --upload-certs --v=5

..................
I0610 21:15:21.756087  137580 initconfiguration.go:122] detected and using CRI socket: unix:///var/run/containerd/containerd.sock
I0610 21:15:21.756296  137580 interface.go:432] Looking for default routes with IPv4 addresses
..............

Your Kubernetes control-plane has initialized successfully!

To start using your cluster, you need to run the following as a regular user:

mkdir -p $HOME/.kube
sudo cp -i /etc/kubernetes/admin.conf $HOME/.kube/config
sudo chown $(id -u):$(id -g) $HOME/.kube/config

Alternatively, if you are the root user, you can run:

export KUBECONFIG=/etc/kubernetes/admin.conf

You should now deploy a pod network to the cluster.
Run "kubectl apply -f [podnetwork].yaml" with one of the options listed at:
https://kubernetes.io/docs/concepts/cluster-administration/addons/

You can now join any number of the control-plane node running the following command on each as root:

kubeadm join xxxxxxx3 --token pqs6v9.xxxxxxxxxxx \
--discovery-token-ca-cert-hash sha256:dc0fdhwjwhwhhwjkwjjkwjjwhhdwsw \
--control-plane --certificate-key 3ajdjkskwklkkewclwdjclwclwlvclschslcgskskggsgcgg

Please note that the certificate-key gives access to cluster sensitive data, keep it secret!
As a safeguard, uploaded-certs will be deleted in two hours; If necessary, you can use
"kubeadm init phase upload-certs --upload-certs" to reload certs afterward.

Then you can join any number of worker nodes by running the following on each as root:

kubeadm join 10.10.14.145:6443 --token pms,jjdnskjkd,s,jmsd \
--discovery-token-ca-cert-hash sha256:dsjsjjdslkdkskdnvssjlkvlksks1
#This will take a bit of time depending on your internet speed because images required for setting up a Kubernetes cluster will be pulled
NB: This is the pod network range that Calico expects by default. It’s the default value used by Calico in its custom-resources.yaml. If you use a different CIDR (e.g., 10.244.0.0/16), you must edit Calico’s configuration to match that.
10. (Step 10) configure the Kubernetes user to communicate with Kubernetes cluster using the kubectl command
Kubernetes already notified us in the previous step
ansu@mastern-01:~$ mkdir -p $HOME/.kube
  sudo cp -i /etc/kubernetes/admin.conf $HOME/.kube/config
  sudo chown $(id -u):$(id -g) $HOME/.kube/config
NB: when you run the command above, you can verify that the Kubernetes cluster components are deployed by using the command
– kubectl get nodes [of course the node will be in a non-ready state because a pod network hasn’t been deployed to the cluster – CNI plugin (calico)
– kubectl get pods – A [This will show 6 Kubernetes components deployed, just as below. However, the coredns component will still be in a pending state because a pod network/CNI plugin hasn’t been deployed yet]
NAMESPACE NAME READY STATUS RESTARTS AGE
kube-system coredns-76f75df574-d7jh5 0/1 Pending 0 4m27s
kube-system coredns-76f75df574-tc9v8 0/1 Pending 0 4m27s
kube-system etcd-mastern-01 1/1 Running 0 4m38s
kube-system kube-apiserver-mastern-01 1/1 Running 0 4m38s
kube-system kube-controller-manager-mastern-01 1/1 Running 0 4m38s
kube-system kube-proxy-kld7b 1/1 Running 0 4m27s
kube-system kube-scheduler-mastern-01 1/1 Running 0 4m38s
-crictl ps -a [to see the containers that are running]
11. (Step 11) install calico CNI plugin on master node 1
Calico is a full network plugin built on the CNI spec — it includes its own binaries to handle: Pod networking, BGP-based routing. Network policies (firewall rules between pods), IP Address Management (IPAM)
a). Install the Tigera Operator/controller
Calico is a product developed by a company called Tigera. The Tigera Operator consists of two main components: the operator pod/controller and the various Custom Resource Definitions (CRDs) that Calico relies on. This step takes about 1 minute
When deploying Calico—especially through automation—it’s important to understand the initialization order. A key requirement is that the critical CRDs, particularly the Installation CRD, must be registered with the Kubernetes API server before the Tigera Operator starts. If this doesn’t happen, you’ll encounter an error indicating that the Installation CRD is missing when applying the custom resource manifests.
This usually isn’t a problem when deploying manually using kubectl, because the steps naturally happen in order. However, when automating with tools like Ansible, you must explicitly ensure the CRDs, especially the installation CRD is established before proceeding to install the Tigera Operator. We addressed this requirement in our own automated deployment workflow.
In essence, the Tigera Operator not only deploys its controller pod/operator but also manages the lifecycle of Calico’s CRDs. It continuously watches resources like Installation and APIServer to properly configure and maintain the Calico networking system.
ansu@mastern-01:~$ kubectl create -f https://raw.githubusercontent.com/projectcalico/calico/v3.28.0/manifests/tigera-operator.yaml

namespace/tigera-operator created
customresourcedefinition.apiextensions.k8s.io/bgpconfigurations.crd.projectcalico.org created
customresourcedefinition.apiextensions.k8s.io/bgpfilters.crd.projectcalico.org created
..........................
NB: when we automated using Ansible, we used the version 3.27.3 because it’s a bit stable and doesn’t really have annotations problem with Ansible, especially when you include the “–server-side”option
b). Install the calico networking configuration
This step takes about 3-5 minutes before the pods start running & when the network component pods starts running, the coredns pod also changes from pending to running, this also changes the “not ready” state of the master node to the “ready state”
This installs the Calico networking components of course as pods via a Kubernetes Custom Resource (CR). Specifically, it tells the Tigera Operator (which you should have already installed with tigera-operator.yaml) how to install and configure Calico in your cluster.
ansu@mastern-01:$ curl https://raw.githubusercontent.com/projectcalico/calico/v3.28.0/manifests/custom-resources.yaml -O

  % Total    % Received % Xferd  Average Speed   Time    Time     Time  Current
                                 Dload  Upload   Total   Spent    Left  Speed
100   777  100   777    0     0    742      0  0:00:01  0:00:01 --:--:--   742
ansu@mastern-01:$ kubectl apply -f custom-resources.yaml
installation.operator.tigera.io/default created
apiserver.operator.tigera.io/default createdIf you do “kubectl get pods -A”, you will see the calico pods creating and running all things being equal. You will also notice that the coredns pods will also start running and the not-ready node becomes ready
12. (Step 12) Join the second control plane – Run this on master node 2
This too will take some time depending on the network speed
ansu@mastern-02:~$ sudo kubeadm join 10.10.14.145:6443 --token pqs6v9.bcgsdet5yzijhwtc \
        --discovery-token-ca-cert-hash sha256:dc0ff7b2cd639f60872c38f75hds skwytrel5fc848c5359720aeac90c49cb8c41 \
        --control-plane --certificate-key f9c1ba08d44b968d43fcecc2350c7d020224wksloegstru7915e682b077177ea8 --v=5

..................
I0611 20:12:16.054609   38691 join.go:413] [preflight] found NodeName empty; using OS hostname as NodeName
I0611 20:12:16.054740   38691 join.go:417] [preflight] found advertiseAddress empty; using default interface's IP address as advertiseAddress
I0611 20:12:16.055026   38691 initconfiguration.go:122] detected and using CRI socket: unix:///var/run/containerd/containerd.sock
...........................
On the first master node, you can run the following kubectl commands to verify
ansu@mastern-01:~$ kubectl get nodes

NAME         STATUS     ROLES           AGE   VERSION
mastern-01   Ready      control-plane   22h   v1.29.15
mastern-02   NotReady   control-plane   45s   v1.29.15
NB: Whenever you join nodes, master or worker nodes to the cluster, they don’t become ready immediately because the CNI, in our case, calico also needs to initialize the calico network pods on the nodes for proper network communication in the cluster, more so, other Kubernetes resources pods needs to be initialized and be running on the newly joined nodes. so it can take between 1-5 minutes before the nodes becomes ready.
ansu@mastern-01:~$ kubectl get nodes

NAME         STATUS   ROLES           AGE     VERSION
mastern-01   Ready    control-plane   22h     v1.29.15
mastern-02   Ready    control-plane   2m20s   v1.29.15
13. (Step 13) Join the worker node 1 and 2 to the cluster – Run this on worker Node 1 and 2.
NB: To join other worker nodes, 2,3,4, run this command on the worker nodes
srvadmin@workern-01:~$ sudo kubeadm join 10.10.14.145:6443 --token pqs6v9.bchwkote5yzijhmsc \
        --discovery-token-ca-cert-hash sha256:dc0ff7b2cd639f60872c38ddswqwwa6a661d5fc848c5359720aeac90c49cb8c41

..................
[preflight] Running pre-flight checks
[preflight] Reading configuration from the cluster...
[preflight] FYI: You can look at this config file with 'kubectl -n kube-system get cm kubeadm-config -o yaml'
[kubelet-start] Writing kubelet configuration to file "/var/lib/kubelet/config.yaml"
...........................
You can run this command below on master node 1 to verify
ansu@mastern-01:~$ kubectl get nodes
NAME STATUS ROLES AGE VERSION
mastern-01 Ready control-plane 23h v1.29.15
mastern-02 Ready control-plane 38m v1.29.15
workern-01 NotReady 25s v1.29.15
ansu@mastern-01:~$ kubectl get nodes

NAME         STATUS   ROLES           AGE     VERSION
mastern-01   Ready    control-plane   23h     v1.29.15
mastern-02   Ready    control-plane   45m     v1.29.15
workern-01   Ready    <none>          7m43s   v1.29.15
14. (Step 14) configure the Kubernetes user to communicate with Kubernetes cluster using the kubectl command
Kubernetes already notified us to do this when we joined the second master node to the cluster
ansu@mastern-02:~$ mkdir -p $HOME/.kube
  sudo cp -i /etc/kubernetes/admin.conf $HOME/.kube/config
  sudo chown $(id -u):$(id -g) $HOME/.kube/config
Run the command below on master node 2 to verify that kubectl is working.
How to install load balancer in ubuntu
how to install containerd in ubuntu
Click the link for automating using Terraform and Ansible on Vmware Vsphere and Vcenter. ansible inventory file
Leave a Reply