
Last updated: September 2024
Hello everyone, Victor here! In today’s lesson, we’ll dive deep into How to Configure Firewall in Linux Systems. Firewalls are essential in maintaining system security by controlling incoming and outgoing network traffic, and protecting your system from unauthorized access. Let’s explore what firewalls do, how they work, and the tools you need on how to configure firewall in Linux Systems.
Understanding Firewalls: Your First Line of Defense
A firewall acts as a gatekeeper, determining which traffic is allowed into or out of your system. This is managed through a set of rules known as firewall rules. When a request or packet of data attempts to enter or leave your system, the firewall compares it against these rules.
If the firewall rules permit the traffic, the firewall opens the gate and says, “Come on in!” If the rules don’t match, the firewall blocks the traffic, effectively saying, “Access denied.” This is true for both inbound and outbound traffic.
Hardware vs. Software Firewalls
There are two primary types of firewalls:
- Hardware-based firewalls are physical devices designed to protect an entire network.
- Software-based firewalls (like those we use on Linux) protect individual systems.
In Linux, the software-based firewall works in tandem with NetFilter, a framework in the Linux kernel responsible for handling network traffic.
NetFilter: The Backbone of Firewall Management in Linux
Before diving into firewalls, it’s important to understand NetFilter, the underlying framework that manages all network-related operations in Linux. Since firewalls deal with network traffic, they are inherently tied to NetFilter.
Historically, iptables was the main tool used to manage firewalls through NetFilter. However, iptables can be quite complex, which led to the development of more user-friendly tools like firewalld and nftables. These tools simplify firewall management while still offering powerful control over network traffic.
- firewalld: A dynamic firewall manager that supports both IPv4 and IPv6.
- nftables: A high-performance firewall tool that replaces iptables, designed to provide more flexible handling of complex firewall rules.
Though iptables is still available, Red Hat distributions have moved towards using firewalld and nftables for better usability and scalability.
Exploring Firewall Tools in Red Hat
Red Hat-based distributions provide a variety of tools for managing firewalls. The most commonly used are firewalld and nftables.
FirewallD is a dynamic firewall daemon that manages firewall rules in real-time. It provides flexibility by allowing the use of zones, which are predefined sets of rules governing network traffic. These zones help you manage different types of traffic (incoming and outgoing) based on your system’s network interfaces.
Unlike the Uncomplicated Firewall (UFW) on Ubuntu systems, FirewallD in Red Hat requires more granular control, particularly when handling outgoing traffic.
Firewalld: Simplified Firewall Management
Firewalld is the default firewall tool in many Red Hat distributions. It simplifies the process of how to configure firewall in Linux systems. It enables management of rules by allowing dynamic rule changes without requiring a firewall restart. Firewalld is structured around the concept of zones that define a level of trust for network connections.
Checking Firewall Status and Rules
To begin, it’s important to check if your firewall is running and view the current rules.
- Check if FirewallD is running:
firewall-cmd --stateYou should see the status as running. To get a more detailed view of the FirewallD service, you can use:
systemctl status firewalld- List the current firewall rules:
firewall-cmd --list-allThis command shows you the active zone, services, ports, protocols, and other firewall attributes.
Understanding Firewall Targets
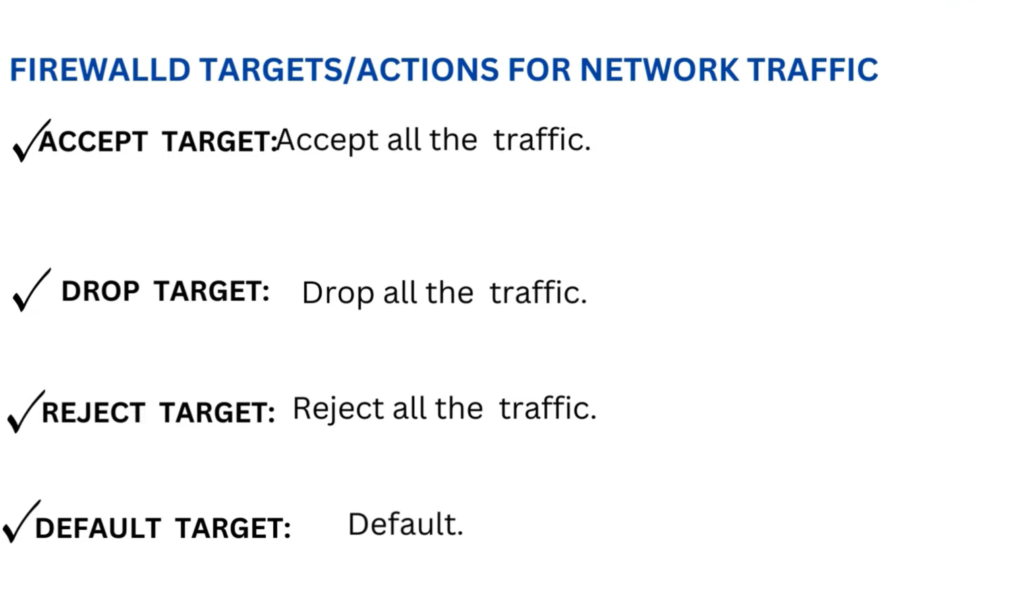
Before modifying the rules, it’s important to understand the targets available in FirewallD. A target is essentially the action you want the firewall to take on a connection or packet. FirewallD offers the following targets:
- Accept: Allows all traffic.
- Drop: Silently drops all traffic without notifying the sender.
- Reject: Drops all traffic but notifies the sender of the rejection.
- Default: Similar to reject, but used as the fallback action.
In practice, you will often switch between accept and reject for incoming connections based on your system’s needs.
Managing Ports in FirewallD
A common use of firewalls is to manage traffic based on ports. Here’s how you can add or remove ports in FirewallD.
Adding a Port Rule
To allow incoming traffic on a specific port, such as port 44 for TCP:
firewall-cmd --add-port=44/tcp --permanentMake sure to specify the protocol (TCP, UDP, etc.), as FirewallD will not assume it for you. After adding the port, reload the firewall to apply the changes:
firewall-cmd --reloadVerifying the Port Rule
You can list all active ports by using the following command:
firewall-cmd --list-portsRemoving a Port Rule
If you want to remove a port rule, such as the one for port 44, simply run:
firewall-cmd --remove-port=44/tcp --permanentDon’t forget to reload the firewall again to apply the changes.
Adding Service Rules in FirewallD
Instead of opening individual ports, you can allow services. For example, to allow SSH, which uses port 22, you can add the SSH service:
firewall-cmd --add-service=ssh --permanentTo view all predefined services on your system, run:
firewall-cmd --get-servicesThis will display a list of services that can be enabled or disabled.
Managing Firewall Zones
FirewallD operates on the concept of zones, which group firewall rules together. Every system has an active zone, and by default, this is usually the public zone. You can verify the current active zone by listing all rules:
firewall-cmd --list-allYou’ll notice that one of the first attributes shown is the active zone, typically labeled as public.
Changing the Active Zone
To switch to a different zone, you would use:
firewall-cmd --set-default-zone=<zone>Replace <zone> with the name of your desired zone, such as trusted, dmz, or internal.
Persistent vs. Runtime Rules
One critical aspect of knowing how to configure firewall in Linux systems using FirewallD is understanding the difference between runtime and persistent rules.
- Runtime rules are temporary and will be lost upon reboot.
- Persistent rules are saved and will be applied on every reboot.
To ensure your rules are persistent, always add the --permanent flag when creating rules:
firewall-cmd --add-port=80/tcp --permanentIf you forget to add --permanent, you can make runtime rules persistent by running:
firewall-cmd --runtime-to-permanentBlocking IPs and Handling Security Emergencies
Sometimes you may want to block or allow traffic from specific IP addresses. Here’s how to handle that:
Allowing Traffic from an IP Address
You can allow traffic from a specific IP by adding it as a source:
firewall-cmd --add-source=192.168.1.100 --permanentBlocking All Network Traffic (Panic Mode)
In case of a security breach, you might need to immediately block all traffic. This is where panic mode comes in:
firewall-cmd --panic-onThis command blocks all network traffic until you disable panic mode with:
firewall-cmd --panic-offYou can check the panic mode status with:
firewall-cmd --query-panicKey Commands for firewalld:
- Check firewall status:
firewall-cmd --state- Enable/Disable the firewall:
  systemctl enable firewalld
  systemctl start firewalld
systemctl stop firewalld- Listing active zones and rules:
  firewall-cmd --get-active-zones
  firewall-cmd --list-all
nftables: Advanced Firewall Management
nftables provides advanced management of firewall rules and offers greater flexibility compared to firewalld. It supports complex firewall rules while maintaining high performance, which makes it suitable for managing large-scale systems.
Key Commands for nftables:
- View existing rules:
nft list ruleset- Add a rule to allow traffic on port 80:
nft add rule inet filter input tcp dport 80 accept- Delete a rule:
nft delete rule inet filter input handle <rule-handle-number>Moving from iptables to firewalld and nftables
As mentioned earlier, Red Hat distributions transitioned from using iptables to more user-friendly tools like firewalld and nftables. However, if you’re used to working with iptables, you can still properly know how to configure firewall in Linux systems. The key is to familiarize yourself with the newer tools as they offer enhanced functionality and ease of use.
Step-by-Step Guide to Configuring Firewalls on Red Hat
Let’s get hands-on with firewalld. Here’s a step-by-step guide to configuring your firewall:
1. Install firewalld (if not installed):
sudo yum install firewalld2. Start and enable firewalld:
sudo systemctl start firewalld
sudo systemctl enable firewalld
3. Check the firewall status:
sudo firewall-cmd --state4. List active zones:
sudo firewall-cmd --get-active-zonesZones categorize the network interfaces. For example, public is typically the default zone for external-facing interfaces.
5. Add rules to zones:
To allow HTTP traffic:
sudo firewall-cmd --zone=public --add-service=http --permanentThen, reload the firewall to apply the new rule:
sudo firewall-cmd --reload6. Listing all rules:
sudo firewall-cmd --list-all7. Remove firewall rules:
sudo firewall-cmd --zone=public --remove-service=http --permanent
sudo firewall-cmd --reload
Managing Firewalls on Debian Systems: UFW
On Debian-based systems, UFW (Uncomplicated Firewall) is a user-friendly frontend for managing firewall rules, simplifying the complex syntax of iptables. UFW makes it easy to configure both inbound and outbound traffic policies, allowing administrators to secure their systems without getting bogged down in intricate rule definitions.
Installing and Enabling UFW
To begin using UFW, you first need to install it (if not already installed) and enable the service. Use the following commands:
sudo apt update
sudo apt install ufw
sudo ufw enable
Once enabled, UFW starts filtering traffic according to the default rules, which are generally set to allow all outgoing traffic and block all incoming traffic.
Configuring UFW Rules
To configure UFW rules, you can define which services or ports are allowed or blocked. For instance, to allow incoming SSH traffic, use:
sudo ufw allow sshTo block access to a particular port, you can specify it explicitly:
sudo ufw deny 8080You can also set default policies for incoming and outgoing traffic. For example:
sudo ufw default deny incoming
sudo ufw default allow outgoing
This blocks all incoming traffic while permitting outgoing connections.
Viewing the Status and Rules
To check the status and currently active rules, use:
sudo ufw status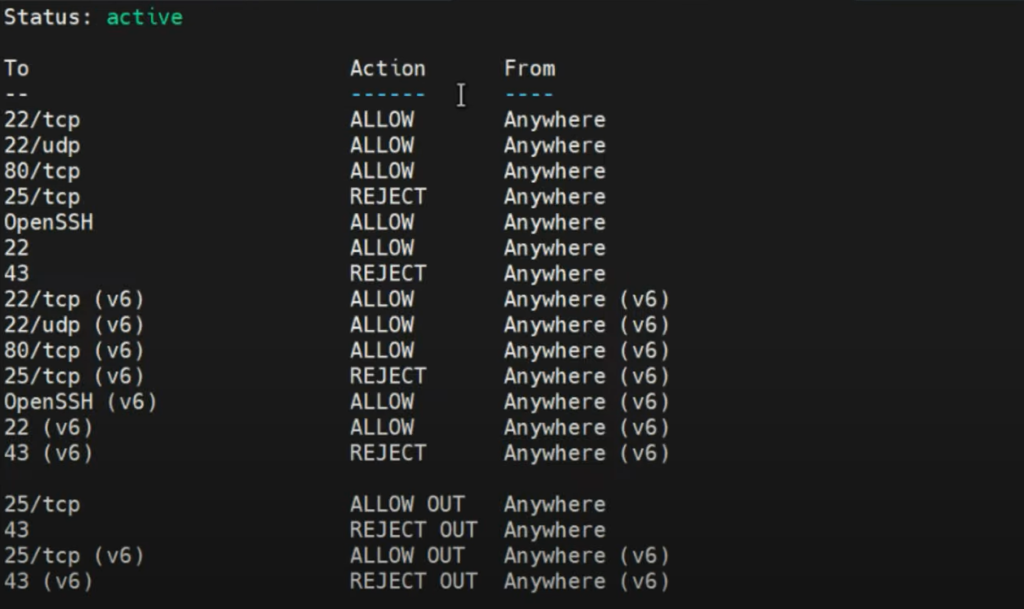
For a more detailed output:
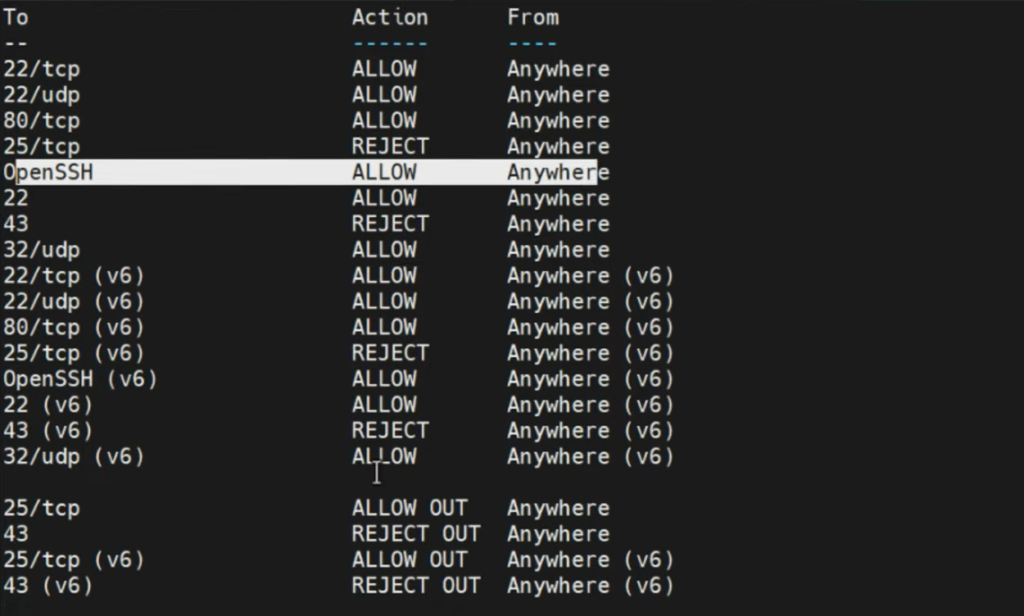
sudo ufw status verbose
You can see this shows the level of logging, and other incoming & outgoing traffic rules.
UFW Actions For Network Traffic
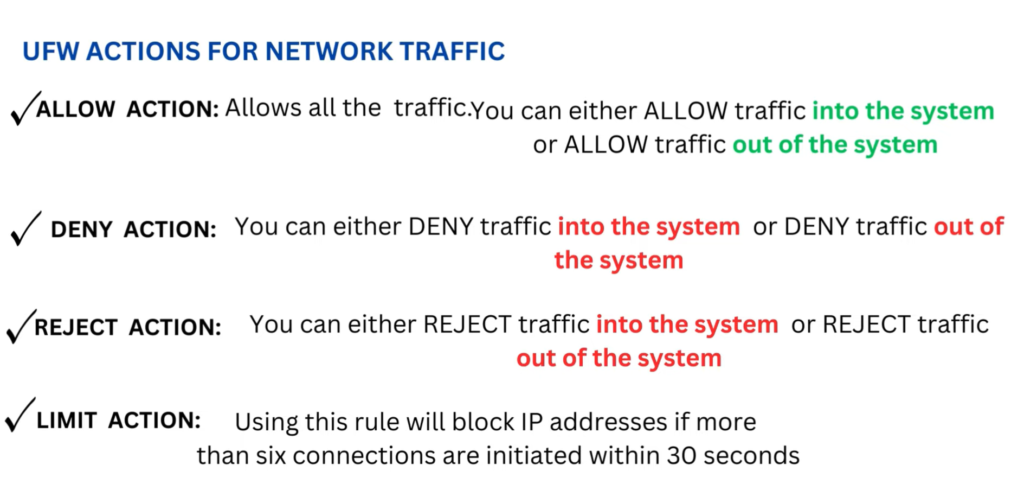
Note that the “Deny Action” rule does not inform the sender of the traffic that the packets are being dropped.
Advanced UFW Usage
You can also specify rules based on ports and IP addresses which is helpful when securing access from a particular source or allowing traffic from specific trusted networks:
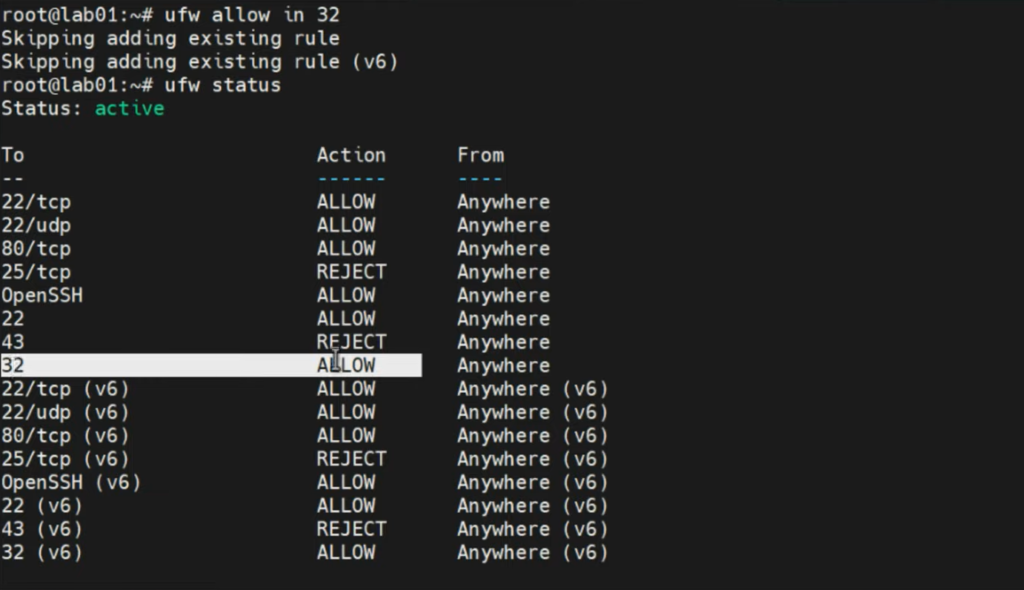
Allowing form Ports
#ufw <action> <flow> port
sudo ufw allow 32
This allows all inbound traffic incoming through port 32.
In order to allow outbound traffic through the same port, the command is:
sudo ufw allow out 32
You can also specify what protocols to be allowed:
sudo ufw allow in 32/udp
Allowing from source IP address:
#ufw <action> <flow> <IP>
sudo ufw allow from 192.168.1.100Or, you can allow a specific service only for a certain range of IPs:
sudo ufw deny from 192.168.1.0/24 to any port 80Firewall Rules for Application Profiles
#ufw <action> <flow> application-profiles
sudo ufw app list
This will show the available applications.
In this case, it is OpenSSH:
sudo ufw allow openssh
Firewall Rules for Services
#ufw <action> <flow> service
To check for services:
sudo less /etc/services
Now let’s allow smtp service
sudo ufw allow smtp
Always remember to input allow out for outgoing traffic.
Resetting UFW
If you want to reset UFW to its default configuration, removing all rules, you can use:
sudo ufw resetThis is especially useful if you need to start fresh with a new set of rules.
Disabling UFW
To temporarily disable the firewall, you can run:
sudo ufw disableTo re-enable it:
sudo ufw enableConclusion
Firewalls are a critical part of system security, and learning to configure and manage them effectively is key for any Linux system administrator.
UFW is an excellent tool for system administrators looking for an uncomplicated way to manage firewalls on Debian-based systems. While it may not offer the extensive customization options of iptables, it’s perfect for users who prefer simplicity in configuring and understanding how to configure firewall in Linux systems, while mastering essential firewall rules.
firewalld and nftables offer simplified yet powerful tools for managing firewall rules in Red Hat distributions, ensuring that your system is protected from unwanted traffic. FirewallD is a powerful and flexible tool for knowing how to configure firewall in Linux systems. Whether you’re adding ports, allowing services, or managing traffic based on IP addresses, FirewallD gives you the control you need to secure your system.
Whether you’re preparing for Red Hat certification or just looking to enhance your security skills, understanding how to configure firewall in Linux systems, manage runtime and persistent rules, work with zones, and employ actions like panic mode, will give you the confidence to configure your firewall effectively for various scenarios. Mastering firewalld and nftables will also give you the control you need to safeguard your Linux environment.
Keep practicing and don’t forget, knowing how to configure firewall in Linux systems goes hand-in-hand with a deeper knowledge of NetFilter and network security as a whole.
YOUTUBE VIDEO SHOWING HOW TO CONFIGURE FIREWALL IN LINUX SYSTEMS
YOUTUBE VIDEO SHOWING HOW TO CONFIGURE FIREWALL IN LINUX SYSTEMS
For exam practice questions and answers, kindly click this link; or email us at info@tekneed.com
Hi Victor.
how can I be very good with devops, Linux, kubernetes, ansible and all you do. How did you know all these? can you mentor me please?